Chilkoot Trail Hiking & Backpacking Guide
Hike the Fabled Klondike Gold Rush Route

Turquoise alpine lakes, glaciers in hanging valleys, lush boreal forests, and Klondike Goldrush history await the Chilkoot Trail hiker. Photo by Matt McDonald.
Distance: 33 miles
Days: 3-5
Elevation gain/loss: 5,805 gain/3,711 loss
Best season: Summer
Permits: Required June through the first week of September
Difficulty: Moderate
Quick Facts
Wet, blustery fog sweeps me through a gap in jagged rock spires that roughly mark Alaska’s border with the Yukon Territory. It may be raining. Or the barrage of pin-prick water droplets could be the meat of a cloud. The temperature—around 40 degrees Fahrenheit—and the wind chill—colder—have me thanking my wool, polyester, Gore-Tex, and rubber layers. In Southeast Alaska, the saying goes, “There’s no bad weather, only bad gear.”
Atop the historic Chilkoot Pass, I stop to snack in the summit hut. But I don’t linger. Can’t let the muscles get cold. After five minutes or so, I’m sliding down a mushy snowfield and splashing through a glacial creek. Then Crater Lake practically smacks me in the face. The turquoise expanse of alpine water sprawls across the valley below, suspended amidst the fog for a moment. Then it dissolves like an apparition, leaving just fog ahead. Thankfully, it clears in half a mile. I’ve left behind Alaskan rainforest and fat brown bear tracks. I don’t know it yet, but tomorrow morning I’ll hear my first wolves in the Yukon. I may be 119 years late for the Klondike Goldrush — but I feel rich.
The famous Chilkoot Trail, which follows the first 33 miles of the Klondike Goldrush route from Dyea, Alaska to Bennett, Yukon, is a backpacking route steeped in history. It’s hands down a bucket-list trip and is one of the great North American trails. Between the surprisingly dialed campground and campsite infrastructure (cook huts and tent platforms!), stunning views (like a hanging glacier and turquoise lakes!), and the distinct loneliness of Chilkoot Pass, this is a hike unlike any other you’ve visited.


We create reader-supported, objective, independently-selected gear reviews. This story may contain affiliate links, which help fund our website. When you click on the links to purchase gear, we may get a commission — without costing you an extra cent. Thank you for supporting our work and mission of outdoor coverage for every body! Learn more.
Highlights

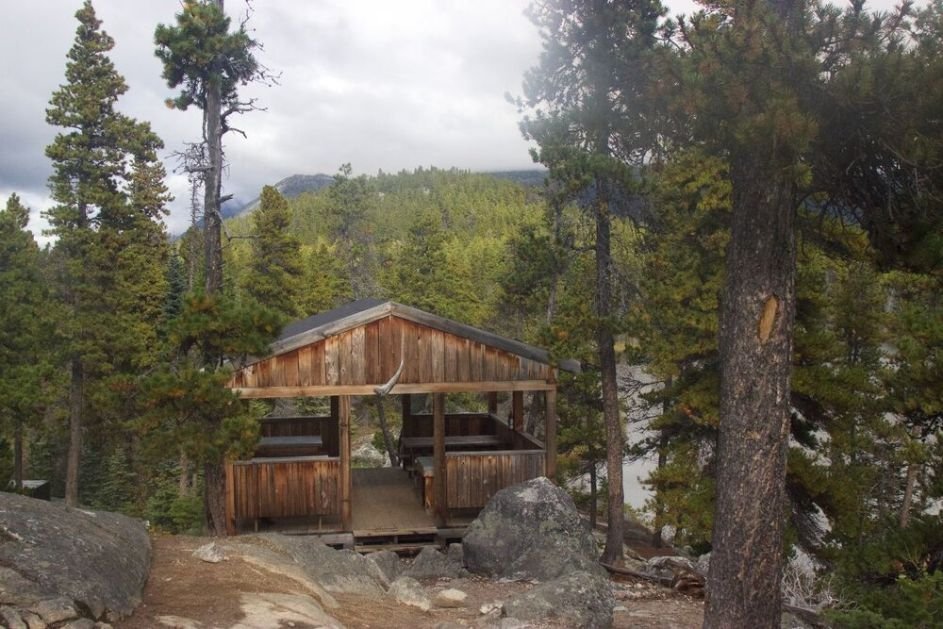
Well-built camps, warming huts, and summit huts all add to the historic feeling of this hike. Photo by Matt McDonald.
Lush temperate rainforest on the Alaska side
Alpine tundra and pristine boreal forest on the Yukon side
Legendary scramble up the Golden Staircase to the summit of Chilkoot Pass
Remnants of pop-up gold rush settlements
Turquoise alpine lakes
Well-built camps for overnight hikes
Train station finish at the town of Lake Bennett
Generally, fast miles as you drop elevation on the Canadian side
A walking history lesson through the past
CHallenges
Wet slogging on the Alaska side
Large and numerous mosquitos on the Alaska side
Frequent thick fog on Chilkoot Pass (pay close attention to the route)
Coordinating drop-off and pick-up can be challenging

The lush boreal forest of Alaska is a highlight of the trip. Photo by Matt McDonald.
Best Season for the Chilkoot Trail
Snow pummels Chilkoot Pass for most of the year, and unless you are trying to emulate the struggles of the gold rush miners, a snowy alpine pass is best avoided. That means hiking in summer months while the Chilkoot is “in-season” per the National Park Service recommendation.
If you want to avoid dealing with permits, September can be a phenomenal time for a Chilkoot Trail hike—although you won’t have any trail markers to follow over the pass. The park season removes them for the off-season.
Difficulty and Skills
Navigation
For the most part, navigation is simple: you just follow the trail. The major exception is Chilkoot Pass, where you’ll need to link trail markers — sometimes in dense fog — or follow the route without them if you hike in the off-season. When visibility is low, this is a scary place to get lost.
Load a GPS track to follow onto a phone app like Gaia or a handheld GPS device.
Old tram cables mark the proper route through the rocks, but we recommend carrying some sort of navigation aid to be safe. We recommend picking up a National Geographic Chilkoot Trail map to plan your hike and help you stay on track.
Rough Terrain/Scrambling/Rock Climbing
Most of the Chilkoot is trail walking. On the Alaska side of Chilkoot Pass, however, you will need to traverse chunky boulder fields, which will involve your hands on the ascent. On the Canadian side, you may encounter snowfields that require careful sliding or walking. It’s a good idea to bring microspikes if there’s more snow than you anticipate. Also, know that you will splash through many creeks, so always have a plan for drying your feet once you get to camp.
Elevation Gain/Elevation Loss
You’ll grind out most of your elevation gain going up Chilkoot Pass. The route gains more than 2,500 feet of elevation in the 3.5 miles between Sheep Camp and the summit of Chilkoot Pass. Each day, you will climb and descend along rolling terrain, but once you crest the pass, it’s mostly downhill to Lake Bennett.
Permits
As of fall 2020, permits cost $48 per adult plus a reservation fee of $10 per person. However, pricing is likely to change year-to-year. Call Parks Canada to reserve dates, pick your campsites, and pay. Reservations can typically be made six months or more in advance. You should check dates and pricing to ensure you dial in your trip’s logistics early. Learn more about permits here. You will need to pick up your permits in person in Skagway at the Trail Center and receive your orientation.

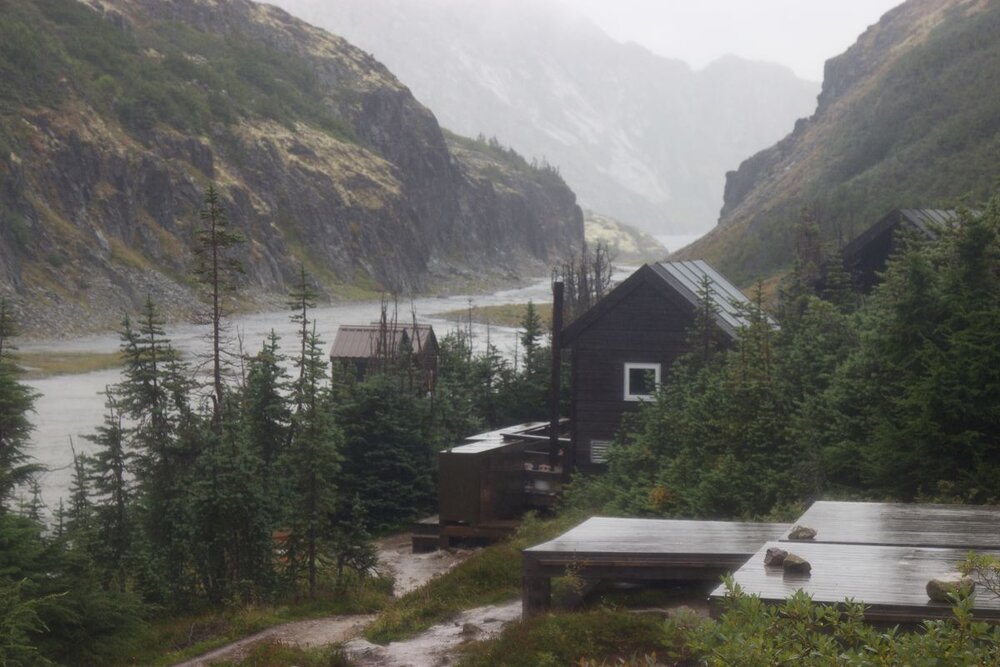
Summit huts, warming huts, and camps serve as milestones along the 33-mile long trail. Photo by Matt McDonald.
Route Summary
From the trailhead in Dyea, hike along the Taiya River through mud and lush coastal rainforest for 2.7 miles to a photo-worthy beaver pond and a series of boardwalks (Note: if the river is in flood stage, these bridges could be submerged. Get up-to-date weather and conditions from the Trail Center in Skagway). Continue to mile 4.8 and Finnegan’s Point, the first camp on the Chilkoot. Groups with longer itineraries may camp for the night, but many continue on another 2.9 miles to the Canyon City camp. Either way, before you reach Canyon City, you’ll want to take the one-mile detour to see the remnants of the ghost city, which include a full-on rusted-out steam engine.
After Canyon City, you’ll climb steeply away from the river through corridors of sphagnum moss. Don’t miss the views of impossibly rugged glaciers on your way to Pleasant Camp at mile 16.9. Most groups press on, crossing an iconic suspension bridge and hiking another 2.3 miles to Sheep Camp — the final camp before you ascent Chilkoot Pass. Cook in one of the two cook huts, and if you’re hiking in season, don’t miss the ranger talk in the evening.
From Sheep Camp, you’ll hike 3.5 miles and climb more than 2,500 feet to Chilkoot Pass. This includes crossing The Scales, the place where gold rushers would weigh their mass of gear before beginning the climb. Check out the relics as you rest here. Watch your step on the slippery boulders as you traverse to the base of the Golden Staircase. The slope angle is aggressive, over a chunky boulder field, and you will use your hands. Stay close to the old tram cable if you can’t see the trail markers, or ideally follow your GPS track. Atop the lonely pass, stop in the warming hut before you descend. From here, it’s still 5.5 miles (with many creeks and surreal views) to Happy Camp.
The route undulates from Happy Camp through alpine valleys, following the falling snowmelt past multiple lakes and ponds to Deep Lake (where you should keep an eye out for bears!) and down to Lindeman City camp at mile 26. This was the site of a massive settlement during the Gold Rush. Camping here will give you a great view and lots of space to spread out, but we recommend pushing three more miles to Bare Loon Lake. There, you’ll be rewarded by a scenic cook deck and the haunting calls of loons at sunset (hence the name Bare Loon Lake).
For your final day, hike rolling terrain through boreal forest and across a random sandy wash—your clue that the end is near. From Bare Loon Lake, it’s four miles to Lake Bennett. If hiking in-season, you can take the White Pass & Yukon Route train (advance ticket required) back to Skagway. (Hint: If your hike happens during the train’s off-season from mid-September through the end of May, walk the railroad tracks eight miles from Bennett to the Klondike Highway at Log Cabin. You could shuttle a car here ahead of time, or have an arranged ride meet you here to take you back to Skagway.)
Maps and Guidebooks
Gaia
The Gaia GPS phone app is my favorite GPS app for all my adventures. You can upload a GPS track prior to your trip or make one as you go.
Maps
We love the National Geographic maps for most things, and that holds true for the Chilkoot edition.
Guidebooks
First choice, if you’re being pragmatic: Chilkoot Pass: A Hiker’s Guide to the Klondike Gold Rush National Historical Park.
But, really, if you’re going to buy one book, pick up a book of collected poems by Robert Service. Service was a Scotsman who wound up in the Yukon and became one of the most notable writers to ever pen odes to the northern wilds.

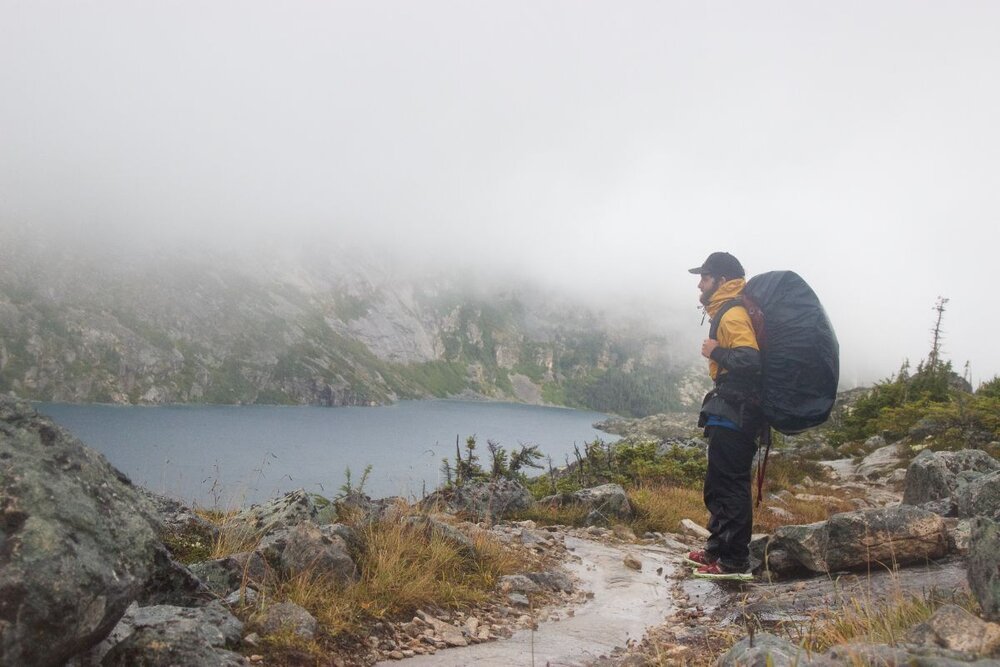
The Chilkoot Trail is remote but the hike is straight-forward once you get there. Photo by Matt McDonald.
getting there
By Plane
You have a couple of options for your flight north. The largest airport nearby is in the Yukon at Whitehorse. From there, you can rent a car or catch a ride to Skagway. Alternatively, you can fly to Juneau and take a floatplane to Skagway. Either way, you’ll still need to arrange a shuttle out to the trailhead at Dyea.
By Car
The Alaska-Canada Highway is one of the most famous road-trip routes in North America, and for good reason. You can follow it to Whitehorse before banking southwest for Skagway. If you’re coming from the Northwest, take the Cassiar route through British Columbia and into the Yukon.
Bus and Shuttle Services
The crux of your logistical planning may be arranging your shuttle to the Chilkoot Trailhead at Dyea and your ride back to Skagway (if you don’t take the train). Our recommendation: Use the Dyea-Chilkoot Trail Transport, organized through the Skagway Visitors Bureau.
Trailheads
When you get to Dyea, the trailhead will be across from a small parking lot before the bridge over the Taiya River. You won’t miss it.
Post Trip Favorite restaurant
No trip to Skagway is complete without a stop at Skagway Brewing Company (known locally as Brew Co). You’ll want to try the blonde ale made with spruce tips (an Alaska staple) and either the fish ‘n chips or one of their immaculate burgers.
Rules and regulations
Follow Leave No Trace Ethics, including camping and pooping at least 200 feet from water. But for #1, the solution to pollution is dilution; if you’re near a fast-flowing stream, you can urinate directly into the river.
The National Park Service limits the total number of hikers to 50 per day on the Chilkoot.
You must reserve campsites when you get your permit, and keep to those campsites.
Carry your permit with you at all times.
Water Planning
Water is reliable along the Chilkoot Trail. On the Alaska side, you’ll have the Taiya River, and in the Yukon many lakes and creeks. Most people find a pump water filter (rather than a purifier) to be sufficient. See our Best Water Filters guide for more information on what works.
Bear Safety
Bears (coastal brown, grizzly, and black) are common along the Chilkoot. If salmon are running, you will find them on the Alaska side along the Taiya River. If they’re not, you might find bears picking blueberries on the Canadian side near Deep Lake. Either way, you want to stow your food where they can’t get it. At each campground along the Chilkoot, you will find bear lockers. Use these lockers for all your food, your dishes/utensils, and all your other smellies like sunscreen and lip balm.
You are allowed to carry bear spray labeled for use on animals on the Chilkoot Trail—and in fact, it’s recommended. (Note that Parks Canada does not allow any spray intended for use on humans, like mace.) Bear spray cannot be carried or checked onto commercial air flights. If you intend to fly part of the way, purchase bear spray in Whitehorse or Skagway.
We highly recommend purchasing a practice can of bear spray for, well, practice. This inert canister is affordable and meant to be used at home to give you a sense of how to use bear spray before you need it. Your familiarity with drawing and deploying the canister could make a difference when you’re far from medical facilities.

Be sure to carry quality rain gear on the Chilkoot Trail. Photo by Matt McDonald.
Gear List
TENT
Every campground along the Chilkoot features campsites with either immaculate tent platforms or flat tent sites on dirt or gravel. Make sure you guy out your tent lines when you set it up, and yes, you’ll want your rain fly. Check out our Best Backpacking Tents story for some solid recommendations.
BACKPACK
Your gear distribution will depend on your group size/ability, but generally, you’ll want a 50-70 liter pack that fits you well. Uphill miles on the Canadian side can feel quite tedious, so make sure your pack fits right before you start slogging. We used the Gregory Baltoro 65L pack on our Chilkoot adventure. Check out our Best Backpacking Tents story for some solid recommendations!
SLEEPING BAG
The most important aspect of your sleeping bag is the material. The Chilkoot is wet, so it’s no place for down. We recommend a 20-degree synthetic bag. If you are a fan of down bags and feel confident in your ability to keep it dry, see our Best Sleeping Bags article.
SLEEPING PAD
We used the Klymit Static V sleeping pad on our trip, and it perfectly blended comfort with packability and weight. It received an honorable mention in our Best Backpacking Sleeping Pads guide. See that story for a full review of that pad and other suggested sleeping pads.
COOKING SYSTEM
We used the classic MSR WhisperLite on our Chilkoot trip. We recommend using your favorite lightweight backpacking cook system. You won’t be subjected to excessive wind (thanks, cook shelters), but want a system you can count on. The WhisperLite has been a best-selling and highly regarded stove for decades and received Honorable Mention for Best International Backpacking Stove in our Best Backpacking Stoves guide.
What to wear on the Chilkoot Trail
SHOES OR BOOTS
Simply put, your feet will get wet. Most folks will feel most comfortable on this trip wearing hiking boots with good ankle support and Gore-Tex. Check out our Best Hiking Boots story or our Best Lightweight Hiking Boots story for recommendations on waterproof boots.
Alternatively, you could go light ‘n’ fast with trail running shoes, but make sure you bring extra socks and plan to dry your feet out each evening at camp. Thirty minutes a day of dry feet keeps the trench foot away. Our Best Trail Running Shoes story has suggestions and tips.
Hiking shoes would’ve been a nice footwear compromise for this trip since they’re designed to feel like a trail runner but have more stability and durability, like a boot. See our Best Hiking Shoes story for more.
SOCKS
Expect to get your socks wet on the Chilkoot Trail. You should plan to bring several pairs to cycle out as they get too wet to use. See our Best Hiking Socks article for more about what socks we love.
HEADLAMP
You may begin your summit push from Sheep Camp in the dark, so bring a reliable headlamp and extra batteries. We used the Black Diamond Spot, which is the Best Overall Pick in our Best Headlamps story.
RAIN JACKET
On the Chilkoot, you want to make sure you’re ready to get wet. This means bring a rain shell and wear nothing made of cotton. If you sweat through your layers under your jacket, you’ll want to make sure you have warm clothes at camp. See our Best Rain Jackets article for ideas on breathable rain jackets that can handle the trail conditions.
PUFFY JACKET
The Chilkoot is a prime example of a place where wet trail conditions during the day can turn dangerously cold in the evening. So be sure to bring a dry sack, and store your puffy jacket, your extra warm socks, and your baselayers in there to protect them from the elements.
Our Best Down Jackets story has ideas for warm layers that are lightweight. If you’d rather have the extra comfort of knowing that you’ll stay warm if your puffy gets wet, our Best Synthetic Jackets story has suggestions for you.
Related: The Best Baselayers


