Best Mountain Bike Lights of 2026
Top MTB Headlamps and Handlebar Lights Ranked by Brightness, Battery Life and Price

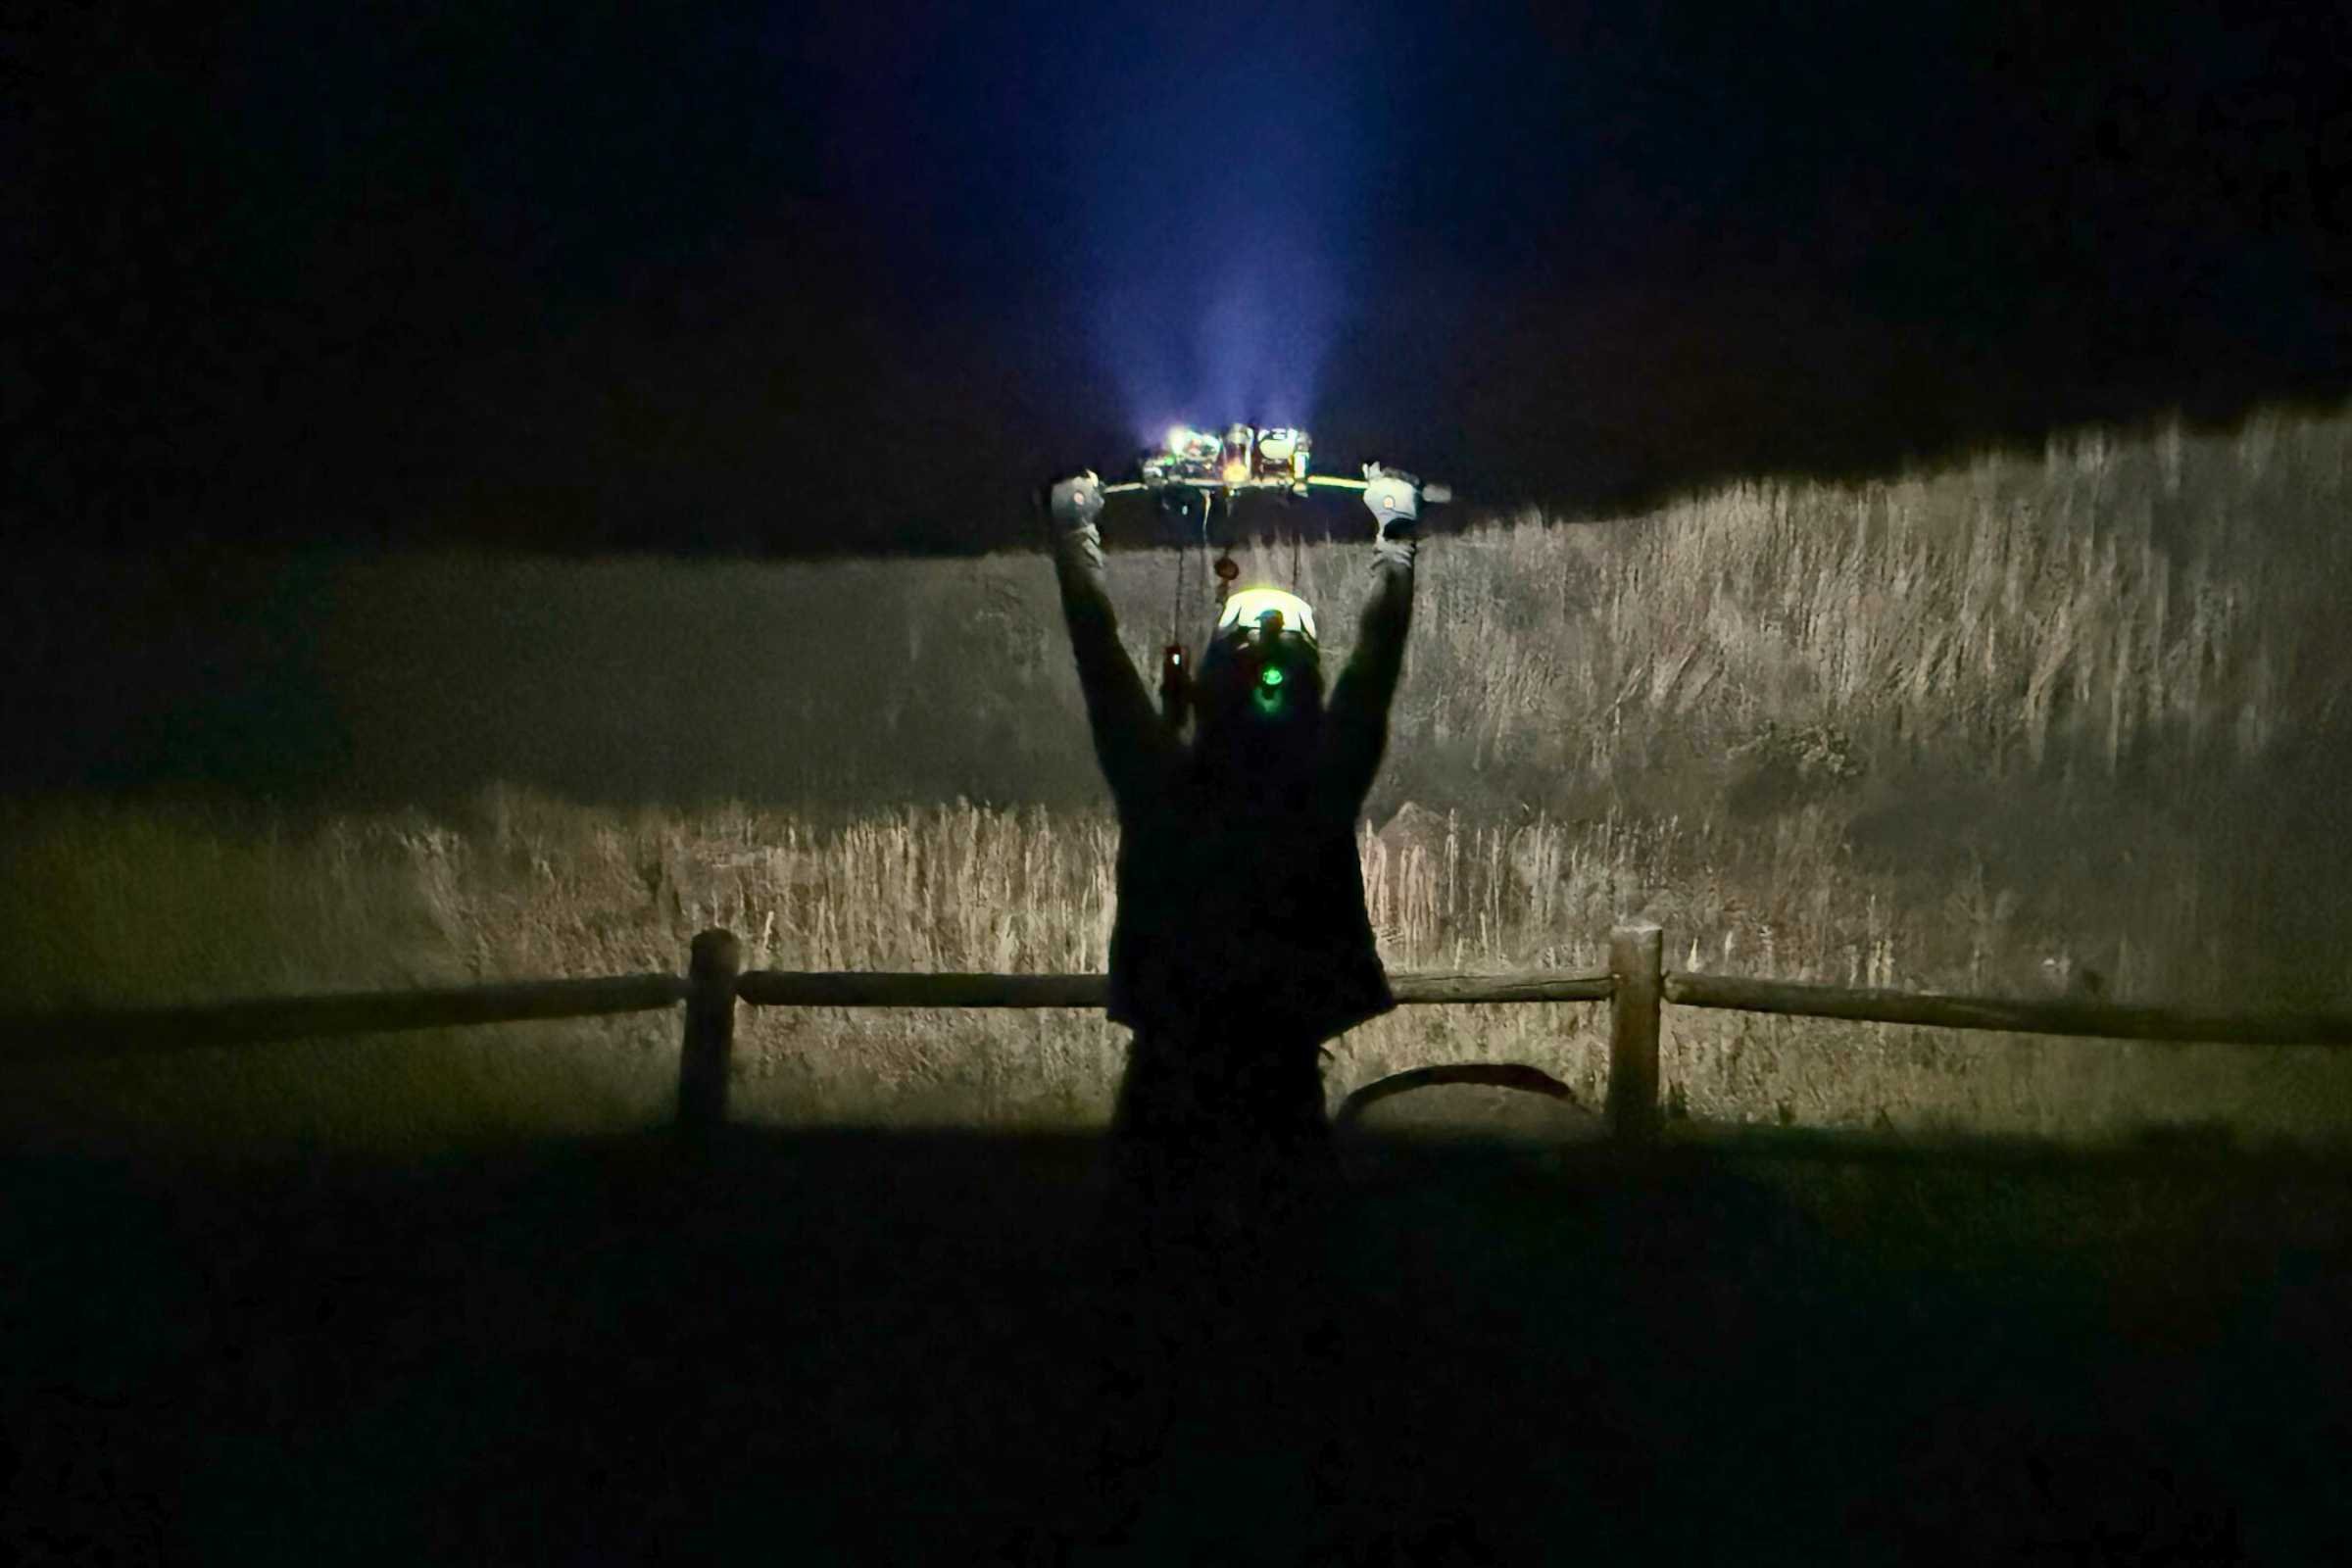
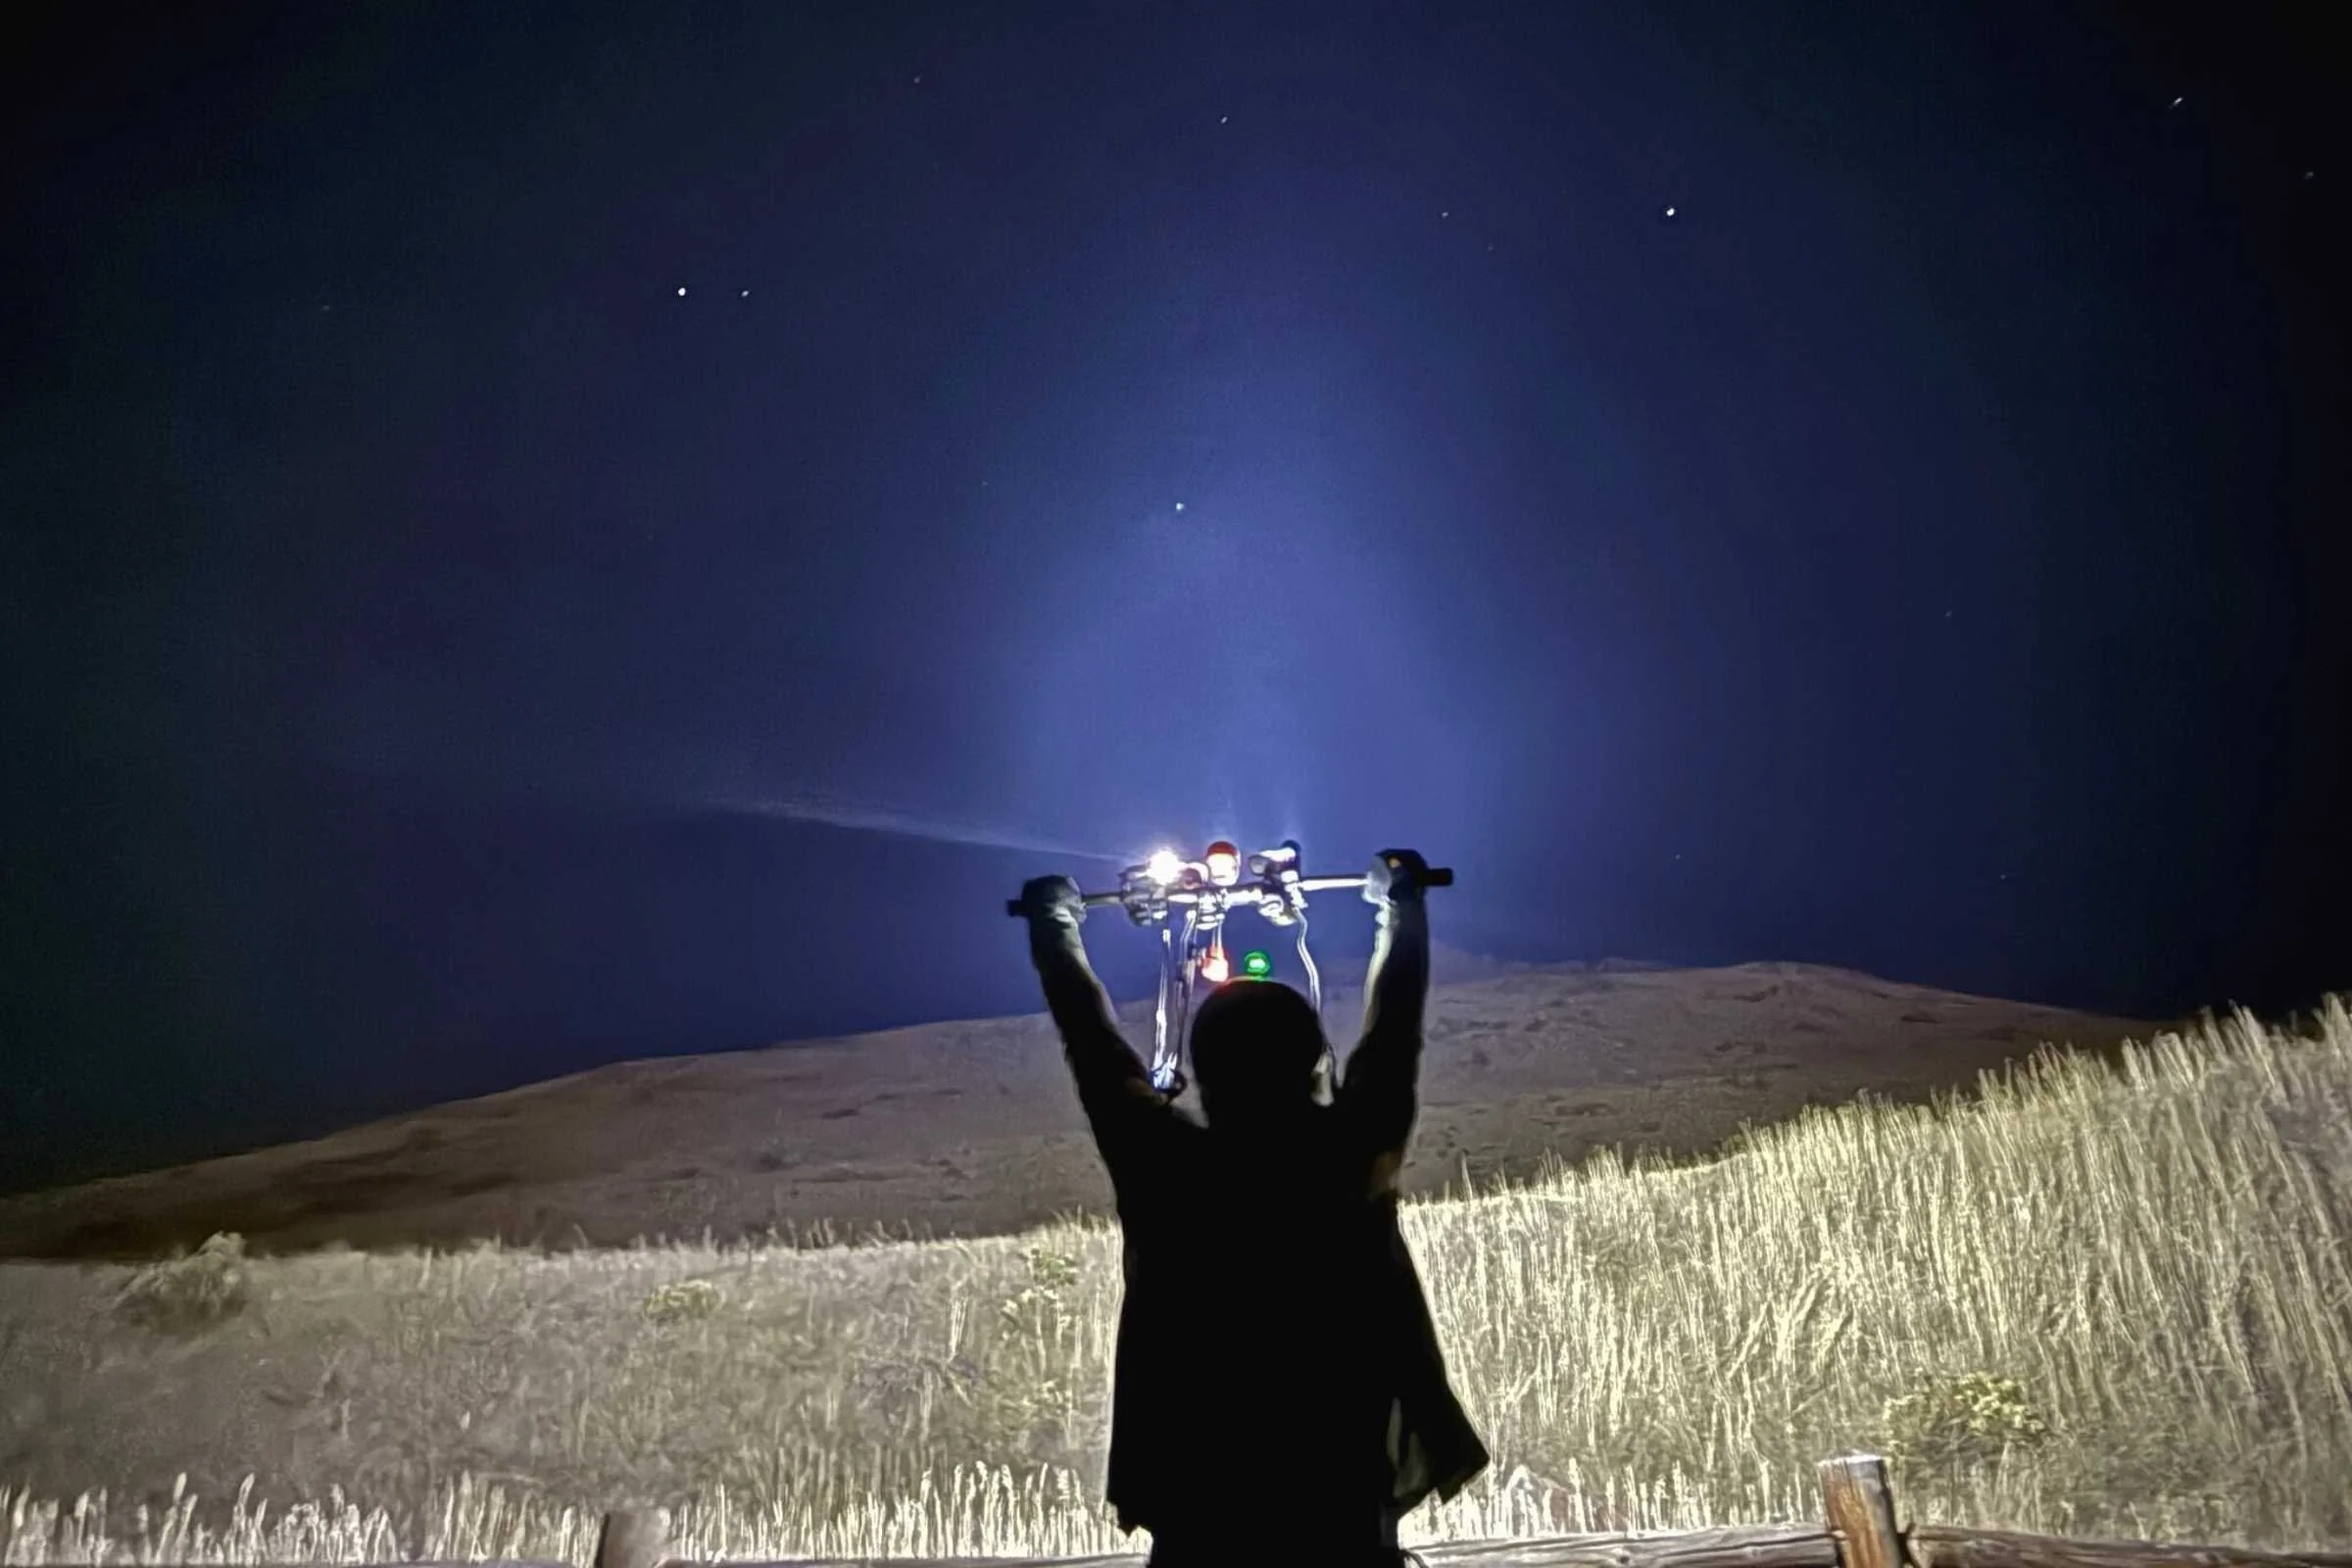
The author getting ready to fire up a collection of lights tested in 2025. Courtesy Chris Meehan/Sam Schild
November 17th, 2025, updated with all new winners for every category and to remove discontinued models
Home > Gear Reviews > Bike
This is our first major revisit to testing mountain bike lights since we originally tested them in 2021. Somewhat surprisingly for a rather niche product, a lot has changed. One of our favorite brands from testing in 2021 and a favorite of many other reviewers, Light & Motion, has called it quits, for instance—if you can still find any of their lights, we’d still recommend them and they should last for years of romping through the nightscape.
The brightness of lights have increased substantially as well. The most powerful light in our initial testing was the Gloworm XS, which has 2800 lumens on high. It’s still a great light, but in this round of testing we evaluated 3 more powerful lights. The MagicShine Monteer 8000s—with 8000 lumens on high—nearly triples the amount of lumens that Gloworm XS can put out. The result, with lights that bright, you may not need both a helmet and bar light for even the hardest terrain at night.
The other substantial change we saw was that USB-C is now the dominant means of charging these beasts. In fact, only one light in this latest round of testing, the NiteRider Pro 4200 Enduro, used a DC charger to power up. We hope in future iterations this will change, too, since USB-C can carry a higher voltage and current than most DC chargers and it makes it much more easy to charge from other battery packs in remote situations.
Our top pick: The Exposure Six Pack 15 emerged as our top overall choice, delivering exceptional 6000-lumen brightness with integrated battery convenience, fast USB charging, and unique, intelligent features that help extend useful battery life—even on full blast.
*Disclaimer: Mountain biking is more risky than most outdoors activities and mountain biking at night with lights adds even more risk. While we're offering insight into the best equipment and practices for nighttime mountain biking adventures, we assume no liability. It's up to the reader to learn more and accept the risk―after all, the learning is worth the adventures it leads you to!
We create reader-supported, objective gear reviews independently selected by our editors. This story may contain affiliate links, which help fund our website. When you click on the links to purchase gear, we may get a commission, without costing you an extra cent. Thank you for supporting our work and mission of outdoor coverage for every body! Learn more.
MTB Lights Comparison Table
| MTB LIGHT | TREELINE AWARD | MSRP* | WEIGHT (OZ) | LUMENS | # OF LIGHTS | # OF MODES | BATTERY ON HIGH (CLAIMED) | RECHARGE TIME | BATTERY SIZE | CHARGING TYPE |
|---|---|---|---|---|---|---|---|---|---|---|
| Exposure Lights Six Pack 15 | Best Overall Read why |
$540 | 14.2 | 6,000 | 6 LEDs | 3 light settings and 7 programmable modes | 2 hours | 5:22 | 20,000 mAh Li-Ion | USB-C |
| Exposure Zenith | Best Helmet Light Read why |
$305 | 5.3 | 2,360 | 3 LEDs | 3 light settings and 7 programmable modes | 1 to 36 hours | 2:45 | 6,000 mAh Li-Ion | USB-C |
| Knog Blinder 1300 Front Bike Light | Best Budget Read why |
100 | 6.3 | 1300 | 6 | 6 | 1.5 hours | 5 hours | 5000 mAh | USB-C |
| MagicShine Monteer 8000s Galaxy V2.0 | Brightest Light Read why |
$420 | 1 lb 4 | 8,000 | 5 LEDs | 5 | 1.5 hours to 32 hours | 9.5 hours | 10,000 mAh | USB-C |
| Nite Rider Pro 4200 Enduro Front Bike light with Thumb Remote | Best Downhill Light Read why |
$450 | 1lb 13.6 | 4,200 | 6 LEDs | 7 | 1:30-21 hours | 5 hours | 11,600 mAh | DC charger |
| Lezyne SuperDrive 1800+ | Best Gravel Light Read why |
160 | 8.5 | 1,800 | 3 LEDs | 7 (app customizable) | 1:45 to 180 hours | N/A | 6,600 mAh Li-Ion | USB-C |
| Exposure BoostR + ReAKT & Peloton Mk2 | Best Tail Light Read why |
110 | 1.6 | 150 | 1 LED | 6 | 6 to 48 hours | 3 hours | 1,600 mAh Li-Ion | USB-C |
Do you need a Mountain Bike Light?
Bike lights for mountain biking and gravel riding give riders the ability to extend their rides into the early morning and late evening hours. Oft packed trails become solitude-filled adventures in these hours.
The lights transform even a riders’ best-known and favorite trails into something new. It’s like riding a rollercoaster or the mine cart scenes in “Indiana Jones and the Temple of Doom.” For gravel grinding bikepackers it allows them to extend their ride to reach that next camp site or get to the next town.
Whatever the rider’s scenario, these reliable, high-performance lighting systems are essential safety equipment for expanding riding possibilities beyond daylight hours.
Sensibly, most people choose to ride mountain bikes in the daylight. But with bikepacking, 24-hour races, the shorter days of winter, and the opportunity to have trails to themselves in the wee hours of the morning or the evening, some folks opt to ride in the dark. One bonus of night riding? You get to see the trail in a whole new light.
If you ever strapped a Maglite to your handlebars to ride through the neighborhood at night as a kid, you know how paltry that light was—and how hard it was to keep the light focused on where you’re going. Thankfully, technology has come a long way since then. Today’s front-facing mountain bike lights can pack more lumens than a car’s high beams.
Mountain bike lights, along with many other gear items, are on our list of Essential Mountain Bike Accessories.

Mountain bike riding at night can add a fun, additional challenge to mountain biking. Photo by Chris Meehan.
The portable lighthouses that are modern-day MTB lights can illuminate every rock, drop, and obstacle on dark trails, making it easier and safer to enjoy the challenges of the trail when others are climbing into bed or still sawing lumber in their slumber. That’s thanks in large part to lightweight, efficient LED bike lights, as well as high-powered, rechargeable lithium-ion batteries — both of which are becoming more compact and less expensive than ever.
All this made picking a winner for the Best Overall Mountain Bike Light tough. Each of the lights we tested (and some we didn’t have a chance to evaluate) has a lot going for it.
Modern trail lights don’t need a bunch of whistles and bells, but some of those features, like remotes, Bluetooth connectivity, and apps are nice. They can turn your smart device into a remote and unlock additional features of the light, like monitoring how much juice is in the battery. Apps and bar-mounted remotes allow you to control multiple lights with the same device, ideal when using a helmet light and a handlebar light together.
Here at Treeline, we’ve done the initial work to find you the latest and greatest MTB light. We waded through hundreds of reviews on top review sites and tested the best on the trail. We’ll tell you what to look for in trail lights and all about the important (and nice-to-have) features you can find out there.
The Best Mountain Bike Lights
Best Overall Light: Exposure Light Six Pack 15

MSRP: $540
Weight: 14.2 oz
Mount Type: Front Light
Lumens: 6,000
Number of Main Lights: 6 LEDs
Number of Modes: 3 light settings and 7 programmable modes
Battery Life (claimed by manufacturer): 2 to 36 Hours
Recharge Time (claimed by manufacturer): 5:22
Battery Size: 20,000 mAh Li-Ion
Charging Type: USB-C
What we liked: Brightest light in an all-in-one package, best design, intelligent dimming, screen shows light burn time
What we didn't like: Clamp is a little finicky and wish the tightening screw was captive, accessing the additional lighting modes is a little hard.
If a bike light was to prove Arthur C. Clarke’s axiom, “Any sufficiently advanced technology is indistinguishable from magic,” it would be the Exposure Six Pack 15 for 2026. Exposure packs a ton of techno-magic into the handsome anodized aluminum body of the Six Pack 15—its flagship mountain bike bar light. That includes auto-dimming and brightening features that subtly work while you’re riding, which Exposure calls Reflex 2.0.
Exposure calls Reflex 2.0 a form of AI as it doesn’t just adjust statically—it uses onboard sensors, including accelerometers and thermistors, to adjust the light automatically to your riding style. When you’re going slow or going uphill it subtly dims. When you’re charging hard downhill it gives you the full 6,000 lumens—making this beer-can-sized light more of a hearty barrel-aged barleywine or imperial stout than a Michelob Ultralight. It’s got punch!
This helps the light save battery and reduce how hot it gets. It also will dim when you’ve got it on but aren’t riding—something fellow Treeline Review writer Sam Schild and I didn’t even notice had happened until we reviewed a short video he shot.
In all, this is a fantastic light and the second brightest we’ve ever tested, all within a package that’s a little smaller than a beer can. With six LEDS arranged in a flower pattern, the Six Pack provides a great throw of light down the trail both peripherally and with a strong central focal point, and we had no problem seeing roots, rocks, and drops in the Buffalo Creek Recreation Area where we tested it against other lights.
We also liked that it’s a single unit with the 20,000 mAh Li-Ion battery integrated into the body and that it’s easy to take off the solid aluminum clamp that comes with it. The clamp, though a little difficult to put on (especially in the dark!), was solid on our bars and didn’t slip.
Exposure Light Six Pack 15
-
The Six Pack was a perennial favorite of gear testers already, but the Six Pack 15 really amps it up over previous versions. Moving from a DC charger to a USB-C port gives it a considerable boost. Charging time is cut from eight hours in the previous version to just under five and a half hours, it now has 6,000 lumens up from 5,800 and is now IP67 waterproof rated. The USB-C port also means you can use it as a power bank to charge up other devices in a pinch or charge from a power bank while using it. Exposure also upped the ante with its new OSD+ screen. It’s now in color and displays how long the light will last on the current setting.
-
Auto-dimming and brightening based on your riding patterns. Waterproof with USB-C charging and power bank capabilities.
-
Highly versatile for an all-in-one unit.
-
Integrated 20,000 mAh Li-Ion battery.
-
There are few downsides to this powerful light. Perhaps the biggest downside is that the clamp is a little hard to get on and off and the screw that tightens it isn’t captive, so when you’re switching lights out in the dark you could—as we almost did—lose it. But since most users will likely just put the clamp on and leave it on without the light, it shouldn’t be a problem for most riders.
We also found it easy to switch from the highest to lowest brightnesses and pulse mode with a single button touch. But accessing the other different lighting modes, which reduce the maximum brightness for longer run times, is a bit trickier. Thankfully, we were happy with the three normal brightnesses and battery run time.
-
If you want all the tech in a single, extremely powerful and good-looking unit, this is the light for you. Sure, it’s spendy at $540. But it also has the highest battery capacity of any light we tested and, with this light you don’t really need to worry about a helmet light as well—as with the other high-powered lights we tested this year—which means you kind of save $150 or more by not buying a second light.
Best Helmet Light: Exposure Zenith
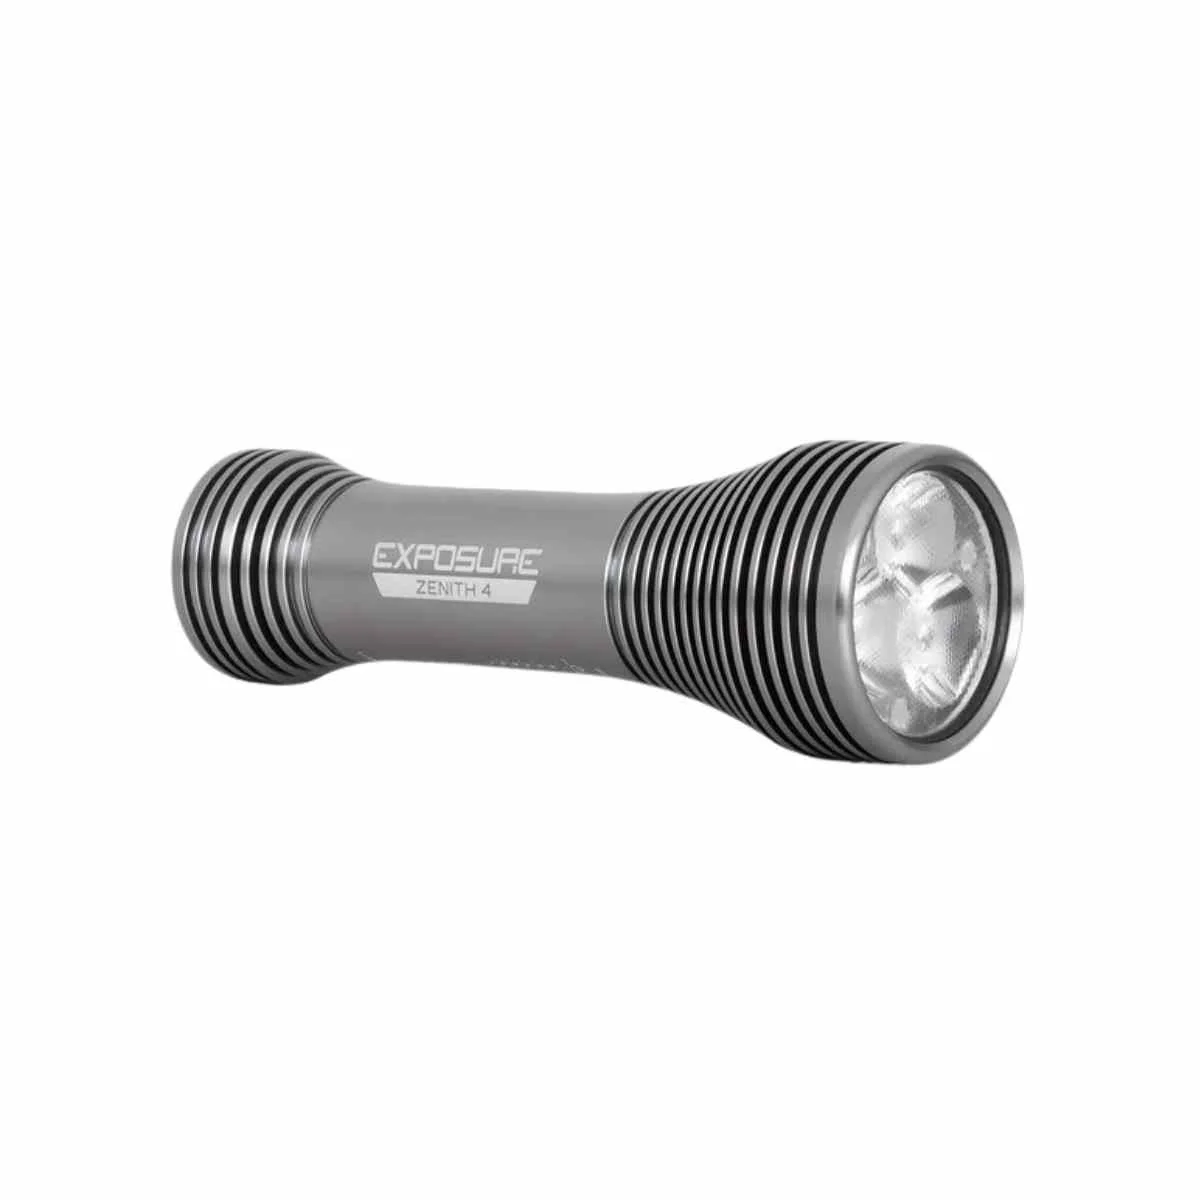
MSRP: $305
Weight: 5.3 oz
Mount Type: Helmet Light
Lumens: 2,360
Number of Main Lights: 3 LEDs
Number of Modes: 3 light settings and 7 programmable modes
Battery Life (claimed by manufacturer): 1 to 36 hours
Recharge Time (claimed by manufacturer): 2:45
Battery Size: 6,000 mAh Li-Ion
Charging Type: USB-C
What we liked: Great focus on a point, USB-C charging is speedy, unique clamp worked really well with our helmet
What we didn't like: Difficult to cycle through the various programs
Though this is a much smaller light than its Six Pack sibling, Exposure still manages to pack some unique features into this aluminum bat of a light. Primarily intended as a helmet light, the Zenith’s standout technology is its tap technology.
Once enabled you can tap through three light settings by tapping either the body of the light itself or your helmet. Even without the tap feature enabled, it was easy to cycle through the two or three levels of brightness with a tap on the power button.
With over 2,300 lumens on full blast, you could get away with using this as your only light—and Exposure does include an easy-on easy-off bar mount secured by a rubber strap. But it provides more of a focussed beam than bigger lights than we’ve tested.
As a helmet light it works great. It helps a rider immediately focus on where they’re going as they move their head with a laser-like focus and the lumens are enough to provide those important highlights and shine through all but the brightest of bar-mounted lights.
At 5.3 oz it weighs about as much as a GoPro or Insta360 camera and doesn’t put a lot of extra weight on the head and neck. However, it’s not as light on the head and neck as light units with a corded battery pack that stows in a backpack or pocket.
The helmet clamp is essentially an adjustable round clip mounted on a plastic disc. It’s secured by a disc on the inside vent of a helmet with a nylon screw. A little bonus: the clip is removable and the helmet mount uses the type of mounting hinge that action cameras use so you could easily put your action camera on the mount, too.
Exposure Zenith
-
The tap to change brightness mode is this light’s killer feature. The helmet mount also is one of the best we’ve seen.
-
This is primarily intended as a helmet light but we could see using it as a bar light with another helmet light. It won’t give as wide a beam pattern as we’d like to see on most bar lights though. It’s also really easy to unclip from the mount and use as a flashlight like a super power Maglite Mini.
-
The 6,000 mAh li-Ion battery is pretty high up there among the battery integrated lights we tested and should provide a great run time for most riders as long as they don’t blast it on high all the time.
-
Accessing the programs and the tap feature was a little difficult at first and is definitely something done easier at home than on the trail at night.
It’s not as light as most helmet lights connected to a remote battery pack.
-
This is a great helmet light and we’d recommend it to anyone who doesn’t mind paying for a premium light.
Best Budget Light: Knog Blinder 1300 Front Bike

MSRP: $110
Weight: 6.3 oz
Mount Type: Front light (tested), Helmet Light (not tested)
Lumens: 1,300
Number of Main Lights: 6 LEDs
Number of Modes: 6
Battery Life (claimed by manufacturer): 1.5 hours to 120 hours
Recharge Time (claimed by manufacturer): 5 hours
Battery Size: 5,000 mAh Li-Ion
Charging Type: USB-C
What we liked: Durable as heck, good mounting options, great value
What we didn't like: Can be hard to put into the bar mount clip and get it out, can’t provide as wide coverage as bigger lights can
Over the past few years, the Australian company Knog has entered into the US with some pretty good bike lights and accessories. We had a chance to check out the Knog Blinder 1300 Front Bike Light and found it was a pretty darned good light—for road and perhaps gravel riding.
This was the least expensive light we tested and it punches above its weight.
This is our second go-around with this light. What we found the first time around still holds. Knog has improved the handlebar mount clip since our first testing of it.
We found the clip that secures the light in place was a little less robust than we need for mountain biking and rough gravel riding. While we could clamp the silicone strap down on the handlebars pretty tight, it still didn’t stay in place as well as some of the other lights we tested and loved.
The clip and strap also made the light easier to remove than other lights, which we realized was a problem when we stopped for a mid-ride beer and someone liberated the light from our handlebars. With a couple improvements, this could be a much more significant contender at a decent, $100 retail price.
Knog Blinder 1300 Front Bike
-
The light has six modes: low through high steady beams and pulsing and strobing options. We also like that the silicone button doubles as a battery life indicator with green, yellow, and red lights to indicate how much battery is left. We found that on high and even on medium, it’s plenty bright for road riding at night—though the beam was narrower than one we’d want on our handlebars for night mountain biking.
-
The light is well designed with a durable aluminum chassis. It was so durable, in fact, that after the light fell off our handlebars and was subsequently driven over by at least one car, the light survived. However, the story here is that the light fell off our handlebars.
-
It’s a great light for commuting and light gravel riding but not one we’d recommend as a primary light for mountain biking. However, with a helmet mount this would do a good job for easier mountain bike trails.
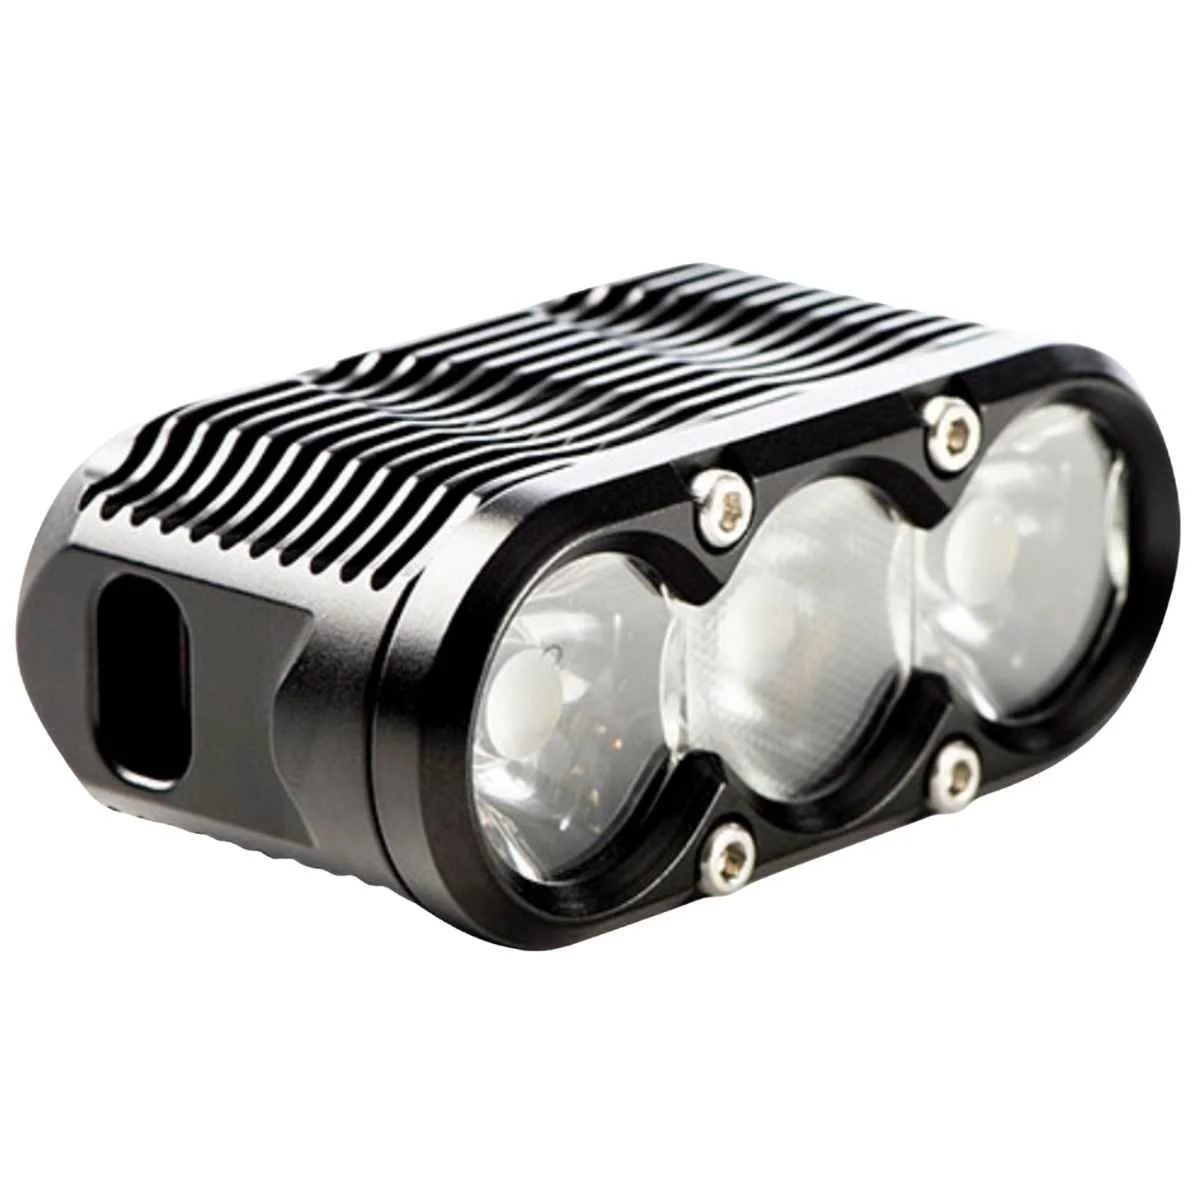
Brightest Light: MagicShine Monteer 8000s Galaxy V2.0
MSRP: $420
Weight: 1 lb 4 oz
Mount Type: Front LIght
Lumens: 8,000
Number of Main Lights: 5 LEDs
Number of Modes: 5
Battery Life (claimed by manufacturer): 1.5 hours to 32 hours
Recharge Time (claimed by manufacturer): 9.5 hours
Battery Size: 10,000 mAh
Charging Type: USB-C
What we liked: Brightest light by far, great central focus and peripheral lighting, solid mount
What we didn't like: Light only works with MagicShine’s battery pack, wireless remote is easy to lose, blinds animals and spooks alike
Imagine taking a lighthouse and putting it in a compact aluminum body and mounting it on your mountain bike’s handlebars. That’s what you get with the MagicShine Monteer 8000s Galaxy V2.0—a light that’s more than double the legal limits for car headlights. This is by far the brightest light we tested, and it’s one of the brightest mountain bike lights available.
When we tested it on high it was the only light that was capable of completely washing out the helmet light we were using. As such, it pretty much obviated the need for a separate helmet light.
MagicShine claims the Monteer 8000s has an illumination range of 315 meters. We can’t attest directly to that—after all, we were testing the lights on a trail in the woods. But it definitely had the longest cast of any of the lights we tested, slightly beating out the Exposure Six Pack in terms of absolute distance. The light it casts bathes the sides of the trail in enough light to see everything you need to see, turning a little island of trail in front of you into daytime as you hop rocks and roots on twisty, rough single track.
The three floodlights on the top provide a wide, 31-degree viewing angle and the two spotlights on the bottom help focus in on the trail in front of you. In all we found it a great effective light.
The LEDs on the light’s button turn from green to red as it depletes and flash red when the battery is at 5%. The battery pack also has a bar indicator showing how much power is left. The wireless remote was easy to use and also unfortunately easy to misplace.
MagicShine Monteer 8000s Galaxy V2.0
Light from the MagicShine Monteer 8000 is bright enough to X-Ray yourself—and hot enough to cook an egg! Courtesy Chris Meehan.
-
It has a wireless remote, IPX5 water-resistance rating, and brightness of 8000 lumens.
-
The Monteer 8000s Galaxy provides enough light that you really don’t need both a helmet and bar light, so in that sense it’s versatile but it’s also not an all-in-one unit so you can’t carry it like a flashlight.
-
USB-C rechargeable 10,000 mAh Li-Ion battery pack with power pack capabilities
-
Remote could be designed a little better. Almost bright enough to wash the trail out with too much light.
-
This is a great light that provides all the illumination you could need for mountain biking. It’s almost overkill, but if you only want one light for mountain biking instead of a bar and helmet light, this is a great option. Since it doesn’t have the bells and whistles of the Exposure Six Pack, it’s also not as expensive even though it was the brightest we tested.
Best Downhill Light: Nite Rider Pro 4200 Enduro Front Bike Light w/ Thumb Remote
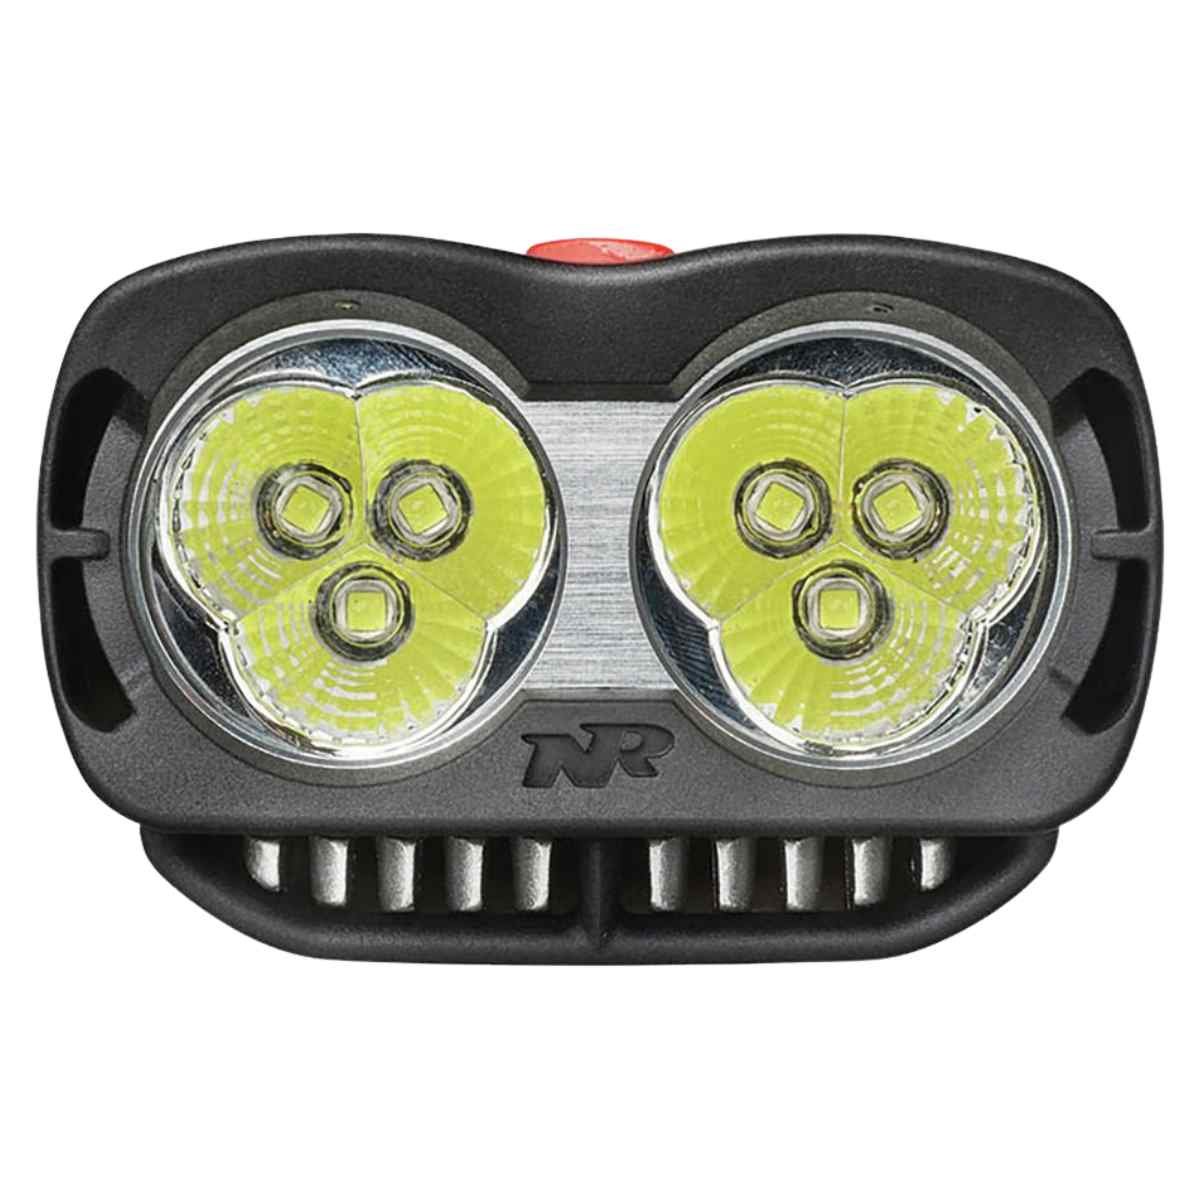
MSRP: $450
Weight: 1lb 13.6 oz
Mount Type: Front Light
Lumens: 4,200
Number of Main Lights: 6 LEDs
Number of Modes: 7
Battery Life (claimed by manufacturer): 1:30-21 hours
Recharge Time (claimed by manufacturer): 5 hours
Battery Size: 11,600 mAh
Charging Type: DC charger
What we liked: Great brightness and focus, durable cords
What we didn't like: Mounting systems could be better, not USB-C rechargeable and proprietary plugs
This is a really well-designed light from NiteRider, not that we’re surprised—the company has produced bike lights since 1989. There’s a lot to love in the 4200 Enduro.
First off, it showed the power of well-designed optics. The light has two lens clusters, each of which focuses three high-powered LEDs. The result? A phenomenal blend of center focus and softer peripheral vision, making careening through tight, rocky, downhill sections of Buffalo Creek Recreation Area a breeze, even without a helmet light on. In fact this is a light we’d be comfortable tackling a midnight marauder downhill race with.
Like the other super-lumen lights we tested, the Pro 4200 Enduro was just about bright enough that a helmet mount light was redundant. With the Pro 4200 Enduro as our bar light, in most situations we’d probably leave a helmet light off and only turn it on when sending highly technical areas.
Nite Rider Pro 4200 Enduro Front Bike Light w/ Thumb Remote
-
We also liked the light’s burly, silicon cords because they’re thick and feel like they’d withstand plenty of bashing against rocks. They also use the same cord on the remote control, which is in addition to the control button on top of the light itself.
-
It has an external 11,600 mAh Li-Ion battery, proprietary DC recharger. The battery pack looks like a small e-bike battery or motorcycle gas tank. It’s got enough juice to power the LEDs on high for about an hour and a half, and up to 21 hours on the lowest mode.
-
NiteRider’s Pro 4200 Enduro light is a great light but we think there could be some improvements to the mounting, both for the handlebar and the external battery. However, the biggest downside to the light is the proprietary plug on the DC charger and that the battery has a USB-A port rather than a USB-C port. We’d expect this will change in the next iteration or two.
While the battery does have a USB-A power port for charging other things, this was also the only light we tested that wasn’t USB-C rechargeable. That’s definitely a bummer if you forget the DC charger that connects to the proprietary port on a multi-day trip and didn’t bring an extra $220 battery with you.
The plastic handlebar clamp was great in that it allows the light to perfectly center over the handlebars and it’s adjustable on two axes to work with all sorts of handlebars, but it does take longer to put on and adjust than other options. Also, the nylon straps securing the battery to the bike worked but felt flimsier than those of other bike lights we tested.
-
Wired handlebar remote, swappable battery, multi-adjustment mount, USB-A power pack capability
-
This is the light we’d choose for technical mountain biking at night. It’s too powerful to use for road and perhaps even gravel riding. And it’s only designed for bar mount applications.
-
This is the best bar light for downhill mountain biking and racing that we tested and we’d be happy to have it as our only light even if we were doing highly technical downhill mountain biking on a regular basis. There could be a couple improvements, but overall it’s a great light with central focus and good peripheral vision.
Best Gravel Light: Lezyne SuperDrive 1800+

MSRP: $160
Weight: 8.5 oz
Mount Type: Front Light
Lumens: 1,800
Number of Main Lights: 3 LEDs
Number of Modes: 7 (app customizable)
Battery Life (claimed by manufacturer): 1:45 to 180 hours
Recharge Time (claimed by manufacturer): N/A
Battery Size: 6,600 mAh Li-Ion
Charging Type: USB-C
What we liked: Great center and peripheral focus for an all-in-one bar light, easy-to-cycle-through modes, USB-C rechargeable and can run while connected to a power bank, app connection
What we didn't like: Little hard to latch the mounting strap, customization only through the app, must have a thin USB-C cord to plug in
The Lezyne Super Drive 1800+ was a fun light to ride with on the loops off the Three Sisters trailhead in Durango, CO. It provided enough of a spotlight and peripheral light to see the parts of the trails we needed most. And we caught the bushy white butts of deer and jackrabbit escaping the light numerous times on the fun, hardpack dirt of the trails as we wended our way through sage-covered flats. We also found that it provided plenty of illumination through short tree-filled sections with narrow turns.
This light excels over both the smaller NiteRider lights we tested thanks largely to the focal designs of the LEDs. Two LEDs provide more peripheral vision while the last provides a little more central brightness.
Lezyne SuperDrive 1800+

The Lezyne Mega Drive (shown here) is a battery-integrated light ideal for pass through charging. It is the predecessor for the SuperDrive. Photo by Chris Meehan.
-
Good central and peripheral focus, able to charge while using, super-low power Femto mode, can wirelessly connect with Lezyne’s KTV Drive Pro Smart Rear light.
-
With a rubber strap mount it’s super easy to move this light from one bike to another. It’s a bar-mount only light, however.
-
Integrated 6,600 mAh Li-Ion, USB-C rechargeable battery
-
This is a good value light. It’s not as bright as some of the other lights we tested so shouldn’t be used as your only light in technical terrain. The other downside is it isn’t helmet mountable.
-
We would definitely use this as a single, bar mounted light on gravel and road rides—and it’s more than adequate for commuting. But for hard twisty and technical terrain and downhills on a mountain bike, this light needs a helmet mounted companion.
Best Tail Light: Exposure BoostR + ReAKT & Peloton Mk2
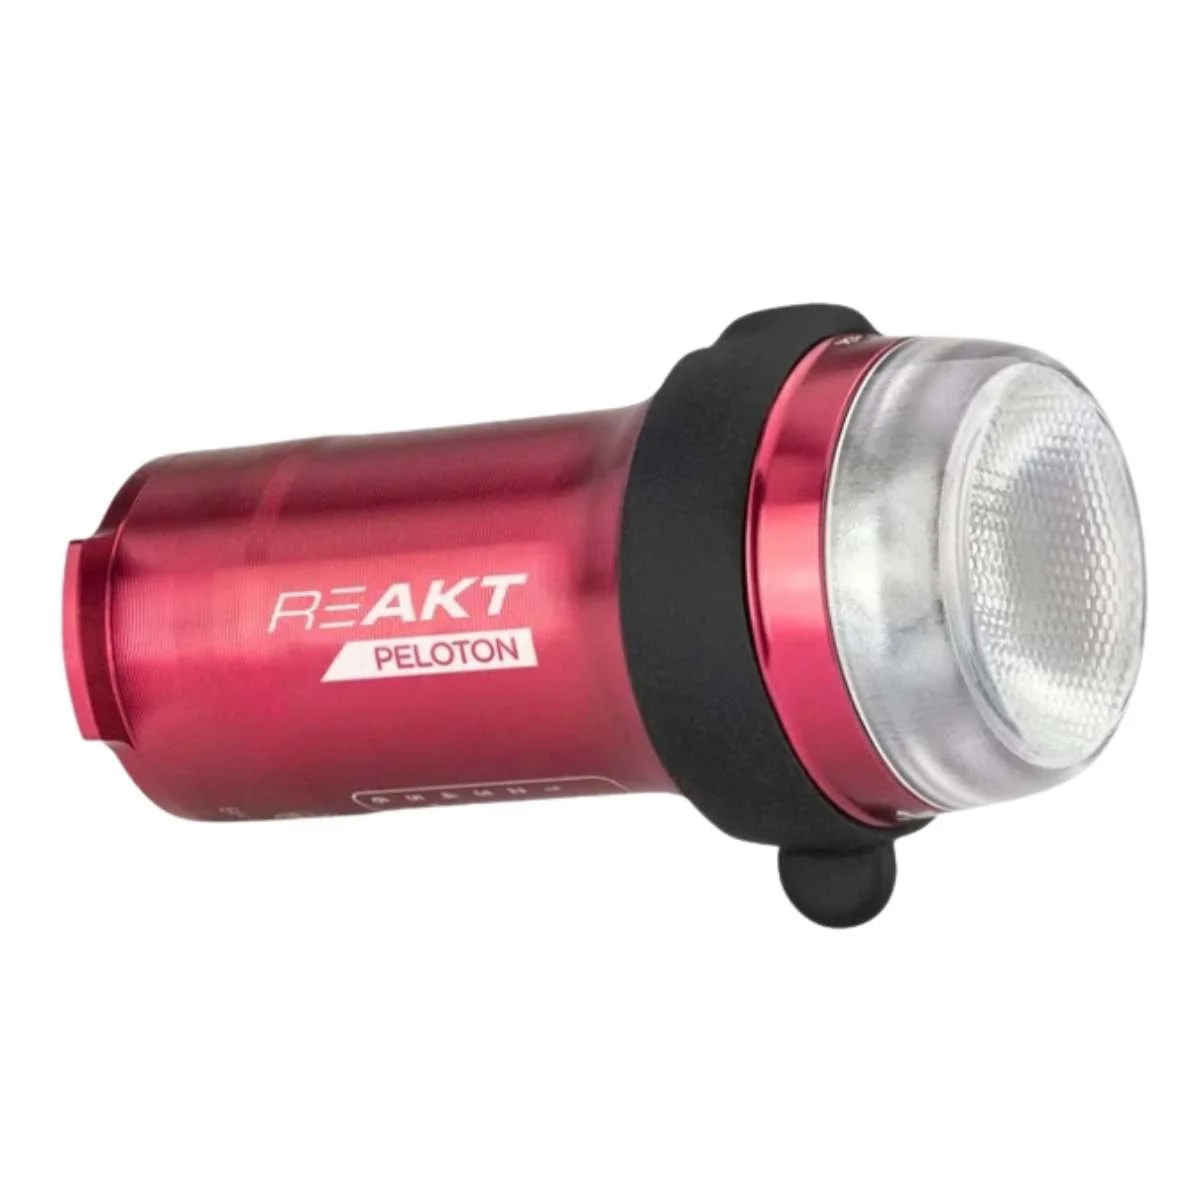
MSRP: $110
Weight: 1.6 oz
Lumens: 150
Number of Main Lights: 1 LED
Number of Modes: 6
Battery Life (claimed by manufacturer): 6 to 48 hours
Recharge Time (claimed by manufacturer): 3 hours
Battery Size: 1,600 mAh Li-Ion
Charging Type: USB-C
What we liked: Lightweight, easy to put on and take off, smart technologies
What we didn't like: Mount isn’t as robust as we’d like, button and charging port cover could slip off
To be fair the Exposure BoostR + ReAKT & Peloton Mk2 is the only tail light we tested since we’re more focused on trail and gravel riding where riders don’t usually need a tail light. But, gravel riders are also often bikepackers, who might need a tail light for long stretches of road. For bike packing, road riding, commuting, and even gravel riding, this is a great tail light.
We’ve used other tail lights in the past and this light has proved to be better than them. Like other lights from Exposure, this light packs a lot of technology that acts like magic. In this case it’s the ReAKT and Peloton capabilities.
ReAKT automatically brightens the lights when it senses that the rider applied the brakes and lightens up when the light senses its under a street light so it still shows up. Peloton automatically dims the light when it senses another rider and light behind the BoostR light and it brightens when it senses no other riders behind it.
Exposure BoostR + ReAKT & Peloton Mk2
-
ReAKT and Peloton intelligent lighting features, day mode and USB-C rechargeable
-
With a rubber strap mount it’s super easy to move this light from one bike to another. It’s a tail light only, however.
-
Integrated 1,600 mAh Li-Ion, USB-C rechargeable battery
-
The mount uses a thick rubber band to attach to the plastic mount. It worked but we found that the gasket-like strap didn’t stay secured to the plastic mount when it wasn’t stretched, meaning it would be easy to lose when not on a bike.
-
For bikepacking, road riding, commuting, and even gravel riding, you’re hard pressed to find a better light than the Exposure BoostR + ReAKT & Peloton Mk2. It’s a solid light with well-thought and implemented smart features and, as it comes out of the box, it’s easy to install and use on multiple bikes.
Other MTB lights we tested
Knog Blinder X2300
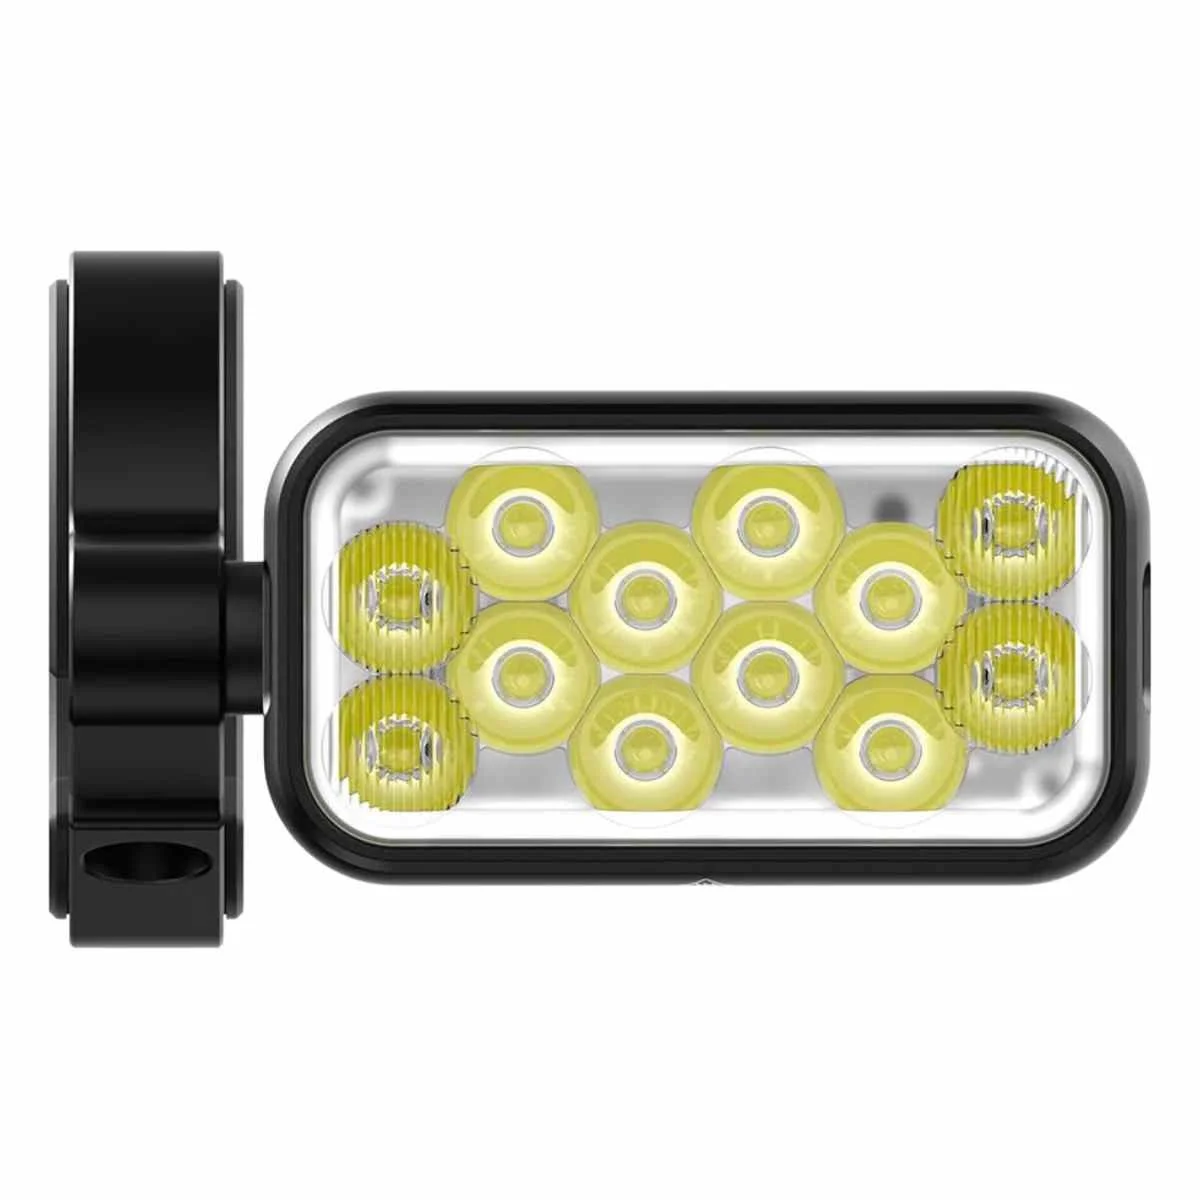
MSRP: $300
Weight: 11.8 oz
Mount Type: Front light (tested), Helmet Light (not tested)
Lumens: 2,300
Number of Main Lights: 12 LEDs
Number of Modes: 6
Battery Life (claimed by manufacturer): 1.8 hours to 75 hours (eco flash mode)
Recharge Time (claimed by manufacturer): About 3.5 hours
Battery Size: 10,000 mAh battery pack
Charging Type: USB-C
What we liked: Beam width and central focus, solid mounting options, lightweight remote
What we didn't like: Not as powerful as other options, USB-C rechargeable but not can’t swap battery pack for a third party pack, no captive screw on mounting bracket, lighting modes are only accessible via the connected remote
The Knog Blinder X2300 is a solid choice for a great bar mount mountain bike light and can also serve as a helmet light. The mounts on the light are solid, whether you want to mount it on the handlebars or most helmets.
Knog Blinder X2300
The beam pattern is solid with a good focus on the middle thanks to a cluster of eight spotlight LEDs providing plenty of light down trail and two wide angle LEDs to each side provide peripheral vision on the trail.
With a separate battery pack you can place the battery pack on the bike frame when the light is bar mounted or you can use the extension cable to place the pack in a backpack, which is useful for helmet-mounting the light.
The lighting modes are only accessed via the small remote button that can be attached to the handlebar. We like that the remote button has colored LEDs to give an idea of how much power the battery pack has left. However, we would also like to have a control and power button on the light body itself and/or on the battery pack. If you damage the remote you can’t control the light otherwise.
It is rated IP67 for water resistance and dust resistance. The helmet and bar mounts come with the light.
This means the Knog Blinder X2300 can serve as either a bar or helmet-mounted light, making it as versatile as most other lights.
It has an eExternal 10,000 mAh USB-C rechargeable Li-Ion battery pack. The battery pack has an extension cord.
Though the battery pack is USB-C rechargeable it doesn’t offer the ability to serve as a battery pack to power other devices. That, and the remote button is the only way to cycle through the lighting modes, were enough drawbacks to make this not a winner.
This is a great light that punches above its weight in terms of lumens, but it’s still not as bright or quite as well focused as some of the other premium lights we checked out. As such, we’d recommend using it in conjunction with a helmet light for any hard night mountain biking and descending. We’d also recommend it as a single light for gravel or road riding.
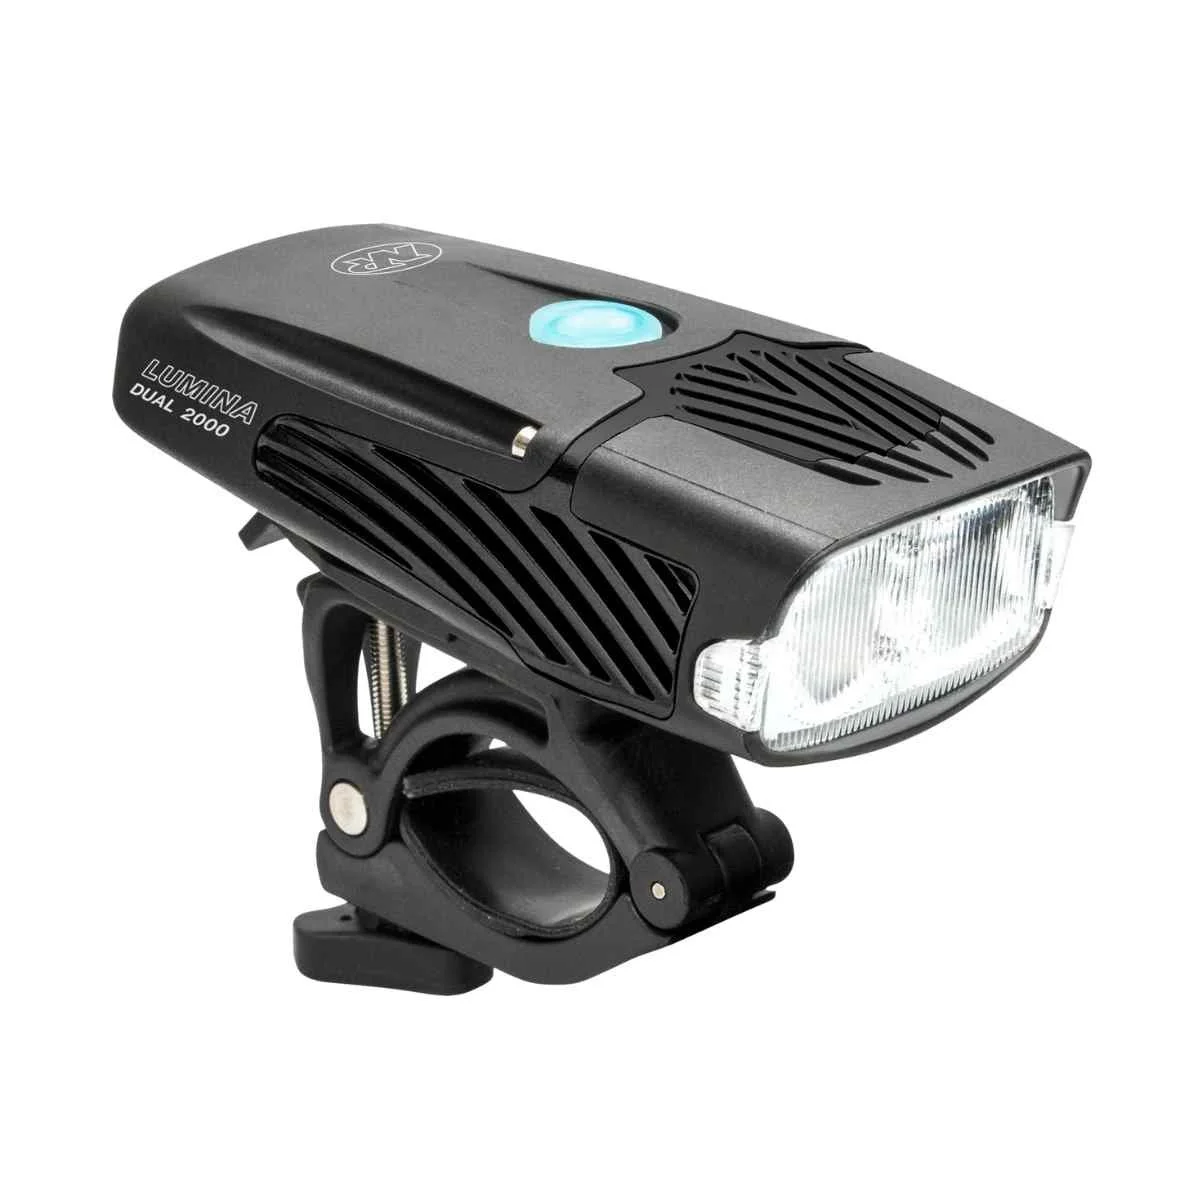
MSRP: $140
Weight: 9.1 oz
Mount Type: Front Light (head light mount available)
Lumens: 2000
Number of Main Lights: 2 LEDs
Number of Modes: 7
Battery Life (claimed by manufacturer): 1 hour to 21:30 hours
Recharge Time (claimed by manufacturer): 3:30 hours
Battery Size: 6,000 mAh Li-Ion
Charging Type: USB-C
What we liked: Compact and lightweight, clamp is easy to put on and take off, clamp works with multiple NightRider lights
What we didn't like: No sharp central focus, clamp seems a little cheaper than other options, Travel Lock Mode is too easy to defeat
This is a little powerhouse of a light, putting out 2,000 lumens in a small package. However, with the two LEDs side by side and without any lighting overlap, there’s a lack of a central focal point, which we prefer for any bar mounted light to use as our only light.
The 2000, which is priced at the same retail price as the Lumina Pro 1400 that we tested ($140 as of writing), barely edges it out with a bit of a broader beam width and the ability to illuminate a little farther than the 1400. Between that and the single-button simplicity of the Dual 2000, we’re more likely to recommend it over the 1400.
NiteRider Lumina Dual 2000
Testing the NiteRider Lumina Dual 2000 at Three-Springs Trail System in Durango. Courtesy Chris Meehan
However, we found that the button on this battery was too easy to press and since the travel lock mode only requires one long press before being able to turn on, we found this light turned on in our pack before we were able to use it and lost a lot of full brightness time with it on our first go-around with it. In subsequent testing it performed on par with the 1400.
It is USB-C rechargeable with seven lighting modes. The mount makes it easy to swap out different NiteRider lights, though it is not as versatile as other lights we tested.
It has an integrated 6,000 mAh Li-Ion battery that is USB-C rechargeable.
This light doesn’t have a great central focus and doesn’t offer as much peripheral light as many of the other lights we tested. We also found that the light’s travel lock mode, which is supposed to lock it in an off mode, was easy to overcome and it had turned on in our backpack a couple of times.
A quality light, and we’d probably buy it over the NiteRider Lumina Pro 1400. There are better options out there for a bar mount light, but they're more expensive.

MSRP: $140
Weight: 6.8 oz
Mount Type: Front Light (head light mount available)
Lumens: 1,400
Number of Main Lights: 1 LED
Number of Modes: 7
Battery Life (claimed by manufacturer): 55 minutes to 20 hours
Recharge Time (claimed by manufacturer): 4 hours
Battery Size: 3,000 mAh Li-Ion
Charging Type: USB-C
What we liked: Compact and lightweight, clamp is easy to put on and take off, helmet compatibility, clamp works with multiple NightRider lights
What we didn't like: No real central focus, clamp seems a little cheaper than other options, Travel Lock Mode is too easy to defeat
The NiteRider Lumina Pro 1400 Front Bike Light is an inexpensive light and was one of the easiest lights we set up on the handlebar and it’s also easy to swap it out with other NiteRider lights in case you run out of batteries and can’t plug it in to the USB-C port on the bottom of the light.
We used this light for a little bit on the trail in Buffalo Creek and found it was much more suited for gravel or road riding than for using on singletrack in the woods as a single light on a mountain bike handlebar. It just doesn’t have the brightness and focus we’d want when compared to the brighter lights we used. We also tested this out with other smaller lights on gravel bikes on gravel roads and easy trails in Golden and Durango, CO. In this capacity it did well.
NiteRider Lumina Pro 1400 Front Bike Light
The two large, easy-to-push buttons on the top made it easy to cycle through the seven modes of light, from the highest settings to the low-energy pulse and S.O.S. modes. However, the easy-to-press nature of the lights and the travel lock mode requiring a single long press to enable or disable also meant that it could be easy to unlock it in a crowded backpack and turn it on by mistake.
It is USB-C rechargeable with seven lighting modes. The mount makes it easy to swap out different NiteRider lights. It is also mountable as a helmet light (mount sold separately).
Usable as both a bar-mount and helmet-mount light, the Lumina Pro 1400 Front Bike Light is somewhat versatile, but it’s most suited as as bar-mount light for gravel and road-riding in our opinion.
It has an integrated 3,000 mAh Li-Ion USB-C rechargeable battery.
This light doesn’t have a great central focus and doesn’t offer as much peripheral light as many of the other lights we tested. We also found that the light’s Travel Lock mode, which is supposed to lock it in an off mode, is easy to defeat.
The NiteRider Lumina Pro 1400 Front Bike Light is a great value and a good light for gravel and road riding but if using it on the trail, it should definitely be used with a helmet light, since it provides a more diffuse light with no real central spotlight effect.
Price: $309
Weight: 16.8 oz
Lumens: 2800
Number of Main Lights: 3
Number of Modes: 4
Battery Life (claimed by manufacturer): 3 hours
Recharge Time: 5.25/3.5 hours
Battery Size: 10,000 mAh
Charging Type: USB-C (20W/45W)
The 2800-lumen 3-LED Gloworm XS Lightset is an incredible light with a whole bunch of amazing features. It was our former best upgrade winner.
Mountable on either your handlebar or your helmet, these lights are great for normal mountain biking, but really shine during night-time and 24-hour mountain bike races. We found the XS is ideal as a bar light.
The wireless remote control is handlebar mounted and features two buttons configurable to control multiple lights. You can control all of your Gloworm lights with a single button, or spread your lights out over the two buttons.
Gloworm XS Lightset


The Gloworms come with interchangeable lenses that allow you to control your beam pattern. Changing the lenses lets you choose whether or not you want the 2 (X2) or 3 (XS) LEDs to perform primarily as a floodlight for seeing as much breadth as possible around you, a spotlight for seeing further down the trail, or a combination of both. For instance, if just using the XS, you may want to use a floodlight lens for the outer LEDs and a spotlight for the center LED.
The battery on the Gloworms is separate from the lights themselves, so if you decide to mount the lights on your helmet, you can opt to mount the battery to the back of your helmet, using the short cord Gloworm supplies you with.
Or, if you want to minimize the weight on your head and neck, you can use the longer cord, but you’ll still have to deal with the cord, and you’ll have to stash the battery somewhere secure, like a pack or pocket.
The Gloworm lights have the only external batteries we tested that are USB-rechargeable. While they use USB-C connections, they come with an adapter that allows you to use the most common USB-A chargers. This means you can easily connect it to a variety of charging sources, like a cigarette lighter adapter in a car, a solar charger in the backcountry on a multiday trip, or your buddy’s AC adapter (if you forgot to bring Gloworm’s charger).
It is among the priciest lights we tested, so aren’t for everyone. But we think the features are worth it, especially for 24-hour races or serious night riding.
Weight: 13.2 oz
Lumens: 1600
Number of Main Lights: 1
Number of Modes: 5
Battery Life (claimed by manufacturer): 5 Hours
Recharge Time: 5-8 Hours
Battery Size: 6400 mAh
Charging Type: AC
Hands down, at 1600 lumens for just over $50, the Bright Eyes 1600 Lumen Helios is by far the least expensive well-performing light in our test. It was our former winner for best budget mountain bike light, but as technology has improved, we think there are better bang-for-the-buck options out there.
The Bright Eyes Helios 1600 has great versatility for the value, too. You can mount it on a helmet or handlebar, use it as a headlamp, and convert it from a spotlight to a floodlight, giving you a heckuva lot of bang for your buck. Plus, if you buy this as your first light to try nighttime mountain biking, you could later use it as a helmet-mount light if you decide to buy a different bar light.
Bright Eyes 1600 Lumen Helios


The mounting for the Helio 1600 is simple: it relies on 2 rugged, rubber O-rings that clip to hooks on the base of both sides of the light and go around either the handlebar or the mount on the headlamp harness. Our package came with 4 O-rings, and we’d recommend bringing at least one extra in case one slips off or gets lost either when riding or after taking the light off its mount.
The Helios 1600 has an external battery setup, with 27” inches of cord between the light and the battery. The plug that connects the two is a few inches from the light itself. This plug seems pretty secure, but we didn’t notice a washer or gasket in it like on many waterproof plugs. Why are we worried? Bright Eyes claims the Helio 1600 is waterproof for up to half an hour, but we don’t see an IP rating on it—and they didn’t respond to a request for details.
Despite the robustness of the bike headlight unit itself, we noticed that the underlying power wires were easy to see when we pivoted the headlight unit just slightly askew from its base, suggesting it may not be entirely waterproof. Still, we think it should withstand almost all thrashings on a mountain bike ride.
The Helios 1600 didn’t win the overall pick for a number of reasons. First, you have to use a wall plug AC-charger for the external battery pack. If you’re on multi-day trips in the backcountry, this means you may have to carry extra batteries to keep your nights well-lit.
While you can change it from a floodlight to a spotlight by changing out the lens, the process involves removing 4 very small, deep-seated Allen-head bolts—something we can’t recommend doing on the trail. It’s far too easy to lose one or more of the bolts while changing them out at home, even more easy to lose them on the trail.
The Helios 1600 was the only light we tested that delivered fewer hours of high-beam light than promised—4:25 instead of 5 hours. That said, it was also the only one that promised such a long run time on high. All other lights tested promised far less time running on full blast.
For all these quirks, we still think the Bright Eyes Helios 1600 is a decent budget pick. After all, you get a versatile, bright light with interchangeable lenses (as long as you prepare ahead of time), that’s got a long battery life and the ability to extend its run time by adding another battery.

Weight: 6.5 oz
Lumens: 1300
Number of main lights: 1
Number of Modes: 5
Battery life on high (claimed by manufacturer): 1.5 hours
Recharge time: 7 hours
Battery size: 4800 mAh
Charging type: USB
The Trek Ion Pro RT was almost our pick for the best bargain light. But when we found the Bright Eyes light for about $50, it couldn’t compare.
The Trek Ion Pro RT is a great light, but a little finicky. It’s not the most intuitive light to use. One of our testers noted he wouldn’t wish it on his worst enemies because he had trouble turning it on. You have to double-tap the switch so it doesn’t turn on accidentally. Of course, as we told him, reading the instructions helps.
Trek Ion Pro RT
Weight: 4.6 oz
Lumens: 900
Number of main lights: 1
Number of Modes: 5
Battery life on high (claimed by manufacturer): 2 hours
Recharge time: 4.5/2.5 hours
Battery size: 2900 mAh
Charging type: USB
The NiteRider Lumina is a battery-integrated light like the Trek Ion Pro that’s also in our Honorable Mentions section.
The Niterider Lumina can be worn as a helmet light, but the extra battery weight on the front of your helmet will put more strain on your neck. It received some acclaim, but we ultimately decided that the Light & Motion Vis 360 Pro is a better fit for helmet light. The NiteRider Ion Pro also has 1300 lumens vs. the NiteRider’s 900.
NITERIDER LUMINA
How to Get Into Night Mountain Biking

The brightness of the light is an obvious factor when choosing mountain bike helmets, but other features like battery life and easy and secure mounting are essential as well. Photo by Chris Meehan.
Riding a road bike at night might seem challenging enough. Riding a mountain bike at night adds even more complexity, as you’re navigating a twisting trail, rocks, trees, drops, jumps, and more. Here’s some advice for your first outings at night and a couple of tips for maximizing the experience, and for the record, we don’t recommend getting into night riding or more dangerous trails at night if you’re just getting into mountain biking.
Learn more in our How to Get Started Mountain Biking guide.
Go with someone who has experience riding at night
First off, for your first time out, we recommend going with someone who’s ridden at night and/or a group that’s ridden at night before. Also, ideally, choose a trail that you’ve ridden before in the daylight that’s not too difficult. It takes a while to adjust to riding at night with lights, so you’ll want to err on the easier side while you get the hang of it.
Make sure you can see the buttons on your light
If this is your first mountain bike light, you’ll want to make sure the buttons are easy to see and push. This makes it easier to change the light mode while riding and to turn the light on and off.
When mounted on a handlebar the buttons on the lights we tested were easy to see and use. Obviously, it’s a little harder to see a button when a light is mounted on your head, but those buttons were easy to access as well. With its remote control capabilities, the Gloworm X2 is exceptionally easy to control, since you can change its brightness from your handlebar.
Familiarize yourself with the batteries
Lights with external batteries are a little harder to set up than battery-integrated lights since you need to secure the battery and the cord as much as you can. All the external battery packs we used had hook-and-loop straps on them to secure the battery to the bike frame when used as a handlebar light.
Additional straps allow you to secure the cord to the frame as well. However, make sure there’s enough slack in the cord to allow you to rotate your handlebars fully, otherwise, you can yank the cord out on sharp turns or change what the lights are illuminating. If using a corded light as a helmet light, stash the battery and any extra cordage in a pocket or a backpack where it won’t get in the way or jiggle while riding.
Be smart about when to use the light on high
Don’t keep your lights on full blast the whole time you’re riding, especially when you’re on the flats or climbing. You really only need that brightness when you’re moving downhill quickly, and you'll burn through the battery much faster if you leave it on the highest setting the whole time.
Many mountain bike lights remember the last setting you used and will revert to that the next time you turn the light on. So when you first turn on the light for a ride, it’s a great idea to cycle through all the illumination settings to make sure you’re not in the brightest lighting mode to start. We recommend that you start at the lowest setting on easy terrain, giving your eyes time to adapt. Then, as you get into rougher terrain, you can shift into the brighter light settings as you need to.
Space yourself when riding with others
When riding with buddies, allow a good amount of space between you. Being too close to someone in front of you can make things more confusing for both of you, especially if you’re only using helmet lights and the beams interrupt each other. Spacing yourselves out a little bit ensures you won’t have that problem.
Do I need a Rear Light?
You don’t need a rear light. Yes, really. A rear light is essential in cities, where your bike light can get drowned out by other light sources—the rear bike light ensures cars can see you. But on a mountain bike trail, it can be distracting to other riders who can already see your helmet or handlebar lights projecting in front of you.
However, if you plan on riding on the road or a pedestrian pathway to get to your mountain bike trails, a tail light or reflector is important to have. Turn it off only after you get on the trail. If your tail light is reflective, consider stashing it while riding.
What to do with a bike light battery in the cold
If riding in cold weather, keep the battery warm. Lithium-ion batteries lose significant amounts of power when they get too cold. Integrated lights like the Seca 2000 have an advantage here: high-powered LEDs can produce significant amounts of heat that will help keep the light warm. If your light has an external battery, consider wrapping it in some insulation or keeping it under your jacket in the cold.
What to do with a bike light battery when it is hot
On the other end of the spectrum, when riding in warm weather, don’t let things get too hot. The LEDs put out a lot of heat energy, but too much heat could damage the electronics or circuitry. Most lights (and all of the ones we recommended) will power down a bit when they get too hot. Some will go to a lower light setting, while others may dim to a lower light setting imperceptibly. When you’re taking a break on the trail in hot weather, turn the light down to help reduce the chance of overheating.
Bring an extra bike light
If you’ve got an extra bike light, bring it! Just like a spare tube, having a spare light can help you or someone in your group have a much better night ride if someone’s normal bike light fails.
How We Tested
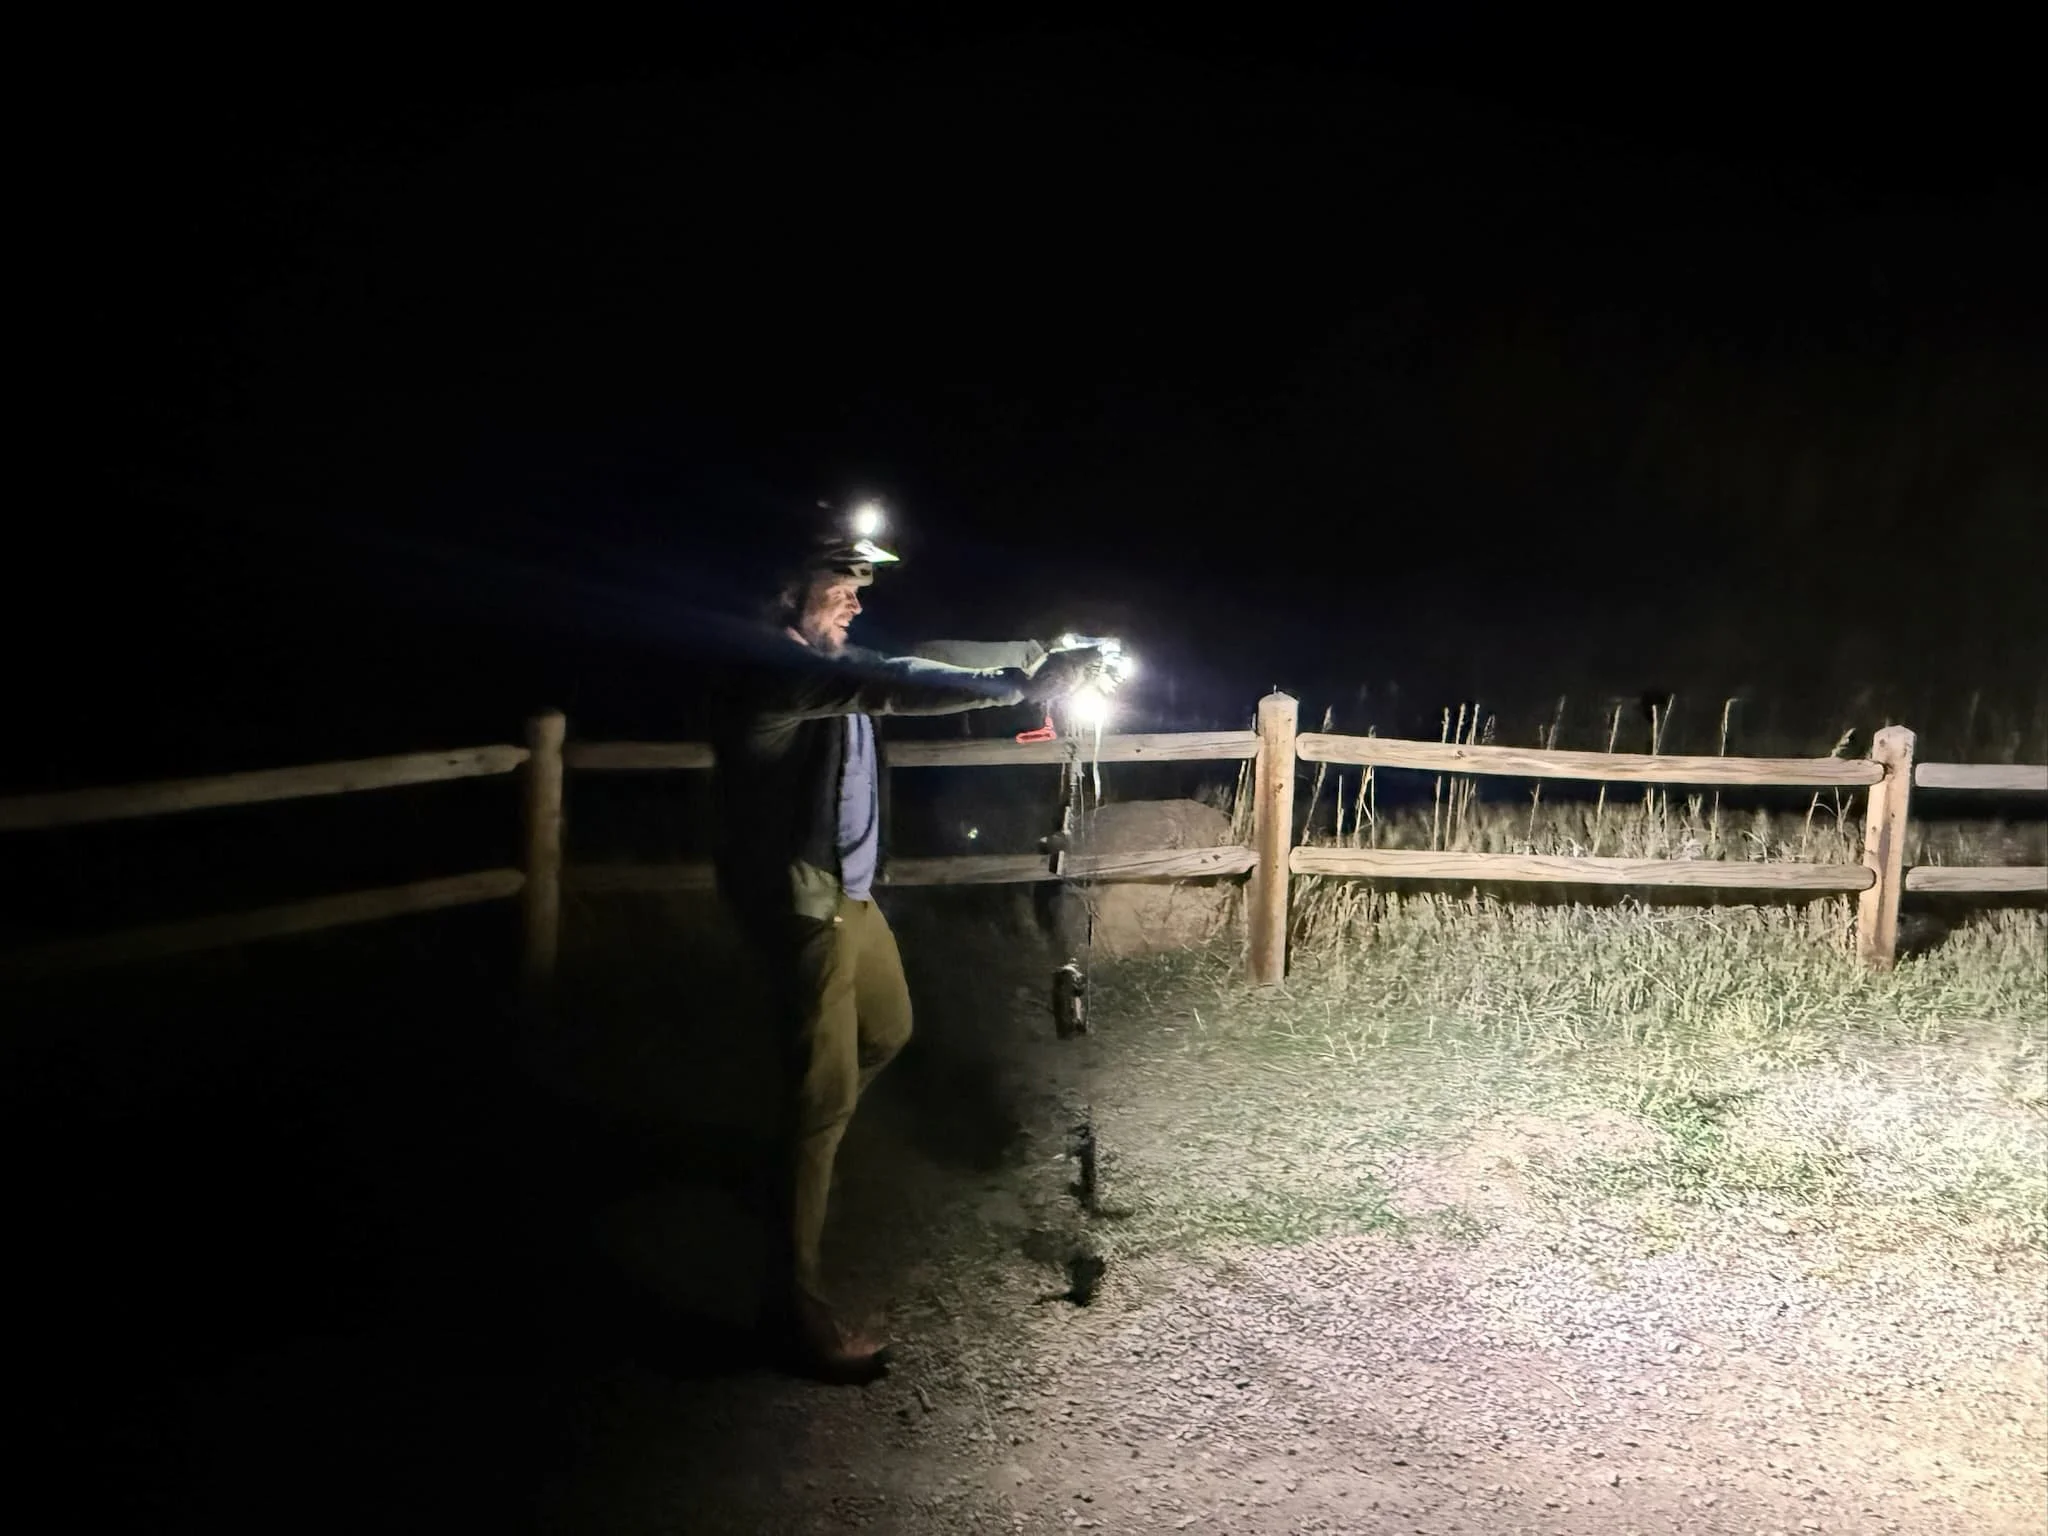
Summoning trail angels at night with mountain bike lights. Courtesy Chris Meehan/Sam Schild
To find the best mountain biking lights, most individual use and testing were done on Colorado’s Front Range. We rode intermediate to difficult trails where access is allowed after dark in the evenings and early in the morning before the sun was out. We tested the lights on North Table Mountain, Green Mountain, Floyd Hill, and other areas along the Front Range.
We also group-tested lights with eight people and various lighting configurations on BLM land at 18 Road in the North Fruita Desert region—often zipping by the semi-surprised eyes of trailside cows. Tests included multiple rides with different lights so riders could better understand what worked (and what didn’t) for them.

We compared the same lights on the same trail to see how they performed side-by-side. Shown here are the Bright Eyes Floodlight (left), Light & Motion Seca Comp 2000 (center), Lenzye 1800 Mega (right). Photos by Chris Meehan.
Tests lasted for longer than an hour and users tried multiple brightnesses on the trail. Even on lower settings when climbing, the lights performed admirably and none ran out of juice or had any overheating issues requiring them to operate at lower power levels. Everyone was happy with the lights they tested, though some emerged as favorites, of course.
In addition, we tested the lights in a controlled environment, aka indoors, to determine whether the lights lasted on high as long as their manufacturers claimed they should. During these tests, we used a fan to keep the lights cooler so that they could better operate at full capacity and to simulate the effects of ambient air cooling them as it would on the trail.
Our Testing Process
Night riding and controlled testing on Colorado Front Range trails
Testing Locations
- Colorado Front Range Trails including, North Table Mountain and Green Mountain Colorado
- Buffalo Creek Recreation Area
- Floyd Hill trails
- Golden gravel roads
- 18 Road North Fruita Desert (BLM)
- Three Springs Trails, Durango
- Intermediate to Difficult Trails
What We Test
- Brightness & lumen output
- Battery life on different settings
- Mounting security & ease of use
- Beam pattern (flood vs spotlight)
- Durability & water resistance
- Charging method & time
What to look for in MTB lights
Lighting up North Table Mountain with something like 20,000 lumens. Courtesy Chris Meehan/Sam Schild
Many features make a mountain bike light great, but the most important features are:
the brightness of the light (measured in lumens),
how long it lasts on the trail (based on the milliamp-hours (mAh) of the battery and the lumens of the light),
the beam pattern (floodlight, spotlight, or hybrid),
the mount type (helmet light or bar light),
and, of course, the price.
Other features to think about are the battery type (integrated or external), how it charges, the durability and waterproofness, whether or not you can operate it remotely, and if you can, the connectivity options.
Lumens

A comparison of brightness on the Glowworm XS and Seca Comp 2000. Photo by Chris Meehan.
Lumens are a measure of how bright a light is. If you’re used to watts as a measure of a light bulb’s brightness, you’re not misremembering. Historically, watts were a determination of the light produced by a bulb based on the amount of energy it used. With the advent of low-cost, high-efficiency LEDs that produce the same amount of light with less energy, we’re now measuring a light’s brightness in lumens.
More lumens equals a brighter light—a light with plenty of lumens should illuminate more of your surroundings and let you see farther. The safest (and funnest) option for a bike light is to use both a spotlight-beam helmet light and flood light-beam bar light. That said, if you’re opting for one light, go for a bar-mounted light with a powerful floodlight (with no distracting hotspots—small areas that receive greater illumination than others).
What is the recommended number of lumens for a bike light?
For mountain biking we recommend that bar-mount lights have at least 1000 lumens, which is brighter than the headlights of most cars. For gravel and road riding you can get away with less since you’re not as likely to be in tight spaces facing drops, switchbacks and jumps—or sometimes the giant eyes of roaming cows on the side of the trail!
The brightest light we tested, the MagicShine Monteer 8000s produces 8000 lumens of light on high—enough to scare off any vampires or ghosts. That gives you hundreds of feet of strong illumination. (As a note, we found out most of our recommended lights do not meet requirements for lighting in Germany, of all places, so be aware of local rules and regulations where you ride.)
All the lights we tested had at least 3 different power settings, and most had a flash mode. Using full power is best reserved for the most technical parts of the trail or screaming downhill on inky nights. Riders generally use lower settings while climbing or riding in flat, open parts of the trail, as the maximum power setting burns through the battery fastest. The flashing mode is most useful for daylight and night riding on roads and pedestrian paths but isn’t recommended for trail riding.
Battery Life
How long a light will last in the wild is partly up to the user. As previously mentioned, most riders use lower power settings while climbing or riding flat sections to save battery life.
We recommend a light that’s rated for at least 90 minutes on high power, which is the minimum rating of all the lights we tested and each lasted at least that long. That said, by using lower power settings you can easily enjoy night riding for 2 or more hours on a single charge, and lights with external battery options can allow you to extend your ride even further under the stars.
Beam Pattern

The floodlight beam pattern of the Bright Eyes (left), Light & Motion Seca Comp (center), and Lezyne 1800 Mega (right). Photo by Chris Meehan.
There are two primary beam patterns in mountain bike lights: floodlights and spotlights.
Floodlight pattern
Floodlights help you better anticipate turns and ups and downs on the trail. A bar-mounted floodlight gives you a broader look at all the terrain in front of you—and perhaps the nearby cows or wild animals. The cows were so close on one dark trail we felt their warm breath in the cool night air.
Spotlight beam
Spotlight beams are ideal as helmet-mounted lights that track your head movement. These focused beams add more illumination and eliminate more shadows. They’re also great for looking ahead to see things like narrow gaps between trees or rocks. However, if you’re only using a helmet light, especially with a single LED spotlight, it can prove distracting on the trail—particularly if it’s not securely mounted or you move your head a lot since the beam will jostle with each movement. Hence we recommend a bar and helmet light combo, and a bar light if you’ll only have one.
Many mountain bike lights have multiple LEDs and some have multiple lens covers. This allows a cyclist to switch between a focussed beam, a spotlight, or a mix of the two.
In the end, users want to find an LED bike light system that offers a good view of everything ahead without any bright or dark spots.
Mounting
The Exposure Six Pack provides great peripheral light as well as central focus for riding every type of trail at night. Courtesy Chris Meehan.
Mountain bike lights are mounted in two spots: on the helmet and on the handlebars.
Handlebar-mounted lights
A handlebar-mounted light is the most important to have, as it offers a more stable lighting solution. Handlebar lights mount with a collar or strap that secures them to the handlebar. It’s best to mount them as close to the stem as possible so the beam is centered on the path ahead.
Helmet-mounted lights
Helmet mounts are a little trickier since you have to thread them through your helmet vents. They’re also a bit more wobbly than handlebar-mounted lights, as your head bounces along the ride. Some battery-integrated lights are helmet mountable, but they add weight to the front of your bike helmet. Keeping the extra weight steady can cause neck pain over long distances.
Some lights have accessories that allow you to mount them on either the handlebar or the bike helmet. You can even buy accessories that allow you to mount them alongside a GoPro or your cycle computer so you don’t need to take up more bar space close to the bar stem.
While our favorite light is a handlebar-mounted one, you may want to consider a bike light with multiple mounting options for your first mountain bike light. That way as you get more into mountain biking you have an additional backup light, which you can use if a battery goes out or a buddy needs one.
Price Range
Price is always a factor—and most mountain bike lights aren’t cheap.
The least expensive light we tested, the Bright Eyes 1600 Lumen Helios Rechargeable Bicycle Light Set, has an MSRP of $100—but we’ve found it for $49.47 on the company’s site.
The price of other lights increases with their features. Features can include multiple LEDs, external batteries, displays that show how long the battery will last, an extra mounting bracket, Bluetooth connectivity and/or apps, and even a remote control. The most expensive light we tested was the Gloworm XS Lightset (G2.0).
Battery Type
Every light we tested used a rechargeable battery. Some use external battery packs, others were integrated with a battery and light in the same unit.
External battery
An external battery is bigger and can offer longer run times. Plus, if the one you’re using runs out, you can swap it for a charged battery to extend the ride. Though lights with external batteries are heavier overall, the LED light unit itself is lighter, which is particularly nice for a helmet-mounted light, since you don’t have the weight of the battery on the front of your helmet. Even a few ounces on the front of your helmet can add neck strain and pull the helmet forward over your eyes a bit.
On the downside, the light and battery must be mounted away from each other. They’re connected by cords that must be secured so they won’t get caught on anything while you’re riding. You’ve also got to keep the cords from getting tangled in your helmet or handlebars. Helmet lights with external batteries are often kept in a jacket pocket or the top of a pack, to keep them from getting in the way while riding.
Integrated batteries
Lights with integrated batteries are nice because you don’t have to deal with any cords, they attach to the handlebar securely, and it’s easier to attach just one light to your bike (rather than the light and a battery). The integrated lights are more compact units overall, but most had a shorter burn time than lights with external batteries.
Charging
How the lights charge matters, too.
All the battery-integrated lights have an advantage because they’re USB rechargeable. The external battery Gloworm is a USB rechargeable bike light that uses a USB-C cord (rounded) to charge and connect. However, it comes with an adapter for USB-A (rectangular, more common) connections, so it will work with either USB port.
The rest of the external battery packs use AC adapters for charging. External batteries often charge faster than internal battery models because they can charge using higher currents. However, if you forget the charger for one of the external battery packs and can’t find a replacement when you’re at the trail, you’re out of luck.
If you’re out for a few days and nights of riding and have a USB rechargeable battery, you can charge during the day with a solar charger or backup battery. Two of the battery-integrated lights, the Bontrager Ion Pro RT and the Lezyne Mega Drive 1800i, also allow for pass-through charging, meaning you can plug in a battery while using it. The Bontrager uses micro USB charging, and the Lezyne via its own battery pack and a separate connection.
Durability/Waterproofness
Over their lifetimes, these units are likely going to suffer. You don’t want to smash them into every rock or splash them down in every puddle, but the lights need to survive any rowdier-than-expected nights.
The water resistance of the lights we tested ranged from IPX4 (rated to handle splashing water) to IP67, which means they can withstand being submerged in about three feet of water for up to 30 minutes and are totally protected against dirt, dust, and sand. We break down how the IPX ratings work in our wireless earbuds guide.
Some lights and enclosures are also drop-tested up to a meter to ensure the light will operate even after a significant impact or drop. Lights with better durability and waterproofing ratings tend to last a long time, reducing the need to replace them often along with your environmental impact.
Remote Operation
As long as you’re not in an overnight race or trying to get away from a charging bear or elk, you don’t really need a remote control. It’s easy enough to tap the button on all the lights we tested to cycle through the lighting modes. But having a remote for your handlebar positioned right by your brake lever means you can cycle through the light modes more easily. This is great when dealing with rides that require a lot of ups and downs where you don’t want to stop often.
Connectivity
Another nice but unnecessary feature is connectivity. Some lights are controllable with a smart device via Bluetooth and an app. Others are ANT+ capable, allowing them to work with devices like cycle computers. When connected to these devices, users can access different light modes and information about the lights they might not otherwise see, like anticipated burn time.
Care and Maintenance
Testing out the brightness of mountain bike lights. Courtesy Chris Meehan/Sam Schild
Mountain bike lights are rugged by design. Most quality lights are sealed and able to withstand drops from up to a meter. They can also handle being splashed with (and even submerged in) water. The majority of the maintenance you’ll have to do to your mountain bike lights will be cleaning and charging them.
In fact, the most important maintenance is to keep your light’s battery charged properly. Modern rechargeable bike lights with lithium-ion batteries are capable of being fully charged hundreds of times. But to extend the lives of the batteries—and keep them operating for as long as possible on a single charge—it’s important to keep them fully charged. This is especially true before storing them for a long time. Likewise, once you’re done storing them, it’s important to charge them up before using them the first time, since batteries will drain over time.
Proper charging is most important for self-enclosed lights since users can’t replace the batteries easily themselves. For lights with external battery packs, users can buy a new battery to replace one that’s no longer working as well as it should—but we should all still be taking good care of our batteries, especially given their environmental cost.
Do I need an MTB Light?
If you’re going to ride at night deliberately, then the answer is yes, absolutely.
If you go on longer, more remote rides where you might be out longer than you anticipated (and you might need to switch from MTB glasses to an MTB light), then the answer is also yes, absolutely.
About the Author
Growing up mountain biking, hiking, and adventuring in the Appalachian Mountains around Virginia and Maryland in the 90s, I’ve seen a lot of things change on mountain bikes (lights are just one of them). These days, I spend most of my time mountain biking and crisscrossing Colorado and the Rocky Mountain region, climbing thousands of feet for thrilling descents on Pikes Peak granite, ripping through thick pine forests and tight hairpin switchbacks on loose dirt.
Overall, I have 20-plus years of exploring, mountain biking, hiking, backpacking, climbing, guiding, and playing in the wild.
As an outdoors writer covering adventure and gear, I write regularly about bike and mountain bike equipment and have a long history with the sport. I’ve authored numerous gear guides for Treeline Review, write for Popular Mechanics, Bicycling Magazine, Popular Science, Backpacker, and other outdoor publications/organizations.
My experience with mountain biking stretches back to the Appalachians in the late 1980s when Specialized, Trek, Gary Fisher and Cannondale were among the first companies to mass-produce mountain bikes. My first ‘mountain bike’ was a 10-speed Huffy Scout, which I got around ’87, my first real mountain bike was a beautiful, chartreuse Gary Fisher SuperCaliber from 1991.
These days, I spend most of my time mountain biking, backpacking, hiking, climbing, and crisscrossing Colorado and the Rocky Mountain region. I enjoy using all my knowledge of gear and skills to learn about new equipment and how it will benefit me-yes, I’m selfish-as well as Treeline’s readers.
I have authored multiple outdoor guidebooks, including Colorado’s Best Front Range Adventures: The Greatest Hiking, Climbing, Paddling and More From Denver to Colorado Springs and Fort Collins. In it, I cover the best hiking, mountain biking, climbing, and rafting in the region.
I’m also the author of Falcon Guide’s Climbing Colorado's Fourteeners: From the Easiest Hikes to the Most Challenging Climbs and edited Justin Lichter’s excellent guide to thru-hiking titled Trail Tested: A Thru-Hiker's Guide To Ultralight Hiking And Backpacking. All of this experience has helped me become a first-rate gearhead and product tester.
At Treeline Review, we strive to offer unbiased reviews to help you find the best product for the price. Treeline Review doesn’t accept sponsored content, native advertising, or paid reviews. I am not sponsored by any companies, nor are any of my family members sponsored by, employees of, or ambassadors of any of the companies in this review.
See all of Chris Meehan's stories on his author page.


