How to Plan and Prep for Full-Time RVing
Life on the Road: Advice for Full-Time Camper Living

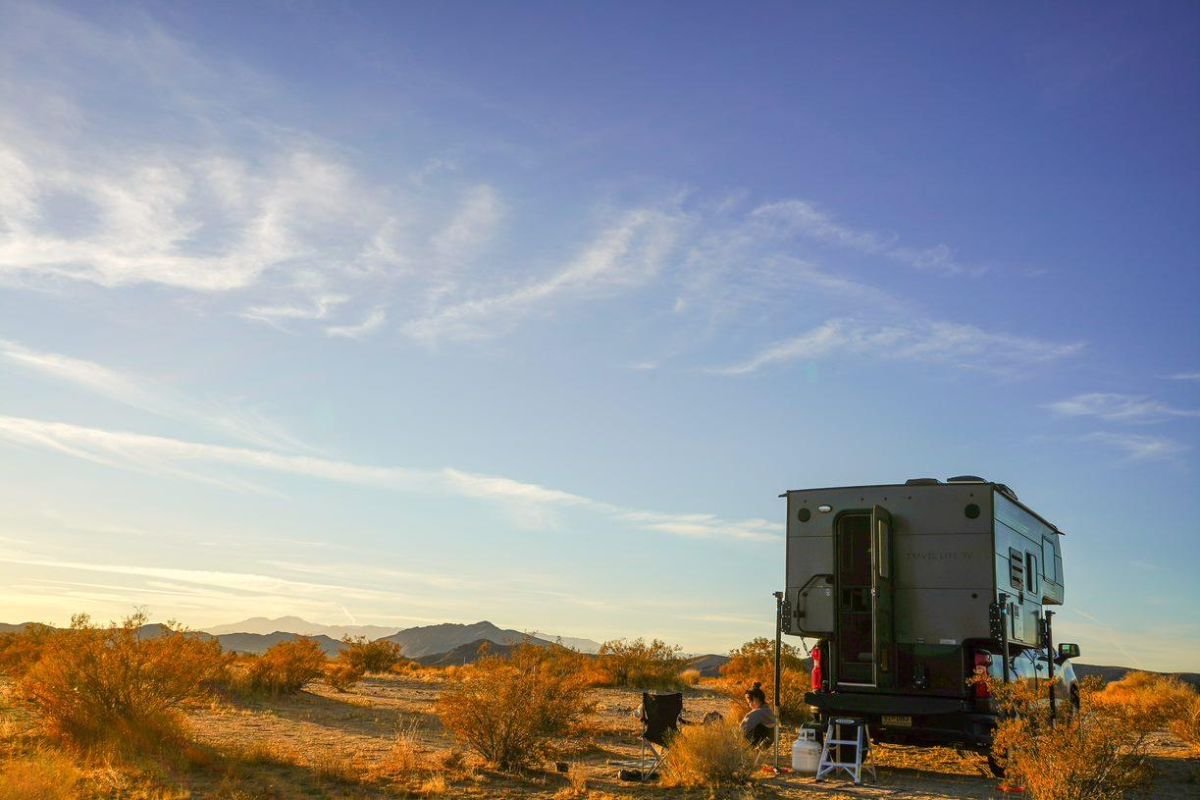
With planning and prep, a multi-month national park road trip in a truck camper is within your reach.
I have been captivated by life on the open road for as long as I can remember. I grew up revering stories of my father's cross-county road trips and daydreaming about iconic U.S. route 66, known as America's Main Street.
Growing up, two of my favorite books were Jack Kerouac's road trip classic "On the Road" and John Steinbeck's emblematic travelog "Travels with Charley: In Search of America." From a young age, I loved the idea of the Great American Road Trip.
In the Fall of 2020, my life-long dream of taking an extended road trip finally came true. After months of planning and research, I departed on a seven-month journey with my wife, Rebecca, and our dog, Avery. Our goal was to explore the sights and sounds of America's Public Lands, including national parks, lakeshores, forests, and more!

The author Tony Richardson (driving), his wife Rebecca and their dog Avery while full-time Truck Camper RVing.
From October 2020 through April 2021, we lived the full-time RVer life in a truck camper that we purchased specifically for this trip.
Our set-up was a Travel Lite 770R Super Lite RV on a Chevrolet Silverado 1500 pick-up truck.
We thought living as full-time RVers was an exciting and safe way to visit public lands across the country, especially in 2020, when the COVID pandemic significantly impacted most forms of travel.
Traveling in a truck camper is a fantastic experience; every day is full of new adventures!
But, it can be stressful due to the uncertainty that comes with full-time RVing.
I will share the lessons I learned from my time on the road through this guide.
Whether you're gearing up to embark on an extended journey or planning a shorter weekend RV trip, this guide will provide you with the ins and outs of road-tripping in a Truck Camper.
We create reader-supported, objective, independently-selected gear reviews. This story may contain affiliate links, which help fund our website. When you click on the links to purchase gear, we may get a commission, without costing you an extra cent. Thank you for supporting our work and mission of outdoor coverage for every body! Learn more.
Packing List for Full-Time RV or truck camper Living
Car and RV Insurance
Roadside assistance package
Road snacks/meals
Water
Ice or Ice Packs
Trash bags
Music or Podcast (download ahead of time for offline use. Better for data usage and in case you go through pockets with no service)
Phone chargers and chargers for other electronic items (e.g., headlamps)
Health insurance card
Emergency contact info
Cash
Blanket or sleeping bag
Emergency water and snacks
Optional RV Accessories:
Rechargeable Battery Powered Generator: Jackery Portable Power Station
Waterless, Portable, Travel Toilet: Laveo Battery Operated Water-Less Toilet
Portable Propane Heater: Mr. Buddy Heater
Anti-Condensation Ventilation Mattress: Tochta HyPUR-Flo Moisture Protection

The author remote working while full-time RVing in his truck camper.
What is full-time RVing?
Full-time RVing or “full-timing” is when you live in your recreation vehicle or motor home full-time for at least six months out of the year.
According to the RV Industry Association, more than one million Americans live in their RVs full-time.
Full-time RVing is often associated with retirees who have traded in their brick and mortar houses for the opportunity to travel, but that perception is starting to change.
With the rise of remote work jobs, it is becoming increasingly common for young families, such as us, to live and work entirely from their recreational vehicles.
Read More: How to Get Started Camping
How to Work From Home Like an Outdoor Writer
Related: How to Solo Road Trip

The author’s truck camper RV set up in Joshua Tree National Park. Truck campers can be loaded and unloaded to the bed of a pick up truck and are also known as truck bed campers, slide-in campers, pop-up campers, and cab-over campers. The main advantage is that you can load them on a truck—meaning you can take them on rougher roads than most RVs. It’s also possible to remove the camper if you want to drive away from it for a day hike or side-trip.
What is a Truck Camper?
Truck campers are recreational vehicles (RVs) that can be loaded and unloaded to the bed of a pickup truck. Truck campers are also known as truck bed campers, slide-in campers, pop-up campers, and cab-over campers.
Truck campers are considered one of the most versatile forms of recreational vehicles. They are capable of going virtually anywhere a pickup truck can go, making them a good option for full-time RV living for people who want to go off the beaten path.
Truck campers are loaded on and off the pickup truck using four corner jacks or four electric lifts that raise and lower the camper. Once raised, the pickup truck can drive under the camper. The camper is then dropped into the bed and secured to the vehicle using turnbuckles or spring-load tie-downs.
Despite their small size, truck campers contain most of the amenities found for comfortable RV living in larger vehicles (Class A or Class C), including full-size beds, bathrooms, showers, refrigerators, cooking stoves, and water heaters. With a truck camper, you can camp anywhere with almost all of the comforts of home.
There are two main types of truck campers:
1. HARD-SIDE TRUCK CAMPER (WOOD OR ALUMINUM FRAMED)
These campers have hard sides with rigid walls similar to a motorhome or towable RV. This type of camper is constructed using wood or aluminum framing and finished in a thin fiberglass layer on a wood backing. These types of campers can usually be slept in while off-truck.
2. POP-UP TRUCK CAMPER
These campers have soft sides with flexible walls that can be popped up while stationary and collapsed for travel. The low profile of these types of truck camper decreases weight and wind resistance. These types of campers typically cannot be slept in while off-truck. As a soft-sided camper, they also are less durable. Some national parks request food not be left inside pop-up campers as they are susceptible to wildlife.

One advantage of RVing in a truck camper is that you can load them on a truck—meaning you can take them on rougher roads than most RVs. It’s also possible to remove the camper if you want to drive away from it for a day hike or side-trip, as seen in this photo.
Why Road Trip in a Truck Camper?
We choose a truck camper over a more traditional recreational vehicle due to its versatility. For us, the most crucial element was having the ability to go anywhere. During our trip, we traversed many winding dirt roads that would have been impossible to access with a larger RV, motorhome, or trailer.
We also considered a travel van (Class B), but they were out of our budget. Most newer model travel vans with the amenities we sought, such as a full-size bed and an indoor shower, start at around $70,000. Our truck camper was a fraction of that price and provided us with a more affordable way to try out full-time RVing. For us, it was the right RV for our budget and the type of road trip we wanted to take.
Our truck camper is a 2019 Travel Lite 770R Super Lite, a hard-side, wood-framed truck camper. One of the most significant factors in choosing our truck camper was the weight. Our 770 weighed 1,385 pounds, which is unusually light for a hard-side truck camper. The lightweight meant our camper could be carried by almost any newer model half-ton pickup truck, including our Chevy Silverado 1500. This was critical because we could not afford the bigger three-quarter-ton truck with a high carrying capacity (such as a Silverado 2500 or Ford F-250). We could have opted for a pop-up camper since they tend to weigh less, but we ultimately chose a hard-sided camper so that we could sleep in it while dismounted.
Specs for our 2019 Travel Lite 770R Super Lite
INTERIOR
5” Memory Foam Mattress (queen)
Three-way Refrigerator
Two-Burner Stove Top
On-Demand Water Pump
Wet Bath (bathroom/shower combo)
Six gallon Gas Water Heater
20” Mounted TV (with built-in DVD)
LP/CO2 Detector
Smoke Detector
40 AMP Converter
EXTERIOR
Natural Wood Construction
.024 mil Aluminum Siding
13” Skylight
Structural Insulated Wood Floor
5/8” Plywood Floor Decking
Insulated Sidewalls, Roof, and Floor
Detachable 30 amp Power Cord
45 amp Converter/Charger
Battery Disconnect Switch
Vented Battery Box
Exterior 110-volt Receptacle
20-pound LP Gas Tank
12,000 BTU Furnace
12-volt Antenna Booster Outlet
Exterior Cable Hook Up

The author designed a road trip route based on national and state destinations. From there, he was able to design a full-time RV adventure. Here, their truck camper is shown in the Redwoods of Northern California.
steps to Planning and Prepping for Full-Time RVing
Research and planning are two of the biggest parts of full-time RVing and going on an RV adventure. Here are the steps that we took before embarking on our extended road trip:
1. Pick a Destination(s)
The first thing you need to do is decide where you’re going. If you’re planning to go to national parks like we did, it is good to research the park well ahead of time. Some national and state parks can partially or fully close during different seasons. You should also research the best time to visit the park. Personally, we prefer to avoid popular parks during peak tourist seasons, so we seek out the weeks before or after peak season.
2. Make Campsite Reservations
Once you’ve decided on a destination, you should try to make campsite reservations as far in advance as your timeline will allow. Designated campgrounds and particularly RV campsites at popular public lands can fill up months in advance.
During our trip, I saw many RVs turned away because the RV Park or campground was full when they arrived. The last thing you want to do is be in a situation where you are looking for a last-minute campsite after a long day of driving.
It takes a lot of time to research new locations and contact the parks, so plan accordingly. Many National Parks allow you to make reservations up to 1-year in advance on recreation.gov. And many state parks now offer online registration systems (although systems vary from state to state).
CAMPSITES WITH RV HOOKUPS, WATER, AND ELECTRICITY
One of the biggest appeals of staying at an established campground or RV park is having access to electrical, water, and sewer hookups. All RVs will routinely need these services. How long you can go after filling up your water or charging your batteries depends heavily on your RV and your use.
When you connect your RV to hookups, there is no need to worry about running out of water or electricity. You can use these amenities the same way you would in a brick-and-mortar house.
Before you reserve a campsite, you should check to see if hookups are available and if there’s an additional charge to use them. Many RV parks offer full hookups, but some may have limited offerings, especially more rustic RV parks.
3. Choose a Driving Route
The next thing you will want to decide on is a driving route. How you get from Point A to B is particularly important in an RV as your height or weight could prohibit you from using specific routes. We learned that apps like google maps are not always your friends when driving an RV.
Instead, we used an app called RV LIFE. The paid version of the app allows you to input information like your vehicle height and weight, and it automatically creates a custom route. You can easily access your planned trips to quickly get RV Safe GPS directions to your next stop. Using the app, you can also save maps, trips, and data for offline use when you have no internet connection. When you’re traveling, you may not be familiar with what’s coming ahead, so tools like the RV LIFE App are essential.

Many but not all national parks have campgrounds that provide water filling stations. For example, Joshua Tree National Park (seen here) only has water filling and dump stations at 2 of its 5 campgrounds. Plan ahead and do your research before you go.
Finding RV Services Along Your Driving Route
There are also RV services that you may need to seek out along your route, including:
Water Filling Stations
Water is a precious commodity. While the size and capacity of RVs may differ, all RVs are limited to the amount of water that they can carry in their freshwater tanks. There may be campgrounds, gas stations, or grocery stores along your route that you can use to fill the water tank in your RV. This is even more crucial if you are traveling to a destination without hookups.
Propane Filling Stations
Unless you are in a propane-free RV, you will need to use propane for heating and cooking within your unit. Most RV furnaces also run off of propane. So, if a cold front is coming, you'll want to be sure you have a backup tank of propane. And, depending on the type of refrigerator in your RV, propane may also power your fridge. We had a three-way fridge that would run off propane when we were not hooked up to electricity. One of the most common places to refill your propane tanks is travel stops. Travel and truck stops, like Flying J and Love's, are great options. In suburban areas, you can look for hardware stores that fill propane. ACE Hardware and Tractor Supply are two widespread options that are usually easy to find.
Gray/Black Water Dump Stations
Most modern RVs and motorhomes have restroom facilities and kitchen spaces. While those features are convenient, they also create the need to empty your RV's tanks from time to time. If your RV has these features, you will have two types of holding tanks: greywater and blackwater. The greywater tank holds "soapy water" from your RV kitchen sink and shower. The black tank holds "wastewater" from your RV toilet.
How often you need to empty your tanks depends on several factors, including the size of your tanks and the number of people traveling. One of the most common places to dump gray and black water tanks are Campgrounds and RV Parks.
The cost to use these facilities is usually factored into the price you pay to stay at the property. Dump stations can also be found at some gas stations and rest stops. You can use the RV LIFE app to research stations and stops along your route. The website Sanidumps is an excellent free alternative for researching dump stations.
Boondocking is free dispersed camping in an RV on public land. This kind of road tripping requires some skill sets but can also bring you to beautiful places.
Dispersed Camping for rvs (Boondocking)
Another option for overnighting is camping for free at a "dispersed campsite." The USDA Forest Service defines dispersed camping (or boondocking) as camping anywhere in a National Forest outside a designated campground. Since they are outside of established areas, these sites lack most of the amenities and services you would typically find at a designated campground, such as restrooms, potable water, or garbage cans. Dispersed campsites are dry camping. They are bare-bones but FREE!
1. Know the Skills Needed for Dispersed Camping (Boondocking)
Please note that dispersed camping can be extremely challenging and dangerous if not properly prepared. Unlike an RV resort or even most campgrounds, it takes a high level of experience and expertise in the outdoors to safely and comfortably stay at a dispersed campsite. My partner and I are both very experienced backpackers who have spent extended periods in remote areas without services or facilities. These experiences helped us learn the camping and survival skills needed for dispersed camping.
It is your job to know the responsibilities and dangers of dispersed camping before trying it. There are also best practices for dispersed camping that you should follow to help keep the natural resources scenic and unspoiled for other campers, such as Leave No Trace principles. Also, note that many boondocking areas limit the length of your stay to 14 days. Check local regulations before you go.
2. Have a Plan B
Always have a backup plan. On more than one occasion, we did not drive as far as we thought we would, and therefore, we did not make it to the camping spot we planned on staying at for the night.
Phone apps like iOverland and the Dyrt are great tools for developing a backup plan and finding alternative sleeping spots. These apps use your current location to search for nearby overnight spots in the area. You can also read reviews from people who have recently stayed at the site. The best thing about these apps is that they include free overnight options in urban locations such as Walmart parking lots or streets where overnight parking is allowed. Alternatives like these are a great way to save money on hotels, especially if you only need a place to sleep for a few hours before heading to your next destination.
3. Find The Balance
There is a delicate balance between structure and flexibility when traveling full-time. Too much planning can be stressful and defeats the purpose of the RV lifestyle. When necessary, do your planning and research, but do not be afraid to head out with no real agenda in mind. For instance, we would only plan the “milestone” stops for our trip ahead of time. These were places that we knew we wanted to go (like national parks) and places where we usually already had made reservations months in advance. Outside of these major milestones, we created an RV lifestyle that tried to leave as much room for spontaneity in our schedule as we were comfortable with.

One of the chores of full-timing is charging our Jackery solar panels, as seen here along the Snake River in Northern California.
daily Life in a Truck Camper
We love traveling in our truck camper! Each day was a brand-new adventure, filled with exciting places and compelling people. While we had a few major destinations, we tried to keep our schedule as flexible as possible. We designed our RV lifestyle to purposefully leave 4 or 5-day gaps in our schedule for built-in spontaneity. The freedom to wake up, open the map, and ask, "where do we want to go today?" was incredible!
However, even with that being said, there are some real negatives involved with full-time RV living. Living in a 100 square-foot space with a significant other and a pet can be very stressful. And while it is a privilege to be on the road every day, the reality is that full-time RV travel can be exhausting. Sometimes you want to sit on the couch in your sweatpants and do nothing, which is not always an option when traveling full-time. There are ALWAYS chores to do, things to fix, and errands to run for full-time RVers.
A typical day of RV Living on the road would fall into one of three categories
1. DRIVING DAYS
We tried to limit our driving days to weekends, but that was not always possible.
Clean and Prepare to Move: On drive days, we would get started by cleaning and preparing the RV to move. This may include putting the truck camper back on the pick-up truck. First, we make sure everything is picked up and put away. When you live in 100 sq. feet, even the smallest amount of clutter can make the space feel messy. Next, we would make sure everything was securely tucked away. The last thing we wanted was for all our stuff to come crashing out of drawers and cabinets while we were driving. Once we got to our new spot, we would set up camp and offload the truck camper.

Full-timing and remote work have their benefits. Here, the author was able to get in an after-work hike in Arizona.
2. STATIONARY DAYS
Stationary days started very early. During our trip, I worked a full-time remote work job that required me to be online and working by 8 am ET. Depending on our time zone, I often had to wake up at 5 am or earlier. I would typically spend the mornings working and catching up on emails. While I worked, my wife would be in charge of researching and planning our next move.
In the afternoons, after the workday had ended on the east coast, we would get out and explore the area. Campgrounds and RV parks tend to be near opportunities for outdoor recreation. Once I wrapped up my office work for the day, we would spend the rest of the day hiking, exploring, and taking photos. For us, this is what full-time living and full-time travel were all about.
In the event of rain, we would use stationary days as self-care days. Everyone needs a day to relax, crack open a book, turn on Netflix, and re-energize our batteries-even while on the road.
3. CHORE DAYS
Part of RV living is doing chores. We would use chore days to complete our weekly needs: grocery shopping, laundry, and fixing things on the RV. We would try to stay close to an urban or suburban area. The proximity allowed us to go into town to do laundry, grocery shop, and resupply with relative ease.

Camping in the Redwoods in Northern California. Full-timing allowed the author to see America’s national parks, landmarks, lakeshores, and more on a 7 month road trip.
Cost of full-time RVing in Truck Camper
The cost of living in an RV full time will be very different for each person or family. A full-time RVer may choose to live in an RV to save money. Others, like us, choose full-time RVing to have the freedom to travel anywhere at a moment's notice.
Below you will find our average cost for one month of RV living on the road. The figures are for two adults and one dog. We probably could have cut expenses and kept our monthly budget lower. For instance, we could have done more meal planning and cooking at home or found a free campsite outside of the city. But for us, experiencing regional attractions, cultures, and cuisines during the trip was a priority.
Expenses for 1-Month of Full-Time RV Living
The average cost of one month full-time RV living on the road can vary by hundreds of dollars depending on the individual’s unique circumstances. This budget was provided as a starting point to help you think about what expenses you may or may not incur.
$300 - Truck and RV Payments
$80 - Regular Maintenance (Truck and RV)
$160 - Car and RV Insurance
$300 - Campsites
$120 - Hotels/ Lodges
$20 - Laundry
$300 - Gas
$100 - Dog Supplies (food, toys, medicine, etc.)
$400 - Groceries
$50 - Park Entrance Fees (on top of the Interagency America the Beautiful National Park Pass)
$300 - Recreation (site seeing, eating out, etc.)
$40 Entertainment (subscriptions to Apple Music, Netflix, etc.)
$150 - Cell phone/Internet
$100 - Misc. Supplies (propane, gear, etc.)
__________________________________
$2420 - Grand Total for 1 Month
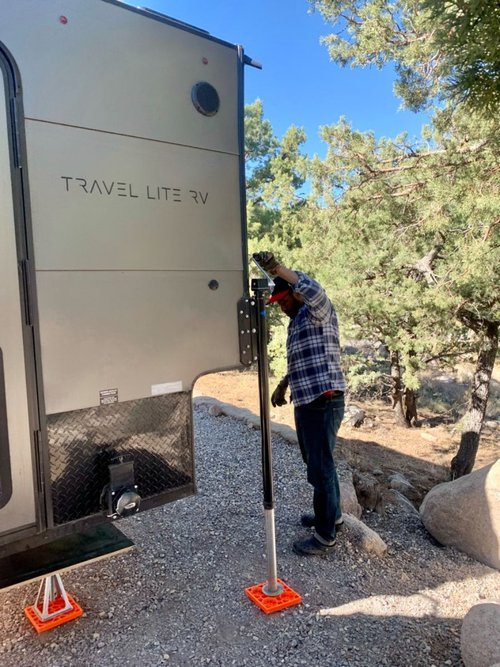
Here, the author isn jacking the camper up near Sedona, Arizona. Putting on and removing the camper are two parts of RV living where you should take special care to read instructions to do it right.
Safety Recommendations for RV Living
Safety recommendations for RV living fall into three categories: Safety tips for Before you Start Driving, Safety tips while driving, and Safety tips for parking and camping. You’ll find recommendations for each of these stages below.
Safety Recommendations for Before You Leave
1. PRE-TRIP CHECK (TRUCK)
Make a habit of walking around your rig and doing inspections.
Before you start driving, do a pre-trip walk around your truck and camper the same way each time.
On the outside, inspect your windshield wipers, check for tire wear, and check the tire pressure.
Open the truck hood and make sure everything looks right. Check your headlights, high and low beams, taillights, brake lights, four-way caution lights, and turn signals.
And don’t forget to reposition your mirrors!
2. PRE-TRIP CHECK (RV)
Check your camper’s turnbuckles to ensure they are tensioned and connected properly.
Also, check for open roof vents, open windows, and raised television antennas.
Inside your truck and camper, check that all drawers, cabinet latches, and bathroom doors are secured. Any loose items should also be put away and secured.

Driving the truck camper at the Grand Canyon. Many National and State Parks have low overhangs and bridges so it’s good to know the height of your rig before taking any particular route.
Safety Recommendations for On the Road
1. DRIVING EXPERIENCE
The experience of driving your truck will change dramatically with the added weight of a camper. With the truck camper loaded, your rig is now higher, longer, wider, and heavier. All of these changes require adjustments to your driving.
2. KNOW YOUR HEIGHT
There are a lot of low overhangs and bridges, especially in National Parks and state parks. They always do a good job of labeling bridges and letting you know the clearance ahead of time. But that is only helpful if you already know the height of your rig.
3. KNOW YOUR PERSONAL LIMITATIONS
Know how long you should drive before taking a break. Know how fast you should drive given your rig and the terrain. For instance, we had a 65-mph top speed when driving with the truck camper. We didn't drive at night. We also tried to avoid major cities and the traffic that comes with densely populated areas as much as possible.
4. STAY IN THE MIDDLE LANE
When driving on a highway, entrance lanes and ramps can be an issue. When driving in a congested area, I suggest avoiding the right lane unless you are entering or exiting the highway. Stay in the middle lane and go with the flow of traffic.
5. BE AWARE AND MAKE DECISIONS BASED ON WEATHER
There were tons of times that we would pull over because it was too windy or raining. Don’t be afraid to stop for a few hours or even overnight to wait out the weather.
There are also some destinations that we really wanted to visit but decided to skip because of hazardous conditions. For instance, we really wanted to go to Crater Lake National Park in Oregon and included it on our shortlist of must-visit destinations. But during our research, we learned that the park is one of the snowiest places in North America during the winter months and decided to skip it.

Camping with the camper off the truck at Pleasant Lake, Arizona. Loading and unloading the truck camper from your vehicle requires special care.
Safety Recommendations for Loading Your Truck Camper
Here are the steps we use to load our truck camper. Be sure to keep kids and pets at a safe distance away from the camper and truck while loading. While these recommendations can help make the process easier, always read and follow the manufacturer’s instructions that come with your camper.
1. USE REFERENCE POINTS
Aligning your truck with the center of the camper and perfectly placing it underneath can be daunting. One thing that helps make it easier is to use reference points. We like to use reflective 3M tape placed in the center of the camper and in the center of the truck bed to help us with alignment.
2. HAVE A SPOTTER
For the loading/unloading process, it’s best to have another person serve as a spotter as you back in the truck. A second set of eyes are critical. At several points, while backing the truck underneath the truck camper, have your spotter check around the camper for clearance.
3. BE ON LEVEL GROUND
It makes it easier to line up the camper when the ground is level and flat. Be conscious of where you unload and know you’ll have to load the camper back on in the same spot.
4. TIPS FOR SECURING THE CAMPER TO THE TRUCK
The camper is secured to the RV using a combination of truck camper tie downs and turnbuckles. Tie-downs are the anchor points where your camper will connect to your truck. You’ll typically mount 4 of them to your truck bed, frame, or even bumper.
Tie-down components are often sold in sets of 2, one for the front corners and one for the rear. Because of this, it is not uncommon that people will mix and match the tie-down type on the front and rear of the camper. Some tie-down systems are designed for specific trucks, so be sure when shopping that you find a system that is compatible with your truck.
Turnbuckles are essential pieces of hardware in truck camper ownership. They act as the “middleman,” securing the truck camper to the tie-down system of your truck.
Strong winds, rough roads, and driving at highway speeds will test the ability of your tie-downs and turnbuckles to control the forces or stresses working against your camper.
Proper tension and installation of your turnbuckles are critically important. Too much tension can overstress and damage your camper; too little tension can allow your camper to shift and slide around in your truck bed while you drive.
Make sure you read and understand the installation instructions for your turnbuckles to make sure they work optimally.
Safety Tips for RV Camping and Overnight Parking
1. HAVE A QUICK GETAWAY
Have an escape plan and park your vehicle in such a fashion where you can drive away immediately if needed, without much hesitation.
2. AVOID CALLING ATTENTION
As a general rule, we refrained from attracting unnecessary attention to ourselves. You never know who you are sharing a campground with, and unfortunately, theft is not an uncommon occurrence.
Try not to make your truck camper a huge spectacle, no matter how much you love it. Refrain from drawing attention to yourself by displaying outside lighting if it is not necessary. Unless you need to be rescued, don’t fly flags, awnings, campfires, and/or smoke to announce your location to others.
3. BE AWARE OF YOUR SURROUNDINGS
When you first arrive, survey your overnight spot and identify potential hazards. It is also a good idea to introduce yourself to your neighbors. Try to keep from spreading your contents out around the area.
Items like bicycles, carpets, grills, and chairs can tip people off to whether you are home or not.
Also, avoid posting pictures of your camper and trailer contents on public social media, announcing your destination, or announcing your travel dates.
4. SECURE YOUR CAMPER
If your truck camper has a ladder, remember to fold it up and lock its folded position. Also, if you have a roof access ladder that can’t be removed, make sure to close the vents, as they can be an easy point of access. If you have solar panels on the roof, install security bolts on them to prevent theft.
RV Accessories for Full-Time RV Living
In addition to the critical items listed above in our Packing List, here are our favorite pieces of non-essential RV accessories and gear for full-timing in a truck camper. For more, read about our backcountry road emergency car repair kit list.

Rechargeable Battery-Powered Generator: Jackery Portable Solar Power Station
Jackery Portable Power Station is a rechargeable battery-powered generator. Equipped with an AC outlet, DC carport, and USB charging ports, they can keep all your gear charged. This includes smartphones, laptops, and even appliances like blenders, coffee makers, and more. We had the Jackery 1000 and two 100-watt solar panels, and we never felt like energy consumption or storage capacity was an issue for us.
Related: The Best Portable Solar Panels
Read More: GPS & Electronics Outdoor Gear Guides
COMPARE PRICES OF THE JACKERY PORTABLE SOLAR POWER STATION

Waterless, Portable, Travel Toilet: Laveo Battery Operated Water-Less Toilet
The Laveo Battery Operated Water-less toilet is a waterless, portable travel toilet that can be used for months on the road without any smells or leaks. The Dry Flush works like a diaper genie.
The Dry Flush toilet comes with mylar liner bags that fit inside the bowl. You can pee and poo in the bowl, then flush the toilet. Once you flush, the liner bag collapses, twists, and seals up the waste in an airtight configuration. Each cartridge comes with 17 flushes. You can get replacement cartridges and replacement batteries for it.
Due to covid, we would use our dry-flush even when staying at campgrounds. Once the bag is full, you can simply tie the bag and throw the bag away in any dumpster. It is a great bathroom option for full-time RVing and does not use any water from your RV’s fresh water tank.
COMPARE PRICES OF THE LAVEO BATTERY OPERATED WATER-LESS TOILET

Portable Propane Heater: Mr. Buddy Heater
A Mr. Buddy Heater is a portable propane heater by the brand Mr. Heater. These heaters have an open-flame heat source and produce a good amount of heat in the immediate area.
Mr. Buddy Heaters are popular with RVs, campers, and hunters because they can arguably be used more safely within an indoor space than other heaters. They’re popular for use in enclosed areas such as a cabin or mobile home (be sure to read and follow manufacturer’s instructions before use). Mr. Buddy Heaters run off of small, disposable one-pound propane tanks.
We learned that the furnace in your RV is not for keeping occupants warm. RV furnaces are designed to kick on for a short period periodically to keep the pipes and other temperature-sensitive components from freezing. While it will keep things from freezing, it will not maintain a comfortable temperature within the RV.
We only used the Mr. Buddy heater in the most demanding situations (we had a few sub-zero nights in Sedona and Grand Canyon), but it was an excellent option for staying warm during freezing nights. Although the Mr.Buddy is advertised as “safe for indoor use,” it is still recommended that you have good ventilation and a working propane/CO2 alarm.
COMPARE PRICES OF THE MR. BUDDY HEATER

Anti-Condensation Ventilation Mattress: Tochta HyPUR-Flo Moisture Protection
Condensation is a huge problem for all RV’s and motorhomes.
How this happens: Mattresses inside RVs, vans and even rooftop tents lie on cold surfaces. When you sleep on your mattress, the warmth from your body heats it. Throughout the night, moisture from the air and your body create condensation. As a result, moisture can form between the bottom of the warm mattress and the cold surface it’s laying on.
RV mattress moisture and mold are no small issues. If not kept in check, your mattress will become very moldy, very fast. It will eventually damage the wood under your mattress and could potentially also threaten your health.
A thin anti-condensation ventilation pad under your mattress is the best way to make sure no moisture ever builds up under your RV mattress. An anti-condensation ventilation mattress underlay helps to increase the airflow even while you sleep.
These underlays are made of super-strong and porous materials and suspend the mattress a few inches above the surface. The material allows full-time constant air to flow underneath the mattress, even when sleeping on it. The airflow keeps moisture from collecting and makes it much harder for mold to grow.
Related: The Best Sleeping Pads for Backpacking
Read More: The Best Camping Mattresses
VIEW THE TOCHTA HYPUR-FLO MOISTURE PROTECTION
We hope that this beginner’s guide to truck camper road trip planning and preparation will serve you well on the open road.
About the Author/ Why You Should Trust Us
Tony is passionate about connecting people to nature. He currently serves as a program director for the National Environmental Educational Foundation (NEEF) in Washington, DC. In this role, he helps manage National Public Lands Day (NPLD), one of the nation’s largest single-day volunteer efforts for America’s public lands. He’s also a board member for the Partnership for the National Trail System. Becoming an Eagle Scout is still one of his proudest accomplishments.