Snowboard Protection Gear Guide: Essential Safety Equipment
Protect your back, wrists, face, and head while snowboarding

November 18th, 2025
Home → Gear Lists → Ski & Snow
With most sports, wearing some kind of safety gear is vital to protect yourself, not only as you learn and progress, but also to keep yourself safe from hazards like fluke accidents and collisions.
According to a 2022 study in the International Journal of Athletic Therapy and Training, more than 100,000 non-fatal snow sport injuries occur annually. Of those, 15% are head injuries. Contact trauma (either with other people on the slopes, with trees, or the ground) is the leading cause of injuries, according to a study in the Journal of Sport and Health Sciences.
So even if you think you are a top-notch rider and don’t need to worry about getting hurt, think again. Edges catch, riders fall, and people collide.
The most important thing to protect? Your head. Winter sports helmets aren’t as heavily regulated in the US (compared to European standards) when it comes to testing, but many companies have invested considerable time and money in improving their helmets to prevent brain and head injuries. After your noggin, the rest of your body could use some protection as well, like your wrists, back, and tailbone (especially if you are learning to snowboard).
In this snowboard protective gear list, we go into essential safety equipment to keep your head, wrists, back, tailbone, and other parts safe while snowboarding.
We create reader-supported, objective gear reviews independently selected by our editors. This story may contain affiliate links, which help fund our website. When you click on the links to purchase gear, we may get a commission, without costing you an extra cent. Thank you for supporting our work and mission of outdoor coverage for every body! Learn more.
Snowboard Protection Gear Checklist
| PROTECTIVE SNOWBOARDING GEAR | OUR PICK(S) | MORE OPTIONS |
|---|---|---|
| Core Protection | ||
| Back/ spine guard | Demon Flexforce Pro Spine Guard | |
| Chest protector | Demon Ghost D3O Chest and Back Protector | |
| Spine jacket | POC Spine VPD 2.0 Jacket | |
| Tailbone protector | Demon AZZPADZ D3O Tailbone Protector |
How we researched

For this guide, we looked at research that states the most common snowboarding injuries (think broken wrists and concussions) as well as rider feedback and horror stories from the past. Thankfully, I’ve never broken anything while snowboarding, but I've definitely slid out, smacked my head, and saw a few stars. I’m also super thankful for eye protection when I am whipping through the trees, and could have shed way fewer tears if I had worn a tailbone protector when I was learning as a 10-year-old. I’ve heard stories of my friend’s mom learning to snowboard and immediately breaking both of her wrists, riders severely bruising their tailbone when messing around in the terrain park, and my snowboarding friend who once cracked his rib snowboarding now swears by his back protector.
Protective gear for snowboarding can really help keep you safer and reduce your injuries. According to the Journal of Functional Morphology and Kinesiology, wearing a helmet in winter sports can reduce the risk of head injuries anywhere from 15 to 60% versus not wearing one. Similarly, a study on wrist guards found that eight wrist injuries occurred in the braced group and 29 occurred in the control group—a significant difference.
What we looked for
We looked at core factors like impact absorption, fit, mobility, and breathability, as well as price. From there, we judged each item on its appearance and comfort, as the safety rating is only relevant if you intend to wear it.
How to read the guide
If you don’t think you need every type of protective gear, we’ve parsed out each category by body area, such as back and tailbone, head, wrists and arms, as well as face protection like goggles and helmets. We also dive into the type of protection you might need for your specific riding style—think learning, park riding, and off-piste—as no matter how good a rider you are, accidents can still happen. Plus, added protection can give you that confidence boost to progress your riding or try something new, like a day in the park or a run through the trees.
Core body protection

Back protectors and spine guards
What to look for
Spine guards or back protectors consist of an impact-absorbing foam or a harder brace-like wearable that offers complete coverage of your spine. Some back protectors use a mix of both, while some products have the harder protection or foam integrated into a breathable, mesh vest. The braces use adjustable straps that loop over your shoulders or around your waist to secure it to your body; many have removable waistbands if that is an uncomfortable fit.
Regardless of the type of back protector, all should still offer flexibility while riding so as not to hinder your range of movement. It should fit seamlessly over a base layer and under a midlayer or jacket. Options include low-profile braces and vests so it won’t look or feel like you are wearing something bulky, but will still provide protection from fall or impact.
Because most back protectors are designed for sports like motocross or motorcycle riding, many are rated according to European Safety Standards; most recommended for snowboarding meet the EN1621-2 Level 1 standards.
Our Choice: Demon Flexforce Pro Spine Guard
This spine guard from Demon is one of the most affordable options that still provides Level 1 protection. The lightweight Flexforce uses a foam inner with a hard outer shell for maximum impact protection. It has two adjustable shoulder straps and a large waistband as well, so that the brace is fully secured to your body. Sizes range from extra small to extra large.

Chest protection
What to look for
If you want protection for your chest specifically (which can be helpful if you have a chance of running into a tree or face-planting off a jump), there are two main options. One resembles a super-padded, long-sleeved top (more on that below) that protects the back, chest, shoulders, and elbows; the other is similar to a spine protector brace, but also has a plate in the front. If you only want a chest protector, the best gear is a mountain biking chest protector that goes on over the head like the spine guard.
The first option has more upper-body protection but can hinder movement a bit, given how much padding is built in. You’ll want to zip this up over a slim-fitting top, which could compromise overall warmth. The brace will offer more freedom of movement and a less bulky feel, but it doesn’t have any protection for the shoulders or elbows.
Our Choice: Demon Ghost G30 Chest and Back Protector
Although a full upper-body padded jacket offers more comprehensive protection, a simpler chest and back protector like the one from Demon is suitable for most in-control riders who want more protection as they enter more difficult terrain with potentially more hazards. It’s lightweight and breathable, yet fully protects your back and upper chest from impacts, meeting the EN1621-2 Level 1 standards. Add a rib protector for even more torso coverage. As one rider says, these braces can make the difference between a fall being a hospital visit or not.
Tailbone protectors
What to look for
Especially if you are learning how to snowboard, you will be falling on your butt often as you practice riding on your heel side. Using a tailbone protector can ease some of that pain or fear of falling, as it adds an extra-thick layer on your backside. A tailbone protector is different from crash shorts, as this gear will only have padding in the back, instead of on the hips and legs as well.
Options for padding in the butt are limited, with one being a harness-style design where loops go around your upper thighs and waist, with the padding extending from the waist down. This type is typically worn underneath snowpants. Another option is a padding that you’d strap onto the outside of your pants or bibs—if you ever see people with a turtle stuffed animal strapped to their butt, this is that protection.
The one that goes underneath your gear is often a bit more technical, as it is contoured to fit over someone's backside and uses a flexible hardshell over layers of foam. You’ll feel it while you are wearing it and sitting down, but it shouldn’t be too cumbersome or noticeable under your gear.
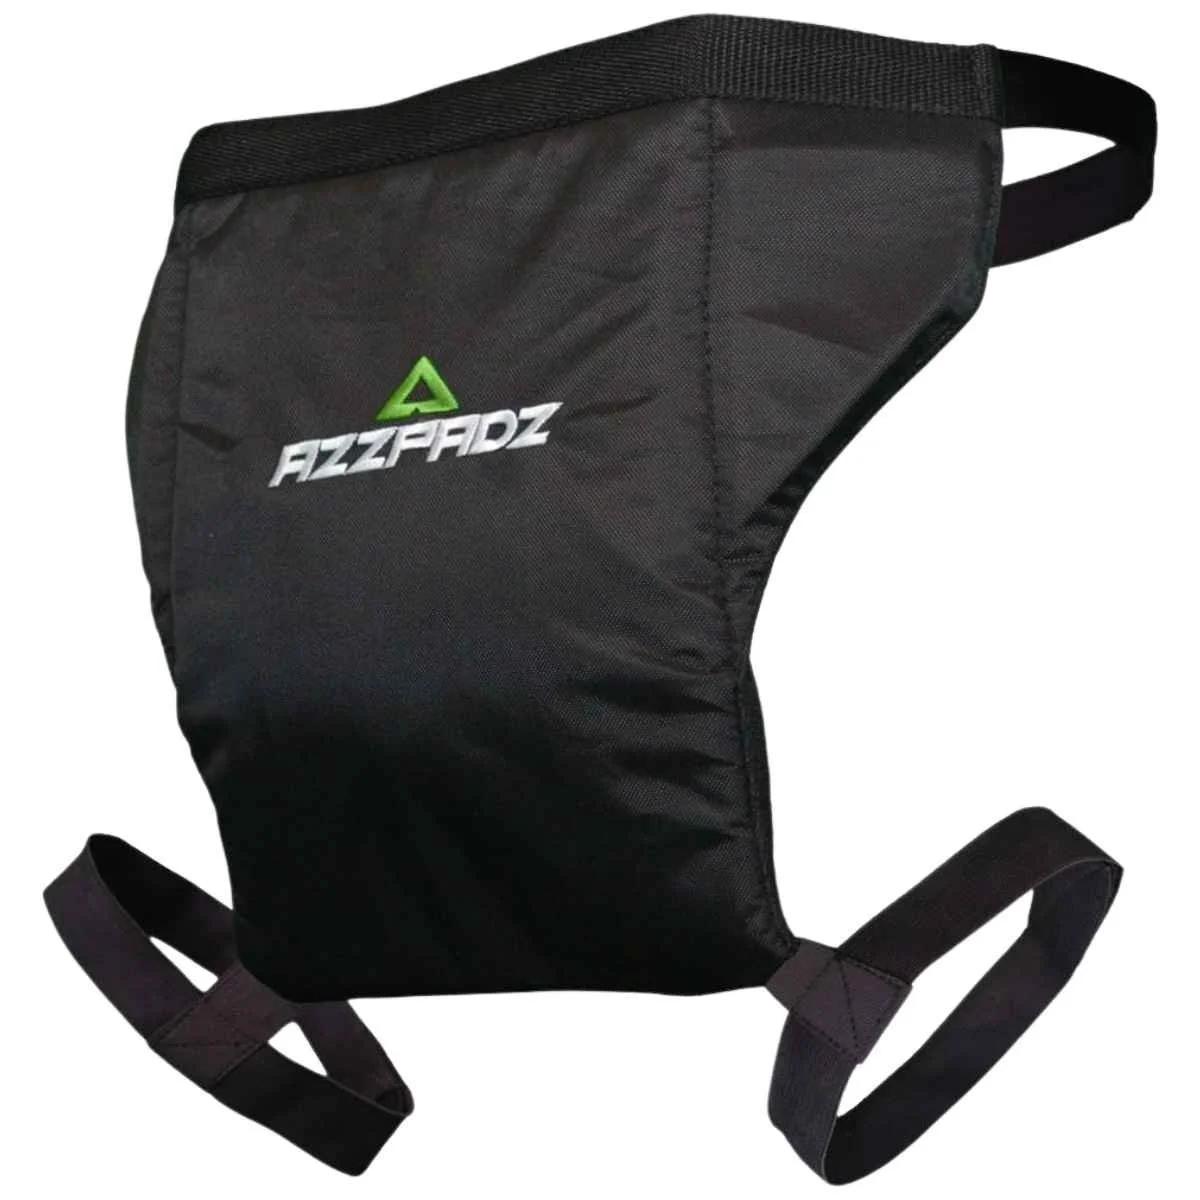
Our Choice: Demon Azzpadz Tailbone Protector
This tailbone protector from Demon is easy to put on and off (you can even take it off without removing your snowpants) as it uses straps around your thighs and one around your waist. Going from the back of the waistband down to the thigh straps is the foam part, which is shaped to cover most people’s tailbone and butt and contoured to rest comfortably on your body. The Azzpadz features a plastic tailbone shield on the outer layer, followed by dual-density foam and shock-absorbing foam. All of this works to dissipate the force of falling and thus reduce pain.
Another version from Demon includes the D3O protective plate, which offers slightly more protection compared to the regular version, rather than the extra layer of foam in the non-D3O version.
Lower body protection
Impact Shorts
What to look for
If you want hip, thigh, and tailbone support, definitely go with crash shorts. Crash shorts are fully padded, slim bottoms that protect from both falls on your butt and impacts to your hips or legs—like when you are in the park and keep eating it on a rail or crash-landing after a jump.
These shorts are slim and tight, but have integrated armor on the back and sides of the thighs, hips, and tailbone. Sometimes this extra protection is in the form of thick pads and foam, while other options include a more rigid plastic that still has flexibility. The shorts themselves should be breathable, stretchy, and flexible. If you have insulated snow pants, you may not need a baselayer in addition to the crash shorts. If you have shell snow pants, wear them over your baselayer.
If you are a casual rider, value comfort over protection, or simply need support for occasional falls, look for crash shorts with slimmer padding and more overall comfort and flexibility. If you are in the park often or are pushing your progression on steeper terrain, you’ll want bottoms with thicker padding, but know that they’ll probably be stiffer or awkward and could even compromise how you're riding.
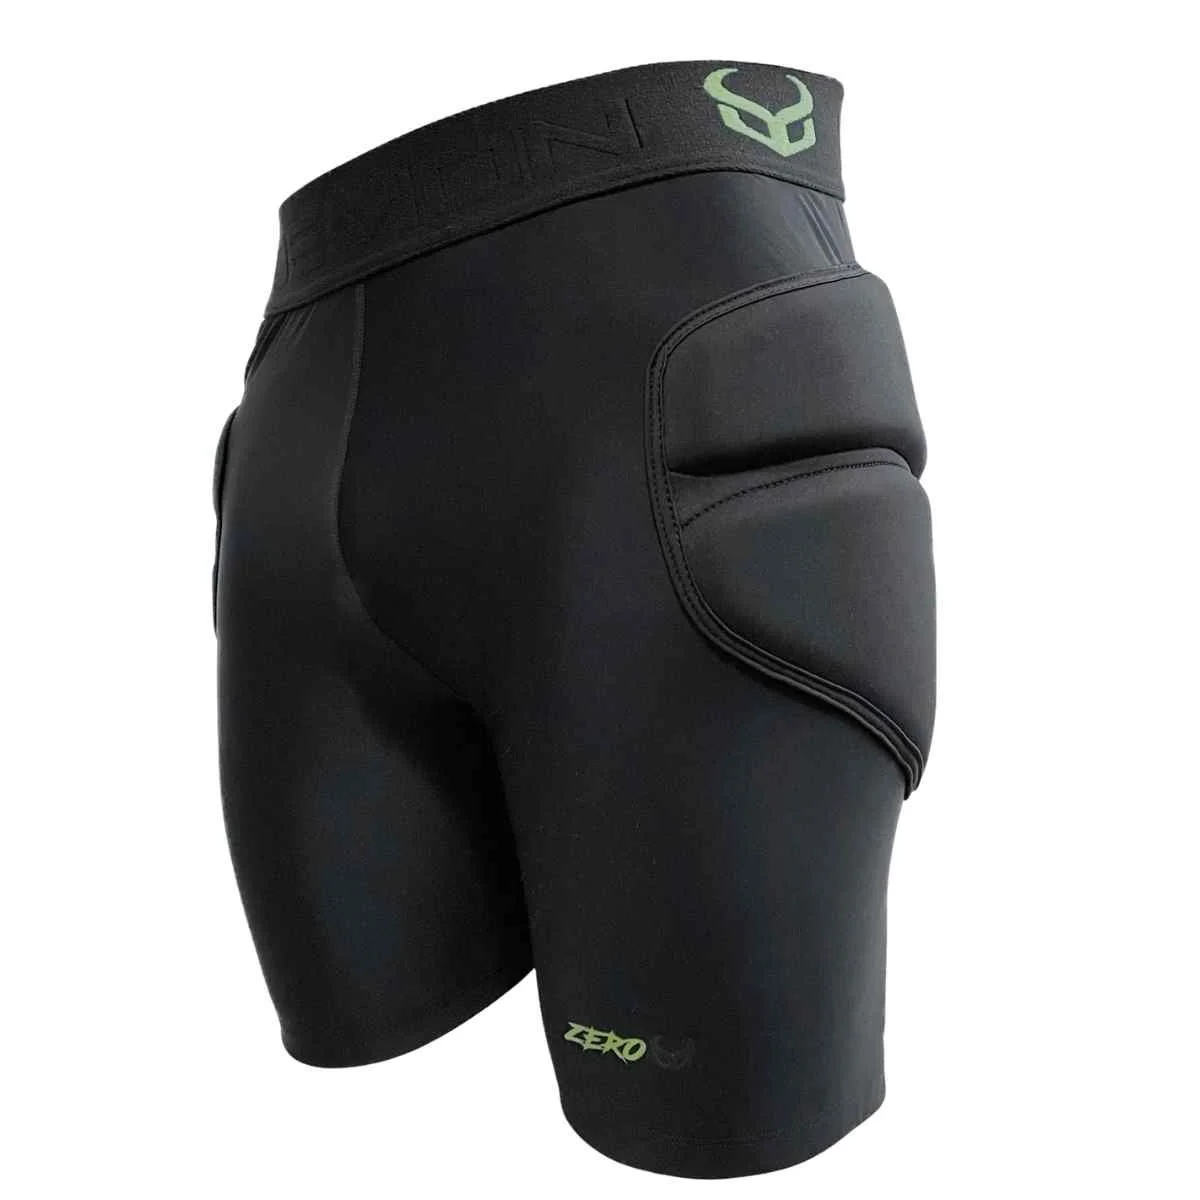
Our Choice: Demon Zero RF D3O Shorts
The Demon Zero RF D3O Shorts are sleeker than other crash shorts, yet still provide top protection from falls and impacts. The low-profile, breathable shorts have padding on the hips and upper thighs, lower butt, and tailbone. The tailbone padding is thicker than the rest of the padding for when you catch those edges and slam down, while the armour on the thighs and legs is a bit thinner so as not to restrict movement, but still keep you protected against impacts. These unisex shorts come in youth sizes through adult. As they are tighter, follow the size chart carefully. Pants are also available with added foam on the knees.

Runner-up: Burton Women’s Impact Shorts
The women’s impact shorts from Burton use G-Form, which is a flexible polymer foam that hardens on impact and helps to dissipate any force. You’ll find the padding on the tailbone and lower bottom, as well as the hips and upper thighs.
The shorts are low-profile, with a slim waistband and a fit like leggings or biker shorts, with plenty of stretch so you can keep carving and moving without compromise. The bottoms are breathable and quick-drying and have flat seams so you stay chafe-free.

Padded Impact Pants
What to look for
If you need lower body protection that covers the thighs, hips, butt, tailbone, and knees, go for a legging-style impact pant that will have all of this padding built in. There aren’t many options for long-impact pants (compared to many brands that make impact shorts), but they are available for full lower-body protection. Just like the impact shorts, the leggings have pads on the legs, thighs, and butt, but also have integrated knee pads.
Our Choice: Demon Project X Impact Thermal Pants XRD Unisex
These bottoms by Demon double as protection and breathable, soft warmth. There are seven places with padding, with two layers on the hip and thighs and three layers on the knees and butt, so you have more mobility where you need it but more protection for hard impacts. The knitted fabric is stretchy, breathable, and moisture wicking, so you can wear this as a standalone layer for warmth and comfort.

Knee Pads
What to look for
Although learning how to snowboard often has you on your butt more than your knees, falling forward definitely does happen, especially when you are learning toeside. Or maybe you are playing around in the park and would rather not get banged up on the rails and boxes. Slipping on some knee pads can help protect this delicate and bony area.
If you choose snowboard-specific knee pads (rather than workwear ones or those used for volleyball), you’ll get breathable and moisture-wicking pads that won’t hinder your movement. They should be low profile to fit over a baselayer but under snow pants, and most will be made with EVA foam padding. Knee guards are heavier-duty and have more coverage than knee pads, but are usually used for mountain biking.
A simple knee pad, on the other hand, is a solid choice for most snowboarders. If you are really hard hitting, look for a kneepad that has a harder outer shell in addition to the padding. Make sure to check for sizing, as you don’t want them slipping or moving out of place as you charge hard; some knee pads do have a strap at the top and an inner lining of anti-slip neoprene for added security.
Our Choice: Burton Basic Knee Pads
The Burton Basic Knee Pads are just that — a slip-on knee pad with slim yet protective padding for when you are learning, pushing yourself to progress, or can tell it’s going to be an icy day. The foam padding on these is sectioned into three different pieces, so your range of movement isn’t impeded. They are quick drying and breathable, so you’ll stay comfortable even as you work up a sweat.
General upper body protection
Snowboarding elbow pads
What to look for
If you stick to the runs or off-piste tracks, you won’t necessarily need elbow pads. If you are playing in the park all day? Elbow pads can be a good addition to your kit. For snowboarding, elbow protection looks like an arm sleeve that has added foam padding surrounding the elbow, and you’ll often find these pads being used for mountain biking.
Look for a low-profile option that can fit under a jacket. The padding isn’t sectioned for flexibility like with knee pads, which is fine, as you aren’t using your arms that much when snowboarding. To stay put, these pads will either be part of a longer sleeve or will have a strap at the top to secure in place.
Our Choice: Demon Hyper X D3O Elbow

Elbow pads are not as affordable as knee pads, but you can get by with a mid-level product that still provides protection and support. And really, most non-park riders won’t need elbow pads, but these are definitely a good choice for anyone who is spending time in the terrain park. The Demon Hyper X D3O elbow pads are comfortable to wear all day and use an upper strap to keep them in place. For impact absorption and durability, the pads have a Kevlar front shield on top of a layer of foam padding. Specific construction, like mesh on the inner elbow and venting, allows for breathability, so the pads should stay comfortable all day. Sizes range from small to extra large.
Snowboard wrist guards
What to look for
Stories of new riders breaking their wrists while learning to snowboard is not uncommon; it’s easy to fall backward onto your butt and try to brace yourself with your hands. A simple and easy solution to avoid a broken bone is to use a pair of wrist guards underneath your snowboarding mittens or gloves.
Wrist guards use a rigid material, such as aluminum or plastic, on the base of the guard, on top, or both, which works like a splint. This prevents your wrist from moving or twisting if there is impact. They limit your wrist’s range of motion to help avoid injury, but you can still easily strap in and out of your bindings or zip up your coat because the inflexible part is under your wrist.
The part that goes over your thumb is typically made from soft, flexible neoprene. A strap encircles the entire device to secure it in place. The most significant factor to consider when using wrist guards is how they pair with whatever snowboard mittens or gloves you are using. Short-cuffed or tight mittens won’t fit these underneath, while a mitten with a larger gauntlet cuff will work fine. Some mittens and gloves have a wrist guard built into them, but you can’t adjust the guard and glove separately.
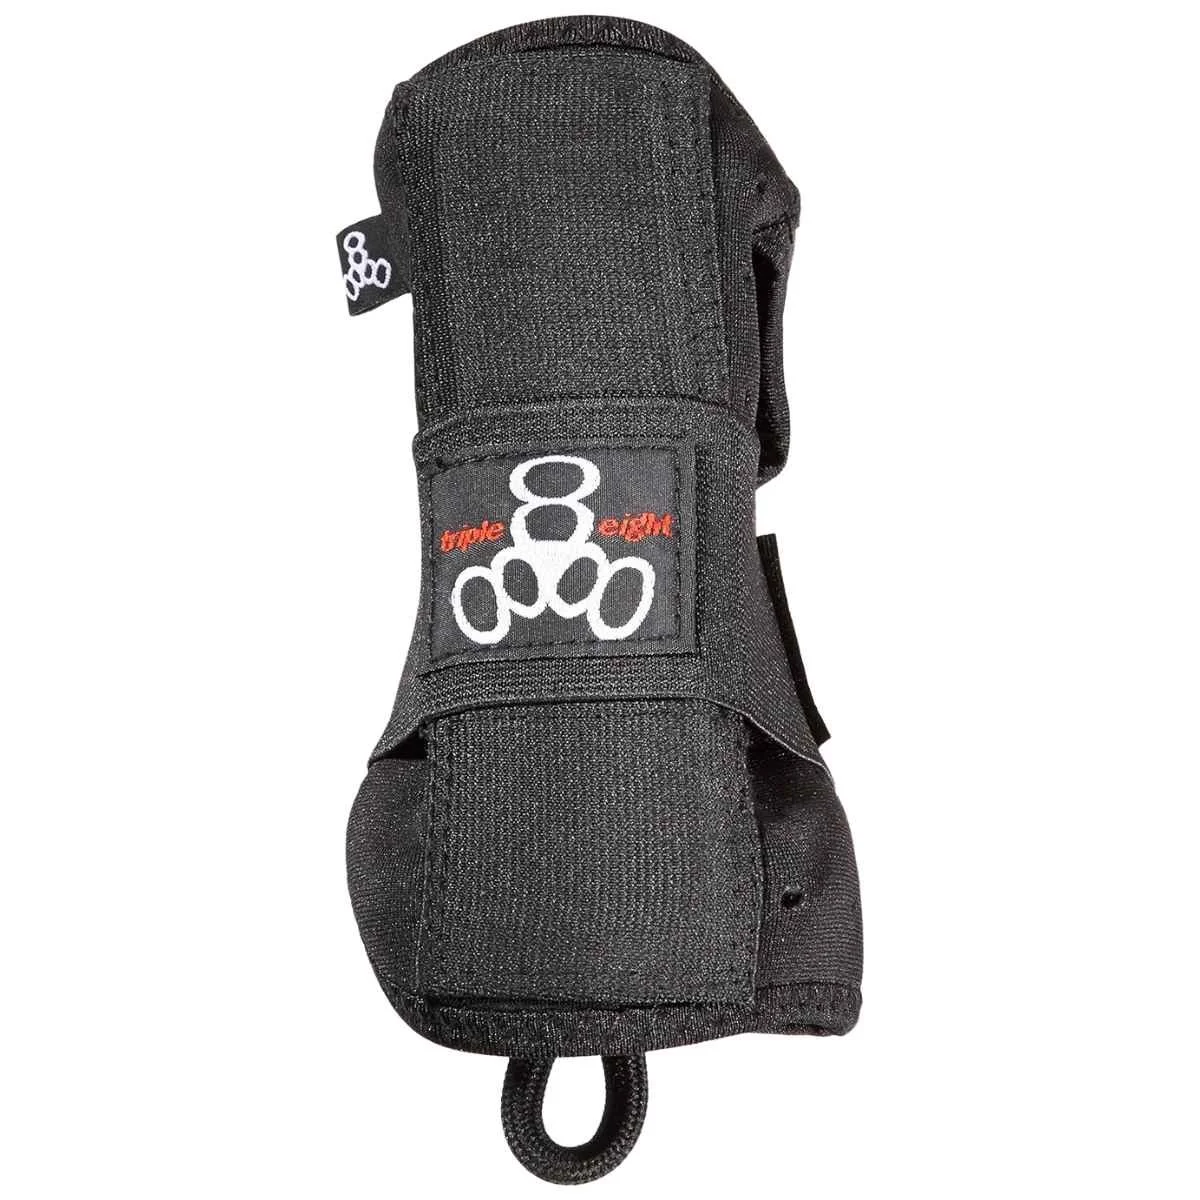
Our Choice: Triple Eight Undercover Snow Wrist Guards
These wrist guards from Triple Eight are a smart investment to avoid one of the most common snowboarding injuries. They are slim and will fit comfortably under most gloves or mittens, although they may feel a bit tight and different when you first start wearing them. This pair has removable splints for both the top and bottom parts of your wrist. Use the pull loop at the bottom for easy-on access over your thumb and then secure with the large strap. The Triple Eight Undercover Snow Wrist Guards are made from breathable neoprene.
Upper body armour and shoulder protection
What to look for
Similar to a pair of impact bottoms, you can also find impact tops that provide full upper body protection with padding on the back, chest, elbows, and shoulders. These tops will have you looking like the Terminator, but will definitely ease the pain from any tough falls. Some range of motion will be compromised, but the top should still have some flexibility so as not to impair your mobility fully.
This is a good option for anyone with upper-body injuries, someone who is perhaps older but still wants to charge hard, or anyone aggressively getting after it in the terrain park. The fabric should be breathable so you don’t overheat or get uncomfortable. Some zip up the middle like a regular jacket, while others zip up the side or asymmetrically in the front. Ones with side zippers can use a single plate as a chest protector rather than two separate pads.
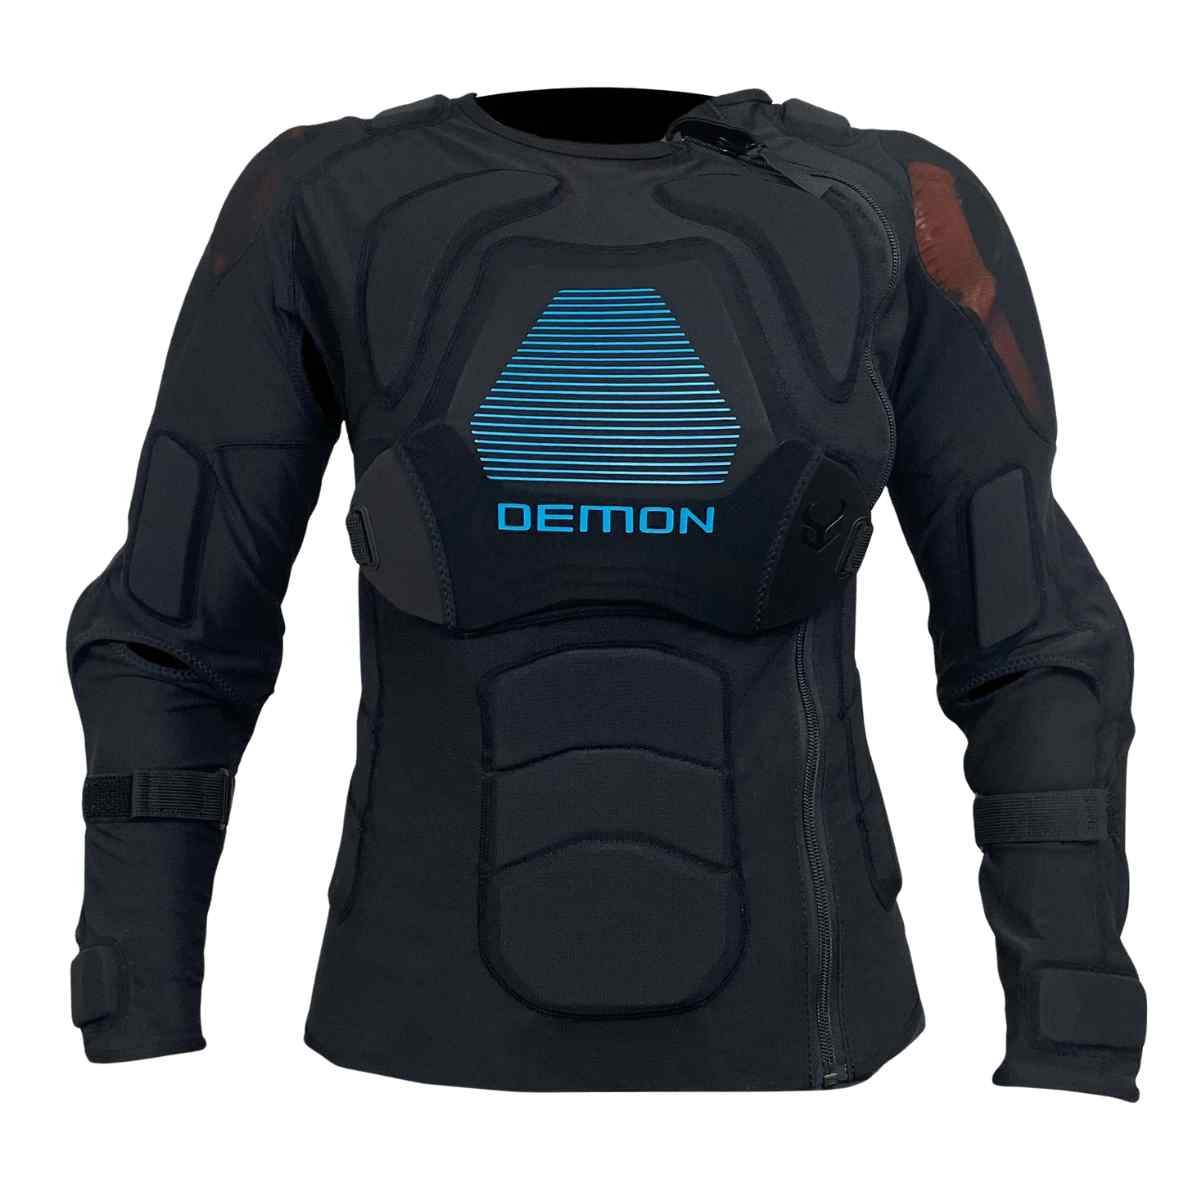
The Demon Flexforce X V6 D3O is a perfect top for aggressive riders or those who send it off massive jumps. Rather than buying a bunch of separate pieces, this Lycra and mesh top features a four-layer padding system, with one layer for comfort and three more for impact and puncture protection (in case you wear this in the summer while mountain biking). There is padding in the shoulders and elbows, along with a back plate and a hard-shell chest protector.
In addition to all that, there is also slight padding on the biceps, stomach, collarbone, and lower back. This jacket uses an asymmetrical side zipper, so the front chest plate is a single piece for added protection. It was designed to be lightweight and breathable with underarm and side ventilation, so you can wear it all day without getting too hot or uncomfortable.
Head and face protection
Snowboard helmets
What to look for
If you invest in no other protective gear, at least wear a helmet. Helmets are made up of hard plastic or polycarbonate outer shells and an inner, shock-absorbent foam to help reduce impact forces.
Many helmets also use MIPS technology (multi-directional impact protection system), which is an additional layer inside the helmet that aims to reduce rotational forces. Other safety tech includes Koroyd, used in Smith helmets, which is a honeycomb-like plastic welded structure inside the helmet that crushes when hit to absorb impact instead of your skull. Anon uses Wavecel tech, which is a similar tube-like construction that flexes and crumbles to divert energy away from your head.
Several specific features can make wearing a helmet for an entire day more comfortable. Vents are great if you sweat a lot and overheat; some vents are adjustable so you can close them when the weather turns chilly, while others stay open the whole time. Often, a venting system on a helmet can range anywhere from a few vents to more than 10. Above where the goggles meet the helmet, there should be two vents to help prevent the goggles from fogging up. A magnetic buckle is nice, though definitely not necessary. These buckles are specifically made to open with one hand, so you don’t have to remove a glove or mitten.
Look for a helmet with a dial-fit system at the back, allowing it to fit snugly around the circumference of your head. Once it feels snug (but not overly tight), you should be able to shake your head back and forth and side to side without it moving. Then, tighten the chin strip so that it is comfortable enough when you move your head around, but not too tight as to pinch. Also, make sure your goggles fit properly with no gap between the top of the goggles and the bottom front of the helmet, but most helmets and goggles do line up without any issues.
Our Choice: Sweet Protection Daymaker MIPS
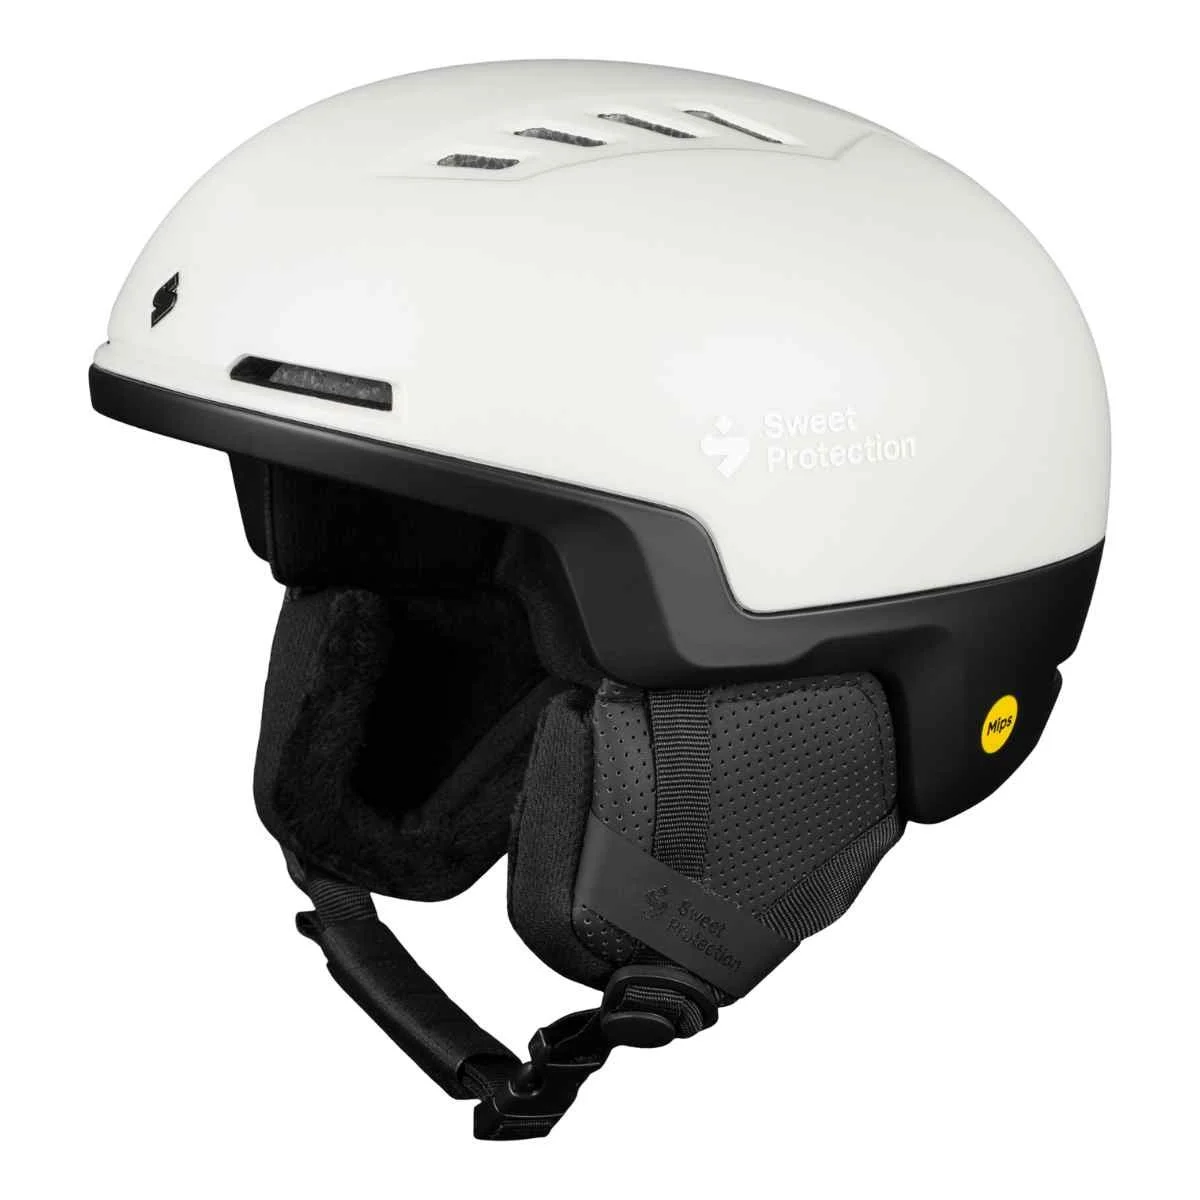
Sweet Protection helmets are both safe and comfortable with all the features you’ll want. With the Daymaker, you get MIPS for added rotational protection along with a lightweight two-shell, in-mold construction for top protection against all types of impacts. There are two goggle vents in the front, 13 vents on the top, a dial-fit system, audio-ready earpads, a goggle strap retainer that snaps so your goggles won’t fly away in a fall, and boxed ear pads which allow for optimal hearing and the most comfort as nothing is pushing on your ears all day. As this is a more budget-friendly option, the vents do not adjust, and the buckle is a regular one where you will most likely have to take off a glove to undo.
Find more helmet recommendations in our Best Ski and Snowboard Helmets guide.
Face protection
What to look for
If you're concerned about damaging your teeth or jaw during a fall, consider wearing a full-face helmet with an integrated chin bar. These helmets feature a continuous, hardshell that extends from each ear to the front of the face, much like a motorcycle helmet, and include a vent near the mouth for easy breathing. Many full-face helmets do have the option to remove the face mask part. These helmets will be heavier than a non-face mask helmet, but they do offer complete protection and a bit more warmth.
Our Choice: Ruroc RG2

Ruroc is a company that makes both motorcycle helmets and winter helmets, so their protection and construction is high quality. In fact, the Ruroc RG2 is certified in both European safety standards (EN1077: 2007 Class A) and the American Society of Testing Materials standards (ASTM F 2040 Certified safety standards). The RG2 features not only a removable face mask for front protection but also uses Rheon technology for protection against both impacts and rotational forces. It has an adjustable fit system, a magnetic chin strap for easy on and off, and a moisture-wicking liner. This helmet also comes with a pair of Ruroc goggles.
Eye protection

What to look for
Whether it’s from the sun, snow glare, or rogue branches, wearing a pair of goggles is a wise choice to protect your eyes. Goggles, however, aren’t as easy to fit as one might think, and a proper fit is crucial—it can be the difference between fogging up or icing over versus being able to actually see the run. Many goggles come with an anti-fog coating and vents on top to prevent this, but depending on the shape of your face or how the goggles fit your helmet, you might be unlucky on a powder day. If possible, try on the goggles in person, wearing the helmet you’ll be using on the mountain.
Many goggles have expanded their field of vision so you can get some peripheral views, which is especially helpful as a snowboarder when you are carving and don’t want to cut anyone off.
The next key thing to look for in a pair of goggles is the type of lenses they have when it comes to shifts in light. Photochromatic lenses change automatically as the light hits them, while other goggles have multiple pairs of lenses that need to be swapped in or out manually. Sometimes, these pairs of multiple lenses are easy to change via magnets, but they can pop off in a hard fall. If lenses aren’t changeable with magnets, they can usually be replaced by requiring tracks that you have to follow. Many lens options also include a polarized version, which is most commonly used for activities on water, but can be helpful in really sunny and bright winter conditions.
Our Choice: Zeal Meridian

The Zeal Meridian is a more expensive option, but Zeal is renowned for its high-quality lenses and goggles, which are designed and tested by skiers and snowboarders. Plus, if you opt for the photochromatic lens, you won’t have to worry about carrying and changing out lenses depending on the clouds and weather. The Meridian has multiple lens options, including photochromatic, mirrored, and polarized. The Meridians provide 100 percent UV protection and have a medium fit, making them a secure choice for most people. It has extra silicon grip on the inside of the goggle band so that they stay in place on your helmet and triple-layer face foam for all-day comfort. Find more of our top picks in our Best Ski and Snowboard Goggles guide.
Protection by riding style

Beginner protection essentials
When you are just learning how to snowboard, you’ll be falling on your butt very, very frequently. You’ll also want to stop these falls with your hands behind you, which can easily end in injured wrists. At a bare minimum, invest in a good helmet, a tailbone protector, and wrist guards. Not only will this help avoid injury, but it can also give you the confidence to push yourself to keep learning and progressing.
Park and freestyle protection
Riding in the park has different hazards, like metal boxes, unyielding rails, and potentially huge falls from large jumps. Consider wearing knee pads for park features, a spine protector when hitting big jumps, and wrist guards as well. Always wear a helmet.
Off-piste and freeriding protection
If you are heading into the trees or hiking something in-bounds, your best safety bet is going to be riding with a friend. You could also consider a chest protector, as that will help if you run head-on into a tree branch or trunk. If you are heading into the backcountry, do not take this adventure without proper training and gear.
Racing and carving protection
For riders who race, lightweight padded shorts and knee pads can offer added support for falls on hard snow or ice. If you are in a competitive race, check for required gear, like a FIS-certified helmet or a full-face helmet.
How to choose the right protection

Fit and sizing
Protective apparel gear shouldn’t be too tight or restrictive, but not too loose either. It should fit comfortably over your base layer and underneath a jacket without being too cumbersome. Ideally, you’ll have no pressure points or hot spots.
Protection levels and standards
Understanding impact ratings, CE certification, and safety standards — Most snowboarding safety gear, like padding and helmets, do not have to be tested for safety in the US, unlike in European countries. However, most companies do still adhere to the European standards, so you’ll find snowboarding helmets with ratings like EN1077: 2007 Class A and braces or padding rated as EN1621-2 Level 1 standards. There is also the American Society of Testing Materials standards (ASTM F 2040 Certified safety standards), but again, this isn’t required for US companies that manufacture helmets.
Choosing an appropriate protection level — Some protective apparel, such as chest and spine protectors, is rated for extreme protection in sports like motocross. For snowboarding, some protective gear can be padded (like shorts) while others should be more of a hardshell variety (like spine and tailbone protectors).
Layering and integration
How protection works with snow clothes — Protective gear for your body can layer over your baselayer or under, but will all go underneath your snow pants or jacket.
Ventilation and breathability considerations — The gear should be made of a breathable, moisture-wicking synthetic or natural fabric.
Avoiding bulk and restriction — With any safety gear, it must be comfortable enough to actually wear. Try on items in person if possible, and bring your layers and jackets to simulate the real experience.
Budget considerations
Essential vs. optional protection — Always invest in a good helmet and never ride without one. When it comes to other protection, think about whether you are learning, advancing to new terrain, or trying new tricks. Don’t let an injury end your season.
Quality vs. price considerations — When it comes to protective gear for snowboarding, the more protection and tech behind the gear, the higher the price tag. Materials like hardshells or impact-activated polymers offer protection that is flexible until it gets hit, then it becomes hard and protective, like D3O padding used in many of the Demon United pieces. If you aren’t falling far or simply want some protection in case you catch an edge, any padding will be better than none. Rather than focusing only on the tech, choose pieces that are comfortable and that you will actually wear.
Building a protection kit over time — Again, get a good helmet. From there, you can build up your kit piece by piece for what you think you need.
Maintenance and care

Cleaning and care
Proper washing techniques — Don’t ruin quality gear by washing it incorrectly; follow the instructions provided by the company.
Drying and Storage — After a day on the mountain, make sure to air out all your gear to prevent the formation of mold and unpleasant smells. Gear doesn’t need to be washed often, but it should be wiped down after each season and before storage.
Maintaining protection effectiveness — If you take proper care of your gear by letting it air out and keeping it clean, it will last longer. Padding and foam do degrade over time, and more so if not taken care of, so air things out, wipe down any nasty surfaces, and keep an eye on any cracks or signs of compression.
When to replace protection
Signs of wear and damage — With some items, such as helmets, a severe crash can compromise the helmet's efficacy. If there is visible damage, retire the helmet. If there is no visual damage, the likelihood that the inner foam is still compromised is high, and you should retire the helmet. Check out the manufacturer's policy, as some companies offer discounts on new helmets when your old one is damaged or destroyed.
Impact degradation over time — With protective gear for the body, consider replacing it after a few seasons or if you can tell that the padding is being compressed more, as foam does break down over time, impacting the effectiveness of the product and its structural integrity.
Safety inspection guidelines — Before hitting the slopes each season, check your protective gear just like you would your snowboard, bindings, and boots. Make sure any straps still stay tight, that all pads are in place and not separated or broken, and that the clothing still fits and can thus protect properly.
Common mistakes to avoid
Sizing and fit issues
Sizing concerns are less of a problem with protective apparel, but please ensure your helmet fits properly. It won’t protect you adequately at all if it is slipping and sliding around your head.
Skipping essential protection
Especially when you are learning how to snowboard, consider using extra essential protection. As you are falling backward a lot, a tailbone protector and wrist guards will help keep you safe from injury. Similarly, if you are new to the park or are at a point in your snowboarding journey where you are starting to push yourself a bit further, don’t let your season end with one bad fall. Consider back and tailbone protectors that slip easily under your jacket, but will provide that extra support in case of a caught edge or a nasty fall on a rail.
Essential snowboarding safety tips

On-mountain awareness
Understanding mountain conditions and weather — Sporty conditions, like icy slopes, are going to be much more hazardous than fresh snow or newly groomed runs.
Reading terrain and snow conditions — Know your level of riding and what runs you are trying; depending on the resort, some Blue runs might have moguls or be quite steep, so be able to recognize different terrains and how they relate to your skill level.
Recognizing fatigue and taking breaks — Like any sport, you are more at risk for an injury as you get tired. Take breaks often and drink plenty of water.
In case of an emergency — If there is an emergency or injury, you can flag down ski patrol or alert any employee of the mountain, from a guide to a liftie. Alternatively, you can call 911, and they will connect with ski patrol.
Riding etiquette and rules
Snowboard responsibility code — You should know the code when you head to any mountain, but protective gear can keep you safe when it comes to others who are not as responsible.
Right-of-way on slopes — Be aware of when trails merge, but especially be attentive to when you have to stop quickly or carve to avoid something. As a snowboarder, stopping means going perpendicular and can easily lead to a potential crash.
Lift safety and loading procedures — Getting on and off a chairlift is arguably one of the most difficult aspects of snowboarding. A helmet and back protection can help with catching edges and potential whiplash as you unload.
Pre-ride preparation
Proper warm-up and stretching — Protective snowboarding gear won’t help with a pulled muscle if you don’t warm up or stretch. Take that time from the parking lot to get your blood moving and stretch out those muscles.
Equipment checks and binding adjustments — Similarly, ensure that your bindings and boots are the proper size; adjust the stiffness or tightness of your boots to find the type of response that feels more comfortable. A looser feel is better for park riding, while a tighter, stiffer fit can help with more aggressive riding.
Understanding your limits and progression — Consider using extra gear as you transition to more challenging terrain or new tricks.
Riding with a buddy — When you can, ride with a friend. Keep track of each other, especially in challenging terrain, powder days, and wooded areas.
Terrain-specific safety
Park and freestyle safety guidelines — Respect the right of way, have a plan of what features you are going to hit, where a bailout point is, and always stop in a visible place.
Backcountry awareness and avalanche basics — Heading into the backcountry is an entirely different game when it comes to safety. Do not go into the backcountry if you do not have the proper training or gear.
Tree riding and obstacle navigation — Never head into the trees by yourself. A chest protector can help prevent an unintended impact, but protective gear won’t help you from getting stuck in a tree well by yourself.
FAQ
-
At a minimum, every snowboarder should wear a helmet, regardless of skill level. Additional protection depends on experience and riding style. Beginners often fall backward and brace with their hands, so wrist guards and tailbone protection are especially useful. More advanced riders, especially those riding in the park or trees, may benefit from a back protector, knee pads, and chest protection. Helmets significantly reduce the risk of head injury, and wrist guards are highly effective at preventing wrist fractures.
-
Yes, wrist injuries are among the most common in snowboarding, particularly for beginners who instinctively use their hands to break a fall. Wrist guards help prevent hyperextension by supporting the palm side of the wrist during impact. Slim designs fit under most gloves and are comfortable enough for all-day use. Getting used to wearing them early helps build safer habits on the mountain.
-
A tailbone protector is padded gear worn under your outer layers to absorb impact from falls, especially common when learning. It focuses protection on the lower back and tailbone area, where beginners tend to land repeatedly. Some options provide targeted padding, while others include additional hip protection. For new riders, it can significantly reduce discomfort and improve confidence.
-
Impact shorts protect the hips, upper thighs, and tailbone, and are a good choice for most recreational riders. They are worn under snow pants and designed to stay low-profile. Impact pants extend protection to include the knees, making them more suitable for park riding or situations with a higher risk of knee impacts. The choice depends on how much coverage and protection you need.
-
A snowboard helmet should have a durable outer shell and an inner liner designed to absorb impact. MIPS technology adds a low-friction layer that helps reduce rotational forces during angled impacts, which are common in snowboarding. Other systems offer similar benefits. A proper fit is just as important, so look for adjustable sizing, ventilation, and good compatibility with your goggles. Replace a helmet after any significant impact, even if damage is not visible.
-
Park and freestyle riding involve higher-impact features like jumps, rails, and boxes, so a more complete protection setup is recommended. A helmet is essential, along with knee pads and a back protector for added safety. Wrist guards and upper body protection can also be useful as progression increases. Comfort and mobility are key, since gear that fits well and moves naturally is more likely to be worn consistently.
Why you should trust us / About the author
Although I grew up in Wisconsin, my family got me on skis when I was just three years old. At ten, I decided to follow in my older brother's footsteps and try snowboarding. I haven’t stepped on a ski since and, instead, have been snowboarding for more than 25 years, with more than half of those seasons spent out west once I moved to Boulder, Colorado. I have dabbled in park riding over the years, but my go-to is moguls, trees, and steeps as I’ve advanced to an experienced rider; I have spent time in the backcountry as well. When it comes to testing snowboarding gear, I’ve spent numerous seasons sporting many different helmets, boots, bindings, and apparel to break down the minutiae of what truly works and what doesn’t when it comes to what I need as a snowboarder.
Read more on Mattie Schuler’s website or author page.


