How to Get Started Ice Climbing
Skills, Gear, and Safety For Your First Ice Climb

While first time ice climbers will start their adventures on less extreme walls, this photo provides inspiration for what is possible when we take the steps to learn skills, gain experience in reading ice and conditions, and familiarize ourselves with safety equipment. Photo courtesy Montana Alpine Guides.
January 2nd, 2026, updated with more climbing and gear resources
Ice climbing doesn’t have to be scary, despite the sharp learning curve. Yes, there are constantly changing snow and ice conditions and sharp and unfamiliar tools on your feet and in your hands. But ice climbing can be a rewarding activity that relies on your individual physical and mental prowess. It’s an activity that requires you to have company—and ideally a guide, for your first time out.
In this story, we’ll familiarize you with the gear and skills you’ll need before you go ice climbing for the first time, to make your time with a climbing guide much more comfortable.
This story is no substitute for taking classes and hiring a guide, but knowing what to expect and having some book learning around basic ice climbing skills will make things easier for you and your guide.
From understanding the terrain you may face to getting to know the gear, we are here to help familiarize you with the basics so you know what to expect before you meet your first frozen waterfall ice.

This waterfall in Cody, Wyoming is a good example of a climbing area suitable for first-time ice climbers. It’s low angle and relatively short so that climbers can focus on their foot placement and equipment skills. Photo courtesy Montana Alpine Guides.
how to learn to ice climb
Take a class or attend a festival
First things first: take a class! You can either do this on your own or with a buddy. Figure out what classes are available in your area for both ice climbing and avalanche education. You can also attend an ice climbing festival, which offers gear and classes for novice and beginner climbers.
If you have a friend who is familiar with ice climbing, the area, and the avalanche danger, as well as snow and ice conditions—that’s great! That said, you should never rely solely on your friend’s knowledge. To contribute to the decision-making process that keeps you both safe, learn more about the conditions and get a better understanding of the risks and dangers involved in ice climbing.
And even if you’ve been out once or twice, remember if you’re climbing somewhere new, that different regions have different snow and ice conditions. Just because you are familiar with conditions in one region does not mean you can safely climb in another area.
Hire a Guide
Hiring a guide for your first few times out will help you learn the ropes through professional, hands-on training with a person who is familiar with the area and conditions. Typically, guiding services will be able to provide both a wealth of knowledge and, in most cases, the technical gear you need for getting out.
It’s very important to check their certifications—Wilderness First Aid (WFA) and CPR are the minimum qualifications for professional companies. (You can read more about the American Mountain Guide Association’s criteria here.) Most guiding services list their certifications on their website, so you can feel comfortable with their qualifications before they get in touch.
You’ll also want to check what levels the guiding services teach. Some services provide classes at all levels; others cater solely to beginners or specialize in more advanced clientele. For example, I worked for Montana Alpine Guides out of Bozeman, MT, which offers a wide variety of professionally guided courses, ranging from introductory to advanced. If you’re looking for certified ice climbing guides in a certain region, we like the guide aggregation function at 57hours, which is useful for searching for guides by location and activity.
become familiar with basic rock climbing skills
If you’re just getting started climbing, know that just because you haven’t been on rock doesn’t mean you can’t go on ice. That being said, having some rope skills, footwork skills, and knowledge of knots from rock climbing will make your first ice climbing trip easier.
A good guide should be able to work with whatever skill you have, including starting from scratch, as long as the guide has the proper training and certifications and you’re honest with them about your experience level.
Be Honest with Your Guide
It’s worth saying again: Honesty with your guide and guiding service is key to keeping you safe. Whatever service you use, make sure your guide knows your experience level, so they can match you with the guide that will work best for you and your budget. You’ll also want to let them know about your familiarity with and access to gear, so they know where to start you off.
rent ice climbing equipment
Make sure you look into any “extras” that a guiding service may provide, like gear and transportation. Some just give you a guide for a day; others will get you to and from the site and/or rent you all the gear you need. For example, the guiding service I work for also offers ice climbing equipment rentals. Similarly, if you attend an ice festival, local providers will have rental gear on hand.
If local guides can’t provide what you need, they’re often able to tell you where and how to get it. Some local outfitters rent equipment like crampons, mountaineering boots, and helmets.
Lastly, guiding companies don’t always provide transportation, so you will want to check with them before heading out.

A helmet is an essential piece of gear. Kate Butler ice climbing in Hyalite Canyon, Bozeman, MT. Photo courtesy Kate Butler.
What gear do I need to ice climb for the first time?
There is a lot of gear that you need to know about before you head out climbing for the first time. So buckle up for this lengthy section! Prefer gear checklists? See our ice climbing gear checklist below!
What to Wear
Let’s start with a broad view: you’ll want socks, a base layer, an insulation layer, and a waterproof layer. For your hands, you’ll want a thin glove liner in addition to your outer gloves. As with any outdoor activity, you want to be warm but also have ventilation when exerting yourself.
A solid layering system is critical for the three states of ice climbing: hiking the approach trail, standing around belaying, and heavily exerting while climbing. When planning your layers, remember that everyone’s worried about getting cold—and everyone has to pee!
BASELAYER
Start by thinking about your base layer. Something you’re going to wear all day should be comfortable and moisture-wicking, like merino wool line from SmartWool (which is also a winner in our Best Base Layer guide). While there’s something to be said in favor of a onesie base layer, onesies may not be the best option for the ladies out there, as peeling off all your layers to pee will get quite cold. Instead, opt for a tight-yet-comfortably-fitting top and pants. You’ll want to avoid denim and cotton-based fabrics, as they are stiff and bulky, do not dry quickly, and can contribute to hypothermia.
INSULATING LAYER
Up next in your layering system is an insulating mid-layer, like the men’s and women’s Arc’teryx Atom Hoody, (featured in our Best Synthetic Jacket guide), for your top half. You’ll likely keep this layer in your pack so as to not get too sweaty while hiking the approach, but will want it for staying warm while you belay or wait to climb. While jackets are great, I believe vests are the unsung hero of mid-layers for outdoor activities—your core stays warm while your arms are free to roam. Many synthetic jackets, including the Atom LT, are also available in a vest version. Whether to go with a jacket or vest is largely a personal choice, depending on the weather and how warm you typically run.
WATERPROOF PANTS
Whichever mid-layer option you choose, you’ll wear a waterproof layer on top. Water/windproof shell pants and a jacket are going to be your best friend in all conditions. The men’s and women’s Dawn Patrol Pants from Black Diamond are a great example of an all-around shell pant that is durable and comfortable. You can see other examples of waterproof pants in our guides to the Best Men’s Ski Pants and Best Women’s Ski Pants.
WATERPROOF SHELL
As for shell jackets, the men’s and women’s Beta Jacket from Arc’teryx is a crowd-pleaser for ice-climbing; it’s lightweight, and has a longer cut to accommodate a harness. This is important because once you make your way up to the climb, all your layers should be tucked into each other or in/around your harness. Tucking will keep you warmer and remove any hazards from fabric flapping around while you’re climbing. You can see more examples of shell jackets in our guides to Best Men’s Ski Jackets and Best Women’s Ski Jackets. Or, consider a Softshell Jacket for superior breathability.
GLOVES
Don’t forget your hands—they need layers, too. A thin liner is nice for the approach hike, so you can quickly stow them in a pocket if your hands get too warm while walking. For climbing, you’ll need a glove that is well-insulated and not overly bulky so that you can hold your tools comfortably. These The North Face Summit Summit Patrol gloves ave been a staple of mine for the past two seasons.
Additionally, having a down-filled glove or mitt, like these by Outdoor Research, is perfect for either belaying or just hanging at the crag. For more recommendations on gloves, see our guides to Best Ski Gloves and Best Winter Gloves.
SOCKS
Remember your feet, too. You’ll want multiple pairs of socks to cover you for the whole day. When hiking and climbing, you’ll want to have a very lightweight wool sock. If your socks are too bulky for your boots, they could reduce circulation in your feet and make for a very uncomfortable day.
We recommend keeping a second pair of dry socks in the car to have dry and warm feet for the drive home.
You can see recommendations for thin and lightweight socks of different heights in our guides to Best Ski and Snowboard Socks, Best Hiking Socks, and Best Running Socks.
Essential accessories
Other various clothing items that will help you stay warm and comfortable are usually pretty cheap and easy to find.
SUNGLASSES
You’ll want to wear sunglasses, glacier glasses, or another form of eye protection at all times. For recommendations on models we like, see our guide to polarized sport sunglasses that stay put.
BUFF OR NECK GAITER
A buff or neck gaiter is great for wind, snow, or cold weather in general, and can be worn in multiple ways for maximum comfort—I often find myself pulling mine up and wearing it over my ears. You may also want to bring a beanie for the hike up and/or to put under your helmet while at the crag.
HAT
Wearing a baseball cap under your helmet is a nice trick to keep small bits of falling ice out of your face while you’re climbing. Even in the cold, you should be aware of harmful UV rays, which can reflect easily off snow and ice. While most baseball caps will do, if you’re looking for a model that is ventilated and wick away sweat, see our guide to Best Running Hats and Best Hiking Sun Hats.
While first-time ice climbers are unlikely to tackle Hyalite Canyon Ice Climbing near Bozeman, MT, photos like this can inspire anyone interested in ice climbing to take the first steps to get more familiar with the skills and equipment. Photo courtesy Montana Alpine Guides.
Climbing Gear
The items on this list is what most people think of when they think of ice climbing gear: helmets, ropes, harnesses, ice tools, and boots and crampons. All these are critical safety items required to go ice climbing.
While the cost of this gear adds up, for the first few times you ice climb, you may be able to rent almost all the gear from a local outfitter or your guiding service. Renting is an affordable way to see if you like the sport before investing in your own ice climbing gear.
HELMET
A helmet is a critical piece of gear. As with rock climbing outdoors, a helmet will protect you from anything falling from above—whether it be ice, people, or gear. Assess what you already have in your rock climbing gear or even ski gear, as helmets for other sports can be used interchangeably in a pinch (but be sure to check your helmet’s rating first!). For example, in our Best Ski Helmets guide, our Best Backcountry winner, the Sweet Protection Ascender MIPS, is certified for ski mountaineering and rock climbing. If you are in the market for an affordable multi-sport helmet, I like the Petzl Meteor for its versatility! Mountaineering, ice climbing, and skiing, this lightweight helmet is designed for everything but alpine skiing. However, do not use a bike helmet for ice climbing as it has different ratings and designs than climbing helmets or ski helmets.
HARNESS
To tie in and safely climb, you’ll need a harness that fits you in all the right ways and that you put it on correctly (your guide should check for this before you start). You’ll want the waist to fit snug when cinched down, while still being able to get the width of your thumb between your body and the harness. We prefer adjustable leg loops, as they are more adaptable and comfortable.
One thing you should look for in a harness that’s ice-climbing specific is an ice clipper loop. Ice clippers are carabiners specifically designed for racking ice screws and clipping your ice tools to your harness. These loops are important to have when being lowered down from climbing with tired and cramped hands!
Learn more in our Best Climbing Harnesses guide.
ICE TOOLS
Your ice tools are, arguably, the most important tools. An ice tool is different than an ice axe as it is designed for vertical ice climbing. An ice axe (sometimes called an ice ax) is designed for hiking on moderate snowy, icy, or glacier terrain. In these situations, you likely will want a longer shaft to help with self-arrest, plunging into the snow, and building deadman anchors. In contrast, an ice tool is designed specifically for ice climbing. It usually is shorter than an ice axe with a more curved shaft and is lighter in weight. (Of course, there are mixed climbing tools that hybridize the two, but most people getting into ice climbing will want the tool specialized for their activity).
Three beginner tools I would recommend are the Trango Raptor, the Black Diamond Viper, and the C.A.M.P. USA Cassin X-All Mountain. Each ice tool above has excellent ratings for various levels of climbing and offers control and a comfortable feel for the beginner and experienced climber alike.
BOOTS
Ideally, you’ll use a crampon-compatible mountaineering-specific boot—the norm in ice climbing.
When shopping for mountaineering boots, you’ll notice there are several types:
Single
plastic double
synthetic double
8000m
Single and plastic double are what you want for ice climbing—the double plastic is great as an option that allows you to remove and dry the liner. The others will work but can be overkill for beginner ice climbing and your wallet.
No matter what, you’ll want stiff, crampon-compatible boots for ice climbing. Ski boots could do the job in a pinch—they’re generally quite stiff and sometimes crampon-compatible—but they’re less ideal for hiking, so you’ll need something like hiking boots for approach footwear to get to the base of the climb.
CRAMPONS
Crampons are the sharp points that you will strap to your feet in order to climb ice. There are three methods of crampon boot attachments and two different types of front points (the forward-facing points on the crampons).
Strap-on Crampons
The strap-on style of crampon fits nearly any boot and is very versatile, so it’s a great option for beginner climbers without ski or mountaineering boots. However, they have a less secure fit than the automatic style, and the straps tend to loosen over time with movement, rendering them less reliable. They are less than ideal for ice climbing but will get the job done for beginning outings.
Automatic (step-in) Crampons
Automatic (step-in) crampons are ideal for ice climbing. They attach to your boot via the welts (notches) on the front and back of the boot. They feature front toe bails and adjustable heel levers that lock you in securely. The locking levers are why they are called “automatic.” You’ll want to bring your boots along to try automatic crampons on before buying because the toe welt shapes on boots and crampon toe bail shapes vary from one company to another—the ones you like might not fit the boots you love.
Hybrid Crampons
The hybrid style is a mix between the strap-on style and automatic style but suffers from a lack of security similar to the strap-on style.
If you are looking to buy your own, we think fully automatic crampons with vertical front points are best for ice climbing. If you are renting from a guide, depending on their availability, you may not have a choice. See this article by REI for advice on purchasing ice climbing specific crampons.
Shared Gear vs. Personal Gear
One of the nice things about ice climbing being a partner sport is the ability to share some gear with your partner. You’ll be able to share one pair of tools, a single rope, and an ice screw set and quickdraws. However, each person should have their own boots, harness, belay device, and all their own clothing.
For the first few times you ice climb, you may be able to rent almost all the gear from a guiding service. As you get more into the sport, you may want to consider investing in these items. The ability to split the costs of shared tools with a partner is helpful, as it does make getting into this sport much more budget-friendly.
Other Things to Bring
You’ll also want to carry a large-volume pack containing chapstick, sunscreen, your eye protection (sunglasses/glacier goggles), snacks, water, first aid, a headlamp, dry socks, additional dry layers, and potentially different footwear, depending on what the approach to your climb is like. A fan favorite for staying warm and hydrated is bringing along two thermoses, one with a hot beverage and one with soup.

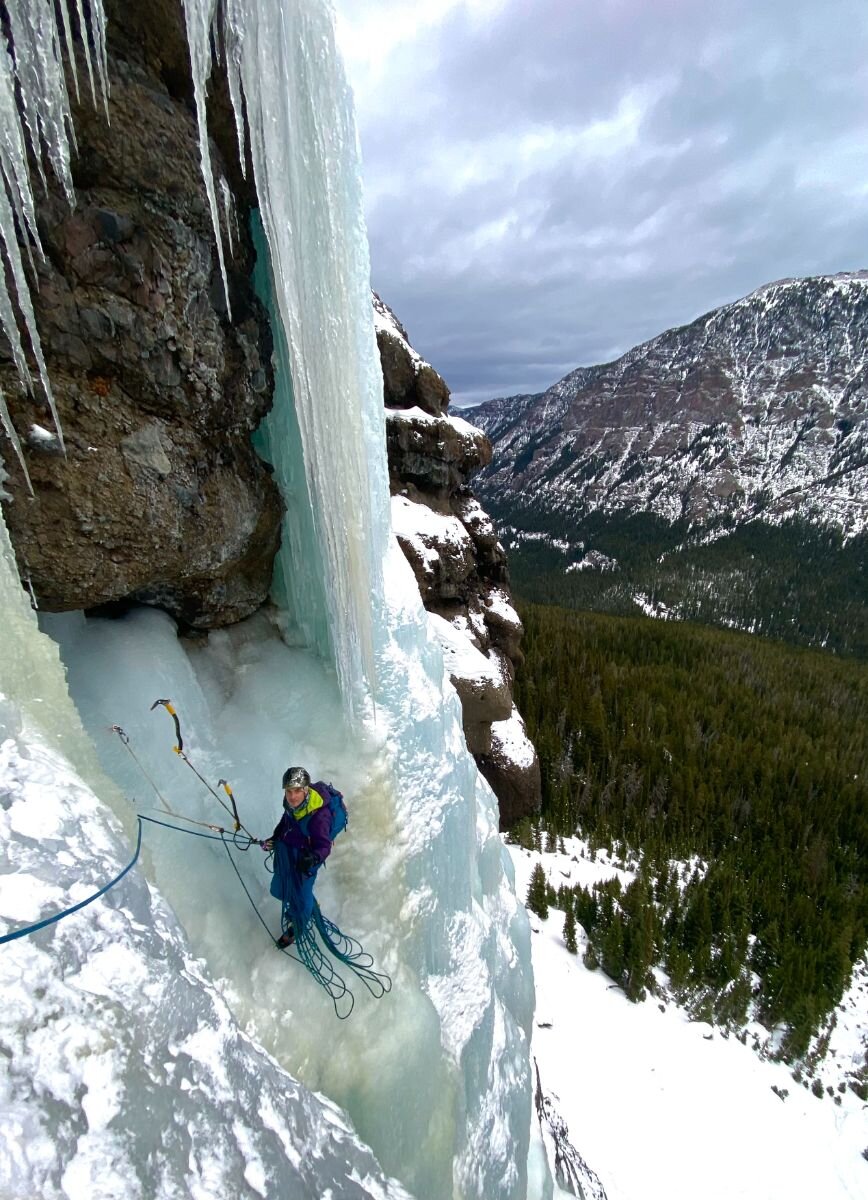
Using ice climbing techniques in Cody, Wyoming. Photo courtesy Montana Alpine Guides.
What techniques and skills can I expect a guide to teach me?
Depending on your guide service, your guide will likely teach you the following skills outlined in this section. It’s important that you practice not just at home, but with the appropriate tools and alongside someone familiar with the proper way to use those tools. We outline ice climbing techniques below to help familiarize you with some key principles that an instructor or guide will show you in person.
Some basic techniques every ice climber should know are:
How to tie a figure 8 knot properly and belay (jump to this section)
How to swing tools properly (jump to this section)
How to walk/climb with crampons (jump to this section)
How to lower from the top (jump to this section)
How to Tie a Figure 8 and Belay
Two things ice climbing has in common with rock climbing are the Figure 8 knot and belaying. If you have the opportunity before heading out to ice, you can learn from a local climbing gym or head to an REI with a rock wall for a basic top rope clinic. You'll learn how to properly use a belay device and belay technique.
Depending on your guide and the services they provide, these may be skills they’re willing to teach you.
Related skills like learning to set up a safe top rope, to clean an anchor and all gear placed while climbing, and to rappel will be handled by your guide your first time out. Still, understanding what your guide is doing may make you feel more safe and confident. You can learn more about these skills in this article from REI. You also may be interested in checking out our Best Belay Glasses guide.
How to Swing Tools Properly
Tools will have varying handles, sometimes more than one place to hold them. Initially, it’s going to be whatever feels most comfortable to you. As you get more advanced, you will get a feel for what works best for you, on each grade of ice.
When swinging your ice tools, you want to think of using a hammer above your head while flicking your wrist. bend your elbow back to where your wrist is almost in line with your helmet, swing forward, and flick your wrist hard to plant the pick securely into the ice. This video will give you a great visual example of how this should look.
Another helpful aspect of a guided experience is that it can help you refine your ice climbing technique in real-time. This is important because swinging your tools at the wrong angle, or not swift enough, will cause the pick to not stick into the ice.
How to Use Crampons
Crampons are sharp spikes worn on the bottoms of your boots to help you walk on ice and progress upwards when climbing. When kicking the crampons into the ice, you’ll want to think about pulling your big toe upward in your boot. This will help your kick be straight into the ice. Once the front points (toe points) are in the ice, drop your heel to stand up flat. REI has more details on how to use crampons here.
As a note, you’ll want to be careful when walking in crampons on flat ground. It’s easy to catch your pant legs—which will not only put a hole in your pants but likely make you fall over. There’s a saying in ice climbing: “walk like a cowboy!” The extra distance between your legs will help keep your pants intact and your body upright.
How to Be Lowered from a Climb
Getting down is a little different than going up—and you’ve got spikes on your feet and hands to make matters more difficult. But this is when the ice clipper loop on your harness comes into play!
Once you’re ready to come down, vocally let your belayer know you’re all set and ready to be lowered, clip your tools into those special carabiners with your picks pointing backward, and sit back into your harness like you’re sitting down into a chair but with your feet straight out in front of you on the ice.
As your belayer lowers you, slowly walk your feet down the ice until you’re able to stand back on the ground, making sure you have proper, stable footing before the rope goes slack.

Being aware of ice fall and conditions is essential for all levels of climbers. Ice climbing in Hyalite Canyon, Bozeman, MT. Photo courtesy Lauren “Sully” Sullivan.
Basic safety skills you should know
Before heading out on your first ice climbing adventure, there are a few basic things you’ll need to know or be aware of. It’s imperative to understand the inherent risks and dangers that come with recreating outdoors, especially during winter weather conditions. It’s important to have general knowledge of what you are—quite literally—walking into. Get familiar with basic safety issues that might come up while ice climbing: avalanche hazards, icefall, hypothermia, dehydration, and ice conditions.
Avalanche Awareness and Ice Fall Awareness
As most ice flows form in gullies and drainages, many places where ice climbing occurs are common avalanche zones. Educating yourself about this specific type of danger is imperative, ideally through a class—whether a class on ice climbing that includes avalanche knowledge or a more intensive class like AIARE 1. We like this avalanche training aggregation calendar that shows trips of various levels across the world.
Equally important is being keenly aware of ice fall, as falling ice will cause injuries if you are hit with it. Even a small piece of ice, with the force of gravity, can cause damage if it strikes you. Always wear your helmet, and keep yourself out of danger zones by staying conscious of where you’re standing, in relation to both the ice and the climber.
You can read about avalanche awareness in our guide to How to get started backcountry skiing and in our Best Avalanche Beacon guide.
We also recommend looking at our Avalanche Gear Checklist and carrying essential avalanche items with you.
Remember that no gear is enough to protect you. Having the proper training, education, skills, and experience is paramount to being safe in avalanche country.
Hypothermia
Hypothermia can happen fairly easily but can also be avoided easily by bringing extra layers and moving around (do calisthenics if you’re not climbing!). Be familiar with the signs and symptoms of hypothermia, and of your own tolerance for cold. Don’t be afraid to be too warm!
Hydration
Staying hydrated is so important, but also can be easy to forget. Understandably, cold water isn’t something you might feel like drinking on a cold day on the ice. Luckily, there are many warm drinks with electrolytes that are a great option for staying hydrated and keeping your body warm. Skratch Labs or Liquid IV are great examples of these sports hydration mixes, both offer single-serving packets that are easy to pack and dump into your warm water bottle. See our Best Electrolytes guide for more recommendations.
Understanding Ice Conditions
Lastly, knowing ice conditions and when it’s safe to climb is very helpful. There are lots of variables that create ice conditions: temperature, traffic on the climbs, amount of ice formed, and more. You should not be climbing on ice that is too thin, too hollow, too brittle, or if the pillar of ice isn’t touching the ground. A good guide should be able to lead you to locations where ice quality and conditions are safest, whatever your skill level—but educating yourself before going out, ideally with a class, is never a bad idea.
Understanding the Ice Grading System, Terrain
Your entry to ice climbing should start with an ice climbing course—specifically, one that also ropes in some basic avalanche knowledge. Setting off a slide or being caught in one set off by someone above you is extremely dangerous, so you’ll want to know how to make safe, informed decisions throughout the day.
Your general knowledge shouldn’t stop there. Get to know how ice climbs are rated for difficulty (keep reading on!). Unlike a rock climb, each ice climbing route is constantly changing, which makes the grading more tricky. Technical difficulty and steep ice are the main factors used in grading how hard a climb on an ice route will be.
In the US, the most common grading system for water ice (WI) ranges from WI1 - WI7 (with the potential for a WI8 grade still a hot topic of discussion). If you are new to ice climbing, your guide may choose to start you on a WI1—this is a low angle “climb” where no tools are required. In contrast, a WI7 has features such as long and sustained 90 degrees climbing on poor quality ice with little to no protection placements available. The criteria for ice climbing grades in between show the variability of snow and ice—knowledge that comes as you get more experience and practice in the field. To learn more about the grading system, check out the American Alpine Club’s International Grade Comparison Chart.
If you’re looking for general conditions knowledge that’s useful to new and seasoned climbers alike, Petzl has a fantastic resource.
Understanding Regional Ice Variations
Depending on your location, there may also be some guidebooks to help you get an idea of exactly what you will be climbing with your guide. These books have the necessary information on access, such as where to park and where the trails leading to the climbs begin, as well as the bigger picture stuff, like where the ice forms each year, the level of difficulty of the ice climb, and the length and terrain of the approach trails.
For example, if you’re climbing in Montana, this writer’s choice for guidebooks are The House of Hyalite and Winter Dance, both written by Joe Josephson. These books are artfully crafted and filled with stories and knowledge of ice climbing routes from the people who first discovered them, along with detailed information on each climb by Josephson himself.
Now that you know what to expect for your first time ice climbing, you are more prepared to go out and learn something new. Even if you are a seasoned rock climber, this is a great way to expand your climbing skills and get outside in a new way during the wintertime.
Packing Checklist
What to Wear
Warm Buff or neck gaiter
What to Pack
Backpack
Snacks
Water
Additional Dry Layers
Eye Protection (sunglasses or glacier goggles)
Dry Socks
Chapstick
Thermoses (hot and cold)
Optional:
Hiking boots (depending on the approach to your climb and the comfort of your mountaineering boots)
Footwear
Ski boots or mountaineering boots
Crampons, preferably ones with step-in fully automatic vertical front points
Climbing Gear
Harness
Helmet
One Rope
Belay device
Ice Screw set
Quickdraws


