Yoga Poses for Hikers
Yoga Poses for Hiking Preparation and Recovery from a Certified Iyengar Yoga instructor
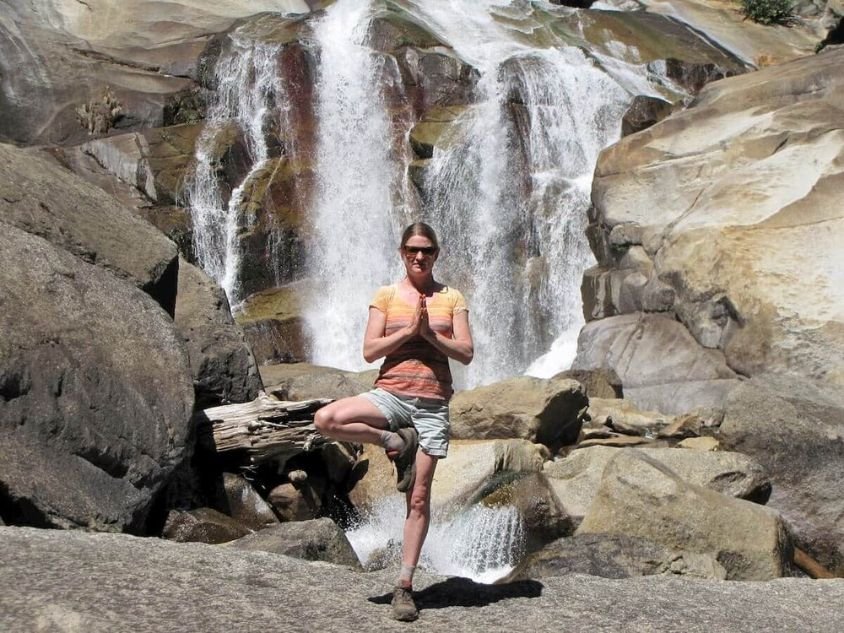
Practicing hiking preparation poses before your hike or hiking day begins can benefit you on trail. Photo courtesy Nina Pileggi.
Yoga and hiking go together. Yoga is an art and discipline that when practiced with intention brings a quiet body, mind, and breath. Hiking can bring about a similar sense of quietness and connection to oneself and to nature. Both yoga and hiking are physically challenging pursuits, yet can be enjoyed at any age and adapted to the body you have today.
Yoga poses can help prepare you for the trials of hiking because yoga is excellent for training for joints, muscles, and balance. A yoga practice can also soothe tired legs or sore muscles the next day.
Let’s look at some specific yoga poses to maximize your hiking practice!
Disclaimer: When participating in any exercise, there is the possibility of physical injury. You agree that you do so at your own risk, are voluntarily participating in these activities, assume all risk of injury to yourself, and agree to release Treeline Review and all people associated with Treeline from claims or causes of action, known or unknown. The information provided is not intended to be a substitute for professional medical advice, diagnosis or treatment.
Yoga can be done almost anywhere. Every small effort is beneficial. Photo courtesy Nina Pileggi.
Including Yoga in Your Life

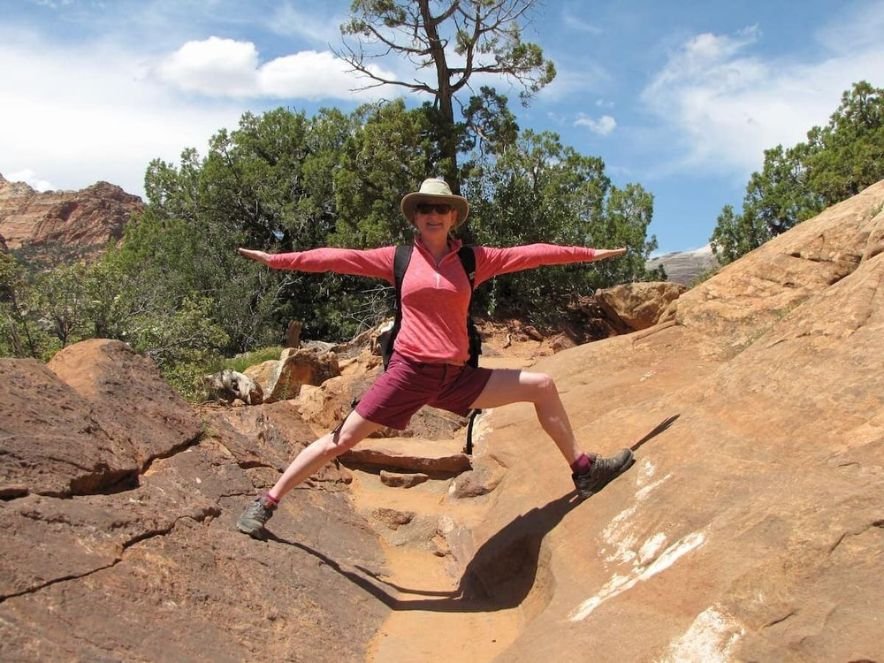
The author doing yoga for hikers in a canyon in Zion National Park. Photo courtesy Nina Pileggi.
Yoga is very adaptable to your schedule; even practicing yoga 15 minutes twice a week can make a difference! The yoga poses described below are suggested as a sequence to do in order.
But, if you don’t have time to do all the poses, pick one or two poses to do in the time you have.
Yoga is additive, and no effort you put into it, however small, is wasted. Also, while the poses and sequences have been designed to target hikers’ needs, these poses are not just yoga for hikers. They are great all-around poses that can be done whenever you want to do some yoga.
The hiking preparation poses (see below) can build confidence the day before or morning of the hike.
The hiking recovery poses (see below) are wonderful after you get home and have had a chance to rest, but are especially nice the day after the hike. If you are out on the trail and are taking a break, go ahead and do a yoga pose!
Hiking Preparation Poses
Your hiking gait benefits from optimizing the freedom in your feet, ankle, knee and hip joints. Long and strong calf and thigh muscles help you tackle elevation changes. Good balance is essential, and a strong back doesn’t hurt either!
Having a yoga mat is helpful, but not absolutely necessary. See my guide to the best yoga mats for recommendations on long-lasting mats that will support your practice.
Have a firm blanket, a sturdy chair and a wall nearby. Most firm blankets will work or you can use a yoga blanket.
Instructions for asymmetrical poses are given for one side.
Reverse right and left instructions to do the second side.
All poses can be repeated, unless otherwise noted.

Thunderbolt pose is helpful to gain flexibility in the feet and ankle, which is beneficial for hiking. Photo courtesy Nina Pileggi.
Thunderbolt Pose (Vajrasana)
This yoga pose is great for gaining flexibility in the feet and ankles. Flexibility in the feet and ankles contribute to a functional gait, leading to ease during the miles on the trail.

A side view of Thunderbolt pose. Photo courtesy Nina Pileggi.
Open a blanket and have another blanket nearby
Kneel on the blanket with your knees, shins, ankles and feet together and the toenails facing the floor. With your hands, reach behind you and press the inner heels together. Keep your inner heels together and sit down on your heels.
If your knees don’t allow this shape, take the extra blanket and put it between your buttocks and your heels to create space for the knee.
Stay for 1-2 minutes. Repeat.
Then lean forward, curl your toenails to face the ceiling and sit back again. This one can be more intense. 30 seconds is probably enough!
While in the pose, you can also do shoulder work to prepare for the next yoga pose. Lift up both arms to reach toward the ceiling. Straighten your arms and stretch up.
Related: The Best Hiking Shoes

Downward facing dog benefits the calves and hamstrings and can promote motion and strength for carrying a backpack. Photo courtesy Nina Pileggi.
2. Downward Facing Dog Pose (Adho Mukha Svanasana)
Downward facing dog pose lengthens the calf and hamstring muscles, and also promotes shoulder range of motion and strength, which may be affected by carrying a backpack. Plus, the spine receives a nice stretch.
Kneel on your hands and knees. Have the knees about hip-width apart and the hands a little wider than shoulder-width apart. Place your hands so that the middle finger is either straight ahead or slightly turned out. Press your palms and straighten your arms.
As you exhale, lift your knees. Press into your palms and from the stability of your palms pressing into the floor, stretch your hips up and back.
With a further exhalation, straighten your legs and reach your heels back and down.
Hold 30-60 seconds and then release.
You can also do this pose with your hands elevated on a chair. The chair should be placed at a wall so that it is stable.
Related: The Best Hiking Backpacks

Step 1: The gentlest version of Reverse Bound pose has you grab wrists. Photo courtesy Nina Pileggi.

Step 2: The more intense version of this pose has you grab elbows. Photo courtesy Nina Pileggi.
3. Reverse Elbow Catch (Paschima Baddha Hastasana)
This pose helps to build good posture. It will also help you reach your water bottle in the side pocket of your pack.
Stand well with your feet hip distance apart and parallel to each other. Take your right arm behind your back and catch your left wrist. Walk your right hand along your left forearm, perhaps catching the elbow.
Take your left hand to the right wrist, forearm or elbow.
Stand tall, with the abdomen back, sides of your chest lifted and your shoulders rolled back. Hold for 30-45 seconds.
Change the order of catching the hand to do the other side.

Step 1: Tree Pose with a support for balance. Photo courtesy Nina Pileggi.

Step 2: A more intense version of this pose takes you away from the support. Photo courtesy Nina Pileggi.

Step 3: For more balance and strength practice, stretch your arms to the sky. Photo courtesy Nina Pileggi.
4. Tree Pose (Vrksasana)
While on trail, you may encounter scree fields, rock scrambles, or creek crossings--each which may challenge your balance. Tree pose is a great pose to practice to improve your balance and give you confidence for these challenges.
Stand well by placing your feet hip distance wide, firming your legs and lifting your chest. Shift the weight to your left foot while keeping your left hip firm.
Bend your right leg and place your right foot on the inner shin or inner thigh of the left leg. Point the toes straight down. Do not put the foot directly on the left knee. Press your right foot into your left leg, and your left leg into your right foot to secure the foot placement. Your right knee should point to 45-60 degrees to the side.
Press through your big toe mound, the outer edge of the foot and center of the left heel to maintain balance.
Have a sense of compactness to your hips and gently move your abdomen back and up.
When you have your balance, stretch your arms up to the sky and reach up. Hold for 30-60 seconds.
If balance is tricky for you, you can have a hand on the wall or a countertop.
Related: The Best Trekking Poles

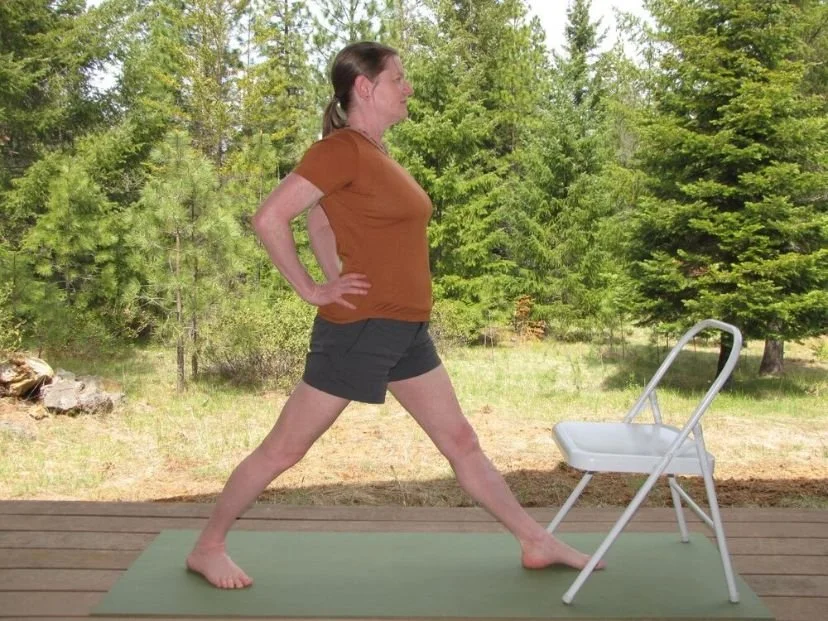
Warrior 2 helps hikers by strengthening key muscles for walking uphill. Photo courtesy Nina Pileggi.
5. Warrior 2 (Virabhadrasana II)
This pose gives length to the groins and strengthens ankles, legs, the core, and the arms.
Stand in Mountain pose (feet hip distance wide and parallel to each other, arms stretch down, chest lifted up).
Step your feet 4 feet apart and arms lifted wide at shoulder level. Then point the left foot straight ahead. Bend the right knee slightly and then turn out your right foot, knee and thigh 90 degrees. This turning out action comes from the thigh bone rotating in the hip socket.
Take a moment and see that your right heel points straight the middle of the arch of your left foot. Adjust your feet if this is not the case.
Keep your right thigh rotating out, but turn your breast bone and collar bones to face forward.
Strongly press your outer left foot down and make your left leg firm. As you exhale, bend your right leg until the right knee is directly over the right heel. Don’t let the right knee fall to the big toe side; instead, press your right knee back and your right buttock forward.
Lift up the sides of your trunk and stretch your arms.
Keeping your front chest forward, turn your head to look to the right. Hold the pose for 30-45 seconds.
To come out of the pose, press both heels and straighten your leg with an inhalation. Turn your feet forward and bring them together.
Related: Hiking the Prescott Circle Trail
Step 1. Intense Side Stretch Pose prepares hikers’ calves and hamstrings. Photo courtesy Nina Pileggi.
6. Intense Side Stretch Pose (Parsvottanasana)
This pose is important preparation for calves and hamstrings. Both of these muscle groups are lengthened by practicing this pose.
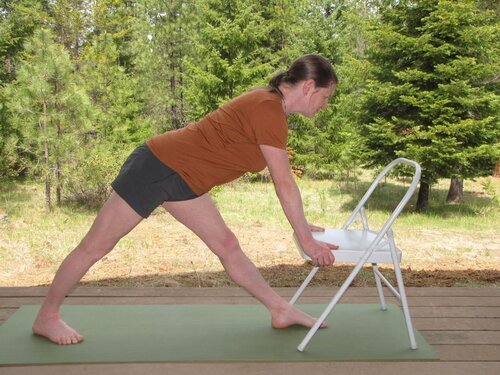
Step 2. Position your left foot with the chair. Photo courtesy Nina Pileggi.

Step 3. Bend at the top of your thighs placing your hands on the chair. Photo courtesy Nina Pileggi.
Stand in front of a sturdy chair.
Step your right foot forward and your left foot back so that your legs are about 3.5 feet apart.
See that your left foot is turned out to the left about 30 degrees and your right foot is pointing straight ahead.
Press your feet and straighten both legs. Use your front thigh muscles to straighten your right leg fully.
Keeping your legs straight, exhale and bend at the top of your thighs and place your hands on the chair. Stretch your chest forward as you press your legs back. Hold for 45-60 seconds.
To come up, place your hands on the waist, inhale and stand up.
Related: The Best Camp Chairs
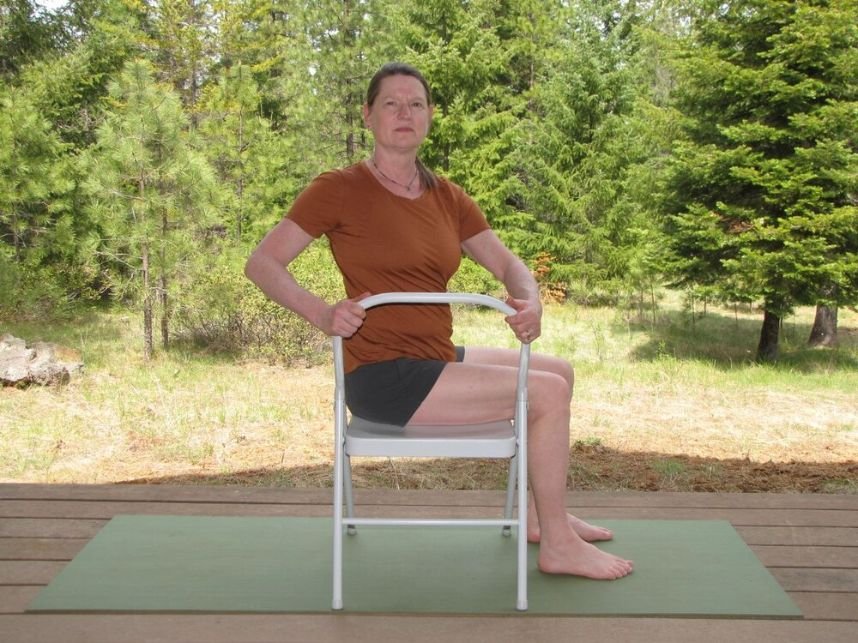
Seated twists help prepare for carrying a backpack. Photo courtesy Nina Pileggi.
7. Seated Twist (Bharadvajasana)
Twists can relieve back aches and give a good range of motion for the spine and ribs. Free movement of the spine and ribs is needed while walking, so this easy chair twist also helps you prepare for having your pack on your back.
Sit sideways on a chair with the right side of your body facing the back rest of the chair. Sit with your feet about hip distance wide and heels under the knees.
Sit up well with your shoulders relaxed.
Inhale - as you exhale turn your trunk to the right and hold the sides of the chair gently. Use your arms to help you sit up and gently turn more as you exhale again. Hold 45-60 seconds.

Corpse pose can be flat on your back (see below) or with your legs bent and supported (as shown). Photo courtesy Nina Pileggi.
8. Corpse Pose (Savasana)
Yoga practice typically ends with a resting pose. Corpse Pose gives us time to integrate what the body has been practicing and learning.
Lie on your mat with bent knees. Place a thin blanket under your head and neck. Use just enough blanket so that your forehead is parallel to the ceiling.
Tuck your shoulders towards the waist and then tuck your buttocks towards the heels.
Extend your legs along the floor, and then let your legs relax in the hip sockets. Let your big toes fall towards your little toes.
Close your eyes and relax. Stay 3-5 minutes. Do this pose just one time.
If your back is uncomfortable, put a rolled blanket behind your knees.
Related: The Best Sleeping Pads

After hiking poses can create space and create balance after hours of repetitive motion. Photo courtesy Nina Pileggi.
After-Hiking Yoga Poses
You completed a long hike the day before and now your body feels tired, sore and tight. As for the hiking preparation poses, have a mat, firm blanket and a wall handy. Also, have a yoga block or heavy book, and a yoga strap nearby. I like Tools for Yoga, but any yoga strap or block will work. If you don’t have a yoga strap, a tie or a belt from a robe would work just as well.
Let’s learn some poses to help with recovery.

Downward facing hero’s pose can be done with supports (as shown) or without the blankets. Photo courtesy Nina Pileggi.
Downward Facing Hero’s Pose (Adho Mukha Virasana)
This pose relaxes the back and makes space in the spinal joints after a long day of carrying a pack.
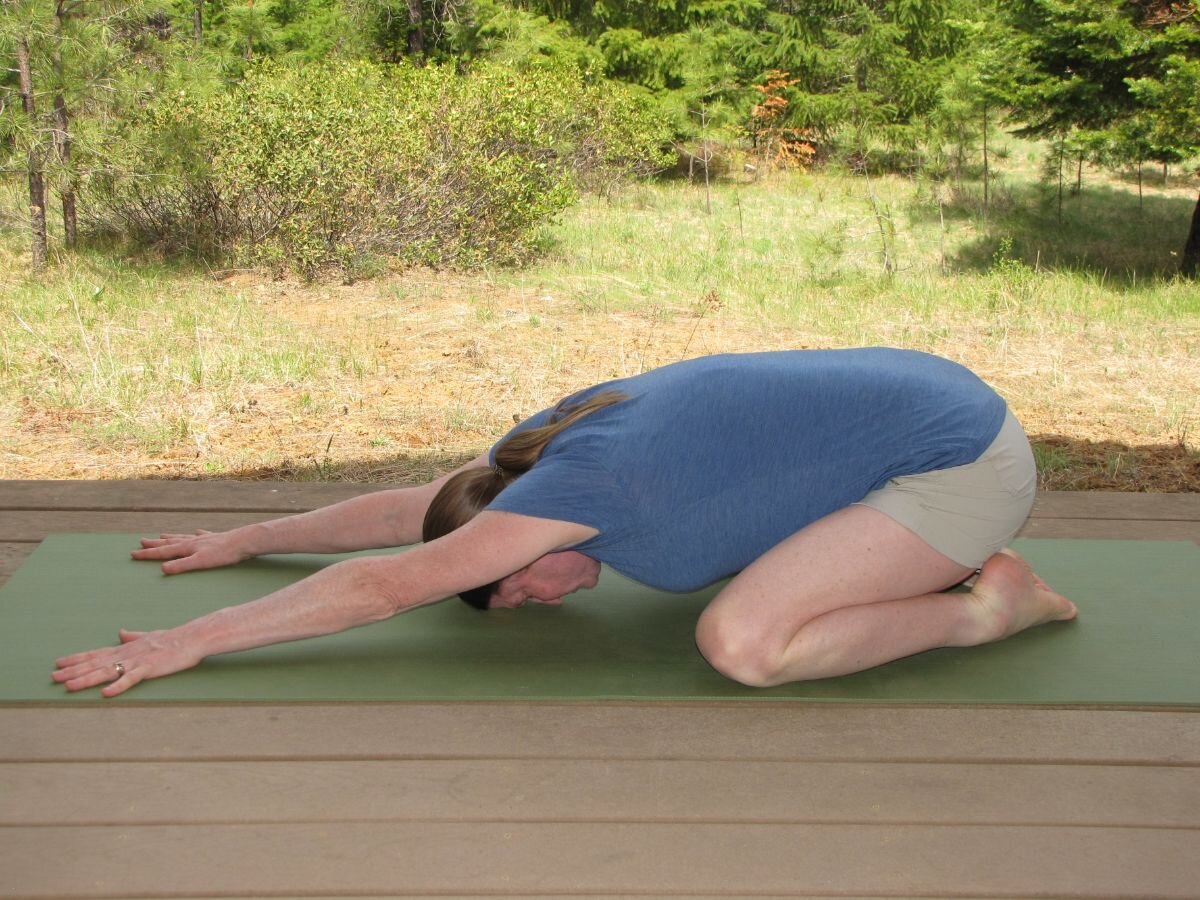
Variation: Downward facing hero without a support. Photo courtesy Nina Pileggi.
Sit on your heels. Touch your big toes together, separate your knees about as wide as your yoga mat.
Keeping your buttocks heavy on your heels, walk your hands forward as far as you comfortably can.
Relax your neck and put your forehead on the floor or on a blanket. Your head should not be below your shoulders.
If you can’t sit on your heels, then put a blanket between you and your heels.
Hold as long as it is comfortable - one to two minutes.
To come out, walk your hands towards the knees and press the floor with your hands.
Related: The Best Backpacking Backpacks

Downward facing dog’s pose can be done with a chair as support or without support (as shown above). Photo courtesy Nina Pileggi.
2. Downward Facing Dog Pose (Adho Mukha Svanasana)
See the description for Downward Dog above in the hiking preparation section. This pose is great after hiking as well, and brings rest and rejuvenation!

Triangle pose benefits hikers by lengthening muscles impacted by climbing hills. It also gives space to the spine and upper chest, which may be impacted by carrying a pack. Photo courtesy Nina Pileggi.
3. Triangle Pose (Utthita Trikonasana)
Triangle Pose lengthens the inner thighs and the hamstrings. The spine and upper chest get space and freedom.
Step the feet about 4 feet apart.
Turn your left foot slightly in. Turn your entire right leg (foot, knee and thigh) out 90 degrees.
Line the center of your right heel up with the center of your left arch.
Press your feet well and straighten both legs. Stretch your arms to the side in line with your shoulders.
As you exhale, bend at your right hip crease and reach your right hand to hold your right shin or ankle.
Turn your chest towards the ceiling and stretch your left arm up.
Hold for 45 - 60 seconds and come up with an inhalation.

Step 1. Intense Stretch Pose can be done with a support like a chair, picnic table bench, or stump. Photo courtesy Nina Pileggi.

Step 2. A more intense version does not require a support. Photo courtesy Nina Pileggi.
4. Intense Stretch Pose (Uttanasana)
This pose is aptly named! The Intense Stretch Pose gives the legs a great stretch and helps the spine and back benefit from gravity.
Stand in front of a chair with your feet hip distance wide.
Press your feet into the floor, especially your heels, straighten your legs, and be tall.
As you exhale, bend from your top thighs and place your hands on the chair. See that your legs stay straight and your back stays unrounded. Take a few breaths.
If you would like more challenge, as you exhale, walk your hands lower down on the chair legs. Let your trunk extend towards the floor and your head release down.
Hold for a minute and then with firm legs, inhale to come up.
Related: Hiking the Three Sisters Loop
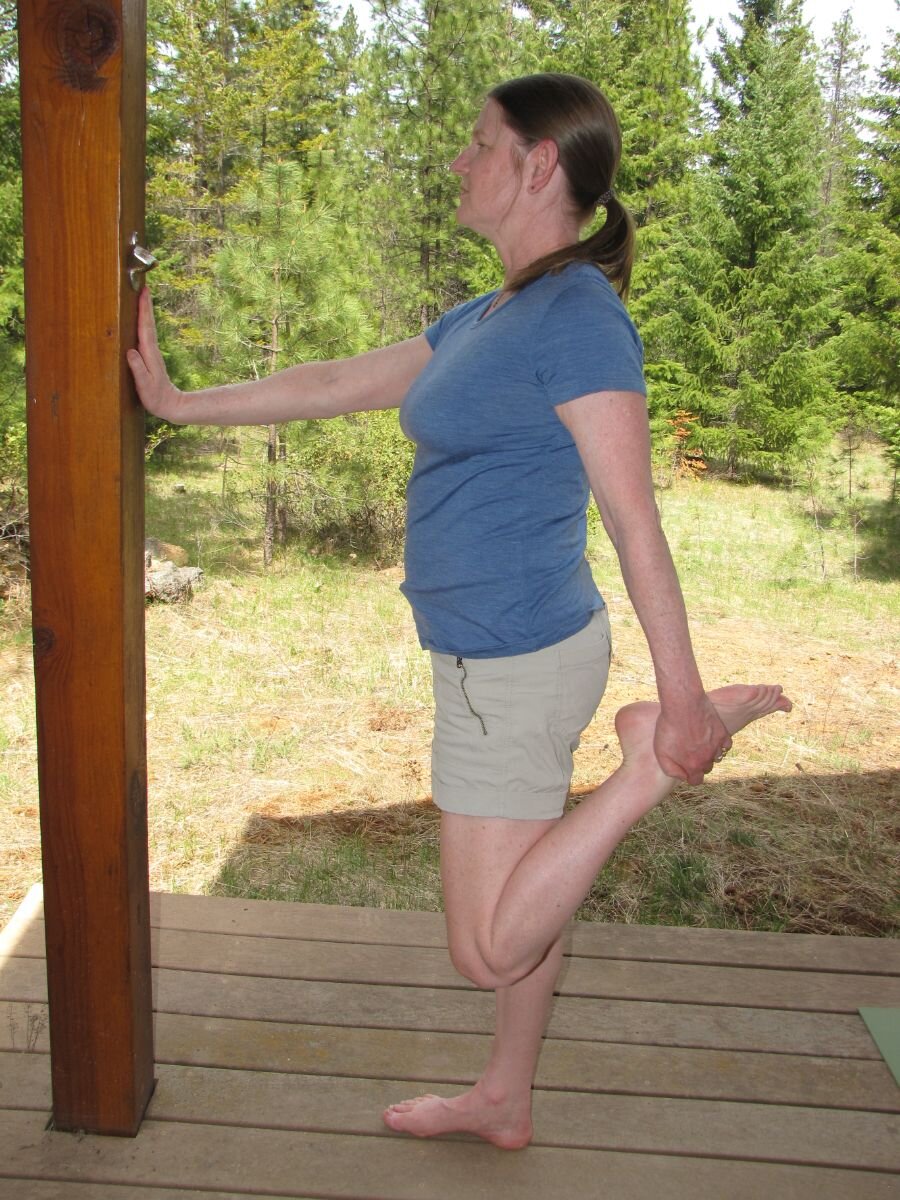
Standing frog pose is beneficial for front leg muscles, which may be taxed by downhills. Photo courtesy Nina Pileggi.
5. Standing Frog Pose (Bhekasana)
After the big summit, it's downhill all the way home! Trudging down a mountainside can tax the quadriceps (front thigh muscles) and make them sore the next day. This pose helps to stretch the quadriceps out.
Stand facing a wall, with your left hand firmly on the wall for balance.
Bend your right leg and catch the front of your ankle or top of your foot.
See that you are upright in your posture. Then, attempt to line up the front of the right thigh with the front of the left thigh.
At the same time, move your tailbone forward towards the wall, as you take the bent right leg back a little further. Press the wall with your hand to lift the chest up.
Hold for 20-30 seconds and then do the other side.
Related: The Best Electrolyte Powder

Reclining big toes pose is a relaxing post-hike stretch. Photo courtesy Nina Pileggi.
6. Reclining Big Toe Pose (Supta Padangusthasana)
Reclining on the floor can be a relaxing way to stretch the legs and hips. This pose has many variations, but here, we will focus on two of them.
Lie down with both knees bent and have a strap or a belt nearby.
Bend your right leg to your chest and put the strap around the ball of your foot. Hold one end of the strap in each hand.
With your exhalation, straighten your leg. Where the leg ends up in space depends on your leg flexibility. Keep your sacrum on the floor. Push into the strap with the ball of your foot. Pull back with your arms. Relax your shoulders.
For more challenge, straighten your left leg along the floor while keeping your right leg in position. Hold for 60 seconds.
To move to the 2nd variation, hold both ends of the strap in the left hand. As you exhale, move the right leg to the left side of the body to get a great stretch on the outer right hip and leg. Hold for 60 seconds and then bring the leg back to the center and down.
Related: The Best Hiking Socks
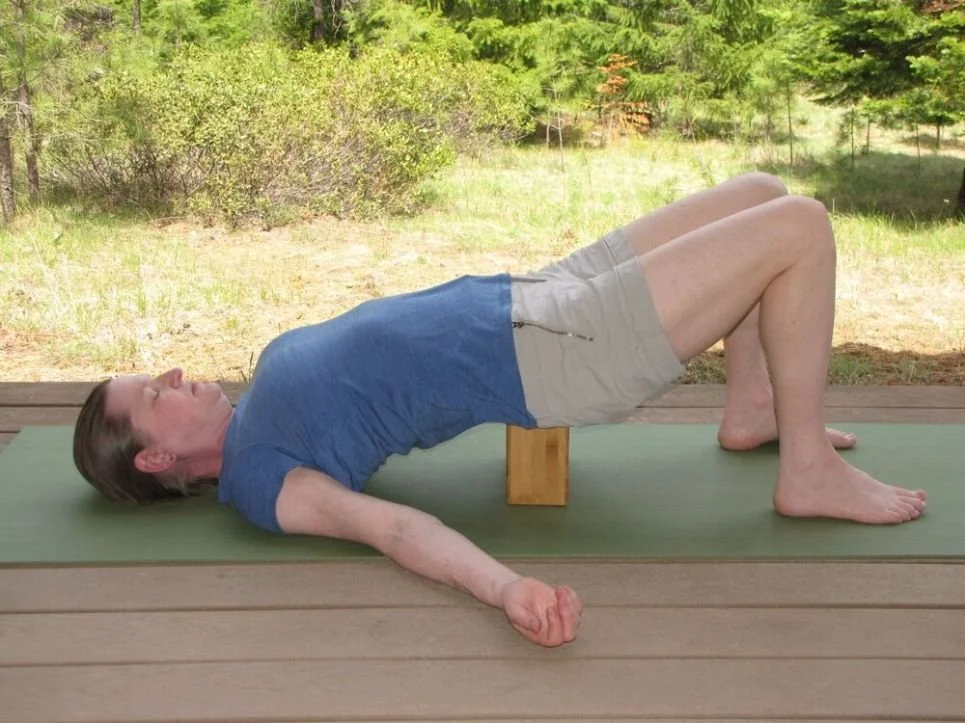
It’s easy to start hunching while hiking or backpacking. Supported bridge pose can create space to counteract that tendency. Photo courtesy Nina Pileggi.
7. Supported Bridge Pose (Setu Bandha)
This pose is relaxing and restful. It creates space in the chest region and helps balance the hunching tendency that comes with carrying a backpack on a hiking or backpacking trip.
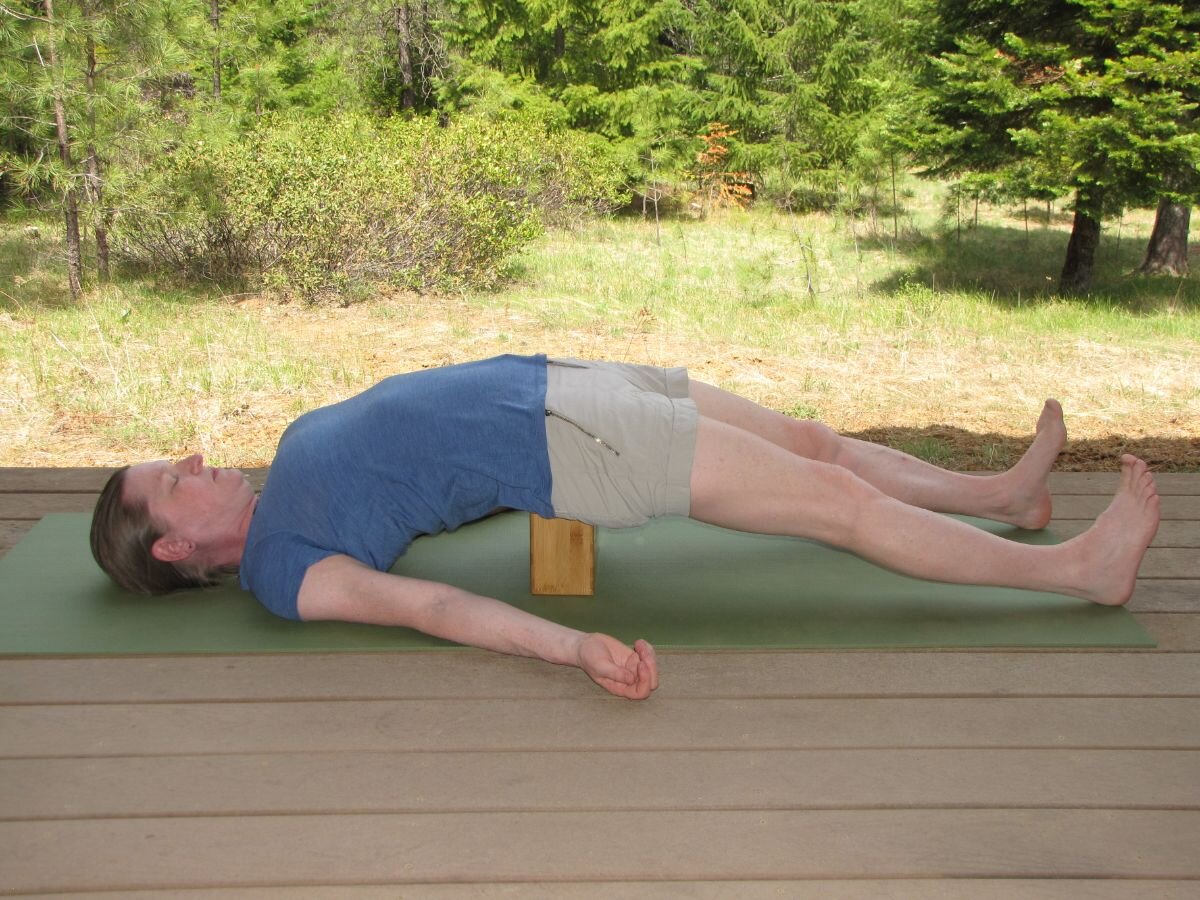
Variation: Extend your legs for a more intense stretch. Photo courtesy Nina Pileggi.
Lie on your back with a yoga block nearby, legs bent.
Press your shoulders and feet firmly into the floor. Lift the back and hips.
Place the block under the sacrum on the 2nd height or tallest height.
Tuck the shoulders under yourself and let the neck and throat relax.
Stay 2-3 minutes. Just do this pose one time.
To come out, press the feet firmly into the floor and lift off the block. Then, lengthen the buttocks towards the back of the knees as you come down to release the back.
Related: The Best Protein Powder

You don’t need a wall for Legs Up the Wall Pose. If you are on trail, you can use a post (as shown here) or a tree trunk. Photo courtesy Nina Pileggi.
8. Legs up the Wall Pose (Viparita Karani)
This pose rests the legs deeply and quiets the brain and breath. A firm blanket is handy!

Variation: Do this pose with a chair as a support. Photo courtesy Nina Pileggi.
Fold the blanket long and narrow.
Put it 3” from the wall, with the long edge of the blanket parallel to the wall.
Sit with your hips near the wall. Then swing your legs up the wall and your shoulders to the floor. Center yourself on the blanket. This might take a few tries to master!
Scoot your hips right up to the wall. The blanket should hit at the natural waist.
Rest your arms about 45 degrees away from the waist, palms up.
Close your eyes and relax for 3-5 minutes. Just do this pose one time.
If your hamstrings are stiff, put your calves on a chair instead of having your legs up the wall.
If you don’t have a firm blanket, the pose can be done without it.
Related: Backpacking the Wonderland Trail

The author hiking in the Columbia River Gorge. Photo courtesy Nina Pileggi.
About the author
Nina Pileggi has taught yoga for over 20 years. She is a Certified Iyengar Yoga Teacher, an E-RYT 500, YACEP with Yoga Alliance and a C-IAYT, International Association of Yoga Therapists. Nina has also written for Treeline Review covering The Best Yoga Mats.
In addition to being a yoga instructor, Nina is an avid hiker and backpacker. She lives in White Salmon Washington.
More about Nina and her yoga class and workshop schedule can be found at www.ninapileggi.com