Appalachian Trail Gear List & Strategy 2026
THIS APPALACHIAN TRAIL GEAR List and STRATEGY IS BASED ON 11,000 AT MILES OF TRIAL AND ERROR
January 13th, 2026
Home > Gear Reviews > Long Trails
For those with their sights set on section-hiking or thru-hiking the 2,200-mile Appalachian Trail (AT), this 2026 gear list and trail-wide strategy cover everything you need to bring with you and tips on how to hike.
We’ve broken each section of the AT (The South, Virginia, The Mid-Atlantic, and New England) into comfort and ultralight gear lists, plus we have strategies on how to prepare for the Appalachian Trail — when to go, and what to expect — whether you’re doing the entire thing or a section.
Putting together and updating this Appalachian Trail guide has been a team effort. Liz Thomas is a Fastest Known Time holder on the Appalachian Trail who has thru-hiked the AT twice. Together, with input from editors Naomi Hudetz and writer Mike Unger, who also has hiked the AT twice, this Appalachian Trail gear list and strategy features what we’ve learned on five end-to-end AT thru-hikes in addition to numerous other long trails and routes. Our goal is to walk you step-by-step through not just what gear to carry but how to get the most out of your gear for each section of the trail.
Looking for logistics? See our guide to How to get to (and Go Home) from the northern terminus of the AT
Related: Pacific Crest Trail Gear List & Strategy
Read More: Arizona Trail Gear List & Strategy
We create reader-supported, objective, independently-selected gear reviews. This story may contain affiliate links, which help fund our website. When you click on the links to purchase gear, we may get a commission, without costing you an extra cent. Thank you for supporting our work and mission of outdoor coverage for every body! Learn more.
Appalachian Trail Gear Lists
In addition to our gear lists below, a couple Treeline Review writers have also compiled some of their must-haves for an AT thru-hike. Check out Sam’s 5 Favorite Gear Items from the Appalachian Trail and Elliot’s Favorite Gear from the Appalachian Trail.
Lightweight AT Gear List
This list for hiking the AT provides for a lightweight, yet comfortable backpacking setup. It contains gear that is highly recommended for first-time thru-hikers because the items are intuitive to use and time-tested on the entirety of the AT. The less mental energy spent on gear, the more mental energy you have to develop a self-care routine and strategies to thrive so you can complete your goal.
While it’s common to see gear lists that are heavier than this one—especially on the AT—in our experience, many hikers decide not to carry the items on those lists for their entire thru-hike. We believe that this list provides the comforts most thru-hikers end up using (and keeping) for the whole trail.
| GEAR | MODEL | WEIGHT (oz) | WEIGHT (oz) |
|---|---|---|---|
| Packing, Shelter, Sleeping | Women | Men | |
| Backpack | Six Moon Designs Swift X Backpack | 36.0 | 36.0 |
| Waterproof pack liner | Six Moon Designs Pack Liner | 3.0 | 3.0 |
| Tent and stakes | Six Moon Designs Skyscape Trekker | 31.0 | 31.0 |
| Sleeping bag | Feathered Friends Egret UL 20 (Women's) Feathered Friends Swallow UL 20 (Men's) |
27.2 | 28.5 |
ULTRALIGHT AT Gear List
This is the gear list we recommend for those who have long-distance hiking experience but are looking to upgrade or tailor their gear list to a wetter, more humid, and less flat ecosystem. This ultralight backpacking gear list requires some extra skills to manage.
Note that the tarp recommended in this list requires two trekking poles. If you don’t want to carry trekking poles, Mountain Laurel Designs sells a set of carbon fiber poles that will add 2.6 ounces to the base weight.
| GEAR | MODEL | WEIGHT (oz) | WEIGHT (oz) |
|---|---|---|---|
| Packing, Shelter, Sleeping | Women | Men | |
| Backpack | Mountain Laurel Designs Prophet 48L DCF | 17.0 | 17.0 |
| Waterproof pack liner | Nylofume Pack Liner | 0.9 | 0.9 |
| Shelter | Mountain Laurel Designs Grace Tarp (solo, DCF) | 6.5 | 6.5 |
| Tent stakes | Vargo Outdoors Titanium Shepherd's Hook Stakes x 8 | 2.4 | 2.4 |
What is the Appalachian Trail?

White blazes are painted along the entire length of the Appalachian Trail directing hikers to stay on the correct trail.
The Appalachian Trail is a ~2,200-mile trail from Springer Mountain in Georgia to Mt. Katahdin in Maine, passing through 14 states, 2 National Parks, and 8 National Forests.
The AT is the longest hiking-only footpath in the world and has become an international model of a long-distance hiking trail.
The Appalachian Trail is one of the best marked, signed, and maintained trails in the world. The entire trail is marked by 6-inch white blazes, paint marks mostly on trees at eye height, making navigation relatively easy compared to other thru-hikes. It has iconic 3-sided wooden shelters and primitive campsites with water and privies located approximately every 8 miles. It’s one of the most social long trails in the US and a place where hikers form lifelong friendships.
When to start the AT?
Most AT thru-hikers looking to hike the entire trail in one season start in early spring hiking northbound (“NOBO”) from Georgia to Maine (GAME) with the goal of arriving on Mt. Katahdin before the cold and snow hit and camping is closed on October 22nd (see below for When to Start).
How long does at AT thru-hike take?
An AT thru-hike typically takes 4-6 months and travels through the wild east along the Eastern Continental Divide and high peaks and ridgeline of the Appalachian Mountains. Each section can be thought of as 4 distinct hikes (described below).
How much does it cost to hike the Appalachian Trail?
On a monthly basis, the Appalachian Trail is generally less expensive than other long distance trails like the Continental Divide Trail and Pacific Crest Trail when it comes to lodging and food, which make up the biggest expense on a long hike. There’s a common consensus of $1,000 monthly for all expenses considered, including gear. We’ve spent more and less and seen other hikers spend much less and a lot more. Some hikers practice frugality by using hiker boxes (like take a penny, leave a penny boxes–but for hiking supplies and food). It's one way if you're on a very tight budget to supplement needed gear and food.
When you’re budgeting your thru-hike, consider incorporating potential unforeseen town stays, medical needs, and more ice cream that you planned on consuming. Trust us, leaving town in adverse weather may have you reconsidering your predetermined spending limit.
What are the four regions of the appalachian trail?
The South: Springer Mountain to Virginia (jump to this section)
Virginia: Virginia to Pennsylvania (jump to this section)
The Mid-Atlantic: Pennsylvania to Connecticut (jump to this section)
New England: Connecticut to Mount Katahdin, Maine (jump to this section)
How often will I need to change gear on an AT thru-hike?
Most hikers find themselves making two to three significant gear changes during the trip to be comfortable in changing seasons. Thru-hikers must prepare for a wide range of conditions and changing seasonal weather. The trail passes through lowland deciduous forest and sub-alpine forests as well as into the alpine zone.
More than most trails, your optimal AT gear strategy depends on when you start and when you finish. The strategy described here will work for the vast majority of people attempting an end-to-end hike.
Whether you prefer ultralight gear or want a complete hiking gear list tailored to comfort, this story discusses gear strategies for the changing ecosystems, seasons, and conditions that a northbound Appalachian Trail thru hiker faces.

The Appalachian Trail is a wonderful place to make friendships with hikers from all backgrounds and levels of experience.
How to Prepare for the Appalachian Trail
Appalachian Trail with No Experience
One of the best things about the AT compared to other trails like the PCT is that folks of all levels of experience have been able to complete a thru-hike. Many hikers learn and get stronger on the go.
That being said, learning as you hike is an expensive and potentially painful way to do a thru-hike.
Just because you have no experience now doesn’t mean you can’t do some prep before you start. Your wallet and body will be happy for any skills you learn ahead of time.
We recommend practicing hiking, camping, and backpacking before you go, even if it's just for a few hours or a night at a time. This will help strengthen small muscles in your feet and ankles that take longer to get strong than leg muscles. It will also familiarize you with your gear and get accustomed to sleeping outdoors.
“Learning as you hike is an expensive and potentially painful way to do a thru-hike. ”
We recommend picking up a book on thru-hiking like Liz Thomas’s Long Trails: Mastering the Art of the Thru-hike. While it’s easy to google gear and food advice, many of the most important things you need to know about thru-hiking aren’t questions that are obvious to ask. A book or chat with someone who has thru-hiked the AT can help orient you for your trip.
Your hike will benefit from any class on camping and backpacking, navigation, or backcountry medicine.
If you’d feel more comfortable going with an Appalachian Trail guide, there are guide services available that will take you for week-long trips, month-long trips, and even the entire 6-month thru-hike.
Alternately, you can take an online prep class for thru-hiking the Appalachian Trail, which covers topics such as logistics, physical preparation, nutrition, gear, budgeting, and safety.

Liz Thomas on the summit of Springer Mountain, the southern terminus of the AT.
When to Start the AT?
Most northbound AT hikers start in March or April. March can be cold and icy—especially by the time hikers reach the Smoky Mountains. Most hikers take 4 to 6 months to finish the trail, so if you start later than May, you may not be able to finish by October 22nd, when Mt. Katahdin closes (plus, October is very cold in Maine).
AT Flip Flops
To have more solitude, many hikers are opting for Flip Flops—a mix of north and southbound.
The Appalachian Trail Conservancy throws a flip-floppers Kick-Off party in Harper’s Ferry. Many flip-floppers hike South, then return by transit to Harper’s Ferry and then hike north. Others hike north to Mount Katahdin, return to Harper’s ferry by car, and hike south to Georgia from Harper’s Ferry. The ATC actually encourages flip flops as it reduces crowding and pressure on natural resources.

The AT is a social trail with more elevation gain, but a less steep learning curve.
The PCT goes to higher elevations and more types of ecosystems, but on less steep trail.

The CDT visits rugged and remote areas and skillsets to navigate harsh conditions are essential.
AT vs. PCT. vs. CDT
The Appalachian Trail, Pacific Crest Trail, and Continental Divide Trail are the Triple Crown Trails of Hiking and are all National Scenic Trails—yet they differ in length, elevation, skills, and gears required. The AT is the shortest trail but has the most elevation gain. The AT also has the longest potential thru-hiking season, with folks starting in Georgia as early as January and finishing in Maine into October. The Continental Divide Trail is the longest trail but has the shortest hiking season due to its higher elevation. The West Coast trails generally have better vistas, but the Appalachian Trail is a social trail that visits many historical sites. Navigation tends to be easiest to follow on the AT and most difficult on the CDT. Most Triple Crowners find the AT or PCT to be better options than the CDT for a first long-distance trail.
Related: PCT Gear List & Strategy
Which is harder: the Pacific Crest Trail vs. Appalachian Trail?
Most hikers who have hiked both trails will say the AT is more physically demanding (on a day-to-day basis), but the PCT requires more skills.
Related: PCT Southbound Gear List and Strategy
Read More: Our Favorite PCT Gear
The Appalachian Trail has more elevation gain than the Pacific Crest Trail, although the Pacific Crest Trail is longer by about 500 miles. This up and down makes it physically challenging to cover as many miles per day. The AT also has sections of near-vertical rock scrambles, sometimes requiring ladders, which may be difficult for those who struggle with balance. The AT’s climate is humid and it rains often, so this can be a challenge for many folks, especially those accustomed to a western climate.
However, the PCT has more skills-based challenges like crossing deserts, snowfields, fording rivers, and long stretches between water and food. The PCT requires changing gear between different ecosystems, climates, and seasons. Temperatures fluctuate from well above 100F to below freezing during a typical PCT thru-hike. Distance hikers must have the gear and skills to keep themselves safe in both conditions and everything in between.
Permits and regulations
Do I need a permit to hike the Appalachian Trail?
There is no comprehensive permit for the Appalachian Trail. You’ll need three area-specific permits along the AT.
Permit 1 is a fee-required backcountry permit for Great Smoky Mountains National Park (NC/TN). The GSMNP permit must be obtained up to 30 days before entering the park. Thru-hikers are exempt from reservations and campsite quotas, though they are expected to sleep in shelters. If shelters are unavailable, they may tent outside the shelter. For more information, check out this GSMNP page
Permit 2 is for Shenandoah National Park, VA. As of January 2026, there is a fee for this permit, which is $9 per person with a $6 reservation fee. In other words, a permit for one person would cost a total of $15, but two folks on the same reservation would cost $24. Permits must be obtained here, and can be obtained as early as 90 days in advance.
Permit 3 is in Baxter State Park, ME. It’s free, specific to summiting Katahdin, and can be obtained in person at the Katahdin Stream Campground ranger station up to 7 days in advance.
We recommend registering through the Appalachian Trail Conservancy to stay current on trail conditions. It can help curb crowding, help you plan and prepare for changes on the trail before and during your hike, and preserve the AT.
Do I need a bear canister to hike the Appalachian Trail?
You need a bear canister for camping within a 5 mile stretch between NOBO mile 26.3 at Jarrard Gap and NOBO mile 31.3 in the Blood Mt. Wilderness in Georgia. This requirement is in effect between March 1 - June 1 yearly. Most thru-hikers simply plan to avoid camping in this area by hiking straight through it.
The ATC encourages proper food storage throughout the trail. Protect yourself and the wildlife that makes the trail special. You can learn about the ATC's bear canister lending program here.

While the AT differs between regions and seasons, becoming familiar with trail-wide strategies sets you up for success on a thru-hike.
AT TRAIL-WIDE STRATEGIES
Attempting an Appalachian Trail thru-hike, a flip flop, or any long-distance section hike of the AT has similar strategies, even as you go through different distinct ecosystems and seasons.
Whether you’re thru-hiking or section hiking, you should approach the AT like a series of shorter hikes between resupply points or larger trail sections. Stay flexible—change your approach, gear, or food strategy as needed.
Perhaps most importantly, remember long-distance hiking is hard. There are also wet monotonous days, nagging aches and pains, and mosquitoes. Everyone has days where they don’t want to hike or consider quitting. Stay strong. You can do this.
The following are overall strategies for the entire trail. Later on in this story, we have gear strategies specific to certain sections of the trail timed to the seasons when most hikers reach that area.

Mike Unger on a rocky section of the AT.
how to PROTECT YOUR FEET on the AT
Most thru-hikers experience foot issues such as blisters, damaged toenails, or strained ligaments. The rain, mud, roots, rocks, and humid climate of the Appalachian Trail leave AT hikers more susceptible to blisters than hikers of most other trails.
Taking care of your feet is such an important topic, we’ve dedicated a whole article to How to Take Care of Your Feet While Hiking and Backpacking
To reduce the chance of getting blisters, we recommend hikers wear trail running shoes or hiking shoes (see our guide for recommendations) as compared to hiking boots for the AT.
Regardless of what footwear you choose, air out your feet during breaks. If it’s raining, take breaks in shelters to dry them out. Consider using an ultralight camp towel or bandana to dry your feet and Gold Bond powder to help with the drying.
If you intend to spend time hanging out at shelters for breaks or after a day of hiking, you may want to strongly think about carrying camp shoes or sandals. Wearing camp footwear when you’re not actively hiking can give your feet time to recover and blisters time to air out. We recommend checking out our best camp shoes or best hiking sandals guide for popular models used by AT hikers. The minimalist Mayfly sandals are less than 2 oz per pair and should provide the protection most hikers need for getting water, setting up a tent or hammock, hanging out with other hikers, and doing camp chores.
Having the right gear for the wet conditions and varying temperatures of the AT is one of the best ways to ensure comfort and success on your thru-hike.
Soak your feet in cold following water whenever possible (but at least 200 feet from water sources that people are using). Yes, we did just say, “keep your feet dry,” but cool water can help reduce swelling, which is another contributor to foot pain. Rockier parts of the AT like Pennsylvania or New England can be especially tender on feet. See strategies below for how to deal with rocks in PA.
More than any other long trail, for the AT, we advise changing your socks regularly. Don’t expect wet socks to dry overnight on the AT. Pack several pairs of wool or synthetic socks—not cotton. Wearing the same wet socks day-in, day-out on the AT can lead to chafing, infected blisters, and even trench foot. When you have a chance, wash them in town so that dirt doesn’t rub away your foot’s skin. See our Best Hiking Socks guide for quality socks that will hold up on this trail.
This goes for hikes of any distance anywhere, but especially on the AT, immediately address all foot issues (hot spots, rocks in shoes, etc.). Wet conditions, poor hygiene, and not enough rest days mean you’re much more likely to hear of hikers getting trench foot or infected blisters on the AT than other trails.
It is worth repeating that many thru-hikers find that using a trail runner (men’s or women’s) or hiking shoe instead of a hiking boot or even lightweight hiking boot allows their shoes to drain better to reduce moisture pooling by their feet. Trail runners are designed to let water escape vs. boots which can often trap water inside and lead to trench foot. In all but the coldest seasons, opt for a non-waterproof trail runner over a Gore-Tex shoe or waterproof shoe. To learn more about how to choose between trail runners and hiking shoes, we wrote a guide comparing and contrasting them.
It is very common for foot size to increase over the course of a thru-hike. Opt for larger shoes and know that your shoe size at the end of the hike may be up to 2 sizes larger than at the beginning.
Read More: Best Hiking Socks
TIPS FOR SWOLLEN FEET AND BLISTERS
Most northbound thru-hikers will get blisters in their first few weeks on the AT. Your feet swell after miles on rocky trail, and the persistent trail moisture from mud and rain can wreak havoc. Good foot care is essential—remember you will need your feet to carry you more than 5 million steps. The following are foot care strategies we use:
NEVER IGNORE THE FIRST SIGNS OF A foot issue
It’s a hassle to stop to take a rock out of your shoe or address a “hot spot.” However, the potential consequences could lead to days of misery and could potentially end a hike. We have found that Leukotape is much better than duct tape at dressing blisters and “hot spots.” Leukotape will stay adhered for days through sweat, dirt, and days of rain.
Pro tip: Use Neosporin or Polysporin on popped blisters and open sores. Let your feet air out at night and change your bandages regularly.
WASH AND AIR YOUR FEET WHENEVER POSSIBLE
Take every opportunity to soak your feet and calves in naturally flowing water sources (at least 200 feet downstream from where folks collect water to drink). During breaks, take your shoes and socks off and elevate your feet and legs. Don’t use soap. Just the water does the trick.
Pro-tip: Naomi swears by massaging her feet at night. Even if it's only for 30 seconds per foot, it’s one evening ritual she never skips, no matter how tired she might be. She suffered through a lot of pain and now swears by the healing power of massage. Her ritual also includes ankles and calves. If you don’t want to touch your own filthy feet, use sleep socks or bring a Rawlogy lightweight cork massageball (that can also be used on other aching body parts).
USE ANTI-FRICTION CREAM
Both Naomi and Mike start pre-conditioning their feet a couple of weeks before a thru-hike with Trail Toes, an anti-friction cream designed for ultra-runners. They continue to use the cream during the hike for “hot spots” and when their feet “pucker” from being constantly wet on the AT. Trail Toes also works great for chafing in lieu of Bodyglide.
WEAR INJINJI TOE SOCKS OR LINERS
Blisters between your toes caused by grit are very common. Injinji toe socks can be a big help. While we have found Injinji socks to be great at preventing blisters, they can be a hassle to put on every morning, especially when wet.
Related: Best Hiking Socks
WEAR GAITERS
Lightweight gaiters, like Dirty Girls or the Altra Trail Gaiters, help reduce (but don’t eliminate) grit getting in your shoes. They also allow you to have a little personal flair on the trail. An added benefit is that they help keep your shoes tied.
SOAK YOUR FEET IN EPSOM SALTS WHEN YOU ARE IN TOWN
A warm Epsom Salt foot bath works wonders for just about any foot ailment. In fact, it’s a good idea whether or not you have any foot issues. This is such a common remedy for AT thru-hikers that some hostels can provide a bucket to soak your feet in warm water and Epsom salts.

The AT is a wet and rainy trail, but with the right gear, skills, and mindset, it can still be comfortable to hike.
how to STAY WARM AND DRY on the at
It rains a lot on the Appalachian Trail. Snow or freezing rain is possible in the South and in New England. Strong and potentially dangerous lightning storms and even tornados are possible along the entire trail.
Good rain gear is a must; however, no rain gear will type you dry after hours of hiking through a steady downpour. See our Best Rain Jackets guide for suggestions.
Accept that you will get wet. What’s important on the AT is not letting being wet get you to a state of hypothermia. Know the signs and symptoms—some bodies are more susceptible than others. The following are some strategies we recommend.
Related: Early Spring and Late Fall Backpacking Gear
ADD SYNTHETIC INSULATION LAYERS AND WARM CLOTHES
All rain gear will eventually wet out. The key is to stay warm, even when you are wet. We like to carry a fleece top or synthetic puffy coat when hiking in cold and wet conditions. Unlike down jackets, these layers will maintain up to 99% of their insulating properties when wet.
We're partial to the Patagonia Micro Puff, which has a similar weight to warmth ratio as down.
See our Best Synthetics Jacket guide for more recommendations or read our long-term, in-depth review of the Patagonia Micro Puff.

Naomi and Mike during a snow storm on the AT. They are wearing lightweight fleece tops.
Keep a dry shirt, tights, and wool socks to sleep in. Nothing feels better than climbing into dry clothes after a long wet day of hiking. Plus, in an emergency hypothermia situation, these dry clothes can be a lifeline.
Wool or Synthetic Layers That Retain Warmth When Wet
We like to wear a lightweight fleece (like the Patagonia R1 Air Crew) and synthetic tights (like the Patagonia Capilene Tights) under our rain gear when hiking in cold and wet conditions. See our guide to Best Fleece Jackets for more recommendations.
The AT for most hikers will be much warmer in the mid-Atlantic. That may be a good time to bounce these layers ahead or send them home entirely, depending on what month you reach New England.
Protect Your Hiking Gear from getting wet
It’s critical that you protect your gear, especially your sleeping bag/quilt and sleep clothes, from the rain. Do not rely on a “waterproof” pack or pack cover. We think a basic trash compactor bag (not a regular garbage bag) makes a good durable bag liner.
In addition, use a dry bag to protect your most valuable gear (sleeping bag, dry clothes, electronics). When hiking in wet conditions, or when wet conditions are likely, we believe in the double protection of a dry bag and trash compactor bag.
Dry Out Your Gear Whenever Possible
Take advantage of every sun break to dry your gear, especially your sleeping bag and tent. We recommend doing this every day of the trip. Don’t forget to do this when you are in town for the night.
Protect Your Electronics and Opt for Waterproof Electronics
Rain on the Appalachian Trail has destroyed multiple cameras and cell phones for our writers. We highly recommend choosing a waterproof camera for the AT. Most hikers will carry a waterproof phone case to protect once of their most expensive and essential gear items. At the very least, plan to protect your electronics from the rain with Ziploc bags.
Related: Best Waterproof, Freezeproof, and Rugged Cameras
bring Sleep Clothes
Keep a dry shirt, tights, and socks to sleep in. Nothing feels better than climbing into dry clothes after a long wet day of hiking in wet clothes. Plus, in an emergency hypothermia situation, these dry clothes can be a lifeline.

The AT has several sections where hikers can take bad weather routes to avoid lightning prone ridgelines.
Watch for Changing Weather Conditions
It’s essential to check daily on potential weather changes. Severe weather can occur at any point along the AT. Fortunately, you are seldom more than a few hours from a road that can get you to town to wait out a storm. For parts of the trail without cell phone coverage, the Garmin inReach satellite communicator provides weather forecasts. See our guide to the Best Satellite Messengers and Personal Locator Beacons for more information.
You may also consider wearing a hiking watch that can measure barometric pressure and warn of storms—even when you aren’t able to pick up a satellite. See our Best Hiking Watch guide for recommendations or our in-depth review on the Garmin Instinct 3 or Garmin Fenix 8 watch.
how to MANAGE YOUR MONEY on an appalachian trail thru-hike
Running out of money is one of the most common reasons people end their AT thru-hike.
Choose your gear well the first time, and you won’t have to spend your limited thru-hiking dollars on replacing damaged or ill-fitting gear or switching out gear that didn’t work for you.
Limiting your town stays (i.e., zeros) is the easiest way to preserve your funds. The AT has more access to towns than other long trails, and it’s easy to get sucked into the social scene with fellow hikers. Even if you aren’t a partier, it’s easy to get drawn to the AT town vortex with the promise of restaurant food.
One strategy to reduce spending on restaurant food is to eat a can of beans or yogurt as soon as you enter town to help reduce restaurant spending. Many people sense thirst as hunger, so an inexpensive way to fill yourself is to drink a large sports drink as soon as you get to town (it’s less expensive than beer and replenishes electrolytes that you may have lost while hiking).

Getting a pizza delivered to the trail is a perk of the AT being within cell phone range.
how to stay fed on a thru-hike
Eating on the trail can be surprisingly challenging. Certain energy bars or trail mix that tasted good on a previous weekend backpacking trip can become unbearable after a few weeks (or days) on a thru-hike.
It’s hard to know what will taste good after months on the trail. Therefore, we don’t recommend first-time thru-hikers rely heavily on food boxes they make for themselves at home. It’s better to buy food along the way at local grocery stores and markets.
The AT has access to many grocery stores within walking distance from the trail, from convenience stores to full supermarkets.
Here’s why we think grocery store resupplies are the best:
tailor your food hunger to what you want
doesn’t require as much upfront planning–better to spend that time learning skills
doesn’t require spending money upfront
mailing yourself resupplies on the AT is more expensive than on other long trails because there are so many towns along the way
Be open to changing your food strategy based on what you crave on trail. You need to fuel the engine that is propelling you along the trail. For more recommendations, see our What I eat on a long trail? Video.
Related: Best Food Dehydrator for Backpacking

Mike Unger on one of the rebar climbing sections of New England on the AT.
ELEVATION GAIN AND RUGGEDNESS on the at
The Appalachian Trail is shorter than the Pacific Crest Trail or Continental Divide Trail but has more elevation gain. AT hikers will say the trail goes straight up and down every mountain. Unlike the PCT, it is not graded at a maximum of 10%. See more about the differences between long trails below in the section on AT vs. PCT vs. CDT.
Some sections of the AT, like Mahoosuc Notch in Maine, require hikers to scramble between boulders. Expect to use hands, ladders, or rebar to ascend steeper rocks or slabs. While these sections can be challenging, people of all ages and many kinds of physical abilities have hiked the AT.

Mahoosuc Notch in Maine is one of the most infamous sections of trail anywhere: a mile of scrambling and crawling through car-sized boulders.
Hikers should be aware of the dangers of wet or icy rock and the slippery wet wooden bog board bridges that are installed around muddy areas. Trekking poles can often help with balance on these sections. On other sections, you will need to fold down your hiking poles to use your hands for scrambling. See our Best Trekking Poles guide for recommendations on poles that collapse down for easy travel.
To help with the slipperiness, you’ll also benefit from having shoes with good traction. Still, every AT thru-hiker slips or falls at some point on their trek.
Don’t be afraid to take sections slowly and use your hands when necessary. It’s also good to keep track of time and make sure you aren’t stuck on a steeper or rockier section in the dark.
The intense elevation gain and ruggedness of the AT means that most hikers find that they can’t hike as many miles per day as they are used to on other trails. While this can sometimes feel demoralizing, the key to the AT is to relish the experience for what it is. There’s fun to be had in the aerobic workout and the social aspect of the trail.
Physical Training for the AT
We recommend starting any thru hike with a good base fitness level. Ideally, you’d spend some time building your thru-hiking-specific fitness.

A highlight on the AT is the miles of trail that go through forests of blooming azalea and rhododendron flowers—but their thick bushes can make it difficult to find a flat campsite.
Planning and Navigation for the AT
The AT is one of the best-marked footpaths in the world. White blazes (paint markings) on trees serve as confidence markers for the entire length of the trail. While they can be obscured in a snowstorm (when the white blends in with frost), it’s relatively easy to stay on track on the AT.
The exception can be when one steps off-trail to relieve oneself. At least one Appalachian Trail thru hiker has gone missing and lost their lives in the woods after stepping off trail for a potty break. We highly recommend carrying an Emergency Satellite Beacon which is lightweight and could have saved the life of several missing hikers.
The forest is dense on the AT, and it’s easy to lose the trail once it is no longer in plain sight. Even experienced hikers can get turned around. We highly recommend using a mapping phone app to help you navigate back to the trail in these situations.
Related: Best GPS Hiking Watches
CAN I CAMP ANYWHERE ON THE APPALACHIAN TRAIL?
You can camp in many places along the AT following Leave No Trace ethics. A dispersed (aka stealth camp) is free to do on Forest Service land in the South and Virginia. In national parks, near private land, in high-impact areas, or fragile ecosystems like above treeline, thru-hikers should stay at designated campsites. See the Appalachian Trail Conservancy’s camping chart at the bottom of this page for more details. Note that some sites (generally, the nicer ones in New England) have $10 fees, so have some cash on hand. It's becoming less common to have campsites with fees, though. For example, the Long Trail, which shares 100 miles with the AT, no longer charges hikers.
However, finding flat places to camp between shelters can be difficult. The trail is so steep and forested that it can be miles between flat spots big enough to house a shelter. Dense undergrowth makes it difficult to find a spot big enough for a tent. We recommend using maps or at least a mapping phone app to ensure you stay on trail and that you are able to plan your day to reach shelters/campsites at night. The FarOut guides app is a great source of information and is highly recommended.
Most hikers choose to stay at the iconic three-sided wooden shelters and nearby camping areas. These will be marked on all Appalachian Trail maps, signs, and phone apps. They are located on average 8 miles apart from one another. They almost always have water sources, privies and often have campfire rings and bear cables. See our section on shelters below.
Note that some campgrounds have platforms in the tenting area. For this reason, we recommend a freestanding tent in our comfort gear list (see below). While it is possible to use a non-freestanding tent on a platform, a freestanding tent will make your life easier. See our Best Backpacking Tents, Best Ultralight Tents, or Best Camping Hammocks guide for our recommendations.

Liz Thomas’s AT hammock set-up.
HAMMOCKS on the at
The steep terrain and lack of flat spots is one reason why many folks opt to use a hammock on the AT. Hammocks provide a comfortable way to sleep, even when the ground below the hammock is not flat or has understory plants. Hammocks can be strung between trees, which are plentiful on the AT. Liz Thomas hammocked on her FKT, and it’s her preferred shelter method for East Coast trails.
If you choose to hammock, become familiar with Leave No Trace methods of securing your shelter. Practice setting up a tarp over your hammock before you leave for the AT, as getting the angle right is more important than on a tent, and you don’t want to find yourself in a hanging bathtub should it rain. We also recommend becoming familiar with under quilts or other techniques of staying warm in hammocks. Because the mid-Atlantic in particular is such a buggy section, we recommend choosing a hammock with built-in bug netting like the Hennessy Hammocks. Even if you are familiar with tent camping, there’s a learning curve with hammocks. However, for some hikers, the benefits of hammocking on the AT are worth it.
Related: Best Camping Hammocks

Liz Thomas befriending another hiker’s dog at an AT shelter.
AT SHELTERS: PROS and CONS
The AT has three-sided basic shelters located about every 8 miles. AT shelter use has its pros and cons.
Pros: Shelters are easily marked on Appalachian Trail maps and can be a great place to meet fellow hikers—some who may become best friends for life. Shelters and the surrounding area have campfire rings, picnic tables, privies (no need to dig catholes), and some have bear cables to protect your food. If you sleep inside a shelter, you don’t have to worry about setting up or packing up a tent in the rain. If you camp, choosing the area around the shelter will guarantee flat spots free of vegetation as well nearby amenities like water, a privy, a picnic table, and campfire ring.
Cons: Shelters can be home to mice and be a place where hikers can get each other sick. If you hike the wild east in search of quiet and solitude, shelters are not the place to find it.
It is essential you learn Shelter Etiquette before sleeping in shelters. Shelters are for everyone, so make room for other hikers and refrain from practices that exclude others (like setting up a tent inside of a shelter). If you snore or have a dog, don’t stay in the shelter. Practice Leave No Trace, like taking phone calls and relieving yourself 100 at least 100 yards from others.
HYDRATION ON THE AT
Some folks on the first days of their thru-hiker believe they need to leave the AT shelter each morning with enough water to get to the next shelter, carrying up to 4 L to last all day.
However, water sources on the AT are relatively plentiful, especially early in the hike. Many water sources off-trail are signed.
To minimize the weight of water on your back, we recommend that you carry enough water to last you until the next reliable water source.
Most AT hikers carry between 1 and 2 liters of water, with the possibility for more water capacity for a few longer stretches in the mid-Atlantic. Check your maps and hiking navigation apps to find your next water source.
As you can imagine, the AT has a lot of users, which means the potential for contamination is high. We recommend carrying a water filter or chemicals to treat your water.
Related: Best Water Filters and Purifiers for Backpacking
DRINK ON A REGULAR SCHEDULE
For AT hikers who start the trail during cooler months, it can be difficult to remember to drink. One advantage of the AT is that there are enough significant climbs that often your body will want to drink water. Mike sets alarms on his watch to remind himself to drink every hour.
WOMEN & HYDRATION
We have known some women hikers who deliberately do not drink as much as they should because urinating on a trail as busy as the AT can be a chore (Naomi fully admits to this). Learn how to urinate efficiently and practice before you hit the trail:
If you’re wearing pants, learn how to urinate with your pack on. If you’re wearing shorts or a hiking skirt, it’s handy to learn how to urinate standing up. This can be made easier by using a female urinary device.
Carry a “pee rag,” which is much more convenient than TP. We like the Kula Cloth for use as a pee cloth. We recommend selecting the optional retractable leash so that you don’t have to take off your pack to access your pee cloth.
Related: Best Hiking Skirts and Dresses
USE ELECTROLYTES
Water alone is not enough when exerting yourself, and the AT in Georgia, North Carolina, Tennessee, and West Virginia have plenty of steep mountains that will get you perspiring—even when temperatures are cooler. Once the season starts changing and it becomes hot and humid, you’ll definitely be sweating. Liz experienced fatigue from a lack of electrolytes during a heat-wave in New Jersey.
The good news is that electrolytes are easy to find and come in many forms. Flavored and unflavored powder drink mixes, flavored and unflavored liquid drops, flavored tablets that dissolve in water, or capsules to swallow are all readily available. Pick the form you are most likely to use and use them regularly on the AT. Salty snacks are also good—in fact, you’ll likely find that you crave salty over sugary foods. That’s your body telling you what it needs. Listen to it and feed it accordingly.
Read our in-depth review of electrolytes here, where we discuss the pros and cons of each type of electrolytes, when to take them, and more.
Related: Best Water Bottles for Hiking

Thru-hikers hitching show their sign for hitchhiking to town to get food.
DEALING WITH HIKER HUNGER ON THE AT
“Hiker hunger” is the insatiable hunger that most hikers feel on a long-distance thru-hike eventually. For some people, it may take a while for hiker hunger to kick in. In fact, we’ve known quite a few hikers who actually lose their appetite during the first few weeks of a hike. When this happens, your energy levels drop, and motivation goes along with it.
We have some strategies to help through hiker hunger:
Know that your taste buds may change. Foods that you think you will want on trail may not end up being palatable when you’re actually on trail. While you’re hiking, listen to what your body craves, write it down, and buy it at your next resupply.
Because taste buds change, we don't recommend resupply boxes as a strategy for most thru-hikers. Resupply boxes can become costly to ship, especially if you don't like the food you mailed yourself and have to buy all new food.
If hiking food isn’t cutting it for you, carry out town food. We’ve been known to carry out an entire large pizza and/or sandwiches (with condiments on the side). Avocados, carrots, and apples will hold up well in your pack if you eat them in the first couple of days. Scones and muffins also hold up fairly well.
Take regular meal and snack breaks and eat even if you’re not hungry. Tell yourself that food is fuel and your body needs it.
Don’t be afraid of high-calorie foods that you may not eat off-trail. Fat is your friend. Eat Nutella right out of the jar.
Sometimes when it is hot, or you are at altitude, it is easier to drink than to chew. Consider carrying supplements like vitamins or drinking high-calorie or high protein drinks to supplement your diet.

A warning about bears in a trail register in a shelter in Tennessee.
BEARs on the at
Black bears are present in nearly every section of the AT.
AT bears have become habituated to hikers over the years. Certain sections of the AT—mainly in the early parts of the trail and New Jersey—are notable for black bear activity as they have become knowledgeable about getting food from thru-hikers. Bears are rarely aggressive, but they are opportunistic. While sleeping with food is not uncommon on other long trails, it’s really not a great idea on the AT. Bears have been known to enter shelters at night, putting multiple people at risk.
Some sections of the AT require the use of a bear canister, including near the beginning of the trail for northbounders in Georgia. The Appalachian Trail Conservancy writes it is likely other sections along the North Carolina/Tennessee border will follow, as well as the Green Mountains in Vermont.
Nearly 50% of AT shelters have bear boxes, poles, and cables. In some areas, like Great Smoky Mountains National Park and Shenandoah National Park, you are required to use the bear boxes, poles, or cables at your shelter.
In addition to areas with strict bear regulations, it is useful to have plans to protect bears from your food and vice versa. You may also want to consider carrying a separate Odor Proof Sack, which is essentially a large lightweight plastic bag that may reduce rodent attacks on your food. In other areas, consider using a bear hang, though know that AT bears are smart and have outwitted them. We’d also recommend an Ursack, which is a food bag that bears and rodents cannot chew or claw their way through.
Never leave your pack unattended (even when you are relieving yourself), keep a clean campsite, and consider cooking a few miles before you stop and camp—or at least 200 feet away from your tent or the shelter.
The Appalachian Trail Conservancy’s website has the most recent bear canister restrictions and advice on bears along the AT. See REI’s guide to How to Choose and How to Use Bear Canisters for more on weight, volume, and ease-of-use considerations.
MICE AND RODENTS ON THE AT
AT shelters attract mice and porcupines who have become adept at eating food from hikers or salt from hiker’s urine or sweat-covered gear. Rodents sometimes will eat through stuff sacks, backpacks, and other gear to get to your food. Other wildlife, like porcupines, might be after the salt on your pack or trekking poles. Properly store food in bear canisters or in bear boxes, cables, and poles as available. Tactics to keep bears from your food will often work for smaller wildlife as well.
As mentioned above, we recommend carrying a separate Odor Proof Sack, which can reduce rodent attacks on your food. Mice have become habituated to finding food in shelters. It is not a good idea to sleep with your food in shelters on the AT (that is, unless you like mice crawling on your face).
Take special care to pick up any crumbs you drop in shelters or any cooking food that escaped your pot. Mice thrive at shelters because there is food there. Mice also come with ticks—which can spread Lyme disease. They’re also associated with Hantavirus, which can be transmitted via their urine and feces. Plus, mice at shelters attract snakes. For all these reasons, be very careful with your food at shelters.

The AT goes through tick-filled fields, like the one seen here in Connecticut. The trail isn’t far from Lyme, CT, for which Lyme disease is named.
TICKS
While it’s unlikely you’ll see ticks during the cooler weather of the first weeks of your hike, as temperatures warm, you will see them for much of your hike—especially in the mid-Atlantic.
We consider ticks the most dangerous animal we may encounter on an AT hike.
The AT—especially in Shenandoah National Park and later in the mid-Atlantic—goes through significant sections of tall grass, though ticks can be picked up anywhere. Some ticks carry Lyme disease or other diseases that can ruin your thru-hike. We strongly recommend that you do daily tick checks. Ticks are relatively easy to remove if found early.
We consider a tick key an essential piece of gear on the trail. We also recommend treating your clothing and gear with Permethrin. This do-at-home, spray-in bug treatment lasts for ~20 washes. Consider re-treating clothing and gear with Permethrin when you reach the mid-Atlantic. We also recommend AT thru-hikers budget for a Lyme Disease test to take after your hike.

A rattlesnake on the AT.
SNAKES: COPPERHEADS AND RATTLESNAKES
While it’s unlikely you’ll see snakes during the cooler weather of the first weeks of your hike, as temperatures warm, you may see them.
You will likely see a few copperheads and rattlesnakes along the trail. While they are more common in the mid-Atlantic (especially Pennsylvania), you may start seeing them further South as temperatures warm up. There are numerous harmless snakes on the AT, including the big and scary looking but gentle black rat snake.
Rattlesnakes like to curl up under rocks along the trail. We have come close to stepping on a resting rattlesnake on several occasions. It’s crucial to maintain good situational awareness. If you listen to music or podcasts on the trail, consider “open-ear” headphones like the Shokz that allow you to hear the rattlesnake’s distinctive warning.
Norovirus
Norovirus (often called the stomach flu) has been a common illness on the Appalachian Trail. This is probably because hikers often sleep shoulder to shoulder in shelters, stay in crowded hostels, and share privies. We recommend the following practices to help stay healthy on trail (and elsewhere):
Wash your hands often;
Keep your hands away from your face;
Do not share food with other hikers; and
Avoid shelters and hostels where hikers have been sick (norovirus is often caught from infected surfaces)
According to the Cleveland Clinic, norovirus cannot be treated with antibiotics. If you do contract the norovirus, you need to wait it out. Stay hydrated, wash your hands frequently, and avoid others. Mike and Naomi both contracted norovirus on the AT—twice each. It took 2-3 days for the illness to pass.
LEAVE NO TRACE ethics and town etiquette for the at
Leave No Trace (LNT) is composed of seven ethics for the backcountry. LNT acknowledges that we humans are a guest in the outdoors and we seek to leave the AT in better shape than we found it. The goal of LNT is to create an outdoors that will be as pristine and beautiful for future generations as it is now. See Leave No Trace’s website for more on the seven principles.
When it comes to AT thru-hiking, there are several gear hacks that can make LNT a breeze.
APPALACHIAN TRAIL SHELTER ETIQUETTE
Shelters are a blessing and a curse of the Appalachian Trail. Be considerate to other users (LNT Principle #7) by familiarizing yourself with shelter etiquette before you go.
BACKCOUNTRY TROWEL
LNT requires you to bury human waste 6-8” deep. We recommend carrying an ultralight backcountry potty trowel (bonus: it doubles as a stake). Potty trowels dig deep through rocky and rooty soil much better than using a rock or your shoe. It’s become standard for thru-hikers to pack out their used toilet paper (for a few years, it was getting pretty gross along the trail corridor). We’ve found the easiest way to do this is by including doggie waste bags in your potty bag. Treat your used toilet paper like you would picking up dog waste in a park. Tie off the bag and put it in your trash bag. Easy, simple, and clean.
One of the best things about the AT is that almost every shelter has a privy. Many trailheads have outhouses. We know of at least one hiker who managed to thru-hike the trail by only needing to dig a cathole a few times. To the extent possible, take advantage of these pre-built outhouses. They are designed to manage human waste and concentrate impact in areas where maintainers can compost waste sustainably. Just be sure never to put trash, feminine hygiene products, food scraps, or Wet Wipes into outhouses as they must be removed by volunteers by hand (gross!).
Read More: Essential Backpacking Accessories
BACKPACKING STOVE
After a few days on trail, most AT thru-hikers find they don’t have time, energy, or interest in campfires. Despite many shelters having campfire rings, the popularity of having a fire seems to decrease the further north a thru-hiker gets. If you do choose to have a fire, do it only inside established camp rings. Use only downed wood smaller than the size of your fist. Be sure that it is completely out before you leave the area—using water and your hand to feel for any remaining hot coals. Several AT shelters have burnt down over the years. Although the forests of the East are generally moister than those of the West, fires can and will happen. Read more about campfire etiquette here.
If you want warm food and the comfort of a fire, there’s a simple solution: carry a backpacking stove with a fuel canister. Most gear stores, hiker hostels, and even convenience stores along the AT that cater towards hikers will offer fuel canisters for sale. A backpacking stove also requires carrying a compatible Backpacking Cookware Pot, which (bonus) can also serve as your bowl. Some backpacking cookware pots can even be used directly in fires, should you decide to have one.
WIRELESS EARBUDS
Many hikers choose to listen to music, podcasts, or books on the AT. While Bluetooth speakers work great for hanging out in the backyard, they aren’t appropriate for the AT—either on trail or at shelters. Nor is it appropriate to play music out loud on your phone. Much of the AT is wilderness, which is managed to create a refuge for people and wildlife away from the sounds of the city. That doesn’t mean that you can’t listen—it just means that LNT asks that you use a set of headphones instead.
If wires are what annoys you, we’ve enjoyed hiking with wireless earbuds, which now have the battery life to last a day of hiking. We recommend the Shokz OpenRun. They use the technology that allows for situational awareness so you can hear the music but still hear that bear behind the tree. See our full guide to Best Wireless Earbuds for the Outdoors and Working Out, which features waterproof, sweatproof, dustproof, rugged headphones for hiking.
TRAIL TOWN ETIQUETTE AND TRAIL ANGELS
Trail town etiquette for thru-hikers is a key piece of being a good ambassador for the trail. It’s showing respect for those who live in gateway communities near the trail as the important part they play in conserving the land and providing services for hikers. Being respectful in town is a way to ensure future PCT hikers will have the same access to trail town services as you do. Who knows? If you hike any portion of the trail again, as a day hike or thru-hike, that could mean you!
I wrote this full article on Trail Town Etiquette: 10 tips to be a good hiker in town.

Liz Thomas visiting the second largest yellow popular tree on a side trail off the AT in the South.
the SOUTH (Springer Mountain to Virginia)
States covered: Georgia (75.8 miles), North Carolina / Tennessee (361.0 miles)
Distance: 436.8 miles
Elevation Gain: 122,425’
Elevation Loss: 122,734’
Minimum Elevation: 1,339’
Maximum Elevation: 6,626’
The start of the AT can be a jarring experience, even for seasoned long-distance hikers. Georgia has among the most elevation gain of any state on the entire trail, meaning that hikers fresh on the trail are in for one of the most rigorous workouts of the entire trail.
Most hikers start the trail in March or April when it is still fairly cold in the Appalachian mountains. As they approach Damascus, VA, days become warmer and more humid. Sometimes, they can be downright hot. It’s beautiful to watch the forest flower and leaf out and the bright green hillsides of the Southern bald mountains. The AT is filled with many generations and centuries of history, and it’s fascinating to learn about humans and their relationship with the mountains around the trail.

Views on the AT in the South can be expansive before the trees leaf out.
While the AT is sometimes called a “green tunnel” for lack of views, the views in the South can be expansive before the trees leaf out. Flowering green tunnels of rhododendron make the closeup views magical.
Managing clothing and sleep systems to account for changes in temperatures is one of the challenges of the South.
Hiker hunger takes a while to develop, so you’ll likely drop a few pounds. Everyone has pain and fatigue on the AT in the beginning. Rain—which can contribute to blisters—can be demoralizing. Most hikers will want to quit from time to time. You are not alone. It gets better. Never quit on a bad day.

Naomi Hudetz on a windy day on a Southern bald mountain.
RECOMMENDED GEAR FOR THE SOUTH
Backpacking tent: Shelter space is never guaranteed—especially in the South, which tends to have more hikers and competition for shelter space. See our Best Backpacking Tents guide.
Rain Gear: You’ll need a rain jacket for the entire trail, but it’s especially important at the beginning of the trip because of the cooler temperatures.
Warm Layers: Additional insulating layers (depending on your pack weight goals, we like a combination of some of the following: long underwear, wind pants, additional baselayer top, heavier insulating jacket. See our Best Synthetic Insulated Jackets stories for recommendations)
Optional:
Bear canister (this is required in certain sections)
Bear bag hanging kit, Ursack, Odor Proof Sack.
A backpack that can accommodate a bear can, either inside the pack or strapped on top. See our Best Backpacking Backpack guide for recommendations.

Mike Unger on the AT in Smoky Mountain National Park.
CHALLENGES AND STRATEGIES OF THE AT SOUTH
Cold Days
While Georgia can be humid and toasty in the summer, the Appalachian Mountains in March and April are not. In addition to weather that could be in the 40s or 50s during the day, nights can get below freezing. Additionally, you are likely to encounter back-to-back days of rain, making it difficult to dry your gear.
Hypothermia can onset as low as 60 degrees—so it’s important to know the signs and symptoms. Don’t be afraid to take breaks at shelters to warm up and drink a hot beverage.
Cold Nights
You are also likely to experience some of the coldest nights on the AT in the South. Be prepared for subfreezing nights. We recommend starting the trail with a high-quality sleeping bag—20F is the norm. See our Best Sleeping Bags for Backpacking story for our suggestions for 20-degree sleeping bags for folks of different sizes and sleeping styles.
Remember that sleeping warm isn't just a function of not having a warm enough sleeping pad. Your sleeping pad contributes to how well you sleep, too. The NeoAir XLite NXT is popular with thru-hikers, which has good insulation to weight ratio. Take care of it, though, and carry a small repair kit in case of pops or leaks. See our Best Sleeping Pads guide for our recommendations.
For cooking during cold nights and breaks on chilly or windy days, we carry an insulated synthetic jacket and warm hat throughout the entire hike. See our Best Synthetic Jackets story for our suggestions for thru-hiking.
As mentioned above, we’re partial to the Patagonia Micro Puff, which is warm when wet and has a similar warmth to weight to ratio as down.
See our Best Synthetics Jacket guide for more recommendations or read our long-term, in-depth review of the Patagonia Micro Puff. Some hikers will carry down jackets if they already owned them before the hike, but given how wet the Appalachian Trail is, we would recommend a synthetic.
Pro tip: Protect your water filters (Squeeze and BeFree) from freezing at night by sleeping with them in your sleeping bag or quilt. Filters that use a ceramic filtering system will crack at below-freezing temperatures. Sleeping with your electronics will also save battery life.
Lots of Rain — Sometimes Freezing Rain

Rain and foggy days are common the AT in the South and New England and everywhere in between.
Rain is a common occurrence on the AT. In addition to having a good rain jacket (see our Best Lightweight Rain Jackets guide), managing moisture on your body and gear is one of the challenges of the trail.
Keep your gear dry—especially your sleeping bag. Consider a dry bag for your sleeping bag.
Dry Your Gear Whenever Possible
Use your break to dry your gear, especially your sleeping bag and tent. Your sleeping bag can lose its loft—its insulative properties—from condensation, body moisture, or if a dry bag around a sleeping bag isn’t secure. Some time in the sun (be sure to secure it from blowing away) will keep you warm during the cool nights.
Drying out your tent daily will help with its durability (plus, it’ll save you from carrying an ounce of moisture). One reason we like DCF (aka cuben fiber) tarps and shelters (aside from being ultralight gear) is that it holds onto less moisture so dries more quickly.

Water is abundant on the AT, but because it is a crowded trail, treating water is still essential.
Drying out your gear during breaks is a routine habit you should establish early on. On rainy days, it’s worth letting your gear dry out during breaks in shelters (as long as it doesn’t bother other shelter-dwellers).
Sometimes on the AT, it’s not really possible to get gear dried out during the day. When you are in town staying at a hostel or hotel, remember to open up your pack and dry all your gear out (but stores and restaurants frown on this behavior, so please refrain from drying gear in other places in town).

The wild ponies of Mt. Rogers in Virginia are a highlight of the AT.
AT VIRGINIA, WEST VIRGINIA, MARYLAND
States covered: Virginia (517.1 miles) and West Virginia/Mayland (57.3 miles)
Distance: 574.4 miles
Elevation Gain: 128,359’
Elevation Loss: 130,237’
Minimum Elevation: 242’
Maximum Elevation: 5,487’
You’ll spend ¼ of your time thru-hiking the AT in Virginia. It has the most miles of any state. While technically still the South, the terrain in Virginia changes a lot from the Southern Smoky mountains to the gentle Blue Ridge Mountains in the Northern part of the state.
Virginia, West Virginia, and Maryland are home to several icons of the Appalachian Trail experience:
the wild ponies of Mt Rogers (the last sub-alpine forest you’ll be in until Mt Greylock in Massachusetts)
McAfee Knob (often called the most photographed part of the AT) and Dragon’s Tooth and Tinker Cliffs
Shenandoah National Park
the Roller Coast in West Virginia ending at Bear’s Den Hiker Hostel (a stone castle built by the CCC) and the historic Harper’s Ferry National Monument.
Many thru-hikers attempt a 4-state challenge starting at the Virginia-West Virginia border and ending at the Maryland-Pennsylvania state line at the Mason-Dixon line.
A thru-hiker’s experience in the Virginia area and recommended gear for this section can differ a lot depending on whether you reach the state in May, June, or July. Mt. Rogers can be freezing in early May, but Shenandoah National Park can be humid and hot in June.
One thing that can be an issue—no matter when you hike Virginia—is the Virginia Blues. Many thru-hikers get bored and quit in Virginia. Sections of the trail follow the iconic Blue Ridge Parkway and, farther north, Shenandoah National Park. Constant road crossings can be frustrating.
We explain the mental game of the AT below in the mid-Atlantic section as well as recommendations on how to make it better. Still, most hikers start losing some of the enthusiasm somewhere in the midst of Virginia.
RECOMMENDED GEAR FOR Virginia
Lighter sleeping bag (or dump sleeping bag liner)
Lighter jacket (dump the heavier layers from down South)
Bug repellent clothing or clothing treated with bug-repelling Permethrin
Bug net for your tarp (if it isn’t built-in)
Bug spray or lotion
More water carrying containers (a few of the longer waterless stretches on the AT are in this section)
Optional: Sturdier hiking shoes (for crossing rocks in Pennsylvania)
Optional: trekking poles (if you weren’t carrying already, you might want for better balance on the rocks)
CHALLENGES AND STRATEGIES FOR THE AT VIRGINIA AREA
THE VIRGINIA BLUES
After the big mountains of the South, the excitement of starting a long-distance trail is gone. Tedium can set in.
Podcasts and audiobooks are your friends. It’s a gift to have huge, uninterrupted blocks of time to lose yourself in a book binge.

The terrain in Virginia mellows and has less climbing than you experienced in the South.
Many libraries now have audiobooks that can be checked out for free. Sign up at your local library before you leave for your hike and have access to nearly unlimited content. Free podcasts are nearly limitless as well and cover every topic imaginable. If you don’t have any favorites, ask other hikers. Have you wanted to learn a new language? There are free podcasts for that too!
Pro tip: If you’re hiking with a partner, listen to the same podcast at the same time and talk about it afterward. Plus, you’re only draining the battery on one phone and maintaining situational awareness with the other ear!
With both earbuds, you’ll need to charge them between towns, so we recommend carrying an external back-up battery and appropriate cords.

Liz Thomas at the halfway point on the AT.
AT MID-ATLANTIC (PENNSYLVANIA TO CONNECTICUT)
States covered: Pennsylvania (223.2 miles), New Jersey (68.8 miles), New York (84.3 miles)
Distance: 376.3 miles
Elevation Gain: 57,418’
Elevation Loss: 58,201’
Minimum Elevation: 60’
Maximum Elevation: 2,078’
The mid-Atlantic is tough for a lot of thru-hikers. You have made it through the National Parks and iconic peaks of Tennessee/North Carolina. You have your trail legs and figured out everyday trail logistics. So why do we see so many thru-hikers quit in the mid-Atlantic?
The exhilaration of making it to the unofficial halfway point at Harper’s Ferry at the Appalachian Trail Conservancy headquarters is replaced with the realization that you are not even halfway complete.

In the mid-Atlantic, the trail is hot, humid, and buggy. Evenings are usually warm, and the bugs can be relentless. The trail is so rocky in Pennsylvania it’s called Rocksylvania. Feet can hurt. It’s warm enough that snakes are out. The trail goes through grassy areas that may have ticks. Many hikers deal with the mid-Atlantic’s charms by “zoning out” and listening to music, books, and podcasts. They might’ve picked up the strategy to battle the Virginia Blues, but in the mid-Atlantic, it becomes even more common.
Don’t give up. The trail gets flatter in the mid-Atlantic. It has less elevation gain. Yes, there’s rock scrambling. But with the right mindset, it can be fun and feel like playing on a jungle gym.
Town food and deli stops are almost daily affairs. Resupply points are frequent, so you’ll need to carry less food (though you will need to carry more water in some areas). Your pack will feel lighter after you’ve dumped cold-weather gear such as sleeping bag liners. This means that your daily mileage will likely increase.
The mid-Atlantic is also full of history, culture, and opportunities to learn about the region. You’ll hike literally through the Bear Mountain Zoo and the iconic Bear Mountain bridge over the Hudson River. You’ll pass numerous historical monuments including an Underground Railroad stop at Pine Grove Furnace State Park. There’s even a train stop that goes into New York City.
While the mid-Atlantic is the least wild section of the AT, it’s been thoughtfully designed and routed to create an interesting experience for the person traveling on foot. From the Lemon Squeezer in Harriman State Park in New York, Delaware Water Gap in Pennsylvania, Sunfish Pond in New Jersey, to the Palmerton Superfund Site in Pennsylvania, the natural and cultural history in the mid-Atlantic is unlike any other long trail.
Days are longer, and your body is strong. Enjoy the mid-Atlantic for what it has to offer and know that it’s unique challenges will soon be over.

Mike Unger scrambling near the New Jersey-New York border.
RECOMMENDED GEAR FOR THE MID-ATLANTIC
Lighter sleeping bag (or dump sleeping bag liner)
Lighter jacket (dump the heavier layers from down South)
Bug repellent clothing or clothing treated with bug-repelling Permethrin
Bug net for your tarp (if it isn’t built-in)
Bug spray or lotion
More water carrying containers (a few of the longer waterless stretches on the AT are in this section)
Optional: Sturdier trail running shoes (for crossing rocks in Pennsylvania)
Optional: trekking poles (if you weren’t carrying already, you might want for better balance on the rocks)

Mike Unger scrambling on the rocky section near Lehigh Gap, PA.
CHALLENGES AND STRATEGIES FOR THE AT MID-ATLANTIC
HOT TEMPERATURES WITH WARM NIGHTS
If the hot, humid temperatures weren’t hitting you down south in Virginia, almost all northbound hikers will start feeling it by the time they reach the mid-Atlantic. You’ll be greeted with hot days, warm nights, and mosquitoes. We have had nights too warm to get in a sleeping bag but too buggy to sleep without the protection of a tent.
How to deal with this? First, a backpacking quilt helps. The versatility of a quilt helps manage the warmer nights. You can completely open it up and only cover part of your body. As the night cools down, cover up more. Want to learn more about quilts? Check out this video.
Another AT strategy is to dump some of the cold-weather gear you’ve been carrying for the South. Most hikers dump their cold-weather gear somewhere in Virginia—but resist the temptation to send it home too soon. It’s not uncommon for a late-season storm to dump some snow in Mt. Rogers in Virginia. Especially if you are ahead of the pack, Harper’s Ferry is a much safer place to dump cold-weather gear.
Heavier layers and heavier rain gear can be switched out for summer-weight layers and less-robust rain gear. You can also change up your worn clothing for looser, lighter items such as shorts, skirts, and sun shirts.
Related: Best Thru-hiking Shorts
Read More: Best Men's Hiking Shorts, Best Women's Hiking Shorts, Best Hiking Skirts

A rattlesnake on the AT in PA.
MOSQUITOES AND TICKS
The mosquitoes can be fierce. If you didn’t carry a bug head net earlier, now’s the time to pick one up. If you’re wearing shorts or a skirt, you’ll likely need a good insect repellent as well.
You’ll be traveling through grassy areas which are infamous for ticks, such as around Palmerton, Pennsylvania. Although the heat may make you want shorts, the best choice is to cover up with light-colored pants. Whether you’re wearing shorts or not, use DEET and treat your clothing with Permethrin during a zero day. Ticks and Lyme disease are serious. See our section above for this trail-wide concern.
ROCKS AND SNAKES
Pennsylvania in particular is known as “Rocksylvania” among thru-hikers. Consider upgrading your shoes to something sturdier for this section. You may want trekking poles to help with stability.
Keep an eye out for snakes, which like to live in rocky areas.
LONG WATER CARRIES

Mike Unger on a rocky section of the AT in PA.
While the long water carries on the AT may seem short compared to Pacific Crest Trail, Continental Divide Trail, or Arizona Trail standards, they still require planning and preparation.
Check your maps or apps to see the distance until the next water carry. The FarOut app includes crowd-sourced information, which gives you more timely information on the cleanliness of sources. While seasonal water often isn’t an issue on the AT, some spigots at campgrounds, for example, may not be working.
Expect to walk off-trail to reach some water sources in the mid-Atlantic. Sometimes, you’ll get water from campground pumps, like in New Jersey. Other times, springs may be far down a hill from a shelter, like the Darlington Shelter near Pearisburg, Pennsylvania. We recommend carrying some extra water-carrying bags so if you need to walk far from a shelter to collect water, you’ll have enough for dinner and the next morning.
The mid-Atlantic section of the AT is arguably the most important section to keep taking electrolytes throughout the day. Pick up some electrolytes and add them to your water. You’ll be sweating throughout the day in the heat, and heat exhaustion can occur even on the AT.
TEDIUM

Liz at Sunfish Pond in New Jersey.
The mid-Atlantic can feel a bit tedious to some hikers. However, there are good ways to cope. First, find other ways to challenge yourself. Check the calendar—you may need to pick up the pace to finish before fall comes to Mount Katahdin. Use the longer days and flatter terrain to your advantage and challenge yourself to pick up extra miles every day.
Second, if you didn’t already pick up some podcasts and audiobooks for Virginia, this is a good time to do it.

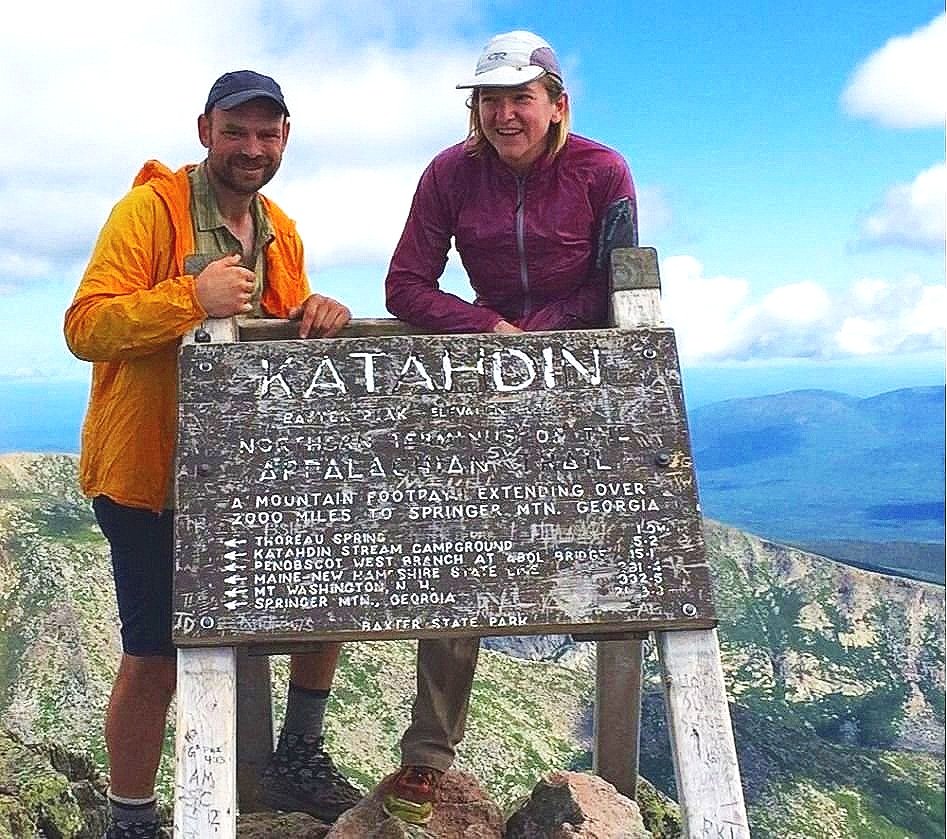
Naomi Hudetz on the summit of Mt. Katahdin in Maine.
NEW ENGLAND (CONNECTICUT TO MOUNT KATAHDIN)
States covered: Connecticut (49.3 miles), Massachusetts (85.8 miles), Vermont (143.0 miles), New Hampshire (146.6 miles), Maine (259.5 miles)
Distance: 684.2 miles
Elevation Gain: 175,712’
Elevation Loss: 170,955’
Minimum Elevation: 6,137’
Maximum Elevation: 271’
New England has some of the most beautiful, challenging, and rugged areas of any long trail. A gradual transition takes place around Connecticut and Massachusetts. You start entering the subalpine zone at Mt. Greylock in Massachusetts and spend miles in the alpine zone in the White Mountains in New Hampshire.
The trail gets steeper and rockier again. You’ll get above treeline on windswept balds covered in moss and “miniature Christmas tree” forests of Balsam Pine. You’ll walk along bogs and lakes occupied by loons, beaver, and moose. Fall color in New England is famous. The boreal forest with the eerie call of the white-throated sparrow is a magical place in summer and fall.
Autumn comes early this far north. Whether you reach Maine in June or October, many AT hikers have at least a few days of cold rain. That being said, the steep climb up White Face Mountain can work up a sweat on a summer day. Some days can be hot and humid. Black flies or mosquitoes may give you trouble.
New England has plenty of sections that require hand-over-hand scrambling like Mahoosuc Notch and Mahoosuc Arm in Maine and the Presidential Traverse in New Hampshire. It’s nearly impossible not to slip and fall at least once in New England.
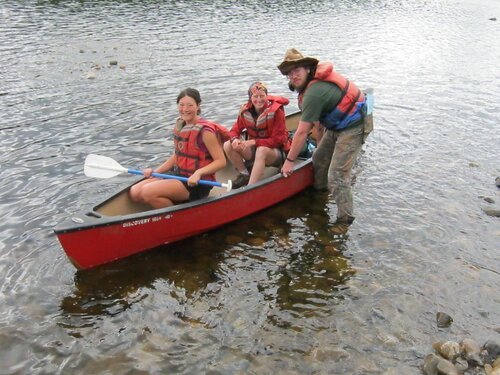
Liz Thomas crossing the Kennebec River in the Appalachian Trail canoe ferry.
Many river crossings in Maine don’t have bridges and can be exciting, especially after a rainstorm. One river, the Kennebec, must be crossed by canoe (during the season, a boatman hired by the Maine Appalachian Trail Conservancy operates it each day at no cost to hikers).
Although you are strong from 1,800 miles of hiking, don’t underestimate the challenges of New England. It is the most wild, remote, and physically demanding section of the AT, especially in New Hampshire and Maine. You go from the relatively flat mid-Atlantic to daily 5,000’+ climbs (depending on your mileage). When it’s foggy, navigating balds and summits can become difficult.
The New England section goes through some of the longest remote stretches of the AT, including the (100 Mile Wilderness). Don’t expect much cell service. Whether you finish the trail during the peak of summer and huckleberry season or during the fall colors, the last 500 miles of the AT are arguably the best miles of the AT.
The northern AT terminus is Mt. Katahdin. Whether you’re starting or ending your thru-hike there, check out our guide on How to Get to (and Go Home from) the Northern Terminus of the Appalachian Trail.
RECOMMENDED GEAR FOR NEW ENGLAND AT
Good rain jacket and rain pants
Cash (for food at huts, and shelters and campsites that may have fees)
Warm clothes for sleeping or long underwear (for men and for women)
Waterproof over mittens and gloves or mittens

Mt. Washington is one of the highest elevation points on the AT and is known for having some of the worst weather in the country.
CHALLENGES AND STRATEGIES OF AT IN NEW ENGLAND
CARRY GOOD RAIN GEAR
When you reach New England, you may want to upgrade your rain gear. AT thru-hikers should always carry a rain jacket—even in the mid-Atlantic. But the cooler temperatures in New England—especially in fall—increase your need for rain gear that can keep you warm.
There is heavy brush along much of the trail. When wet, the brush creates a “car wash” effect, soaking you from the waist down. A rain kilt is a good option for thru-hikers. Also, consider waterproof over mittens to help keep your hands dry.
Related: Best Rain Jackets and Best Rain Pants
RUGGED TRAIL, MORE ELEVATION GAIN, FEWER MILES PER DAY
New England is the most physically challenging section of the AT. It seems like nearly every day is a new 3,000+ foot climb—with some days more like 5,000+ climbs with 1,000 feet in a mile.
If you finish in September, you’ll notice the days start getting shorter. You may consider upgrading your headlamp. See our Best Headlamps guide for recommendations.
Regardless of when you finish, you should plan for lower mileage days and day after day of rain.
Some sections require hand-over-hand scrambling. Be prepared to fold down your trekking poles and generate heat moving. Some of these sections seem nearly vertical, with 1,000+ feet of gain in a mile.

A section of the AT that requires ascending a ladder.
Occasionally, ladders and rebar are drilled into the rock to make it easier. You may have gotten a taste for this in the Lemon Squeezer in Harriman State Park in New York, but New England is extreme. When wet or icy, slabby granite can be slippery.
MORE LIMITED CAMPING AREAS
The steep and rugged terrain limits your camping options in New England. Hikers aren’t allowed to camp in fragile ecosystems above treeline (not that it would be a pleasant experience), so you’ll have to plan your day’s mileage to end at a suitable site. See the Appalachian Trail Conservancy’s camping chart at the bottom of this page for more details.
FEES AND WORK FOR STAY AT SOME CAMPSITES
The Appalachian Mountain Club and the Maine Appalachian Trail Conservancy operate a few shelters and huts in New England that require thru-hikers to pay a small fee to partially offset the costs of trail maintenance in the area and the salary of the shelter caretaker.
While it’s easy to get bummed about having to pay to stay at shelters after months of free accommodation (especially as hikers run low on funds towards the end of the hike), you get a lot for the fee. These tend to be some of the nicest shelters on the trail. Sometimes, they have amenities like canoes you can take on a lake or kitchens and pancakes.
The actual cost of having a human keep things tidy at the shelter is estimated to be 50% of the cost of the fee. Caretakers usually do a full day of trail maintenance in the area, including building bog bridges and rock walls. They’ll coordinate helicopter search and rescues. They also keep shelters clean, dry, and free of rodents. Given the volume of users and the cooler climate of New England, it can take one person 1/3rd of their working day just to stir composting toilets.
Some huts and camps, such as in the White Mountains, have work-for-stay programs for thru-hikers (2 per hut and 4 for Lake of the Clouds). This thru-hiker and hut worker has tips on how to secure work-for-stay. Expect to work 2 hours scouring pots, but it comes with a dry place indoors and hot food.
DEALING WITH REMOTENESS
New England is more remote and wild than other sections of the trail. There are fewer towns—especially in Maine—and often distant. Cell phone reception is less common, especially compared to the mid-Atlantic.
In the past years, there’s been at least one prominent case of AT hikers going missing in Maine and not being found for years. If you aren’t already carrying one, consider carrying a personal locator device for this section. Devices like the Garmin inReach allow you to two-way text with the folks back at home during the significant sections that don’t have cell reception.
We also recommend carrying a phone app that shows the line of the AT. Forests can be dense in Maine. It’s easy to lose the trail if you step away from it to relieve yourself. Always keep track.

Liz Thomas in the White Mountains with Mount Lafayette in the background.
WHITE MOUNTAIN LOGISTICS FOR AT HIKERS/ APPALACHIAN MOUNTAIN CLUB HUTS & TENT SITES
The Appalachian Trail passes through the White Mountain National Forest in New Hampshire, one of the most beautiful ranges in the Wild East. It’s home to Mt Washington, notorious for bad weather and wind. It’s also home to the Appalachian Mountain Club hut-to-hut system, reminiscent of those found in Europe.
Thru-hikers can often purchase hot or cold drinks and baked goods (remember to bring cash!) from AMC huts. They can be a dry place to take a rest while traversing the rugged terrain of the Whites.
One challenge of the Whites is limited legal camping options. Due to the rugged terrain, fragile ecosystem, and popularity of the White Mountains, you’ll need to plan your campsites carefully. This Appalachian Mountain Club guide demystifies the camping options and has suggestions for where you can and can’t camp.

Liz Thomas on the summit of Mt. Katahdin.
APPALACHIAN TRAIL NORTHERN TERMINUS: MOUNT KATAHDIN
While it’s not traditional gear, many hikers like to send themselves something special in their last resupply box (likely in Monson, Maine, before the 100 Mile Wilderness) to enjoy at the border when they finish.
Whether you plan to wear a costume, enjoy a treat, or celebrate with the photo of a loved one, or take a photo with a nicer camera—the end of the trail is an accomplishment you will want to document. Make it special. However, be mindful of other users. Baxter State Park requests that thru-hikers make their finish a quiet affair with at most—a small number of people. Remember that this is a wilderness and many people hike in the park for solitude. Practice Leave No Trace ethics.
Check out our guide on How to Get to (and Go Home from) the Northern Terminus of the Appalachian Trail to learn more about logistics.
AT THRU-HIKER BAXTER STATE PARK MT. KATAHDIN PERMIT LOGISTICS
Mt. Katahdin has some logistical challenges for thru-hikers. It’s located in Baxter State Park, which requires thru-hikers to obtain an AT Thru-hiker card before summiting and has a limited number of cards available per year. Thru-hikers must camp in designated thru-hiker areas, and camping is not available after October 22nd. Familiarize yourself with Baxter State Park’s regulations.
The Appalachian Trail Conservancy also has an extensive FAQ, including logistic information in the unlikely event that the park is no longer issuing thru-hiker permits.
Ready to hike another trail? See our PCT Southbound Gear List & Strategy.
Why you should trust us
Liz Thomas has thru-hiked the AT twice. A former Fastest Known Time (FKT) record holder on the Appalachian Trail, she has also hiked the Pacific Crest Trail and Continental Divide Trail and is a Triple Crowner, in addition to having thru-hiked 20+ other long trails. She’s co-founder and editor in chief of Treeline Review. She’s the author of Long Trails: Mastering the Art of the Thru Hike, which won the National Outdoor Book Award. You can read all her gear articles here and on her personal website, as well as on Wikipedia.
Mike Unger has thru-hiked the Appalachian Trail twice. He’s one of few people in the world who is a Double Triple Crowner, having completed the PCT, AT, and CDT each twice. You can see all articles by Mike Unger on his Treeline Review author page.
Naomi Hudetz has thru-hiked the AT, PCT, and CDT and is a Triple Crowner. She’s co-founder and online editor at Treeline Review. She’s thru-hiked numerous other distance routes including the Great Divide Trail across the Canadian Rockies (twice), Grand Enchantment Trail, Pacific Northwest Trail, the Arizona Trail, (most of) the Idaho Centennial Trail, the first known thru-hike of the Blue Mountains Trail, and the Oregon Desert Trail. You can read all her articles on her Treeline Review author page