Thru-hike the John Muir Trail: Gear List & Strategy 2024
Permits, gear list, sample itinerary, and resupply for hiking the JMT Southbound
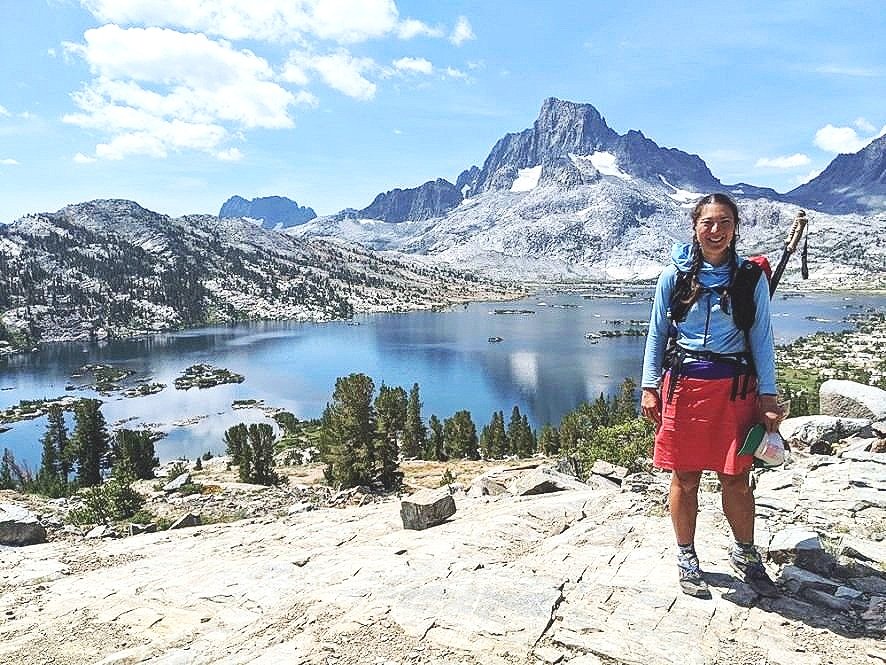
The author, Liz Thomas, at Thousand Island Lakes on the John Muir Trail. Photo by Liz Thomas.
January 21st, 2024
Considered the most iconic thru-hike and backpacking trail in the US, the John Muir Trail (also called the Nüümü Poyo Trail) is a 211-mile hiking trail in the Sierra Nevada mountains. The California trail climbs Mt. Whitney, travels through Yosemite and Sequoia National Park, and passes by Half Dome.
I’ve thru-hiked the JMT four times, spent four summers living in the Sierra hiking along the JMT as part of my work, and authored the book Long Trails: Mastering the Art of the Thru-hike.
This John Muir Trail gear list features what I’ve learned from four thru-hikes of the JMT, along with numerous other long trails and routes along the JMT corridor. The strategy includes how to get JMT permits, the permit process, resupply, a 21-day sample itinerary, and details on John Muir Trail section hikes.
My goal is to walk you through a step-by-step guide on what gear to carry as weather and ecosystems change from a 4,040-foot elevation at Happy Isles in Yosemite to a 14,505-foot elevation at the JMT’s highest point on Mt. Whitney (and the highest peak in the lower 48).
Whether you’re planning a dream long-distance hike or section hiking parts, this in-depth guide will give you guidance for your John Muir Trail gear checklist and strategies for hiking and developing self-care routines to thrive on your journey.
We create reader-supported, objective, independently-selected gear reviews. This story may contain affiliate links, which help fund our website. When you click on the links to purchase gear, we may get a commission — without costing you an extra cent. Thank you for supporting our work and mission of outdoor coverage for every body! Learn more.
JMT Quick Facts
JMT Length: 211 miles, plus 11-mile descent to the nearest road at Whitney Portal (total 223 miles)
How long does it take to hike the JMT: Most people take 2-3 weeks
Elevation gain/loss: 46,000 feet/38,000 feet
What is the highest point on the JMT? Mt. Whitney (14,505 feet)
Best season to hike the JMT: July to August, depending on show pack levels.
Permits required for the JMT? Yes, permits released 6 months in advance, very limited walk-up
Difficulty: Moderate to High


JMT Gear List
JMT Lightweight Gear List
A lightweight gear list with comfort and luxury gear to keep you warm, safe, and having fun on the JMT. Want something lighter? See our ultralight gear list below.
| GEAR | MODEL | WEIGHT (OZ) | WEIGHT (OZ) |
|---|---|---|---|
| PACK, SHELTER, SLEEPING | Women | Men | |
| Backpack | Six Moon Designs Swift X | 38.90 | 38.90 |
| Waterproof Pack Liner | Six Moon Designs Pack Liner | 3.00 | 3.00 |
| Shelter | Six Moon Designs Skyscape Trekker | 26.00 | 26.00 |
| Tent Stakes x 7 | MSR Ground Hog | 3.50 | 3.50 |
JMT Ultralight Gear List (Under 10 pounds with Bear Canister)
An ultralight gear list for the JMT that includes everything you need for minimalists and those with the advanced skill sets and experience on thru-hikes.
| GEAR | MODEL | WEIGHT (OZ) | WEIGHT (OZ) |
|---|---|---|---|
| PACK, SHELTER, SLEEPING | Women | Men | |
| Backpack | Mountain Laurel Designs Exodus | 18.00 | 18.00 |
| Waterproof Pack Liner | Nyloflume Pack Liner | 0.90 | 0.90 |
| Shelter | Six Moon Designs Gatewood Cape | 11.00 | 11.00 |
| 7 Tent Stakes | Vargo Titanium Stakes | 1.75 | 1.75 |

What is the John Muir Trail?
The John Muir Trail is a classic long-distance hiking and backpacking trail that goes along the Crest of the Sierra Nevada mountain range from Happy Isles in Yosemite National Park to the summit of Mt. Whitney, the highest peak in the Lower 48 (also called Tumanguya).
Many hikers of all backgrounds refer to this trail as the Nüümü Poyo Trail or NPT. The Nüümü Poyo (the People’s Road or Trail) is the term used by the Mono Piute (Payahuunadü), whose ancestral lands it crosses. The trail goes between passes that were trade routes for centuries. Since time immemorial, the Ahwahnechee, Paiute, Miwuk, Mono, and other tribes have stewarded this land. Learn about this area’s history here or in this article by REI and visiting the Owens Valley Paiute Shoshone Cultural Center in Bishop, CA.
Hikers pass wildflower-filled meadows, swimmable rivers, and alpine lakes on this equestrian and hiking trail. They may also encounter snow on high passes late into the summer. Wildlife viewing opportunities include black bears, mule deer, and high alpine animals like marmots and pika.

Wildflowers abound in the meadows near Island Pass and Banner-Ritter peaks on the JMT.
Highlights and Challenges of the JMT
Highlights
Postcard-like views every day and opportunities to visit some of the most famous and most photographed destinations in the world
Opportunities to summit Mt. Whitney and Half Dome, as well as numerous other peaks
An opportunity to experience the most remote area in the Lower 48-almost 200 miles without crossing any roads
The Sierra Nevada mountains have more sunny days and better weather than most mountain ranges in the Lower 48
Swimmable and fish-able alpine lakes and streams, well-defined camping sites, and many opportunities to meet other hikers from all around the world

Weather is less predictable in the mountains than other ecosystems.
Challenges
Permits are difficult to obtain as most are made available through a lottery system opened 6 months in advance. See our section on How to Get Permits for strategies and tricks.
Elevation gain paired with the high altitude of the route makes it physically strenuous, and altitude sickness is a possibility. The trail is well-marked but can be rocky.
Bear canisters are required to protect your food, which can add weight to your pack. See our section on Bears and Protecting Food.
Because the trail is so remote, it can take a day or more to leave the trail and return for resupply purposes (as well as requiring extra miles and elevation gain). See our tips on resupply.
Snow and high river fords can be dangerous in the early season, especially the crossing of Evolution Creek and the South Fork of the Kings River. See our section on Fords and Advice for Safely Crossing creeks or our dedicated article on How to Ford a River.
While the Sierra generally has better weather than other mountain ranges like the Rockies, the trail is often above treeline, which means that lightning storms may create challenges and delays in your trip. Carry a rain jacket and consider bringing rain pants in the case of storms.
During peak season, it can be busy. While the JMT is great for making friends with hikers and finding safety in numbers, it lacks the solitude you may want while hiking.
Mosquitos can be annoying in early summer after the snow melts. Although this differs from year-to-year depending on the snowpack, mosquitoes are generally worst in June. See our tips for dealing with bugs.

The Muir Hut is a landmark atop Muir Pass. It’s an accomplishment to get to the top.
How long does it take to hike the JMT?
Most backpackers hike the JMT in 2 to 3 weeks. The most common itinerary is 21 days. If you don’t have the vacation time, it is also possible to section hike the trail over many long weekends.
If you hike 15 miles per day, it will take about 15 days to complete the JMT, not including any rest days or days spent hiking to and from resupply points.
If you hike 10 miles per day, it will take about 22 days to complete the JMT, not including rest days or days spent hiking to resupply.
When planning your itinerary, remember to account for:
Transportation to the beginning and from the end of the trailhead. Pad 1-2 full days of travel before your hike and 1 day of travel before your hike.
Time to reach resupply points. To reach many resupply points, you will need to hike off the JMT on side trails. Plan for the time it takes for you to hike those miles. It may take almost an entire day of hiking on a side trail to reach some resupply points, such as Vermillion Valley Resort, which is 7 miles to reach by trail (if the shuttle boat isn’t operating). You’ll also need to spend an entire day getting back to the JMT.
Rest Days or time spent resupplying. Days where you are not covering miles on the JMT are called “zero days” by thru-hikers. It is because you are hiking zero miles of the trail that day. Even if you feel like you are walking a lot in town between a hotel and a grocery store, those miles don’t get you closer to Mt. Whitney.

Hikers who start the JMT too early may find themselves punching through the snow, an experience called “postholing.”
Start Date and Best Season
The best start times for the JMT are between July and August. You’re less likely to encounter snow and high river crossings or unexpected snowstorms in this window since it’s late summer/early fall. August start dates mean you’re less likely to encounter bugs.
The highest pass on the JMT is Forester Pass at 13,200 feet. Snow can linger there through June; it can linger through July or later in high snow years. Snowstorms can come as early as September, and temperatures often get below freezing at that time of year.
July and August are the months where hikers are least likely to encounter dangerous snowfields and high river fords from melting snow. However, those with the right skill sets and proper gear can ski the trail in winter. See our guide on Thru-hiking Risk Assessment, which includes resources on how snow levels and river levels so you can plan to avoid potentially dangerous situations.
I prefer to hike the JMT in September for the reduced crowds and lack of bugs. However, in recent years, wildfire smoke and closures of the national forests and national parks have made it more challenging to count on September as a viable hiking month in the Sierra Nevada mountains. In 2021, the Forest Service canceled many September JMT permits due to wildfire closures. I expect the cancellation of permits to continue to happen in future years. As a result, I can no longer recommend September as the best month to hike the JMT.

What skills do I need to hike the JMT?
Navigation
The trail is generally well-defined, with most trail intersections signed and marked. In addition, apps like Far Out guides make it easy to see nearby campsites, water availability, resupply options, and intersecting trails. However, early in the season, snow can obscure the trail and make navigation difficult. As such, we recommend taking a map-reading course before hiking the JMT.
How do I know where to camp and find water on the JMT?
The JMT has some established campsites, which are marked on the Far Out app as well as on maps. It includes water sources as well as campsite information, such as how many tents can fit in an area and whether there are bear boxes. With a few exceptions, there are no requirements to stay in established areas. However, many hikers find it easier to plan when they know where campsites can be found.

Rocky trail and elevation gain and loss are one of the things that make the JMT beautiful, but also challenging. This area around Forester Pass is among the most challenging for climbing.
Rocky trail
The JMT is considered one of the rockier trails in the Western US due to the glacial geologic history of the Sierra. Although the trail is well-marked, hikers should have stable and sturdy footwear for stepping over and around rocks. A good pair of trekking poles will help, too. An ultralight backpacking gear set up, like that described in our ultralight gear list, may help reduce the challenges. Check out our JMT Ultralight Gear List for ways to reduce the weight of your pack.
Related: The Best Trekking Poles
Read More: The Best Lightweight Hiking Boots
Elevation Gain and Loss
The John Muir Trail crosses 7 mountain passes. Each pass involves 3,000 to 5,000 feet of elevation gain and loss. In total, the trail has 47,000 feet of elevation gain. However, the trail rarely climbs or descends at more than a 10% grade (this makes it passable for stock animals).
Like navigating rocky terrain, carrying ultralight backpacking gear will help make the climbs easier. Check out our JMT Ultralight Gear List for ideas on how to lighten up.
High Altitude Travel and Sun Exposure
Before you hike the JMT, familiarize yourself with the signs of altitude sickness. Be prepared to take it easy to allow your body time to acclimate to the elevation. Additionally, many miles of the JMT are above treeline, so you should bring adequate sun protection and know-how to protect yourself from sun exposure.
Skin is more sensitive to sun exposure when at altitude, so wear a sun hat, long sleeves, plenty of sunscreen, and perhaps even sun gloves. See our guide to the Best Sun Shirts as well as our guides to The Best Face Sunscreen and The Best Sunscreen for your Body for our recommended sun protection.
Do not forget sunglasses! If there is snow, the reflection of the sun off the snow can cause snowblindness and permanent eye damage. See our guide to The Best Running Sunglasses for recommendations on sunglasses designed for high-output activities.

In big snows years, hikers may encounter snow in June.
Snow and River Fords (During some years)
In high snow years, hikers may encounter snow and challenging river fords. Hikers with permit dates that start before July should have the skills to cross steep and potentially icy snowfields.
If you plan on completing your trek through May, June, or July, we recommend taking a Snow Navigation course, Ice Axe course, and Swiftwater River Fording course during the winter before your thru-hike. Late spring and early summer hikers should also carry snow equipment like an ice axe and ice traction devices.
Even in a lower snow year, thru-hikers will likely encounter snow at the passes. See our guide to How to Prepare for a Thru-hike in a High Snow Year for specific gear, tips, and resources to check snow levels. You can also watch a video of a talk given by 3 thru-hikers who hiked in big snow years.
You can also read more about How Not to Die on a Thru-hike or in our article on How to Ford a River.
In extremely high snow years, snowy conditions can linger at the passes until the beginning of August. However, in low snow years, the trail can be snow-free as early as mid-June.

The JMT permit process is absolutely worth it for the opportunity to hike one of the most beautiful trails in the world.
JMT PERMIT PROCESS FOR 2024
For 2024, these Yosemite wilderness permits are available at recreation.gov. The JMT permit is an interagency permit that will cover your entire hike from Yosemite National Park all the way to Mt. Whitney through Sequoia National Park and John Muir Wilderness, managed by the Forest Service.
Note that in 2024, a reservation is required to drive into the park. Your backpacking permit will allow you entry into the park.
About 60 percent of John Muir Trail permits are available for reservation. For context, last year, 40 percent were allocated for walk-ups and post-lottery permits online. Here are a couple of different ways to save your spot:
1. Apply for the lottery.
The permit lottery opened on November 12, 2023, for trips 24 weeks out. The application is open every week from Sunday to Saturday until May 6, 2024.
2. Reserve a spot that’s NOT part of the lottery.
From November 24, 2023, through October 17, 2024, you can apply for registration for sites not included in the lottery (that application is at recreation.gov).
Pro Tip: You can also choose multiple trailheads and start dates on your application to increase your chance of getting a spot. Note that availability for these spots is available a week after the correlating lottery dates.
3. Just walk up.
Walk-up permits are also available from through October 20, 2024, up to 7 days before your intended start date and no later than 3 days prior. Note that a reservation is required to drive into Yosemite. These dates are subject to change, but from our experience only see small adjustments. You can fill out a permit application upon entering Yosemite at 11 am. It costs $10 to fill out a group application and $5 for each person in the group.
Be aware that the walk-up permit line is first-come, first-serve and the line starts forming as early as midnight. You cannot fall asleep while waiting in line unless you’re willing to risk being ticketed for illegal camping. We recommend bringing a folding camp chair and warm clothes to make yourself comfy, though.
How to Apply for the lottery permit
If you decide to go for the lottery or online reservation route, you’ll need to make an account on recreation.gov. We recommend doing that well in advance of your permit date. You’ll also need $10 for your application fee.
Days before starting the application, you should plan your preferred dates, group size, group leader, and where you plan on starting and exiting. You also should know your itinerary; more specifically, you should know where you intend to camp the first night. The National Park Service offers two types of JMT permits (Little Yosemite Valley and beyond), so you must request the proper permit.
We recommend practicing using recreation.gov before you apply to familiarize yourself with their layout.
For more information on applying for a permit to hike the John Muir Trail, check out the National Park Service’s FAQ page for wilderness reservations.

HOW TO APPLY FOR A SOUTHBOUND JMT PERMIT: HAPPY ISLES TO MT WHITNEY
Due to the increase in JMT permit requests, Yosemite National Park limits the number of hikers exiting YNP over Donohue Pass on the JMT to 45 per day (to allow non-JMT hikers to access YNP):
25 from the Lyell Canyon trailhead in Tuolumne Meadows
20 from the Happy Isles trailhead
The National Park Service has not yet announced how many of the aforementioned permits, roughly 60% are available by reservation, and 40% by walk-up.
For those who leave from Happy Isles, you must specify your first camp. Your options are:
Little Yosemite Valley (4.5 miles)
Sunrise/Merced Lake (6.5 miles and beyond)
If you can’t get a permit out of either of those trailheads, try one of the variations:
Note that you can only go over Donahue pass with the Happy Isles or Lyell canyon trailhead permit with Donahue pass specifically printed on it. The following information isn’t listed specifically on the Park Service’s website for the JMT but on the general trailhead page here.
As of 2023, NPS has added a (no Donahue Pass) extension to the trailhead info. For Glacier Point to Little Yosemite Valley, they have added "Not eligible to exit Yosemite on the John Muir Trail. Half Dome eligible." We think the Park Service has eliminated these options to eliminate confusion for the permit office. In prior years, NPS gave 5 permits from each of these trailheads it looks like, but this is no longer the case.
Glacier Point Trailhead
• Avoids the climb out of Happy Isles
Sunrise Lakes Trailhead
• Option to leave your car at Tuolumne, take a shuttle to the trailhead, then hike past Tuolumne and pick up more of your gear
• Side trip to Clouds Rest is possible
• However, climbing Half Dome as a side-trail isn’t an option

ROLLING LOTTERY APPLICATION
Applications are processed 22 weeks in advance of your start date. In past years, there was a Rolling Lottery Application. For those with a flexible start date, one application allowed you to participate in 21 consecutive daily lotteries. Unfortunately, as of 2022, that function appears to have been discontinued, although we will continue to monitor availability.
Other JMT lottery rules
If you win a permit, you must pay the fee ($5/person). Some documentation says that you have up to 14 days to pay your fee or lose your permit.
Starting the day before your permit, you must pick it up in person at one of the 5 park wilderness centers. This must happen before 11 am. Bonus: Don't worry about where you will stay that night. Your permit comes with a stay at the backpacker's campsite.
You can add a side trip to climb Half Dome, but a permit is required to climb it. Apply for the permit for Half Dome with your JMT application.

Treeline writer Felicia Hermosillo climbing Glen Pass on the JMT in the northbound direction.
JMT Northbound vs. Southbound
Southbound (SOBO) is the classic way of thru-hiking the trail. Northbound (NOBO) is becoming more common as permits for alternate trailheads in the southern Sierra are easier to obtain.
We have an upcoming article dedicated to hiking the JMT Northbound. However, here are some things to keep in mind:
What to know about the JMT Southbound
It allows you to ease into the high altitude and acclimate more quickly.
Resupplies are closer together towards the beginning of your trek, so you have time to build up your physical and mental strength.
Your hike starts with less elevation gain per day, so your body has time to get used to climbing.
There are many options early on for side-trails in case you are injured or need to bail out.
What to know about the JMT Northbound
It’s easier to get permits to start the hike, especially from the Cottonwood Lakes and Horseshoe Meadow area.
The journey starts with the higher elevation part of the trail, so acclimation can be challenging.
The trail starts with longer food carries, which means you should start the trail in shape to carry a heavier backpack.
You have fewer options within the first few days to bail out from the JMT if you decide the trail is not for you.
Our dedicated guide to the JMT Northbound is coming soon.

The Cottonwood Lakes Loop has opportunities for swimming, soaking, and fishing in the Cottonwood Lakes Basin and other lakes along the hike. Photo by Liz Thomas.
Is the John Muir Trail part of the PCT?
The John Muir Trail shares 160 out of its 211 miles with the Pacific Crest Trail, a 2,663-mile long-distance hiking path from Mexico to Canada.
The JMT starts on its own from Happy Isles to Tuolumne Meadows, about 23 miles. Then, the JMT and PCT converge and are the same for about 21 miles. At Thousand Island Lake, the two trails diverge for ~13 miles until Devil’s Postpile National Monument. From There, the two trails converge again, and the JMT and PCT are the same for 142 miles until the JMT splits off to go to the top of Mt. Whitney at Crabtree Meadow.
A PCT thru-hiker permit will not allow you to camp in the JMT-only areas between:
Crabtree Meadow and Mt Whitney or beyond towards Whitney Portal
Between Devil’s Postpile and Thousand Island Lake on the JMT, including Garnet Lake
Anywhere between Tuolumne Meadows and Yosemite Valley, including near Half Dome
Will I see PCT hikers on the JMT?
If you’re on the JMT in mid June and early July, you’ll likely see northbound PCT thru-hikers.
Maps, Apps, and Guidebooks
Far Out App
Far Out Guides (formerly Guthook Guides) has a detailed app that shows your GPS position relative to a map of the trail. The app shows a trail line, water sources, campsites, trail junctions, and resupply areas. You can access their JMT interactive map and the app here.
Guidebooks

The gold standard book for JMT planning is Elizabeth Wenk’s John Muir Trail: The Essential Guide to Hiking America’s Most Iconic Long Distance Trail (Amazon | REI). It includes maps with campsites, elevation profiles, itineraries, backpacking gear lists, entry points, and resupply options.
The Essential Guide includes all the details you need for planning: campsites, water sources, resupply, and side trips to peaks, as well as detailed history, geology, and botany of the Sierra Nevada mountains. Wenk is one of the foremost modern authorities on the natural history and science of the Sierra and a prolific Sierra scholar. In addition to authoring many Sierra guidebooks, she’s accomplished one of the most challenging goals among hikers: climbing all 247 of the significant peaks in the Sierra (and she did it by the age of 25!). It’s likely not an exaggeration to say she knows the JMT better than anyone alive right now, and this book should be in every aspiring JMT hiker’s possession.
The one thing to watch with this book is that the permit process explanation changes from year-to-year. Make sure you get the most up-to-date edition.
Eric the Black’s John Muir Trail Pocket Atlas measures 4.5 x 7.5 x 0.2 inches and weighs 3 ounces. It includes topographic maps and 300 miles of side trails, so it is a viable option for pack weight-conscious hikers who want to carry a guidebook. As with Wenk’s book, the one thing to watch out for in this book is that the permit process explanation changes from year-to-year.
Maps
The Tom Harrison John Muir Maps (Amazon | REI) are the essential topographic map set for the JMT. They come in 14 pages, covering the entire trail from Happy Isles to Mt Whitney. It’s printed on waterproof and tear-resistant paper and includes side trails to resupply locations.
The National Geographic JMT Mapbook (Amazon | REI) has all the maps stapled together. It includes detailed elevation profiles, resupply locations, and a 21-day sample itinerary--all on waterproof and tear-resistant paper. If you decide not to purchase the guidebook, there’s enough information on resupply and entry points included in this map book that you could get by with just this resource. However, we would highly recommend using the John Muir Trail: The Essential Guide to Hiking America’s Most Iconic Long Distance Trail (Amazon | REI) as your primary resource.
Between the two map sets and the maps in the Eric the Black Atlas, I prefer the Harrison maps because they show a more extensive overview area and can more easily be split up. For example, I carry half the maps to begin and send the other half in a resupply box halfway through my backpacking trip. However, the National Geographic maps are convenient because you have all the maps in one place, along with elevation profiles. Both maps are popular with JMT hikers, and either one will work well for planning and navigating the trail.

Gaia and GPX Track
I enjoy looking at maps for the entire area surrounding the JMT. Having maps of the entire Sierra allows me to identify surrounding peaks and landmarks, where rivers come from, and where intersecting trails go. I also think it’s essential to have regional-scale maps if I need to leave the trail for an emergency. For these reasons, I pre-download all the surrounding maps and trails with the Gaia GPS app on our phone. I also pre-load a GPX track of the trail on my phone.
Databooks
The John Muir Trail Data Book (Amazon | REI) is the companion book to Wenk’s JMT book. This smaller book includes water sources, campsites, junctions, and resupply.
The Erik the Black JMT Maps and Atlas package includes a databook, maps, and a GPX track.
Online Maps
For online planning purposes, the JMT Conservancy maintains a map with good zoom-in features.

Treeline Review writer Mike Unger with Mt. Whitney in the background.
How to Get to the JMT
Getting to the JMT trailheads in Happy Isles or Tuolumne Meadows requires some logistical planning. After you complete the trail, you’ll have to shuttle yourself from one trailhead to the other.
By Car
The Pacific Crest Trail Association writes that “driving yourself to the JMT is probably the easiest option.”
Yosemite Valley is this distance by car from the following major cities:
San Francisco: About 190 miles or a 4-hour drive (without traffic)
Sacramento: About 160 miles or 3.5-hour drive
Fresno Yosemite International Airport: 95 miles or about a 2-hour drive
Reno, Nevada: 215 miles or 4-5 hour drive
Los Angeles: 310 miles or 5-7 hour drive
When you enter Yosemite, you will have to pay an entrance fee. Plan for extra time waiting in line at the fee station. You can save time by pre-purchasing a National Parks Pass. Called the America the Beautiful Pass, it gives you free entry to national parks and other fee areas run by the Forest Service, Bureau of Land Management, and Fish and Wildlife agencies.
When you get to Yosemite Valley, park in the backpacker’s lot, near Curry Village, and about ½ mile from the Happy Isles Trailhead. It has bear lockers so you can store any extra food or toiletries in a bear-safe container (do not leave any food in your car!).
This is a detailed list of driving directions to all the trailheads.
By Plane
For those coming from other parts of the country or world, you’ll likely want to fly to Northern California. Here are your options:
The closest airport to Yosemite Valley is Fresno Yosemite International Airport (FAT). Although it’s a smaller airport, you cut down on traffic and bus transfers to get to Yosemite by flying here. You can also easily rent a car from Fresno Yosemite International Airport.
If you’re starting the JMT southbound in Tuolumne Meadows instead of Yosemite Valley, you’re better off flying into the Reno Tahoe International airport (RNO) just across the California-Nevada border. From Reno, you can rent a car for an easy drive to Tuolumne Meadows. The YARTS bus and Eastern Sierra Transit bus also run between Reno and Yosemite Valley. Eastern Sierra Transit also runs between Reno and Lone Pine, so you can quickly return to the airport when you finish the trail.
Many JMT hikers choose to fly into Sacramento International Airport (SMF). This airport is a little farther out than Fresno International Airport but tends to be less expensive to fly into and has more flight options. It also avoids some of the ground transportation traffic you’d hit if you flew into a Bay Area airport. You can easily rent a car from Sacramento and drive to Yosemite. Alternately, you can take Amtrak from Sacramento to Merced and then take the YARTS bus into Yosemite Valley.
If you are coming from a country outside of the United States, your best option may be to fly to San Francisco International Airport (SFO). From SFO, you can rent from numerous car rental agencies or take the Amtrak train and buses to Yosemite Valley.
Regardless of which airport you fly to, plan to arrive in Northern California two days before starting your hike. If you’re taking the bus or train-to-bus option, you should plan to arrive in Yosemite Valley on the day before your hike begins, if not the day earlier.
Your JMT permit will allow you to stay in the Hiker-Biker Campsite in Yosemite Valley for the night before your thru-hike starts. If you get to Yosemite Valley two days before your permit, you’ll have to make reservations for other accommodations for your first night in the park.
Bus Services
YARTS (Yosemite Area Regional Transit System) and Eastern Sierra Transit offer buses to Yosemite Valley and Tuolumne Meadows, the Lyell Canyon trailhead of the JMT.
West Side of the Sierra Bus Service to Yosemite available from:
Fresno, CA
Sonora, CA
Merced, CA
East Side of the Sierra Bus Service to Yosemite available from:
Lee Vining, CA
Mammoth Lake, CA (an easy bail-out point if you decide the trail isn’t for you)
Tuolumne Meadows, CA (allows for access between two popular trailheads for the JMT)
Eastern Sierra Transit connects to YARTS in Lee Vining and Mammoth Lakes:
Lone Pine, CA (this is the closest town to Mount Whitney and how most hikers get back to their cars in Yosemite Valley)
Bishop, CA
Lancaster, CA (which has train service into Los Angeles)
Reno, NV (which has a major airport)
Amtrak provides bus and train service to Yosemite Valley from San Francisco and Sacramento. Service is daily during July and August and weekends only during June and September. Amtrak will take you as far as Merced, and then YARTS provides the last segment of service into Yosemite Valley.
See this National Park Service guide to public transportation options, including from airports.
Greyhound Bus
Take the Greyhound to Merced and transfer to a YARTS bus to get into the park. See more information about taking public transportation into Yosemite on the NPS website.
Note that if you enter a national park on public transportation, you are often required to pay a “walk-in” entrance fee to the park. This fee is less than the vehicle entrance fee. National Parks Pass holders can enter the park for free.
Shuttle Services
If you decide not to drive yourself or take public transit, here is a list of JMT shuttle options in the Sierra.
Resupply
The table below summarizes the most common resupply locations on the John Muir Trail.
| LOCATION | JMT MILE | COST | OFF-TRAIL MILES (one way) | COMMENTS |
|---|---|---|---|---|
| Tuolumne Meadows | 24 | No add'l cost | 0.5 | MAY BE CLOSED IN 2024. Post office; general store; restauraunt; backpackers camp in campground |
| Lee Vining, CA | 24 | No add'l cost | 0 (trail) + 21 miles (by car) | Post office; general store; restauraunts; hotels. An easy hitch. |
| Red's Meadow | 60 | $40 | 0.25 | Pack all food in a plastic bucket; mail $40 check separately 2 weeks before sending package; can drop package off in person and pay $3 per day storage fee; small store with fuel; cabins and campground; café; showers |
| Mammoth Lakes, CA | 60 | $15 Entrance fee to return to trail (plus $7 bus fee) | 0.25 + bus | Major town with Post office, supermarkets, hotels, restauraunts, laundry, hospital. Has excellent free bus system. Pay Reds Meadow entrance and shuttle fees on bus ride back to the trail. |
| Vermillion Valley Resort | 88 | $30 - $50 + $20 ferry | 1 + ferry ($) or 7 via trail | Send your package to arrive 10-14 days before your ETA; 25 pound limit; store carries fuel (call to confirm); ferry ride to resort 2x/day; showers and laundry for a fee |
John Muir Trail resupply 2024
The Tuolumne Meadows store, grill, and Post Office was destroyed in the big snow year winter of 2022-2023. We are still waiting to hear whether the store will be re-built and in operation in 2024.
If you want to resupply at mile 24 an the Tuolumne Meadows store is not open, you can get a ride into the closest town, Lee Vining (a 21-mile hitch hike).
The Tuolumne Meadows campground was also closed for construction in 2023. Due to the high snow year in 2023, it is unclear whether all planned construction was completed. We will update when we hear whether the campground will be open in 2024.
Vermillion Valley Resort can be reached by

Resupply station at Muir Trail Ranch. You’ll send yourself a bucket of supplies, which travels by car, ferry, and horse or ATV to reach Muir Trail Ranch deep in the Sierra.
John Muir Trail Without Resupply
Backpackers who have practice covering more than 25 miles per day may be able to complete the JMT without resupplying. However, we would not recommend it.
In particular, the Tuolumne Meadows store and Reds Meadow Store are within 0.3 miles of walking distance from the JMT. You will likely not save time by skipping these stores because carrying more food means your backpack will be heavier, and you will likely walk slower because of it. Unless you are looking for bragging rights, we would not recommend hiking the JMT without resupply.
With that being said, for backpackers who are on the JMT in early spring or late fall, Muir Trail Ranch, Vermillion Valley Ranch, the stores at Red’s Meadow, and Tuolumne Meadows may be closed for the season. If this is the case, we recommend hiking to a trailhead like Kearsarge Pass or Mammoth Pass, where you can access towns like Mammoth Lakes, Independence, or Bishop.
Bears on the jmt and Food Storage
The National Park Service requires that you store smellables, food, and garbage in an approved bear canister. Note that bear spray is not allowed in Yosemite National Park or Sequoia National Park.
Over my 4 thru-hikes of the JMT, I’ve carried different models of bear cans. For most hikers, I would recommend the reasonably priced, sturdy, and easy-to-use BearVault 500. See REI’s entire list of Bear and Critter Resistant containers for more options (note that not all of them are approved for use on the JMT).
A bear canister and keeping a clean camp are essential on the JMT.
You must make sure that your bear canister is approved by Yosemite National Park and the Sierra Interagency Black Bear Group, as their criteria are more stringent than any other National Parks.
The Bear Vault 500 bear can carry 7 days worth of food for a solo backpacking trip. Backpackers who choose nutrition-dense food may be able to fit many more days or people’s worth of food in there. For other bear canister recommendations, see REI’s Food Storage story or REI’s Bear Canister story.
Side Trips or Peaks
The Essential JMT Guidebook (Amazon | REI) has a detailed list of mountains you can easily climb from the JMT. The JMT hiker will often find solitude by venturing off the main trail. However, I’ve personally found that unless I plan a day into my itinerary for side trips, I am unlikely to do them during a thru-hike. If you do take side trips, be sure to pack extra food.

The Rae Lakes area is a scenic highlight of the JMT.
Entry Locations and Section Hike Trailheads
Whether you are looking for an alternative entry point for a thru-hike or how to connect a section hike, these are essential entry points to the JMT you should know. This is a detailed list of driving directions to all the trailheads.
Yosemite National Park Entry Locations
Happy Isles
Happy Isles is the official Northern JMT terminus in Yosemite Valley. Starting at Happy Isles gives you the option of climbing Half Dome along the way.
Glacier Point
Glacier Point is an alternate northern trailhead that may be easier to secure permits for and starts at a higher elevation than the traditional terminus. This trailhead also gives you the option of climbing Half Dome along the way. You will have to hike 5 miles of side trails to reach the JMT from this trailhead.
Sunrise Lakes Trailhead
The Sunrise Lakes Trailhead is an alternate northern trailhead near Tuolumne Meadows in Yosemite National Park. This trailhead gives you a more extended thru-hike than if you were to start at Lyell Canyon, with the option of climbing Cloud’s Rest along the way. You will have to hike 5 miles of side trails to reach the JMT from this trailhead.
Lyell Canyon
Lyell Canyon is the “official unofficial” northern terminus that starts in Tuolumne Meadows. The JMT from Yosemite Valley intersects the Lyell Canyon trailhead, so you won’t have to hike extra miles on side trails to access the JMT.

Inyo National Forest side trails can be used to access the JMT and have significantly less competitive permit processes.
Inyo National Forest Entry Locations
The trailheads quotas for these entry points are administered by the Forest Service and may be easier to get permits for than those that originate in National Parks. However, we still recommend getting your permits as early as 6 months in advance. All of these trailheads require hiking 5 or more miles on side-trails to reach the JMT. You can get permits at recreation.gov.
The following are the easiest trailheads to access the JMT. While you can use other trailheads to access the JMT (like Taboose Pass or the unmaintained Sawmill Pass), I have excluded them because they require a lot of elevation gain, and these are easier to access:
Rush Creek
Shadow Lake Trail to Agnew Meadows
Crater Meadow/Red Cones
Duck Lake
Mono Pass
Pine Creek and Paiute Pass
Bishop Pass
Kearsarge Pass
Cottonwood Pass (south of Mount Whitney)
Devil’s Postpile JMT Entry Locations
You can get permits out of Devil’s Postpile on recreation.gov or in person at the Ranger Station.
The two entry locations are:
Red’s Meadow Resort
Devil’s Postpile
Sierra National Forest
You can get permits for Sierra National Forest up to one year in advance, and 60% are available for reservation; 40% are available on a first-come, first-serve basis. These trailheads access the JMT from the western slope of the Sierra Nevada mountains. You’ll be starting at a lower elevation and will have to do a lot of climbing, often while being exposed to the sun.
Entry points include:
Mono Creek
Bear Ridge
Bear Diversion
Florence Lake
Sequoia and Kings Canyon National Parks
These trailheads access the JMT from the western slope and include hiking more than 15 miles to reach the JMT. That being said, they are beautiful and iconic trails. Additionally, many section hikers choose to access the JMT via the Woods Creek Trail and exit the JMT via Bubbs Creek to form a loop that doesn’t require shuttling cars. The Rae Lakes Loop is a popular backpacking trip in the Sierra because of its length and scenery.
Entry points:
Woods Creek Trailhead
Bubbs Creek Trailhead
Whitney Portal
Whitney Portal is the exit point after southbound JMT hikers complete their summit of Mt. Whitney. 100% of permits starting from Whitney Portal are by reservation only.

Treeline editor Naomi Hudetz on top of Forester Pass, elevation 13,200 feet, the highest point on the JMT.
Passes of the JMT
The PCT has 7 major passes and several minor passes. Here are the passes and areas of significant elevation gain in order from north to south:
Cathedral Pass (9,290’)
Donohue Pass * (11,056’)
Island Pass (10,233’)
Purple Lake climb (not a pass but almost as much elevation gain)
Silver Pass * (10,745’)
Bear Ridge (not a pass but almost as much elevation gain)
Selden Pass * (10,800’)
Muir Pass * (11',955’)
Mather Pass via the Golden Staircase * (12,100’)
Pinchot Pass * (12,093’)
Glen Pass * (11,926’)
Forester Pass * (13,153’)
Mt Whitney climb (14,505’)
* denotes that it is one of the 7 major passes

For most JMT hikers, the ford of Evolution Creek is no more than calf deep (as seen here). However, for a few weeks early in the season, it can require some planning to get across safely.
Creek Crossings on the JMT and Tips for Crossing Rivers
The most notable creek crossings that cause hikers problems on the JMT are:
South Fork of the Kings River
Evolution Creek
Bear Creek
Mono Creek
Silver Creek waterfall
These fords can be very dangerous during high snowmelt times of the year. PCT thru-hikers, who reach the Sierra in early June, are more likely to encounter high water than most JMT hikers. See our section of Fords and Creeks Crossings in the Sierra in our PCT Gear List & Strategy for a complete list of tips and tricks for crossing rivers and streams. Here are a few must-knows from that guide:
We recommend taking a swift water class before entering the Sierra during the high snowmelt season.
Never ford alone. Always wait for another hiker and cross together.
River and creek flows are highest in the afternoon and evening. We recommend camping and waiting to cross early in the morning when the water depth can be up to one foot more shallow.
Look for alternate crossings. You do not have to cross the river right where the trail goes. Look upstream and downstream for safer crossing points.

Whether you are thru-hiking or section hiking, staying flexible and managing your feet, nutrition, hydration, and warmth/cold will go a long way in keeping you happy on trail.
How to Backpack the JMT
Whether you’re thru-hiking or section hiking, you should approach the JMT as a series of shorter hikes. Stay flexible-change your approach, backpacking gear, or food strategy as needed.
Perhaps most importantly, remember that long-distance hiking is challenging. Everyone has aches and pains. Everyone has days where they don’t want to hike or consider quitting. Stay strong. You can do this!
The following are overall strategies that are good practice for the JMT no matter what length of the trail you’re backpacking.
PROTECT YOUR FEET
Most hikers experience foot issues such as blisters, damaged toenails, or strained ligaments. Air out your feet during breaks, soak your feet whenever possible, change your socks regularly, and immediately address all issues (hot spots, rocks in shoes, etc.). Most hikers find that using a trail runner instead of a hiking boot allows their feet to dry out better to reduce the number of blisters in the desert. See our detailed section below on tips for reducing swollen feet and blisters.
Related: How to Take Care of Your Feet When Hiking and Backpacking
Read More: The Best Hiking Socks
Acclimatizing to the Elevation
Acclimatizing to the elevation on the John Muir Trail can be difficult. Altitude sickness can hit anyone at any time. You’re less likely to be hit by altitude sickness if hiking in the southbound direction because you’re starting at only 4,100’ (whereas northbound requires starting at 8,400’ and hits the highest point of the JMT on the first day). Still, it may be a good idea to spend a night or two camping at Tuolumne Meadows Campground (8,600’) before you start your hike.
Eat Enough Food on the JMT
Eating enough on the trail can be surprisingly tricky. Certain energy bars or trail mixes that tasted good on a previous weekend backpacking trip can become unbearable after weeks (or even days) on a thru-hike.
Take regular meal and snack breaks, and eat even if you’re not hungry. Food is fuel, and your body needs it.
Don’t be afraid of high-calorie foods that you may not eat off-trail. Most hikers choose to bring foods that are high calories per ounce (120 calories or more). Fat is your friend. Eat Nutella right out of the jar.
Sometimes, when it is hot or at altitude, it is easier to drink than to chew. Consider carrying supplements like vitamins or drinking high-calorie or high protein drinks to supplement your diet and recovery.
Related: The Best Food Dehydrator for Backpacking
Aim to be over the high passes by noon
Although less common than the Rockies, like many mountain ranges, storms can form in the Sierra in the afternoon. Set yourself up to camp before each pass. By choosing to camp in the trees rather than above treeline, you’ll be protected from the elements. Then, you can climb the passes in the morning before most thunderstorms roll in.
DRY YOUR GEAR WHENEVER POSSIBLE
Use your break or siesta time to dry your gear, especially your sleeping bag and tent. While it’s less likely to rain on the JMT than other trails and other parts of the country, your sleeping bag can lose its loft-its insulative properties-from dew, condensation, and body moisture. Drying your sleeping bag into the sun for a few minutes will keep you warmer during the cool nights (be sure to secure it from blowing away).
Make a daily practice of drying out your tent daily. Allowing moisture to evaporate from the fabric will improve your tent’s durability and reduce mold and odor (plus, it’ll save you from carrying an ounce of moisture). One reason we like Dyneema Composite Fiber (aka cuben fiber) tarps and shelters (aside from being lighter in weight than other fabrics) is that it holds onto less moisture so dries quickly.
Water Planning and Hydration
Along most of the JMT, you won’t go more than 5 miles without a water source. However, you should plan to have a water carrying capacity that will last you more than 5 miles if you get tired or injured and cannot make it to the next creek. Hydration is critical at higher altitudes. Here are our tips for hydrating on the JMT.
Drink on a Regular Schedule
Sometimes it can be hard to remember to drink enough, especially on cold mornings or days when it is raining. Hydration is critical at altitude. Consider setting an alarm on your watch to remind yourself to drink every hour. Another trick to get yourself to drink more regularly is to bring along good-tasting drink mixes. Although the water is generally good tasting in the Sierra, sometimes a flavored drink mix can trick your brain into drinking more water.
Treeline Review writer Mike Unger writes about how he set an alarm on our Garmin Instinct GPS Hiking Watch to remind us to drink on thru-hike.
Urination & Hydration
We have known some people who use toilet paper after urinating and deliberately do not drink as much because clean-up while outdoors can be a chore. Learn how to urinate outside efficiently and practice before you hit the trail:
If you’re wearing pants, learn how to urinate with your pack on.
If you’re wearing shorts or a skirt, learn how to urinate standing up.
Carry a “pee rag,” which is much more convenient than TP. We like the Wander Wipe from Wander Woman Gear. We recommend selecting the optional retractable leash so that you don’t have to take off your pack to access your Wander Wipe. Many hikers use a similar product called the Kula Cloth.
USE ELECTROLYTES
Electrolytes are essential when exerting yourself in hot and exposed conditions. Much of the JMT is sunny and exposed. Drinking enough water is not enough if you are headed towards a state of hyponatremia.
The good news is that electrolytes are easy to find and come in many forms. You can choose from flavored and unflavored powder drink mixes, liquid drops, or tablets that dissolve in water. Salty snacks can be beneficial. You’ll likely find that you crave salty over sugary foods. That’s your body telling you what it needs. Listen to it and feed it accordingly.
For more on this subject, read our in-depth review of electrolytes written by a nutritionist-turned-thru-hiker; we discuss the pros and cons of each type of electrolytes, when to take them, and more.

A sunhat is an essential piece of gear for all JMT hikers.
Manage Sun Exposure
The JMT-especially the southern portion-sees a lot of sun exposure because many miles are above treeline. When you’re hiking at altitude, your skin is more susceptible to the sun’s rays.
A good sun hat is essential, but also consider a long-sleeve sun shirt and sun gloves to protect your skin and limit the amount of sunscreen you’ll need.
Long pants, despite the heat, can protect you from painful sunburns on your legs (though plenty of PCT hikers wear running shorts). Pants will also help protect you from the ever-present cacti (more on this later). See our guides to The Best Men’s Hiking Pants and Best Women’s Hiking Pants to find either lightweight pants for peak summer hiking or warmer pants for fall hiking on the JMT.
What to do about Cold Nights on the JMT
The JMT is often above 10,000 feet. Be prepared for subfreezing nights, especially if you are hiking in September. See our Best Sleeping Bags for Ultralight Backpacking story for our suggestions for 20-degree sleeping bags for folks of different sizes and sleeping styles.
Remember that sleeping warm isn't just a function of not having a warm enough sleeping pad. Your sleeping pad contributes to how well you sleep, too. The most popular sleeping pad is the NeoAir XLite, which has good insulation to weight ratio. Be gentle with inflatable sleeping pads around pine needles and rocks, though. Inflatable pads are more subject to popping than foam sleeping pads. See our Best Sleeping Pads guide for recommendations.
For cooking on cold nights and breaks on chilly or windy days, we carry an insulating puffy jacket and a warm hat. See our Best Down Jackets and Best Synthetic Jackets guides, which both have lightweight suggestions for thru-hikers. We're partial to the men’s and women’s Patagonia MicroPuff synthetic, which is warm when wet and has a similar warmth-to-weight to ratio as down. In a pinch, you can wear your rain jacket and rain pants for extra warmth. For more info, read our long-term, in-depth review to the Patagonia MicroPuff (with photos from the JMT!).
We also recommend changing out of hiking clothes and into dry sleep clothes before going to sleep. Even if your hiking clothes aren’t wet, salt and small amounts of sweat can remain in the fabric and may make you feel colder at night than you would in dry, dedicated sleeping clothing.
Pro tip: Protect your water filters (Sawyer and BeFree) from freezing at night by sleeping with them in your sleeping bag or quilt. Filters that use a ceramic filtering system will crack at below-freezing temperatures. Sleeping with your electronics will also save battery life.
Related: The Best Water Filters and Purifiers for Backpacking
WATERPROOF YOUR ELECTRONICS
Many hikers choose to use their phones to take photos, stay in touch with folks back home, and supplement navigation. Trail dust and moisture are tough on phones and cameras. Get yourself a good phone case and consider a rugged, waterproof, freezeproof, dustproof camera.
Keep your electronics in your sleeping bag at night to keep your batteries from freezing and failing—especially if you’re hiking the JMT in early June or late August or September.
How to charge your electronics on the JMT
Your phone battery is unlikely to last days, so most hikers carry an external battery and charging cords. Remember that in addition to charging your phone, you’ll likely have other items that need charging like headlamps, Hiking Watches, or Personal Locator Beacons/two-way satellite communicators.
Some devices like the Garmin Instinct 2 Solar GPS watch may be able to run on solar battery alone over the course of your thru-hike of the JMT. Others may require a boost of charge from a battery or a portable solar charging panel. Remember: there are no towns directly on the route of the JMT, so if you don’t have enough battery, you’ll need to go far off trail to charge.
DEALING WITH MOSQUITOES
Depending on when you hike and what type of snow year the Sierra has had, mosquitoes may be an issue throughout your hike from Yosemite Valley to at least Evolution Valley. Prepare yourself. Carry a bug head net, bug-proof clothing, and bug spray.
If you are using a tarp instead of a tent, bring a bug bivy. If you have the time during a rest day in town, treat your clothing with Permethrin before entering the Sierra. Once dried, this spray makes your gear repel bugs for up to 30 washes.
Pro tip: A hooded windshirt, like the Patagonia Houdini, is invaluable in buggy areas. It’s easy to pull out and wear whenever you stop hiking long enough for mosquitoes to find you. It's a winner in our Best Men's Windbreaker guide and our Best Women's Windbreaker guide. If you don’t have a wind shirt, your rain jacket and rain pants will keep bugs away but are less durable for daily use.
Pro tip: DEET bug sprays can react chemically with some backpacking gear (like the waterproofing in your rain jacket and rain pants). DEET also deteriorates plastics, including that found in bear canisters. Still, in the heaviest buggy areas, sometimes DEET is the only repellent that works. However, we suggest for most scenarios opting for Picaridin (a DEET-free gear-friendly but still effective bug spray) in less buggy areas. Bug repellent lotions stick to the skin better and tend to be more effective (if you’re willing to get your hands covered in lotion).

Although it’s easy to always want to look at the view, your feet will appreciate if you check the trail ahead for rocks and roots.
HOW TO REDUCE SWOLLEN FEET AND BLISTERS ON A THRU-HIKE
Most northbound thru-hikers will get blisters in Southern California. Your feet swell in the heat, and the persistent trail grit can wreak havoc. Good foot care is essential. For more info on foot care, see our article on How to Take Care of Your Feet When Hiking and Backpacking.
The following are foot care strategies we use:
NEVER IGNORE THE FIRST SIGNS OF AN ISSUE
It’s a hassle to stop to take a rock out of your shoe or address a “hot spot.” However, the potential consequences could lead to days of misery and could potentially end a hike. We have found that Leukotape is much better than duct tape at dressing blisters and “hot spots.” Leukotape will stay adhered for days through sweat, dirt, and water.
Pro tip: Use Neosporin or Polysporin on popped blisters and open sores. Let your feet air out at night and change your bandages regularly.
CONSIDER CAMP SANDALS
Some hikers choose to bring lightweight hiking sandals to use as camp shoes. Wearing a different pair of shoes in camps gives your hiking shoes and feet time to air out and dry. We’ve also heard of thru-hikers using their hiking sandals to walk dozens of miles when their main hiking shoes cause too much pain to continue. My favorite camp sandals are the Mayfly, which weigh 2 oz for the pair and are sturdy enough to wear in town when resupplying and after I’m done hiking for the day. See our Best Hiking Sandals guide or Best Camp Shoes guide for lightweight thru-hiking recommendations.
WASH AND AIR YOUR FEET WHENEVER POSSIBLE
Take every opportunity to soak your feet and calves in naturally flowing water sources (but never in enclosed water sources like tanks), at least 200 feet downstream from where people collect water.
No water nearby? During breaks, take your shoes and socks off and elevate your feet and legs.

Most thru-hikers will opt for a hiking shoe or trail runner.
WEAR TRAIL RUNNING SHOES
Many JMT hikers choose to wear hiking shoes or trail running shoes instead of hiking boots or shoes. Lighter weight shoes have many benefits, but they generally air out better, preventing moisture that can contribute to blisters.
This past year, most JMT hikers I saw were wearing men’s and women’s Salomon X-Ultra GTX Low, which are the overall winner in our Best Hiking Shoes guide. Among the PCT thru-hikers, I saw, most opted for the men’s and women’s Altra Lone Peaks, the overall winner in our The Best Trail Running Shoes and Best Women's Best Trail Running Shoes guide.
Alternately, if either of those shoes doesn’t provide enough stability or support, you may also consider switching to Hiking Shoes or a Lightweight Hiking Boot. Some hikers find that a hiking shoe or trail runner is enough support if they add an insole or footbed like Superfeet Green or Sole Performance Insoles. Aren't sure whether footbeds are for you? See our article on Should I use insoles with my hiking shoes?
USE CLEAN SOCKS
If possible, rinse your socks out every day (collect water in a ziplock, agitate, and dump at least 200 feet from water sources). Then attach each sock to the outside of your pack to let them dry. Choose socks made of synthetic or wool material, not cotton, which can retain moisture and contribute to blisters. My favorite hiking socks for the JMT are the men’s and women’s Darn Tough Micro Crew Cushion. See our Best Hiking Socks guide for more suggestions.
MASSAGE YOUR FEET
Pro-tip: Naomi swears by massaging her feet at night. Even if it's only for 30 seconds per foot, it’s one evening ritual she never skips no matter how tired she might be. She suffered through a lot of pain in SoCal and now swears by the healing power of massage. Her ritual also includes ankles and calves. If you don’t want to touch your own filthy feet, use sleep socks or bring a Rawlogy lightweight cork massage ball (that can also be used on other aching body parts).
USE ANTI-FRICTION CREAM
Some hikers start pre-conditioning their feet a couple of weeks before a thru-hike with Trail Toes, an anti-friction cream designed for ultra-runners. They continue to use the cream during the hike for “hot spots” and when their feet “pucker” from being constantly wet in the Sierra. Trail Toes also works great for chafing if you aren’t already carrying Bodyglide.
WEAR INJINJI TOE SOCKS OR LINERS
Blisters between your toes caused by grit are widespread. While we have found Injinji socks to be great at preventing blisters, they can be a hassle to put on every morning.
Related: The Best Hiking Socks
WEAR GAITERS
Lightweight gaiters, like Ultra Gams or the Altra Hiking Gaiters, help reduce (but don’t eliminate) grit getting in your shoes. They also allow you to have a little personal flair on the trail. An added benefit is that they help keep your shoes tied.
PROTECT YOUR BONES AND JOINTS
Foot injuries are not just at the surface. Often, the injuries that take hikers off trail are stress fractures or knee issues, exacerbated by overuse. As with blisters, as soon as you feel something off in your feet, take a break. Expect to keep your mileage lower than your ability at first, and then ramp up slowly.
Your toe, foot, and ankle muscles are much slower to develop than your leg muscles. Consider adding collagen powder supplements to your daily routine, which may help with protecting joints. Protect your knee joints on the downhill by using trekking poles. See our guide to The Best Trekking Poles for our recommendations.
Related: The Best Collagen Powder

The JMT is so scenic that you are always destined to have good views no matter where you camp.
21-day Itinerary for the JMT
We recommend planning your itinerary for the JMT before you apply for your permit. To create an itinerary for you, we recommend the 11-mile JMT guidebook (Amazon | Bookshop) and this US Forest Service planning itinerary document.
Although there are many ways to hike the JMT, here is a 21-day itinerary that reflects a popular speed for most backpackers. It includes many of my favorite camping areas that I’ve found over 4 thru-hikes and numerous backpacking trips along the trail. You can urn it into an 11-day itinerary by combining the days. If you hike this itinerary, please let me know how it goes!
| Day | Miles | Off-trail Miles to/from Resupply or Terminus | Resupply? | Start | Stop | Elevation Gain | Elevation Loss |
|---|---|---|---|---|---|---|---|
| 1 | 5 | Happy Isles | Little Yosemite Valley | 2,600 | 285 | ||
| 2 | 12.8 | Little Yosemite Valley | Cathedral Lakes | 4,108 | 1,018 | ||
| 3 | 13.6 | Cathedral Lakes | Lyell Canyon | 944 | 1,394 | ||
| 4 | 11.1 | Lyell Canyon | Thousand Island Lake | 2,907 | 2,049 | ||
| 5 | 7.7 | Thousand Island Lake | Gladys Lake | 1,849 | 2,100 | ||
| 6 | 8.5 | 0.25 | ✓ | Gladys Lake | Reds Meadow | 561 | 2,448 |
| 7 | 10.7 | 0.25 | Reds Meadow | Duck Lake | 2,901 | 493 | |
| 8 | 11.5 | Duck Lake | Silver Pass Lake | 2,900 | 2,532 | ||
| 9 | 11.7 | Silver Pass Lake | Bear Creek | 2,368 | 3,745 | ||
| 10 | 11.7 | Bear Creek | Sallie Keyes Lakes | 1,927 | 832 | ||
| 11 | 11.4 | 1 | ✓ | Sallie Keyes Lakes | Muir Trail Ranch | 151 | 1,986 |
| 12 | 3 | 1 | Muir Trail Ranch | Paiute Creek | 265 | 552 | |
| 13 | 11.3 | Paiute Creek | Evolution Lake | 3,202 | 386 | ||
| 14 | 13 | Evolution Lake | LeConte Canyon | 1,270 | 3,494 | ||
| 15 | 12 | LeConte Canyon | Palisades Lakes | 3,004 | 829 | ||
| 16 | 12 | Palisades Lakes | Lake Marjorie | 2,424 | 2,117 | ||
| 17 | 14.3 | Lake Marjorie | Rae Lakes | 3,266 | 3,871 | ||
| 18 | 11.8 | Rae Lakes | Bubbs Creek | 2,469 | 2,498 | ||
| 19 | 11.3 | Bubbs Creek | Past Wallace Creek | 3,187 | 3,273 | ||
| 20 | 7.5 | Past Wallace Creek | Guitar Lake | 1,808 | 757 | ||
| 21 | 4.7 | 10.7 | Guitar Lake | Whitney Portal | 3,048 | 6,190 |
Day 1 (5 miles): Happy Isles to Little Yosemite Valley. Views of Half Dome, Nevada Falls, and Liberty Dome. Optional side trip to Half Dome.
Day 2 (12.8 miles): Little Yosemite Valley to Cathedral Lakes over Cathedral Pass (9,703). Incredible views of Cathedral Peak. The day ends at one of my favorite camping areas anywhere.
Day 3 (13.6 miles): Cathedral Lakes to Lyell Canyon. Option for resupply and a meal in Tuolumne Meadows. No camping is allowed for the first 4 miles of Lyell Canyon, but the walking is scenic and relatively flat.
Day 4 (11.1 miles): Lyell Canyon to Thousand Island Lake. You’ll go over Donahue Pass (11,073’) with views of Mt. Lyell (the highest peak in Yosemite). Then, you’ll go over Island Pass (10,220’) ending at one of the most iconic camping areas in the country with incredible views of Mt. Banner and Ritter. Camp ¼ mile from the lake and follow posted regulations.
Day 5 (7.7 miles): Thousand Island Lake to Gladys Lake. Today, you have lots of swimming and fishing opportunities, along with one of the most scenic areas in the Sierra.
Day 6 (10.7 miles+0.25 off-trail): Gladys Lake to Reds Meadow. Today is is mostly downhill, with an opportunity for a side-trip to Devil’s Postpile (the namesake for the National Monument). The side-trip is 0.75 miles off-trail. Aim to reach the Red’s Meadow Resort store before they close in the evening. Here, you can shower and grab a meal and resupply.
Day 7 (10.5 miles+0.25 off-trail): Reds Meadow to Duck Lake. Prepare for a sun-exposed climb through a wildfire burn area from Red’s Meadow. Then, you’ll walk near creeks in the forest.
Day 8 (11.7 miles): Duck Lake to Silver Pass Lake. Pass scenic Lake Virginia and over Silver Pass (10,754’) to an above treeline lake that will stun you with its beauty.
Day 9 (11.7 miles): Silver Pass Lake to Bear Creek tent sites. Option to take a side-trip to Vermillion Valley Resort for resupply (adds up to 7 miles one-way).
Day 10 (11.4 miles): Bear Creek to Sallie Keyes Lakes. You’ll climb over Selden Pass (10,913’) to one of the most beautiful tenting sites (as long as the mosquitoes aren’t too bad).
Day 11 (11.4 miles + 1 mile mile off-trail): Sallie Keyes Lake to Muir Trail Ranch (includes ~1-mile off-trail). You cannot camp at the ranch, but camping is allowed just outside the ranch with nearby hot springs. You may arrive after the ranch is closed for the evening, so be prepared to camp and wait until morning when they open again. Restaurant meals and showers are only available for guests, but you can send yourself a resupply box.
Day 12 (3 miles+ 1 mile off-trail): Muir Trail Ranch to Paiute Crek. A shorter rest day that allows you to resupply at Muir Trail Ranch and (if water levels are safe) swim, fish, and play in Paiute Creek.
Day 13 (11.3 miles): Paiute Creek to Evolution Lake. This day ends at one of the most beautiful lakes on the JMT and sets you up for an easier climb over Muir Pass in the morning for a late breakfast or early lunch in Muir hut.
Day 14 (13 miles): Evolution Lake to LeConte Canyon. You’ll go over Muir Pass (11,975 feet) and descend along waterfalls along the Middle Fork of the Kings Canyon.
Day 15 (12 miles): LeConte Canyon to Lower Palisades Lakes via the Golden Staircase. This day has one of the more challenging climbs up the Golden Staircase. This infamous climb has lots of sun exposure and can get pretty hot. Lower Palisades Lake is one of the most beautiful lakes in the Sierra and great for swimming on a warm day. This campsite sets you up for an easier climb over Mather Pass in the morning.
Day 16 (12 miles): Lower Palisades Lake to Lake Marjorie over Mather Pass (12,094 feet). After Mather Pass, you’ll have a scenic and (relatively) easier walking to the South Fork of the Kings River. From there, it’s a scenic climb to Lake Marjorie, which is a beautiful lake to camp.
Day 17 (14.3 miles) Marjorie Lakes to Rae Lakes over Pinchot Pass (12,122 feet). Today is a big day, but much of your mileage is downhill from Pinchot Pass or on the gentle and scenic climb to Rae Lakes. Catching the sunset and sunrise on Rae Lakes from your campsite will be worth the extra mileage.
Day 18: (11.8 miles): Rae Lakes to the last campsite in the trees before the trail makes a sharp turn left to Forester Pass. This high camp sets you up for an easier climb over Forester in the morning, has a creek, and is just a neat spot in the Sierra to camp.
Day 19 (11.3 miles): Bubbs Creek to the campsite at the plateau past Wallace Creek (note the best camping is about half a mile after Wallace Creek, so bring water). You’ll climb over Forester Pass, the highest pass on the JMT. Then, you’ll descend to Bighorn Plateau-one of my favorite places in the Sierra-but the camping is better down in the trees past Wallace Creek.
Day 20 (7.5 miles): Wallace Creek to Guitar Lake. A shorter day for fishing and resting before an early wake-up call tomorrow to summit Whitney.
Day 21 (4.7 miles + 10.7 miles off-trail): Guitar Lake to Whitney Portal. Your last day is a big day, but if you set it up right, it can be among the most magical days of your hike. Your pack will be light on food, and most of the trip is downhill. You’ll be strong from three weeks of hiking. If you leave Guitar lake in the dark, you can catch the sunrise on the top of Mt. Whitney. It will be cold, but seeing the sunrise in the east from the highest point in the continental US is, for most folks, a once-in-a-lifetime opportunity. After sunrise, you’ll have all day to descend from Mt. Whitney slowly.
ALERTS FOR 2024
jmt trail Closures:
The San Joaquin Bridge in Kings Canyon that crosses the South Fork of the San Joaquin River is damaged and closed. The recommended southbound reroute is to take Piute Pass to North Lake and then South Lake to Bishop Pass. This bypasses LeConte Canyon to the Piute Pass Bridge on the JMT. This route is 29.2 miles of trail (adding an extra 2.5 miles from standard route) and 12 miles of road to the trek. The new trail section is +6,190/-6,390 feet and the added road section is -1,900/+1,300 feet.
This updated route will include wading creek crossings, and the two Pinnacles Creeks crossings on the Piute Pass trail are best crossed early in the day.
Leaving and reentering the wilderness technically invalidates the Wilderness Permit required for this hike. We hope this year the National Park Service will make an exception. There are other possible reroutes, but this is the only one entirely on maintained trails. You can learn more about the permit requirements here: https://www.nps.gov/yose/planyourvisit/wildfaq.htm
Here is an interactive map of the PCT with the recommended reroute: https://pcta.maps.arcgis.com/apps/instant/basic/index.html?appid=f2e8379b8a3d492086a4646bfe948b98&locale=en-US
The Woods Creek Bridge between Black Mountain and Mount Pinchot is damaged and snow packed. A timeframe for repair has not been given. In the meantime, hikers are advised to plan a backup option. Check the PCTA's website for details.
The section between the junction with Panorama Trail and Clark Point (known as the “Ice Cut”) is closed indefinitely due to serious risk of rockfall. Hikers in both directions should instead take the Mist Trail to travel between Nevada Falls and Vernal Falls.
A press release from Sequoia and Kings Canyon National Parks also stated hikers should prepare for even previously-mild stream crossings to be hazardous and even impassable crossings. Hikers are urged to practice extreme caution this year.
Construction is expected to begin in 2024
Bus schedule for jmt 2024:
The Eastern Sierra Transit Authority (ESTA) runs along the 395 corridor Monday-Saturday for 2024
Bus schedules can make shuttling to-and-from trailheads more complicated. You may need to book extra nights in hotels or campgrounds in order to make the bus for the following day..
A seasonal Yosemite Area Regional Transportation System (YARTS) is running to /from Tuolumne Meadows only once a day from July 1 to October 1.
This reduced schedule for 2023 can make shuttling to-and-from trailheads more complicated. You may need to book extra nights in hotels or campgrounds in order to make the bus for the following day.
As always, practice caution and plan ahead. Check alerts for Sierra National Forest, Sequoia-Kings Canyon National Parks, Inyo National Forest, and Yosemite National Park.

Liz Thomas in the Colorado Mountains. Photo by John Carr.
Why you should trust us
Liz Thomas has thru-hiked the JMT four times, spent three summers living in the Sierra hiking along the JMT as part of her work.
She’s co-founder and editor in chief of Treeline Review. You can read all her gear articles here and on her personal website, as well as on Wikipedia.
A former Fastest Known Time (FKT) record holder on the Appalachian Trail, Liz came to Treeline Review from New York Times/Wirecutter, the New York Times’ product review site, where she was a staff writer on the outdoor team.
Liz is a contributing editor at Backpacker Magazine, where she is currently the columnist of “Ask a Thru-hiker” and instructor of their online class, Thru-hiking 101.
Her first book is Long Trails: Mastering the Art of the Thru-hike. The book was the recipient of the National Outdoor Book Award for Best Instructional Book, and was deemed by judges as destined to become the “Bible of the Sport.”
Other Resources
ONline Resources
General Trail Prep
Long Trails: Mastering the Art of the Thru-hike (Amazon | Bookshop)
Ultralight Backpackin’ Tips by Mike Clelland (Amazon | Bookshop)
Lighten Up! by Don Ladigin (Amazon | Barnes & Noble)
Trail Tested by Justin Lichter (Amazon | Bookshop)
Ultralight Survival Kit by Justin Lichter (Amazon | Bookshop)


