How Not to Die on a Thru-hike
Safety tips for first-time thru hikers and long-distance hikers
It’s unanimous: cold, wet hiking in hypothermia conditions isn’t awesome
August 18th, 2023
Home > Learn Skills
All too often, wilderness safety is an afterthought—if it’s even a thought at all. An afterthought that is usually synonymous with the security blanket that is the SOS button of a Garmin inReach.
But to think of wilderness safety in these terms is to miss an opportunity. Not just an opportunity to increase the odds of a healthy and enjoyable thru-hike, but to gain the skills that empower us to help someone else.
Among the many lessons that two years of a global pandemic have taught us is that our healthcare systems—in urban settings, let alone in wilderness ones—are fragile things. Technology, however, in the form of seemingly ubiquitous GPS (Global Positioning System) and PLB (Personal Locator Beacon) devices that adorn modern-day thru-hikers, is an incredible advancement that can be the difference between serious situations and fatal ones. However, PLBs and GPS devices can easily abstract away the fragility of those healthcare systems, and give the false impression that free and safe healthcare is always just the push of an SOS button away.
As it turns out, behind that magical button is a complex and even more magical search-and-rescue system that relies on, at its core, just one thing: people. People, who can—and occasionally do—become patients themselves while answering the call of the SOS button.
There’s good news, though. Avoiding situations like that doesn’t require a trip to medical school (or the debt that comes with it). Learning what we can do to help both ourselves and others, knowing the difference between small problems and serious ones, improvising treatment in the field, and understanding that prevention is at the heart of wilderness safety, are skills that anyone can learn regardless of experience.
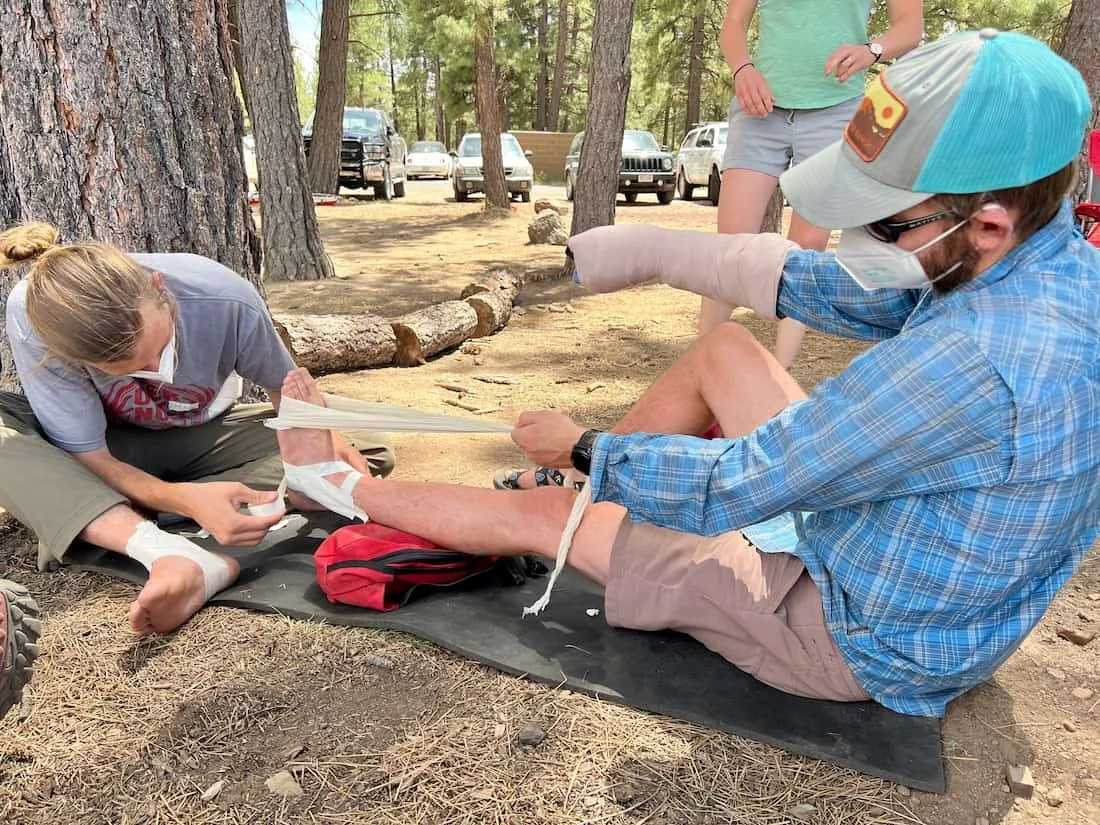
Splinting and taping at a Wilderness First Responder course
In the course of this article, I’ll take you on a whirlwind tour of some of the most common wilderness safety situations and maladies that you’re likely to encounter in your time on the trail. And by the end, hopefully I’ve piqued your interest to take the next step: find a wilderness safety course and get certified.
Nothing in this article is a replacement for getting certified in Wilderness First Aid, as a Wilderness First Responder, or even as a Wilderness EMT. What those certifications will teach you is what no article ever can—real-world practice, treatment improvisation with what you have, and calm under pressure.
In a thru-hiking world where lighter is nearly always better, the most important pieces of gear are the ones that weigh nothing at all: skills. Let’s get to it!
We create reader-supported, objective gear reviews independently selected by our editors. This story may contain affiliate links, which help fund our website. When you click on the links to purchase gear, we may get a commission — without costing you an extra cent. Thank you for supporting our work and mission of outdoor coverage for every body! Learn more.
Snow Travel
In case it hasn’t made headlines where you live, just ask any aspiring Pacific Crest Trail thru-hiker in 2023, and they’ll tell you: the West had just a wee bit more snow than usual this past winter…

Sierra snowpack, April 1st 2022

Sierra snowpack, April 6th 2023
If satellite images don’t fully capture the story, the numbers certainly do. In a winter for the history books, California saw record-breaking snowfall totals. In measurements of snow-water equivalence taken annually in the first week of April, the southern Sierra saw measurements more than 400% of normal. And in the central Sierra—the place that PCT thru-hikers have dreamt of since Mexico, crowned by Mt. Whitney: a “mere” 300% of normal.
All of which is to say that snow will present a very different challenge this hiking season than it did even in 2016, in a very average snow year…

Central Sierra after an average snow year, Pacific Crest Trail, 2016

Approaching Forester Pass, Pacific Crest Trail, 2016

Ascending to Muir Pass, Pacific Crest Trail, 2016
It’s still commonplace—though certainly less so than it once was—to spot an ice axe dangling from the backpack of Pacific Crest and Continental Divide Trail thru-hikers. What’s truly scarce is hikers who have the skills to properly use one in the situations they’re likely to encounter.
Which leads us to the basics of snow safety:
● Check avalanche and weather reports
● Recognize and minimize exposure to avalanche terrain
● Carry safety equipment and have the skills to use it
If you’re unsure how to assess avalanche risk, enroll in a course like those provided by the American Institute for Avalanche Research and Education (AIARE), and take your skills to badass mountaineer levels.
Fortunately, for most thru-hikers traversing mountain ranges in the peak summer season, there are a few simple rules of thumb to keep in mind that can dramatically increase your safety when ascending, descending, and traversing snowbound terrain:
1. Snow conditions can change dramatically in sun/shade
What was soft and slushy on a sunny, south-facing approach to a pass can become rock-hard ice that requires crampons on the colder, shaded north-facing slope.
2. Snow melts both from above and below
“Snow bridges” are narrow, often unstable, arches formed between two points where the snow is rapidly melting on all sides. Be especially cautious when you hear running water beneath the snowpack on which you’re traveling, as this accelerates the melting, and thus instability, of the snow.

Crossing snow on the Continental Divide Trail, 2020
3. Kick/cut steps into firmer snow and ice
Ascending firmer snow and descending softer snow is generally preferable, but depends on both the time of day and weather conditions. Creating steps of your own in firmer conditions means having a stable platform that minimizes the risk of an “unplanned descent.” When conditions tilt even further towards hard and icy, a pair of lightweight micro-spikes can dramatically increase traction and thus safety.
4. Learn how to self-arrest
If that “unplanned descent” does happen, knowing how to use an ice axe for self-arrest can be the difference between harmlessly sliding a few feet and careening down a mountainside.
5. Be able to navigate without a trail
That comforting ribbon of dirt you’ve been following is probably buried under a deep blanket of snow by now. A GPS device can tell you where you are, but knowing how to read a topographical map and how to match it with the terrain you see around you can help inform the safest route.
6. Wear sunglasses to avoid snow-blindness
The sensation of sand in your eyes, even when you close them shut, is not a pleasant one to consider. Many people don’t realize that the cornea—the outermost covering of your eye—is just as susceptible to sunburn as the rest of your skin. A sunburnt eye is about as unpleasant as it sounds, but a decent pair of polarized sunglasses will protect you both from the rays above, and the insidious ones reflecting off the snow beneath you.
See our guides to How to Train for a Thru-Hike, How to Prepare to Thru-hike in a High Snow Year and video and tips on Thru-hiking in a Big Snow Year for more recommendations.
Water Crossings
Lo and behold, all of that snow the mountains have been hoarding has to melt and go somewhere, and that somewhere is the litany of drainages, streams, creeks, and rivers that thru-hikers are faced with crossing. Hikers who only hundreds of miles earlier may have been dreaming of a boundless supply of water as they schlep 6, 7, or even 8 liters of water across a desert inferno suddenly are faced with a paradox—the thing that had been in such short supply is now suddenly everywhere.
Of all the objective hazards a thru-hiker is likely to face, there’s a strong argument to be made that by far the most dangerous is also the most unlikely: water. Short of those who are experienced river runners or surfers who have learned to co-exist with the power of the ocean, water crossings present a danger for which most of us have little reference.
“You might wonder how dangerous it could be to wade across even a small, clear creek, with water that’s only up to your shins, and without a hint of frothing whitewater. The answer anyone who’s had the experience will give: you’d be surprised.”

South Fork Kings River crossing on an average snow year, Pacific Crest Trail, 2016
In the many thousands of miles I’ve had the good fortune to hike, people ask me again and again: what’s the most dangerous part of a thru-hike? Is it the bears? Sasquatch? The rattlesnakes, right? (Spoiler alert that we’ll get to later: it’s exactly none of those things). The answer, without hesitation, is: water crossings.
My own horror story came not on a well-known crossing in the mountain west, but on the typically placid West Branch of the Pleasant River in the Appalachian Trail’s 100-Mile Wilderness. In the span of a mere 12 hours, it had swollen from an ankle-deep crossing to a chest-deep raging torrent, courtesy of the remnant of Hurricane Charley crawling its way up the eastern seaboard.
On the heels of the epic snow year that the Sierra, Cascades, and Rocky Mountains have seen, some rivers may be running at levels never seen before. It’s not hyperbole to argue that being able to assess the danger, know your options, and make the safest choice possible can be the difference between cold, wet feet and a sudden and desperate struggle in swift, freezing water. Just ask Charles Williams to retell his story of survival on the very crossing pictured above. Sadly, Rika Morita and Chaocui Wang were less fortunate.
Here’s what you can do when faced with a challenging water crossing:
1. Scout upstream and downstream
Just because the trail crosses at a particular point doesn’t mean it’s the safest point to cross. Take the time to find the safest crossing, which may be significantly upstream or downstream from the trail. Smartphone navigation apps such as FarOut may also contain comments from previous hikers about specific locations for the safest crossing, though it’s important to note that conditions can change rapidly.
2. Look for a wide and slow crossing rather than narrow and fast
Even if the wide and slow crossing is deeper.
3. Look for downed trees to cross on
Nature to the rescue! But be wary—logs over creeks may themselves be unstable or slippery to cross on. Don’t be too proud to scoot across on your butt!
4. Assess the downstream risk
Generally, a straight stretch of river is preferable, since a bend obscures the risk downstream if you happen to fall in. Downstream dangers such as strainers—trees that have fallen into the river—are especially dangerous because they’re more likely to pin you under the water should you take an unplanned swim.
5. Water levels and current may be lower in the morning
Snow melting under the daytime sun can cause depth and current to swell. Cooler temperatures overnight cause snow to consolidate, slowing runoff, sometimes significantly.
6. Test the water’s depth and speed
Before fully committing yourself, wade into the water close to shore to get a feel for things.
7. Keep your hiking shoes on
Bare feet might save you wet shoes, but they also have no traction. Foot scrapes and injuries are also a risk with bare feet. Keep hiking shoes on or at the absolute minimum, your camp shoes.
8. Unbuckle pack straps
Should the worst happen, having your hip and sternum straps unbuckled increases the chances that you’ll be able to wriggle free of what has now become an anchor.
9. Face upstream and use trekking poles or sticks for stability
The more points of contact with the river bottom, the better. Always keep two, or preferably three, points in contact before moving any other point of contact.
10. Safety in numbers
Water crossing safety increases when hikers form a group to navigate the crossing as a single unit. Although multiple variations exist, linking arms in a line, where the largest and strongest person enters the water first to break the force of the current for others in the formation, allows for coordinated movement and a safer crossing for the entire group.
11. Don’t be afraid to turn back
Be realistic about the danger and your ability to mitigate it. To the best of my knowledge, no one has ever died from a bruised ego.
Environmental Illnesses
One of the greatest gifts of long-distance hiking is the rare opportunity to understand your environment, stripped free from the protections and creature comforts of home. That’s the upside. The downside is making peace with the discomforts of that changing environment and recognizing small problems before they become big ones.
The environmental challenges of extended time in the backcountry can be sorted into three broad categories: heat, cold, and altitude. Let’s take them one at a time.

Hiking early in the morning or late in the evening can be an excellent strategy for managing heat
Traveling in Heat
As anyone who’s hiked in the Mojave, Sonoran, or Chihuahuan Deserts of the American southwest will attest: it can get hot out there. Combine an unrelenting sun with soaring temperatures, challenging terrain, and vast shadeless stretches between water sources of questionable quality (more on that later), and you have a pretty solid recipe for all sorts of “fun”, ranging from less-than-enjoyable to medical emergency.
A personal favorite for pasty-skinned people like me. The best way to avoid needing an aloe bath is to take your cues from the cultures that inhabit the world’s hottest, driest places: protect your skin with loose-fitting, long-sleeved clothing, a brimmed sun hat, sunglasses, sunscreen, and even a sun umbrella if that’s your thing.
Put simply, dehydration is the state of your body lacking a proper amount of water. While not a condition that is often serious on its own, dehydration complicates nearly any underlying medical condition, which is why preventing it is so critical. Sip fluids frequently and add electrolytes. A minimum of 4 liters per day, and more in hot conditions, is a good target. Although it's aimed at runners, our article on How to Stay Hydrated on a Trail Run has good tips that apply to hikers.
If your first instinct is to gulp down a few gallons of water to keep that nasty dehydration at bay, think again. It turns out, you actually can have too much of a good thing. Commonly seen in places like the Grand Canyon, hikers desperate to ward off the heat can guzzle enough fluid to cause hyponatremia: water intoxication that can be fatal. To avoid diluting your sodium levels to the point where basic functions of the body begin to cease, listen to your body, sip frequently, and pair those sips with salty snacks.
When the fatigue of exercising in a hot environment begins to take its toll on the body, heat exhaustion is the result. Often presenting with headache, nausea, fatigue, and warm/clammy skin, patients with heat exhaustion are also often dehydrated, though dehydration is technically a separate medical issue that may not be present. Treatment is intuitive: find some shade to cool down in, shed some clothing, and hydrate. A wet bandana can also feel like heaven.
If the body’s cooling system stops functioning entirely, heat stroke is the result. It comes on rapidly, is accompanied by altered mental status, and is a serious medical emergency that requires rapid cooling and evacuation to definitive medical care.

Sunny and cold in the wilderness of Yellowstone National Park, Continental Divide Trail
Traveling in Cold
“I’m going to be hiking in the summer, so I don’t think cold will be a problem.” —Regretful Hiker
Not only do temperatures dip by roughly 3 degrees Fahrenheit for every 1,000 feet of elevation gain, mountain ranges are unpredictable landscapes that quite literally create their own weather patterns. Even peaks such as New Hampshire’s Mt. Washington—comparatively low relative to the peaks of the western U.S. at a mere 6,288 feet—can be incredibly dangerous.
It even has the stats to back it up. It once held the record for the world’s highest recorded wind speed (231 mph); it experiences hurricane force winds 1 out of every 3 days of the year; and it has recorded more fatalities than any mountain in the U.S. not named Mount Rainier.
Spend enough time on any trail, and it’s inevitable that you’ll be faced with managing wet, cold, windy conditions that can make your day miserable at best and dangerous at worst. What often takes hikers by surprise is how quickly those conditions can compound, creating a real risk of serious injury. The name of the game is avoiding injury in the first place.
For thru-hikers targeting the choicest summer weather, here are a few things to be on the lookout for when the weather takes a turn for the worse:
Raise your hand if you’ve never heard of this one. And yet, it’s far more common than you might expect. NFCIs are the result of prolonged exposure to cold, wet conditions that are common during particularly wet summers on the Appalachian Trail, or extensive travel through the melting snowpack of the Pacific Crest and Continental Divide Trails.
Avoid the potential for persistent foot pain or even nerve damage by rotating pairs of socks to keep your feet as warm and dry as possible. Humble ziplock baggies slipped over your feet can also be useful vapor barriers for added warmth during extended snow travel. They’re how my sandaled feet stayed warm and dry in the photo above, even while breaking trail. Stylish, too, I know.

Ziplock vapor barriers making sandals winter-ready, Continental Divide Trail
Think of frostbite as an NFCI on a bad day. Less common among thru-hikers, except for those pushing their hike into the shoulder seasons, frostbite is when tissue becomes frozen, typically in fingers and toes where circulation is more limited. Treatment of frostbite requires rapid re-warming of the tissue, and has been described as one of the more painful medical interventions. That’s an agony we’d all do well to avoid. Know how to identify frostbite at its superficial phase, i.e., when the skin becomes white and waxy or gray and mottled, and honestly assess your ability to manage the weather conditions you’re in.
When your body loses more heat than it gains, it can no longer maintain core body temperature. Enter: hypothermia. While early stages of hypothermia are treatable in the field, it can advance rapidly to moderate and severe stages that require definitive medical care. As always, the best defense is prevention: keep yourself warm and dry by using a layered clothing system, and learn to recognize the earliest signs of hypothermia both in yourself and in others.

40 degrees + 30 mph wind + rain = perfect hypothermia weather on the Continental Divide Trail
Traveling at Altitude
Ah yes, the beautifully scenic, high alpine vistas that you’ve seen weekend warriors posting to social media. Did they conveniently leave out the part where they might have vomited, been short of breath while at rest, or briefly struggled to remember exactly where they were? How kind of them.
It’s true that many of the most scenic trails in the country rise to elevations of 13,000 or even 14,000 feet and, as achingly beautiful as they are, just getting to them requires the body to adapt to an increasingly oxygen-depleted environment with each upward step.
Despite what we know about the environmental conditions responsible for altitude illness, and setting aside those with pre-existing conditions, there’s limited medical evidence to suggest who exactly is most at risk. World-class athletes have fallen victim to the worst forms of altitude illness in places where young children have shown scarcely any signs of illness at all.
There are three primary types of altitude illness, each of which you’d do well to avoid by following the mantra: “Hydrate. Ascend gradually. Climb high and sleep low.”
Have a headache and nausea after recently climbing to a higher altitude than you’re accustomed to? Welcome to AMS, your first stop on the altitude illness tour. Let’s make it the last stop. It can present at altitudes as low as 5,000 feet and though not a medical emergency on its own, AMS can be a harbinger of far worse things to come.
If the idea of slowly drowning while on dry land seems like a paradox, then allow me to introduce you to HAPE. Holding the grim title of being responsible for the most high-altitude-related deaths, HAPE is the abnormal accumulation of fluid in the lungs and is a serious medical emergency. A dry cough that’s starting to become a wet cough while hiking above 8,000 feet is your cue that it’s time to descend rapidly.

The summit of Mt. Whitney. At 14,505 feet, the highest point in the continental United States, John Muir Trail
Not to be outdone by the lungs, your brain has its own struggles to worry about when the air becomes thinner. Meet HACE: swelling of the brain at altitude. At 12,000 feet or higher, people exhibiting signs of ataxia—slurred speech and the inability to walk a straight line—should be suspected of HACE, and need to descend immediately.
AMS may feel like the worst hangover of your life, but HAPE and HACE are life-threatening emergencies. Prevention of all three might be the same, but so is the definitive treatment: rapid descent (2-3,000 feet or more) and, if symptoms don’t improve, evacuation. Remember that SOS button? Now would be an excellent time to know how to use it.
Water Treatment
It’s not an exaggeration to say that water is our lifeblood. Which is what makes the idea of water potentially holding organisms that can harm us another paradox.
And yet, sidle up to the earthen cow tanks that serve as water sources in much of the southwest, where the water more closely resembles chocolate milk, and you’ll become a believer awfully fast.

Delicious cow tank water and the magic of a water filter, Arizona Trail
No matter how pristine it might appear, or how quickly it may be flowing, any backcountry water source can contain pathogens that may make you sick. Think: the bacteria, protozoa, viruses, and parasites that cause diarrhea, giardiasis, cryptosporidiosis, and many other unpleasant illnesses.
Often misunderstood to be prevalent only among the world’s developing communities, parasite infections are, in fact, surprisingly common in the United States and patients can be asymptomatic for years before symptoms manifest. My own experience with a parasite infection went like this: 2 years of slowly advancing symptoms; 6 months of misdiagnosis and ineffective treatment; 6 months of effective treatment and recovery. I don’t recommend it.
Fortunately, avoidance of most of these baddies while on the trail is quite basic:
Sanitize hands after going to the bathroom and before eating to break the fecal-oral route that is often responsible for transmitting infections
Disinfect all water sources by boiling, filtration, chemical treatment, or ultraviolet light
See our guide to the best water filters and purifiers for backpacking for more recommendations.
Lightning

Lightning storms are not the time to find yourself in an exposed area
Here’s a not-exactly-going-out-on-a-limb kind of statement: humans and electricity don’t mix. According to the CDC, on average, there are 28 lightning strike fatalities per year in the United States. Let’s talk about how to avoid becoming lucky number 29.
If you haven’t sensed the running theme thus far, prevention is at the heart of nearly every aspect of wilderness safety, and minimizing the risk presented by lightning is no different.
Avoid lightning by knowing which locations present the greatest risk
Any exposed area, above tree-line (ridges and summits) or below (bodies of water and open fields), is at greater risk of a lightning strike. Many trails in the western United States spend lengthy stretches in exposed terrain like this, and minimizing the risk of being caught out in a thunderstorm requires: awareness of the terrain ahead; understanding possible escape routes to safe ground; and working knowledge of the typical weather patterns in that area. Here’s looking at you, Colorado, and your clockwork afternoon thunderstorms.
When all else fails, assume the lightning position
Sometimes, despite all the appropriate caution and planning, surprises do happen. If you ever find yourself unable to escape to safe terrain and the risk of lightning is unavoidable, assume the “lightning position”: make yourself as small as possible and sit on a sleeping pad or backpack. Most lightning injuries are not from a direct strike, but from the ground current that runs through the earth from a nearby strike. Sitting on a sleeping pad may provide some protection from that ground current. If the worst does indeed happen, you’ll certainly be glad you took that Wilderness First Responder course and got certified in CPR should you need to put those skills to use.
Wildlife
There are two things I’ve learned most from my time in the wilderness: perspective and perseverance. The former is one reason why this particular section comes last. Lions, tigers, and bears might be top of mind for those with little experience in the outdoors (and an active imagination fueled by gruesome stories in the media), but the risk of injury from the creatures listed here is arguably what you should worry about the least for one powerful reason: statistics.

The extinct California grizzly bear on the state flag
Recognize that creature on the state flag of California? Me neither. Why not? Because the grizzly bear it depicts hasn’t been seen in the state since 1924. Extinction, sadly, is a permanent kind of thing.
Zoom out a little to look at the bigger picture, and you’ll learn that since 1784, there have been only 183 bear attack fatalities in all of North America. That averages out to less than one per year.
OK, if not bears, surely those horror stories about aggressive, venomous snakes must be true, right? About that: courtesy of the CDC, there are somewhere between 7,000 and 8,000 venomous snake bites in the United States each year. The number of deaths? 5.
None of which is to say you should throw caution to the wind or ignore the risks presented by an encounter with a bear, a snake, or any of the plants and animals included below. But it’s important to keep things in their proper perspective and ensure that your mental and emotional energy is focused on the things that are far more likely scenarios.
Any sighting of a venomous snake or a large mammal like bear, cougar, moose, elk, or bison is a rare and exciting thing. Keep your wits, follow some common sense, and you’ll be talking about how lucky you were to have seen such creatures in the wild—safely!—for years to come.
Bears

Bear prints in the Bob Marshall Wilderness, Continental Divide Trail
For as many times as I’ve seen a bear up close in the wild, it still takes my breath away. The awe of standing so close to a creature so large, and yet so misunderstood in the popular consciousness, takes on an almost tangible sort of quality. Most often, it goes something like this…
There you are, mindlessly ambling along the trail, enjoying the scenery (or staring at the ground just in front of your feet), when a sudden commotion in the nearby forest immediately communicates the movement of something massive. Cracking branches and bushes being torn through. By the time it comes to an end, you’ve managed to turn your head in the direction of the tumult to see a giant creature pausing to stare back at you, as if just as mesmerized by you as you are by it. You quietly reach for the phone in your hip belt pocket to take a photo, when the sound of the zipper sends your newfound friend into another dead sprint in the opposite direction, having decided that you are the one who’s much too close for comfort.
That’s a good bear encounter. Here’s how to avoid a bad one, and what to do if the worst happens.
FOLLOW FOOD STORAGE GUIDELINES
Although a precise measurement is hard to come by, and varies by species, the consensus is that the distance from which a bear can smell food is measured in miles. When traveling in bear country, it’s critical to follow the local food storage guidelines. It can be a confusing patchwork of guidance depending on where you are, but one answer is almost universally encouraged: hard-sided bear canisters. In other areas, an Ursack, or a bear bag hang might be permitted. Know the local regulations, pack all of your food, trash, and toiletries inside your container, and if using an Ursack or a bear hang know how to use them properly.
AVOID COOKING WHERE YOU CAMP
You arrive at a beautiful campsite for the evening, set up your tent, and settle in to char that steak you’ve been carrying over an open fire. Not only are you the most well-fed hiker I’ve ever seen, but you’ve just rang the dinner bell for every bear in the area to come investigate your culinary stylings—or what’s left of them—as you sleep off the meat sweats in your tent. For long-distance hikers, your camp is really for one thing: sleeping. Avoid having your uninvited friends over for dinner by cooking in the evening, and then hiking a few more miles before setting up camp. It not only separates food smells from your camp, but it puts those dinner calories to good use.
CARRY BEAR SPRAY
I’ve been asked many times: do you carry a gun? The answer is always the same: no, and neither should you. Bear spray, however, not only requires far less accuracy to deploy under what is almost certain to be an adrenaline-filled moment, it comes with the added benefit of also being effective against other large animals like mountain lions and moose. Interestingly, despite this fact, it’s often only mentioned in the context of grizzly bear habitat, which is a surprising oversight given its broad utility.
KEEP YOUR DISTANCE
This seems obvious, but you’d be surprised. If you have the good fortune to spot a bear, keep a safe distance. It’s a good rule of thumb that if the bear notices you, you’re too close. Never approach a bear.
AVOID DIRECT EYE CONTACT
The bear may interpret direct eye contact as a threat or challenge.
SLOWLY BACK AWAY
If a bear has clearly been alerted to your presence, slowly back away to create more distance. Do not turn and run from any bear. Not only can a bear reach speeds of 35 mph (read: far faster than you), but running can stimulate a predatory response.
IF AN ATTACK HAPPENS…
Bear behavior like huffing, slapping the ground, and clacking of teeth are all signs of an aggressive bear that may be prepared to charge. However, many charges are bluffs. Be prepared to deploy your bear spray. If it’s a black bear, be prepared to fight back. If it’s a brown bear, play dead. When it’s all over, be prepared to have dark-humored friends send you copies of Bear Attacks: Their Causes and Avoidance, by Stephen Herrero—the world’s foremost expert on bear attacks—for your birthday.
Snakes

Western Diamondback rattlesnake, Pacific Crest Trail
For many people, snakes are truly the stuff of nightmares. Slithering in camouflage, ready to strike with enough venom to kill in seconds. As usual, the reality is a little different from the mythology.
In the United States, there are 22 species and 37 subspecies of venomous snakes that are broadly categorized into two taxonomic families, each with their own distinct venom profile: Elapids (coral snake) and Pit Vipers (rattlesnake, copperhead, cottonmouth).
While coral snakes have a neurotoxic venom that can damage your nervous system and lead to respiratory failure, pit vipers have a hemotoxic venom that can cause blood clotting problems and significant tissue damage at the bite site. The Mojave green rattlesnake that is native to the southwest, and can be seen along the southern Pacific Crest Trail, even has a particularly lovely cocktail that combines both types of venom, making it arguably the world’s most potent rattlesnake venom.

Mojave Green rattlesnake, Pacific Crest Trail
Before you start hyperventilating with fear, remember the statistic I mentioned earlier. Not only are bites quite rare in the U.S., fatalities are an even more infinitesimal slice. It’s fair to wonder why there aren’t more fatalities among those unfortunate enough to be bitten in the first place. There are many factors, but one particularly important reason is that a significant number of bites are “dry” bites, where the snake injects no venom at all. 20-25% of all pit viper bites are dry, while as much as 50% of coral snake bites are dry.
The very first rattlesnake I ever saw in the wild was a Timber rattlesnake mere steps from the New York – New Jersey border on the Appalachian Trail, as it made a speedy getaway from my approaching steps. Weeks earlier, I’d had a far more haunting encounter.
While pausing for an afternoon snack at a trailside lean-to, I sat with my legs dangling over the front of the shelter, thumbing through the trail register when I came to a laminated page. On it was a warning that a nest of copperheads had been spotted in the area. At that moment, I jumped off the platform to check under and around the shelter, but found nothing. Satisfied that perhaps the information was outdated, I moved to sit back down before something caught my eye. When I looked up to stare at the roof beam, my mind couldn’t make sense of why it would be moving. By the time my brain caught up to the realization that the snakes had taken up residence in the shelter, I was already grabbing my pack to hit the road. It still gives me chills to think about it.
The good news is that snakes, like most animals, are far from aggressive and will only truly pose a threat when they feel threatened. In the case of rattlesnakes, they will often do you the additional courtesy of alerting you to their presence. If you do happen upon a snake, venomous or not, back away, give it a wide berth, and wait for it to move out of the way.
Avoid tall grasses and, in general, never step in or reach for places that you can’t see. There’s a reason why the most common bite sites are on the hands, forearms, lower legs, and feet.
What about all the things you might have seen in movies, like cutting an X across the wound and attempting to suck out the poison if, in fact, you are bitten? Yeah, don’t do that.
Instead, here are a few basic Do-s and Don’t-s:
DO
● Keep calm. Not only does an elevated heart rate speed the circulation of venom, panic helps no safety situation
● If you can do so safely, identify the snake, e.g., by taking a photo. It will help identify the species and thus the appropriate antivenom
● Remove jewelry in anticipation of swelling
● Clean the bite site with soap and water
● Walk to safety, if reasonable to do so, or call for an evacuation. Antivenom administered in a hospital is the definitive treatment
DON’T
● Ice or elevate. Ice can further the local tissue damage in the case of pit viper bites, and elevating can speed circulation of the venom
● Cut and suck, or attempt to use a venom “extractor” device
● Use a tourniquet
● Harm the snake
Note: treatment protocols vary based on the species of the snake and the country you’re in. Play it safe by getting certified in some form of wilderness medicine, and learn the treatment protocol for snakes in the area you’ll be hiking.
Spiders and Ticks

A tarantula that is far more pleasant in reality than in your nightmares
SPIDERS
We’ve finally come to perhaps the most common fear among all humans: spiders. Creepy, crawly, gangly legged, and always hiding in the dark where you least expect it. On the trail, spiders pose a risk so small that they hardly merit a mention, but since they too are the stuff of nightmares for untold millions, here we are.
Avoidance and treatment here is surprisingly basic. Keep an eye out in places like outhouses and around woodpiles where they tend to call home. Chances are good that they’ll be the ones giving you a wide berth.
If bad luck befalls you anyway, and a venomous species such as a Brown Recluse or Black Widow happens to sink its teeth into you, identify it as best you can, clean and cool the bite site, and monitor symptoms. Although the need to evacuate for such a bite is rare, if symptoms worsen, it’s time to seek medical attention.
Oh, and that big fuzzy tarantula above? In the United States, he’s essentially harmless.
TICKS

Up close with a Deer Tick
Like the little kid brother to spiders, you have to hand it to ticks. They certainly can be annoying, but you have to admire their persistence. In places like the Northeast and mid-Atlantic states, tick season can be prolific. I once picked more than two dozen ticks off my body after a single day of hiking in Virginia.
As harmless as they might appear, Deer Ticks, and other species like Wood and Dog Ticks, can be vectors for serious infections such as Lyme Disease, Rocky Mountain Spotted Fever, and even Alpha-gal Syndrome, which can have the bizarre side effect of causing an allergy to meat and dairy. Attracted to the warm protected areas of your skin like the armpit, groin, behind the knee, and between toes, they thrust their pincers into your skin and feed on the nutrients in your blood, potentially transmitting an infection in the process.
Wearing long sleeves, long pants, and even tucking pant legs into socks can limit the risk of ticks finding their way onto your skin. Chemical treatments containing the insecticide permethrin can also be sprayed onto clothing for another layer of protection.
If you do find one enjoying a feast at your expense, gently remove it by the head with a pair of tweezers, taking care to remove the entire tick intact. Take a photo for identification, clean the site, and take note of the date and time as symptoms of infection from a tick bite may take days or weeks to develop.
Mosquitos

Mosquitos: time to find a happy place
When you get past all of your worst fears and finally step confidently onto the trail, you’ll soon realize what a nightmare truly is when thousands of your closest buzzing friends start paying you a visit like houseguests without boundaries. “Nuisance” hardly begins to describe the hell of bug season, as the inescapable, collective din of mosquitos—like something straight from a sci-fi movie—has the power to bring on a kind of madness that’s hard to top. And that’s just the sound of them.
That something so tiny as to be crushable between your fingertips is what can send people home from the trail, rather than fears of giant predators, is perhaps the greatest paradox of all. But the irony of the mosquito is that its diminutive size betrays an ugly truth: it is, by far, the planet’s deadliest animal.
An almost perfect vector of transmission for a veritable who’s who list of infectious diseases—malaria, dengue fever, West Nile, yellow fever, and Zika, to name only a few—mosquitos thrive and proliferate almost anywhere in the world where there is stagnant water. And though most cases of the more serious mosquito-borne infections in the U.S. tend to be acquired by travelers to foreign countries, recent cases of locally acquired malaria are a reminder that keeping mosquitos at bay is good for your health, period.
And all that record snowfall I mentioned is going to make for one hell of a record mosquito season. Here’s how to protect your body and your sanity:
The less exposed skin, the less you have to be on the defensive. This can be a challenging trade-off in the sweltering summer humidity in the East, where it can be a choice between sweating more and swatting less. See our guide to Best Sun Shirts or Best Men's Hiking Pants and Women's Hiking Pants for options we like for hiking.
Keeping mosquitos away from your face and neck is perhaps the single best thing you can do to free your mind from focusing on the swarm you can barely see through.
The ultra-lightest among us love the simplicity of a tarp, but it’s easy to forget the consequences of that system in the peak of bug season. The psychology of enduring clouds of mosquitoes for hours or days on end may be worth a few additional ounces in both your clothing and shelter system.
DEET remains the gold standard among insect repellants, and despite mythology surrounding its safety, the EPA continues to advise that it is safe based on the evidence of multiple studies. Slightly less familiar in the United States, though found in a growing number of products, picaridin has demonstrated effectiveness equal to that of DEET, while also being odorless and harmless to synthetic fabrics.
In the case of both DEET and picaridin, products with a higher concentration provide the longest lasting protection. Except for oil of lemon eucalyptus and some soybean-oil based products, studies have shown that natural alternatives provide extremely limited protection, which is why the CDC does not include them on their list of recommended insect repellents.
As with ticks, permethrin can also be sprayed onto clothes, as an insecticide that is effective against mosquitos.
My preferred tactic: find a happy place. Spend enough time in the wilderness, and eventually, you’ll find yourself in a scenario where it’s the only tool you have left.
Poisonous Plants
Poison oak and ivy

Poison oak
“Leaves of three, let it be.” Unless you’re the type of masochist who enjoys a good, itchy rash or the stylish look of being painted with calamine lotion, tapping into your inner naturalist is good advice. After all, learning to identify just a couple of common trailside plants can be all you need to avoid their non-consensual touch that tends to leave a mark.
Poison oak, which largely grows west of the Rockies, and poison ivy, which largely grows east of the Rockies, are similar looking plants with a trademark cluster of three shiny leaves. Often growing in shady thickets, their leaves and stems all contain urushiol, a substance that can cause contact dermatitis if you happen to brush into it.
Sensitivity to the urushiol in poison oak/ivy varies from person to person, so reactions can vary from an angry, uncontrollably itchy, and blistering mess to nothing at all. As luck would have it, nature has a sense of humor. Frequently growing immediately next to poison oak/ivy, in equally dense thickets of its own, is its antidote: Jewelweed.

Mashing the stems of Jewelweed and rubbing onto the skin has been used for generations by indigenous peoples as a treatment for contact dermatitis, and its efficacy has even been supported by scientific study.
Poodle-dog bush

Poodle-dog bush
In the west, you’ll find a quite different looking, though equally unfriendly plant, with a friendly sounding name: poodle-dog bush. Endemic to Southern California, poodle-dog bush is a sun bather, unlike poison oak/ivy. Known as a “fire follower” species, it proliferates in areas recently burned by wildfire. On parts of the Pacific Crest Trail in southern California, it has been known to form a corridor for brief stretches that can put your contortionist skills to the test.
Similar to poison oak/ivy, touching poodle-dog bush can yield a nasty rash. Luckily, it’s easy to identify, and hard to miss once your eyes become adept at spotting it. Another giveaway is that it stinks.
If you’ve spotted any of these along the trail, start to get itchy, and your desperate search for Jewelweed is coming up empty, here’s what to do:
Washing your skin, as soon as you suspect contact, may remove some of the rash-inducing oil. The same goes for clothing and gear, as urushiol can last for years on them if not washed.
Antihistamines may quell your body’s histamine response and reduce the severity of rash symptoms. Loratadine (Claritin) and other modern antihistamines have the advantage of being non-drowsy as compared to diphenhydramine (Benadryl).
The rash from contact dermatitis can’t be stopped, but it can be soothed. Although not commonly carried by hikers, cortisone cream and calamine lotion might reduce the itching sensation from uncontrollable to something approaching tolerable. If you still can’t help from clawing at yourself, there’s some good news: the rash itself doesn’t spread via itching or from blisters that break, but from your skin simply reacting to the initial contact with the plant at different rates. So scratch away! Unless you’re starting to bleed, in which case, you may have taken things a bit too far.
Emergency Contacts & Planning

A personalized medical ID on your smartphone
A simple, but often overlooked detail of wilderness safety, is: always ensure that someone else knows your plans. It could be as simple as texting a friend with a rough itinerary of where you plan to go, when you plan to return, and possible spur-of-the-moment alternatives that may delay your arrival. Bonus points if you leave a copy of the map with your planned route(s) highlighted.
Another overlooked and equally simple detail is your medical profile. In a world where we all carry supercomputers in our pockets, every one of us can set up the digital equivalent of a medical ID bracelet. On nearly every modern smartphone, it’s possible to configure a basic medical profile that includes details such as your name, age, emergency contacts, known allergies, medications, and pre-existing conditions. Accessible without a passcode by first responders in the event you happen to be unresponsive, it’s one small but important piece in the larger puzzle of planning ahead for a safe and successful adventure.
Last, but certainly not least, take advantage of GPS technology. Personal locator beacons (PLBs) and two-way satellite communication devices like the Garmin inReach mini have revolutionized wilderness safety. That SOS button? Just promise you’ll use it wisely, when it truly becomes your last and best option, with the full knowledge of the dominos it will set in motion and the risks it will present to those who come to your aid.
Words of Wisdom

Pondering the view from Knapsack Col, Continental Divide Trail
If you’ve made it this far, thank you! I hope this article has sparked your curiosity to learn even more, empowered you to pack more skills and fewer things, and most of all, put whatever fears you may carry into their proper perspective. I’ll leave you with a few parting thoughts…
● Do what you can, with what you have, where you are
A bit of Stoic philosophy often attributed to Teddy Roosevelt, it’s as true on the trail as it is at home. Be present. Keep things in perspective. Stay calm. And improvise as best you can.
● Carry your gear list, not someone else’s
The internet is littered with lists—measured to the gram—of gear carried by other people. There is no “best” gear list. There is only what works for you, your experience, your preferences, and your skill set.
● Only carry gear that you have the skills to use
Anything you carry that you don’t know how to use is not only weighing you down (quite literally), but it can present a false sense of security at best, and be an invitation to operate beyond your skills or certification at worst. Don’t pack your fears. Don’t pack your aspirations.
● A permit date does not mean it’s safe to hike
With the booming popularity of thru-hiking, and backpacking in general, it’s tempting to think: “Surely, they wouldn’t have issued me a permit for this date if it wasn’t safe to hike.” Think again. Do your homework on the conditions you’re likely to face, and use all the information you’ve learned here to make informed decisions in each situation you encounter.
● Get Certified!
You didn’t think I was just going to let this go, did you? After all we’ve been through? See the links at the bottom of the page to find a course that’s right for you.
About the Author

Mountain Man grabbing the only available shade at Mather Pass, John Muir Trail
I’m Jeff Brownscheidle, better known as “Mountain Man” among hiking circles, and I’ve completed over 10,000 miles of long-distance hiking on some of America’s greatest trails, all with a pair of my beloved Chacos underfoot.
I have my dad to thank for my love of wilderness adventure. Long before I became an engineer, a boyhood fascination with the world that exists where roads end and trails begin had taken root.
While I’ve had the privilege of hiking many long trails, and even completing the Triple Crown, I’m also a writer, engineer, Chaco Ambassador, American Long Distance Hiking Association-West (ALDHA-West) board member, and Certified Wilderness First Responder. I’m the founder of Stone and Sky, where I chronicle my on-trail adventures and consult aspiring thru-hikers on how to make the most of their own time on trail.