Backpacking Guide to Canada’s West Coast Trail
47-mile hike along beaches, Tide Pools, and THrough old-growth rainforest — stewarded by first nation members
February 26th, 2026
Home > Trip Guides > Backpacking
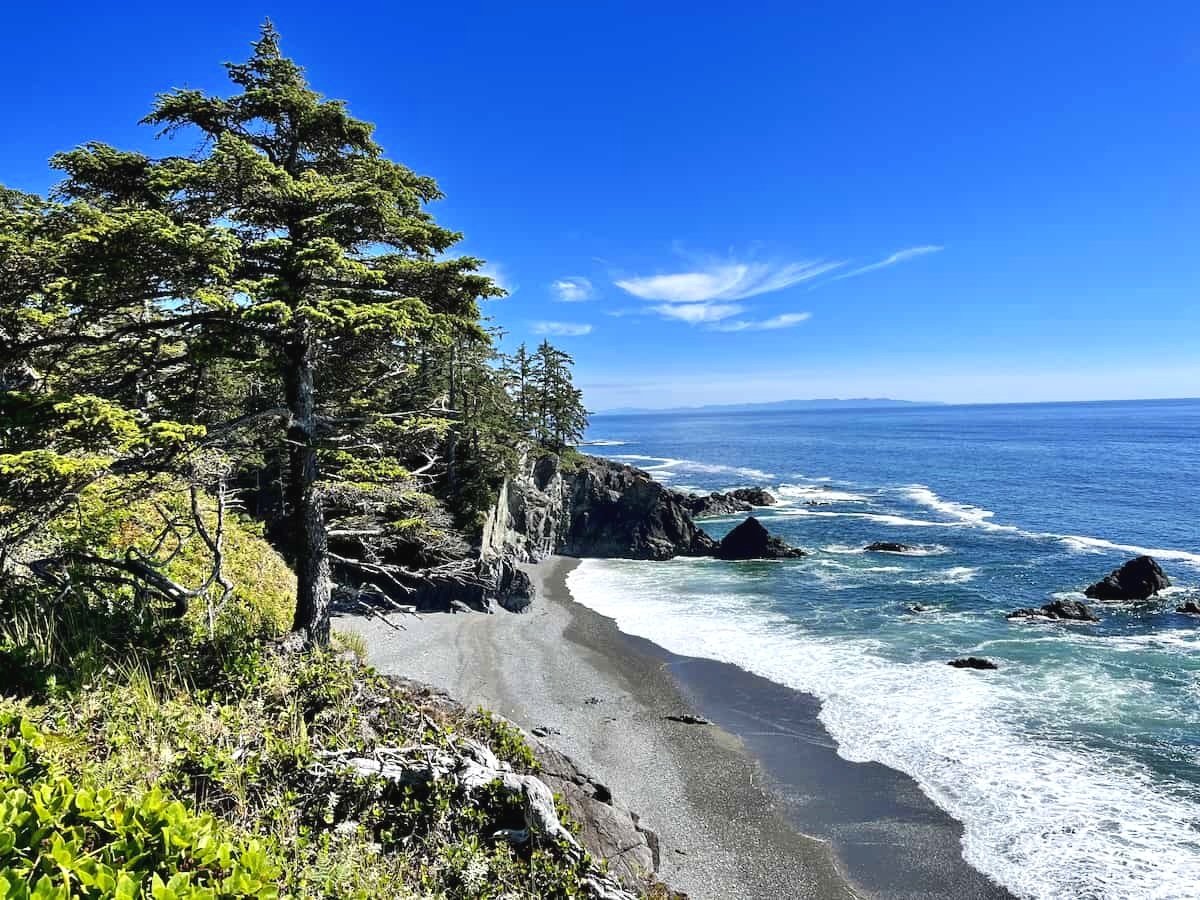
In August, I solo-hiked the 47-mile (85 km) West Coast Trail (WCT), an ancient path along the southwest coast of Vancouver Island that crosses through three indigenous Canadian communities (Huu-ay-aht, Ditidaht, and Pacheedaht) known today as Pacific Rim National Park.
The West Coast Trail is considered one of the most beautiful but difficult trails in North America.
This is a tough trail, physically and logistically, and I committed months to plan what would be one of the most challenging experiences of my life.
Twelve First Nations members guard this almost fairytale-like trail where you can walk over beaches, explore tidal pools, wander through the old-growth rainforest, scramble up 100 ladders, and ride four cable cars and two hiker ferries.
I wrote this guide to share what I've learned and help you prepare for the hike.
Distance: 47 miles (75 kilometers), though some people report that it’s longer by at least 6 miles (10 kilometers)
Days: 5 to 8 days (4 to 7 nights)
Elevation gain: 5,431' (1,655 meters)
Best season: July to September
Permits: Required (see below)
Difficulty: Difficult
Read more: Our Favorite Gear from the West Coast Trail
We create reader-supported, objective, independently-selected gear reviews. This story may contain affiliate links, which help fund our website. When you click on the links to purchase gear, we may get a commission — without costing you an extra cent. Thank you for supporting our work and mission of outdoor coverage for every body! Learn more.
What to know about the West Coast Trail

Though I had backpacked many challenging trails like sections of the Nüümü Poyo (known also as the John Muir Trail) and Grand Canyon, the West Coast Trail was one of the most demanding hikes of my life. After seven days, I emerged injured and dirt-covered yet content.
Though I had the right gear and was prepared for the trek, I struggled; I climbed ladders for about six hours daily and walked over slippery and muddy roots and boulders. Yet this coastline is stunning and many of my moments alone in the old-growth forest stilled my soul.
This hike also felt like a homecoming. As a Canadian citizen, I spent my teenage years living with my family on Vancouver Island, walking and biking through damp, dark green forests and relaxing on driftwood logs along pebbly beaches. Most WCT hikers are Canadians, a fact Lauren Harding unravels in her 2020 dissertation, "Walking the wild coast: territory, belonging and tourism on the West Coast Trail":
One hiker made the unprompted remark to me, in a half-joking but somewhat sincere way "I feel so Canadian right now, is there anything more Canadian than this? Camping in a Canadian National Park?" Citizens embark on treks through what is ‘their’ national backyard, creating an affective sense of belonging to territory that intertwines with ideations of nationhood and what it means to be Canadian.
Yet, the idea of a "Canadian wilderness backyard" erases the Native history and presence on this land, an assumption mirrored in the government's actions when they created the Pacific Rim National Park on top of Native lands. There is an ongoing treaty to return the land to the First Nations while maintaining a 20-meter (65-foot) right of way for West Coast Trail hikers.
Given this context, I walked the trail with respect for the land and its First Nations Guardians and continue to educate myself about these people and this island.

Quick Facts
The West Coast Trail is a multi-day backpacking trail on the west coast of Vancouver Island in British Columbia, Canada.
One of Canada's premier trails on the top of multiple lists, including Backpacker Magazine's "Top 10 Hard Trails" and Explore Magazine's "18 Epic Multi-Day Backpacking Trips in Canada."
Open May to September only to permitted hikers.
In Canada's Pacific Rim National Park Reserve.
Follows early trails that Native/First Nations Canadians used and continue to use for trade and travel.
Crosses villages and ancestral territories of three First Nations: Huu-ay-aht, Ditidaht, and Pacheedaht.
The West Coast Trail Guardian program employs 12 First Nations tribal members as "trail guardians.”
Nicknamed “the Graveyard of the Pacific” due to the number of shipwrecks.
There are:
more than 100 ladders
more than 100 bridges
4 cable cars
2 hiker ferries
multiple shipwreck parts
3 possible entry or exit points: Pachena Bay (north trailhead), Gordon River (south trailhead), and Nitinaht Village (midsection)

Highlights
The West Coast Trail feels like hiking in a postcard, with stunning landscapes of lush old-growth rainforests, colorful tide pools, and rocky beaches.
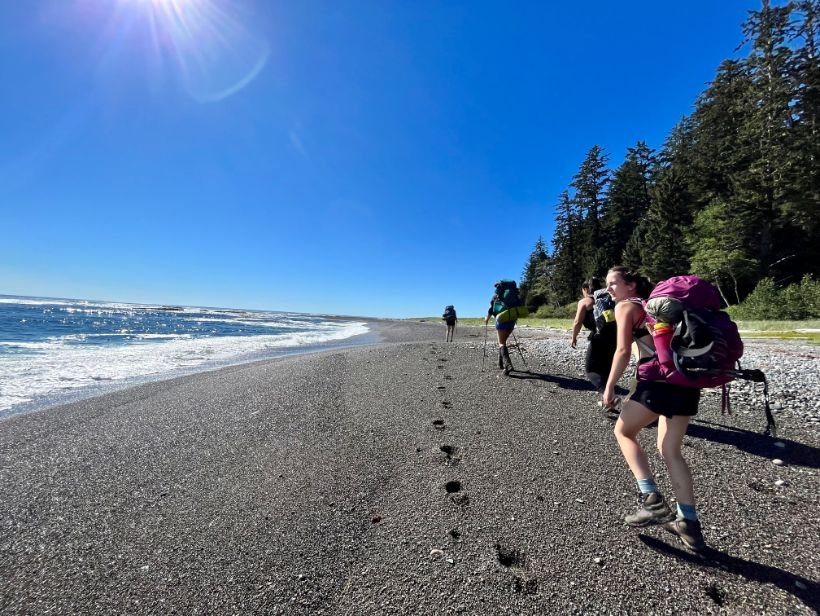
The campsites are on the beach, and you'll fall asleep to the sound of waves every night.
Wildlife sightings are remarkable, from bears to whales, otters to seagulls.
This is Native land, and you'll walk through three First Nations dwellings, often seeing new and ancient art carvings along the path. You'll likely meet and talk with a First Nations guide or two, which is a unique experience on trails.
Challenges
The trail is treacherous — particularly in the southern five kilometers — with the Wilderness and Environmental Medicine journal noting that there is "an alarmingly high number of evacuations and morbidity on the WCT." Parks Canada says that 1% of all hikers are rescued due to slips and falls.
Planning this remote thru-hike includes multiple logistical challenges, from getting a permit, traveling to the trailhead, and minding the daily tide tables.
Nature and extreme weather take a toll on trail infrastructure; broken bridges, sunken pathways, and missing ladder rungs.
The deep mud will challenge even the hardiest of hikers, even during dry summers.
GEAR LIST
Here is a list of the gear I used on the West Coast Trail. Read more about why I chose the gear I did—and the swaps I would make for my next trip—below.
| WEST COAST TRAIL GEAR | OUR PICK | OTHER OPTIONS |
|---|---|---|
| Gear | ||
| Tent | Six Moon Designs Lunar Duo Tent | Best Backpacking Tents Best Ultralight Tents |
| Tarp/ utility cord | Tarp PMI 3mm Utility Cord |
|
| Backpack | ZPacks Arc Haul 60 Pack |
Best Lightweight Backpacks |
| Sleeping bag | Enlightened Equipment Enigma 10F Quilt | Best Backpacking Sleeping Bags Best Backpacking Quilts |
Best Season

Screenshot of average temperatures along the WCT: WeatherSpark.com
Parks Canada only provides wilderness permits between May 1 and September 30. Since there are only five months where people are allowed to hike the West Coast Trail, I’ve broken down the weather month by month. I referred to WeatherSpark.com, with nearby Tofino as my base city.
On average, here are the high and low temperatures you can expect each month on the trail:
Hiking in May
Hiking the West Coast Trail in May is a fantastic way to ensure you’ll get the hiking dates you want, as many hikers avoid this month. May has a high of 58°F (14°C) and a low of 47°F (8°C) degrees. With over nine days of rain on average, 3” of rain, and mostly cloudy skies, this can be a tricky time to hike slippery pathways. In fact, in May 2025, there were several hiker injuries. Also, heavy rain may make the trail impassable, and hikers sometimes have to wait hours or days before crossing full rivers. However, beach campfires are usually allowed in May, a great way to warm up and dry off.
Hiking in June
June is a decent time to hike the WCT, as you’ll have sunsets as late as 9:30 p.m., and you’re less likely to deal with fire bans. You’ll also have more choices of permits. However, with 2.5″ of rain, 9.5 average days of rain, and clear skies only half the time, you’ll have to pack your rain gear and tarp. You’ll also need to bring extra food if you are stuck waiting to cross a flooded river. June has a high of 61°F (16°C) and a low of 51°F (11°C) degrees.
Hiking in July
July is one of the most desirable months to hike the WCT, so entry dates disappear quickly. It’s easy to see why people prefer it, as most days are clear, the sun sets around 9:00 p.m., and it’s the driest time of the year. July has a high of 65°F (18°C) and a low of 54°F (12°C) degrees. However, British Columbia has a greater chance of wildfires and smoky skies. Keep your eye out for when Parks Canada posts a fire bans in response to wildfires or wildfire risk.
Hiking in August
I hiked the WCT in late August. Statistically, August gets 1.5 inches of rain, but the skies are the clearest of the year, and sunsets stretch between 8:00 and 9:00 p.m. It rained on and off during my week, and there were periods of heavy fog. Parks Canada can also put fire bans in place. August has a high of 66°F (19°C) and a low of 54°F (11°C) degrees, which meant that I didn’t sleep as cold as I did in the California Sierras, but also rarely needed sunscreen or a hat.

Hiking in September
If you hike the WCT in September, there’s a higher chance you’ll experience more days of rain as the rainfall doubles from August, marking the beginning of autumn. September has a high of 63°F (17°C) and a low of 51°F (11°C) degrees. However, given the effects of climate change, there’s still a chance of warm weather. And you’ll probably get your choice of entry dates and trailheads.
Given my experience on WCT, I would recommend an early September date for hikers wanting to secure entry during a drier, warmer time of year. The sun begins to set as early as 7:30 p.m. in September, so start hiking earlier.
For years, I defined "difficult" trails as "mountainous and long" and "easy" trails as "flat and short." I naively needed help understanding why WCT, which doesn't have much elevation gain, was considered challenging.
Then I hiked the trail and realized that it was technical. Every day for five to six hours, I carefully stepped over tree roots, mud, soft sand, and slippery rocks and ascended or descended multiple ladders. By the time I reached camp, I was mentally tired.
Since WCT, I've rethought "difficult" hikes as a mix-and-match of long-distance, significant elevation gain, or technical terrain. WCT is going to feel strenuous for most people.
Navigation, Terrain and Elevation Gain

Although the trail is generally well-marked with yellow kilometer markers, you will need a map. There are ambiguous markings like hanging buoys in a tree, and you need to pay attention to the shoreline to avoid a turnoff. Temporarily getting lost on this trail is common.
I talked to several hikers who had accidentally added a couple of miles to their trek by overlooking a beach or forest entrance, then backtracking. For more on how to avoid these mishaps, refer to our "Maps and Guidebooks" section below.
Rough Terrain
The terrain on the WCT is challenging, more similar to rock climbing than anything else. My trail friends are rock climbers, and their skills prepared them well for the moments when we scrambled over boulders, pulled ourselves up over fallen trees, and hoisted ourselves up and down steep ladders. Rock climbing is one of the best ways to prepare for this trail, which demands attentive footwork and a surprising amount of upper-body strength.

Elevation Gain
This trail has around 5,400 feet (~1,600 meters) of elevation gain. A special note about WCT: most days, you'll encounter forks in the trail: a beach route versus a forest route. Each split will inevitably change elevation readings.
Here are three different examples:
AllTrails (northbound): 5,977 feet (1,821 meters) gain
AllTrails (southbound): 4,947 feet (1,507 meters) gain
My Strava (northbound): 5,431 feet (1,655 meters) gain
Though northbound hikers have a little more elevation gain, the difference in elevation gain in either direction is negligible.
However, some days have more elevation gain. For example, here are my daily Strava readings on my northbound journey (a southbound hiker could reverse these days):
1,094 feet (333 meters) elevation gain
347 feet (105 meters) gain
1,011 feet (308 meters) gain
220 feet (67 meters) gain
1,225 feet (373 meters) gain
531 feet (161 meters) gain
1,003 feet (305 meters) gain
Interestingly, my most challenging day was Day 2, and my easiest was Day 4. Both were low-gain days. The technicality was definitely what made the trail difficult for me.
Permits
Permits for 2026 thru hikes are open for reservations on February 5th, 2026 at 8:00 a.m. Pacific Time. You can book online through Parks Canada.
Preparing to Book a Permit
When you book, you'll need to specify the following:
Your preferred start dates (including alternates)
Your entry date and access point at one of the three trailheads
Your exit date and access point at one of the three trailheads
How many people are in the hiking group
How many nights you'll need to reserve (you are only charged per person, not per night)
Walk-up permits are no longer available. All permits are reservable.
You are not required to book specific campgrounds.
You will be required to participate in a hiker safety primer and pre-hike briefings via video.
The Permit Experience
Beginning at 8:00 a.m., thousands of people enter a virtual queue where they are assigned a random number. Based on that number, you may wait one minute to one hour. Once you've made it through the queue, you'll have a choice of permits, but you'll have to book one immediately, so plan a few dates and entry points.
The prominent advice is to log in to Parks Canada before 8:00 a.m. to save a minute; reservations disappear in seconds, even if you're in the system.

Screencapture of the virtual queue for a West Coast Trail permit (I only waited 40 minutes).

Another view of the virtual queue, seconds away from entering the reservation system.
After 40 minutes of waiting, I entered the reservation system and saw the trailheads marked in green (available) or red (fully booked). However, all July permits were reserved, so I looked for August and settled on an available late-month entry. Within three minutes, I had a reservation.

Screencapture of the Parks Canada reservation system (map view). In this screen capture, all three trailheads are available.
Permit Fees
As of February 2026, the permit fees amount to over $200 in U.S. dollars.
Orientation fee = $23.75 (CDN)
Backcountry use permit = $184.75
Ferry Fee – Gordon River = $28
Ferry Fee – Nitinaht Narrows = $28
Reservation fee of $11.50/ group
COST OF CANCELLATION
If you cancel less than 21 days before your entry, you will only be refunded for the orientation and ferry reservation fees.
OTHER FEES
You are also required to buy a Parks Canada annual pass, which you will show to the ranger when you check in for your hike. You'll need one of the following (but not both):
An annual Parks Canada Discovery Pass, CDN $83.50
Or
An annual Pacific Rim National Park Reserve Pass, CDN $60.50
You should also account for Vancouver Island ferry costs and/or parking fees if traveling from Vancouver or Seattle.
West Coast Trail Safety Primer
All WCT hikers must watch the West Coast Trail Safety Primer online before arrival. The primer explains:
How to read tide charts
Backcountry etiquette
Injury prevention
In addition, hikers must attend an in-person orientation at Gordon River, Pachena Bay, or Balaats’adt (Nitinaht Village). Reservations are required.
My West Coast Trail Itinerary: Northbound, 7 Days
Day 1
The WCT starts at Gordon River (p̓ačidaʔ in Pacheedaht language) inside a Parks Canada office. Twice a day—10:00 a.m. and 2:00 p.m.—the staff gives a 30-minute orientation listing all the dangers of the trails: tsunamis, animals, tides, and slippery rocks.
Once everyone has completed the orientation, the ranger walks the group of hikers to a boat dock, where you board a small hiker ferry to the beginning of the trail. When you disembark, you’ll look at a straight-vertical ladder that leads directly upwards into the forest. One by one, you’ll walk up the ladder.
Most hikers take 3.5 to 5 hours to hike the 3.7 miles (6 kilometers) to Thrasher Cove (ʔo:yacs’ in Pacheedaht), though speedier hikers may push on to Camper Bay. The terrain is a dense forest with muddy, root-covered trails. There are at least a dozen ladders.

Ladders are a common feature on the West Coast Trail.

Typical muddy path on the West Coast Trail.

The infamous boulder field.
Day 2
From Thrasher Cove, most hikers will go to Camper Bay, though some will continue to Cullite Cove. There is a beach and forest trail option. If you choose the beach trail, it’s shorter but much more dangerous due to a section called the “boulder field.” Most hikers from the WCT are rescued here due to falls, so most people take it very slowly (it took me over 2 hours).
This boulder field is not to be underestimated. I hiked it during a drizzly morning and often had to scramble over large, algae-covered rocks and driftwood. I fell on a slippery rock and badly bruised (and likely sprained) my feet and shins, an injury that took about six weeks to recover fully. If I did this again, I would opt for the longer forest trail.
From the boulder field, hikers will have to hike another hour to reach photo spot Owen Point (ʔaxačkt in Pacheedaht), then race the tides to cross a long, exposed tidal shelf and incoming surge channels.

Foggy Owen Point at low tide.

Surge channels between the rock shelves.
If you aren’t comfortable jumping between rock shelves to avoid ocean surges, you will sometimes need to hike into the forest to navigate parts of the rock shelf (look for the buoys).
When I hiked, it was too dangerous to re-enter the forest trail at Beach Access Point “B,” so we had to hike further to Access Point “A.” The trail didn’t mark either point, so I used my offline AllTrails map to follow my progress; you could also navigate by noting your mileage. From this point, it’s a forest path toward Camper Bay.
Most hikers take 5 to 7 hours to hike the 5.4 miles (8.8 kilometers) to Camper Bay. There is a lot of animal activity on the WCT, and this is the first day you’ll see fresh animal prints in the sand (we saw cougar and wolf prints).

The author cautiously crosses the suspension bridge.

Blueberry jam-like bear scat.
Day 3
Most hikers from Camper Bay will walk to Walbran Creek, my favorite campground. This day is all forest with multiple ladders and a suspension bridge. Most people will make this 5.8-mile (9.2-kilometer) trek in 5 to 6 hours.
This section of the WCT is probably the first where you’ll see evidence of bears, such as large scat droppings that one of my trail friends likened to “blueberry jam.” We sang and spoke loudly and let our bear bells ring.
The well-designed hiker suspension bridge carried us over a creek; if you’re afraid of heights, you may feel nervous.
Hikers may arrive by midday or early afternoon at Walbran Creek, the perfect place to enjoy a brisk dip in the creek, filter water, and set up camp on the sandy beach overlooking the ocean. There was also cell phone reception for U.S. phones.

Rocks and sea urchins along the trail.

Close up of a sea urchin.
Day 4
From Walbran Creek, most hikers go to Cribs Creek. This day may be everyone’s favorite WCT day. It’s almost all beachfront hiking, with frequent breaks to photograph tide pool animals, visit the Carmanah Lighthouse, spot sea lions, and look for whales offshore. Most people will hike this 6.9-mile (11-kilometer) day in 4 to 6 hours. Make sure to walk it at low tide.

Sea to table: crabs, halibut, and baked potatoes at the beloved Crab Shack.

Lunch at the Crab Shack.
Day 5
This day is remarkable. It starts at Cribs Creek and goes to Tsusiat Fall (tsusiiyit in the Ditidaht language), one of the longest but more rewarding days. At 10.5 miles (16.5 kilometers), this is one of the longest days on the trail, as most people will complete it in 7 to 9 hours.
This day has three parts:
Hiking from Cribs Creek to Nitinaht Village: 6 miles (9.5 kilometers) in about 4 hours.
2- to 3- hour lunch at Crab Shack in Nitinaht Village.
Hiking from Nitinaht Village to Tsusiat Falls: 4.5 miles (7 kilometers) in about 3.5 hours.
This trail was a mix of beach and forest hiking, past dunes, and over well-maintained boardwalk paths that led us to Crab Shack in the indigenous village of Nitinaht, where locals caught and cooked halibut, salmon, and crabs for us. The baked potatoes, cold beer, and cider were also incredible. Most hikers bring upward of CDN $100 in cash for this trail-magic treat (meals cost $37 and up).

Ladders leading to the Tsusiat Falls campground.
After connecting with trail friends and enjoying the most memorable trail lunch, most hikers will take a 5-minute hiker ferry across the narrows to the remainder of the trail, which weaves in and out of the forest and beach.
In the end, a series of long ladders lead down to Tsusiat Falls, a picturesque swimming spot where a waterfall leads to the ocean.

The author swimming at the base of the Tsusiat Falls.

Robyn pulled herself across Klanawa River on the cable car.
Day 6
Most hikers will leave Tsusiat Falls and walk 8 miles (13 kilometers) to Michigan Creek. People are likely to complete this trail in 5 to 7 hours. Much of the day includes walking on the beach, particularly the last stretch between Darling Beach and Michigan Creek.
There are several cable cars, but this day includes the only unavoidable one, across the Klanawa River (Tladiiwa in Ditidaht and ƛaniwaʔa in the Huu-ay-aht language). The cable cars are small and only fit two people, their backpacks, and trekking poles. If you’re hiking solo, it’s easier to wait until someone can help you pull your cable car across; however, it’s doable on your own.
Along the way, enjoy (slightly) smoother hiking along boardwalks hand-carved by Kevin Peters, a local indigenous trail guardian.
Some hikers may prefer to stay at Darling Beach, but this site was closed in 2022 due to an overly friendly bear in the area. There is a likely chance of encountering wildlife during this day.

A local Huu-ay-aht trail guardian, Kevin Peters, carved these boardwalk trails.
Day 7
The final day of hiking starts at Michigan Creek and ends at Pachena Bay (anaqƛa in Huu-ay-aht). This 7.4-mile (12-kilometer) trail takes 3.5 to 5 hours for most hikers and does not include any beach or water crossings.
It is all inland hiking, and most of it is smooth. However, this was one of the most active days for bear sightings, as they tend to eat berries in the forest.
When we emerged on a glassy-smooth beach, we were fortunate it was a Thursday morning. Every Thursday during the hiking season, the local Huu-ay-aht First Nations hosts a salmon bake led by the amiable Kevin Peters. We sat down for our second hot, fresh meal on the trail, grateful for the journey that had brought us safely there.
And a couple of hours later, we all boarded the West Coast Trail Express along a long, bumpy logging road, back to our ferries, cars, and planes. We crossed paths with fresh southbound hikers and wished them luck.

Grace, enjoying the mirror-like Pachena Bay beach.

The author happily poses at the end of the WCT.

This app showed me when there were low and high tides, helpfully including a red line to show me where the tide was. Canada uses meters for tides on their maps, so you can change the app to show you meters instead of feet.
Maps and Guidebooks
You'll need a few types of maps and guidebooks, including a tide chart app and trail map (digital or hard copy).
Tide Charts
Because you're walking on the beach for at least half of the trail, knowing the tide times is critical for safety. I tried a few smartphone applications but settled with "Tide Charts" by 7th Gear because I could use it offline, and it visually plotted out high and low tides. Download the Tide Charts app in the App Store (iPhones) or Google Play (Androids).
AllTrails
Most backpackers, including myself, used an offline map on the AllTrails app (here are the northbound and southbound maps) and found it helpful. AllTrails may not be an ideal digital map for every trail, but it worked well for the West Coast Trail, especially in moments when we tried to find an entrance to the forest.
Gaia
If you prefer, there is a Gaia GPS map, which pairs with Garmin and other devices. While we did not meet anyone using the Gaia map on the trail, we expect some backpackers will prefer Gaia.
Official Trail Map
You'll receive a hard-copy version of this excellent paper trail map during orientation, but feel free to download the PDF file before your hike.

Two comically clean-looking hikers grace the cover of the official Parks Canada map of the West Coast Trail. The photo was a laughing point for tired backpackers (none of us looked this fresh).

Getting There
By Plane
The best airport to fly to is Victoria International Airport (YYJ). From there, you can easily take a shuttle to the trailhead. However, YYJ is one of three airports, and I'll list them in order of convenience: YYJ, YVR, and SEA. See the "By Ferry" and "Bus and Shuttle Services" sections below for more info.
Victoria International Airport (YYJ)
YYJ is the most convenient airport, mainly if you're hiking northbound. Flying here means you don't have to take a B.C. Ferries trip, one less thing to worry about before your hike. Multiple airlines serve this airport, like Air Canada and WestJet. U.S. travelers can fly with Alaska Airlines or United Airlines. YYJ is a 35-minute drive to Victoria city, from where you’ll take a shuttle to the trailhead.
Time from Victoria city to the southern trailhead (Gordon River): 2.5 hours by bus.
Time from Victoria city to the northern trailhead (Pachena Bay): 5.75 hours by bus.
Vancouver International Airport (YVR)
You'll find multiple flights per day landing in YVR. Numerous airlines fly from the US to Vancouver, so U.S. travelers will have the most options for flight times and departure cities. Once in Vancouver, you'll need to travel to one of the two ferry terminals and take a 2-hour ferry to Vancouver Island (see "By Ferry" below). Including more travel steps is riskier for lost bags and canceled flights or sailings, so this is a less preferable airport.
Travel time from Vancouver city to the southern trailhead: 5.5 hours. Up to a 1-hour drive to the ferry, a 2-hour ferry to Nanaimo or Victoria, then a 2.5-hour bus to Pachena Bay or Gordon River.
Time from Vancouver city to northern trailhead: 6.5-8 hours.
Via Nanaimo city: A 1-hour drive to the ferry, a 2-hour ferry, then a 3.5-hour bus to Pachena Bay.
Via Victoria city: A 30-minute drive to the ferry, a 2-hour ferry, then a 5.75-hour bus to Pachena Bay.
Remember that if you're landing at YVR, you'll need at least one hour to get to the ferry terminal. The day's last ferry typically departs at 9:00 or 10:00 p.m., so arriving at least two days before your permit is wise.
Seattle-Tacoma International Airport (SEA)
Seattle-Tacoma International Airport is a convenient airport for U.S.-based travelers. SEA airport is a 20-minute drive from Seattle, where you can travel to Victoria by ferry (see "By Ferry" below).
Travel time from Seattle city to the southern trailhead: 5.5 hours. Up to a 1-hour drive to the ferry, a 2.75-hour ferry to Victoria, then a 2.5-hour bus to Gordon River.
Travel time from Seattle city to the northern trailhead: 5.5 hours. Up to a 1-hour drive to the ferry, a 2.75-hour ferry to Victoria, then a 5.75-hour bus to Pachena Bay.
If you're traveling via Port Angeles, add at least 2 hours to your trip from SEA airport.
Note: TSA may not allow you to fly with some items in your carry-on luggage, like trekking poles and tent stakes. So you may need to check your bag, which is a risk since you'll need it for the hike. To avoid this risk, I flew with a carry-on and rented gear when I landed in Canada with West Coast Gear, a Victoria-based company.
By Ferry
Ferries include B.C. Ferries, Victoria Clipper, and Black Ball Ferry. The most convenient ferry is B.C. Ferries between Tsawwassen (Vancouver) and Victoria, offering the most sailings. Seattle ferries — Victoria Clipper and Black Ball — are the least suitable because they have fewer sailings and add up to 3 hours to your trip.
From each ferry terminal, you will still need to drive or shuttle by car to the northern or southern trailhead (see “By Car” and “Bus and Shuttle Services” sections below).
First, remember that each city has 2 terminals:
Vancouver: Horseshoe Bay and Tsawwassen (they're 60 kilometers apart).
Nanaimo: Duke Point and Departure Bay (they're 20 kilometers apart).
Victoria: Swartz Bay for BC Ferries and Belleville for Seattle-region ferries (they're 30 kilometers apart).
Plan your terminals accordingly because you may need to plan your parking or arrange a shuttle pickup or dropoff.
BC Ferries to or from Vancouver:
Tsawwassen terminal:
To and from Victoria (Swartz Bay):
1 hour, 35 minutes nonstop ferry
8-12 sailings per day
In Victoria, about 2 hours to or from the southern trailhead.
In Victoria, at least 4.5 hours to or from the northern trailhead.
To and from Nanaimo (Duke Point):
2 hours nonstop ferry
6-8 sailings per day
In Nanaimo, about 2 hours to or from the southern trailhead.
In Nanaimo, about 3 hours to or from the northern trailhead.
Horseshoe Bay terminal:
1 hour, 40 minutes nonstop ferry to and from Nanaimo (Departure Bay)
7 sailings per day
In Nanaimo, about 2 hours to or from the southern trailhead.
In Nanaimo, about 3 hours to or from the northern trailhead.
Ferries to or from greater Seattle:
Clipper Ferry (no cars):
Leaves to and from Pier 69 in downtown Seattle
2 hours, 45 minutes nonstop ferry to and from Victoria
1 sailing per day
In Victoria, about 2 hours to or from the southern trailhead.
In Victoria, at least 4.5 hours from the northern trailhead.
Black Ball Ferry:
Leaves to and from Port Angeles, a 2.5-hour drive from Seattle
1 hour, 30 minutes nonstop ferry to and from Victoria
2 sailings per day
In Victoria, about 2 hours to or from the southern trailhead.
In Victoria, at least 4.5 hours from the northern trailhead.
By Car
If you rent a car, start from Victoria and drive to Gordon River, the southern terminus. Park there, hike, then take the shuttle from towns near the northern terminus: Pachena Bay or Nitinaht Village. While you can caravan with friends and do two-car parking, driving is difficult on logging roads, and taking the shuttle is best (see "Bus and Shuttle Services" below).
Driving from Victoria to Gordon River (southern terminus):
Driving from Victoria to Gordon River is uncomplicated because it is a relatively quick, fully-paved road (see the Google Maps route). If you're leaving from Vancouver, take BC Ferries from Tsawwassen to Swartz Bay (book in advance). This route will save you 3-4 hours of driving, which can be a mercy if you're planning to return directly to Vancouver after your hike. There will be at least one hour without cell phone reception, so download an offline map before your trip.
Travel Time: 2 hours from Victoria city.
Pachena Bay Directions (northern terminus):
There are two driving options, from Nanaimo (via Port Alberni) or Victoria (via Lake Cowichan); see driving directions and maps here. All routes are long. For instance, your course could take up to 6 hours between Pachena Bay and Victoria.
Going to or from Pachena Bay features the longest, dustiest gravel roads, with little signage and hours without cell phone reception. Download an offline map and take an old-fashioned map book for good measure. Always allow logging trucks the right of way, and pull over when you see one. If you do take this route, bring a spare tire and know how to change a flat. We recommend getting a shuttle instead.
Travel Time: 4-6 hours from Nanaimo or Victoria cities.
Nitinaht Village Directions (mid-point terminus):
There are two driving options, from Victoria or Nanaimo; see driving directions and maps here. Both routes may take up to 5 hours because these are unpaved gravel roads, often without signage. There is no cell phone service, so download an offline map first. Allow logging trucks the right of way and prepare to fix a flat tire. We recommend getting a shuttle to or from Nitinaht instead. Either way, get ready for a dusty drive.
Travel Time: 5 hours from Nanaimo or Victoria cities.

Bus and Shuttle Services
There's only one shuttle you can take to WCT. Fortunately, it's fantastic. The West Coast Trail Express, or the "Trail Bus," provides service between Victoria, Nanaimo, and the trailheads. Considering the logging roads' condition and the gasoline price in Canada (more expensive than in the U.S.), the bus is an excellent decision.
In addition, I enjoyed the friendly, helpful shuttle staff. One staff member called me from Canada (it's expensive to do that) when I had questions about the rental gear. And one of the drivers gave me a last-minute lift to Bamfield, a town with a shopping mart near Pachena Bay.
The Trail Bus is very flexible with departure dates:
If you end your hike early or up to two days late, you will be offered the first available seats on the bus before those passengers who did not make a reservation. [This rule] does not guarantee seats will be available. Passengers with reservations come first, priority seating comes second, and walk-ons come last.
The Trail Bus works with several other transportation groups. For example, if you enter or exit Nitinaht Village, another group will drive you out of the village, where the Trail Bus will pick you up. Similarly, I paid for a connecting bus from outside Nanaimo to the Departure Bay ferry terminal; the Trail Bus dropped me off, and a driver taxied me to the ferry terminal.
Arriving in Canada
Travel with a valid passport and check to see if you need a visa (U.S. citizens don't). For more information, visit Travel.gc.ca.
HIKER HOSTELS AND OTHER ISLAND LODGING
If you’re arriving from Seattle or Vancouver, it’s prudent to come a day or two before your hike in case a ferry is canceled. If you need a place to stay on the island, here are a few options:
Victoria: Many WCT hikers (myself included) stay at Ocean Island Inn Backpackers Suites, an affordable European-style hostel only a 12-minute walk from the West Coast Trail Express pickup spot. Ocean Island is centrally-located downtown and has free dinner and breakfast, laundry machines, and room lockers that fit backpacks.
There are over 20 other hotels, hostels, and BnBs within half a mile of the West Coast Trail Express pickup (721 Douglas Street, Victoria).
Nanaimo: Budget backpackers will appreciate the Hostelling International Painted Turtle Guesthouse, a 10-minute bus ride from the Departure Bay terminal, which you can travel to via ferry from Vancouver’s Horseshoe Bay. The Painted Turtle is one block away from the ocean, with coin laundry and free luggage storage.
There are a couple other places to stay within a mile of the BC Ferries terminal, which is also the West Coast Trail Express pickup (Google Maps).

Trailheads
There are three trailheads on the WCT: Gordon River in the south, Pachena Bay in the north, and Nitinaht Narrows in the middle.
Gordon River
This is the southern terminus, where you can stay at a campground adjacent to the park office. There is an eco-tourism town nearby called Port Renfrew. Victoria is also a couple of hours away by car. If you start here, the southern end is the most technical and slowest part of the trail, and it gets (a little) easier the further north you walk.
Pachena Bay
This is the northern terminus, where you can stay at a campground nearby. You can also visit or stay nearby in Bamfield, a small fishing tourism town. For hikers starting here, the advantage is that the first two days will have less elevation gain and will be a smoother trek.
Nitinaht Narrows
This mid-section trailhead is a fantastic way to section-hike the WCT in 2-5 days. Go north from Nitinaht Narrows and exit at Pachena Bay for a 2-3 day trek that bypasses the treacherous southern end.
You can also enter via Pachena Bay and exit at Nitinaht Narrows in 2-3 days. Having hiked the entire trail, I believe this second option is a more comfortable journey. The nearest village is the Native community of Nitinaht Village.
Favorite Restaurant
One of my favorite post-trip experiences was the salmon bake at Pachena Bay; we were the first hikers that day to have a plate of freshly-grilled salmon, the perfect way to end the trail. A few hours later, I enjoyed a hearty meal aboard the BC Ferries to Vancouver at the Coastal Cafe.
What I Wish I Had Done After My Trip

After exiting the north end of the WCT, I hitched a ride to the nearby community Bamfield (population: 179). I wandered the town, picked up some snacks, and hitchhiked back to the trailhead, where I took the Trail Bus out.
However, I regretted not extending my visit, especially after I spoke with Kevin Peters, one of the WCT trail guardians. Kevin told me about Kiix̣in, the only traditional First Nations village in the area, home to the Huu-Ay-Aht people. So, I would encourage you to consider extending your journey by a day to stay in Bamfield and enjoy a Kiix̣in tour. Here’s a list of lodging in Bamfield.

Regulations
There are 15 designated campsites on WCT, and you should follow Leave No Trace Ethics and practice “low-impact camping.” You should not camp outside these sites; Parks Canada warns that the “forest environment is sensitive to damage.”
Hammocking is permitted though uncommon, as most campsites are on the beachfront.
Respect that you walk past the private property of First Nations people and that their houses, villages, and cultural artifacts should be left untouched.
Use a stove and minimize fires. Fires are often prohibited in late summer.
Support safe water by using composting outhouses provided at all campgrounds.
If you must poop during your hike, Parks Canada recommends that you dig a hole 7 inches deep, at least 100 feet away from water sources and off the trail. You should bury your waste and pack out any toilet paper.
Parks Canada recommends washing in the ocean.
Pack it in and out, and do not leave trash in the food cache lockers.
There should be at most one person on the ladders at any time.
In the rare case of a tsunami, move immediately to higher ground, where you may see tsunami evacuation routes marked at most campgrounds.
Parks Canada staff provide directions on what to do in an emergency and how to call for an evacuation. For instance, each hiking group is responsible for helping any injured hikers in their party.
You may not fish or harvest fish, shellfish, or plants. You may take human-made objects you find (like glass balls).
Camp on the beach above the high-tide line.
There are no dogs allowed on the trail.
The group size must be limited to 10 people or less.
At the end of your hike, you must register your exit by speaking with a ranger or dropping off your permit in the after-hours drop box.

Food Planning
Plan to pack 6-9 days of food, depending on the weather forecast and your hiking speed. Remember that if it rains heavily, you may need to wait for an extra day or more at your campsite, so always check the forecast. For a 7-day trek, I packed 7 days of food and extra snacks.
There are no resupply stops, and there is only one place to buy food on the trail: at the Crab Shack floating restaurant at Nitinaht Narrows. However, I wouldn’t recommend buying food staples here. Save your money for the memorable plate of fresh crab and halibut.
The West Coast Trail is a "no-harvest zone." You aren't allowed to fish or collect shellfish, berries, or plants on the trail. Don't even consider eating shellfish like clams or mussels, which can be toxic or deadly.
Water Planning
Water is everywhere around you on the trail, but only some of it is drinkable. Every campground had a nearby water source: a creek or a pond. So, it's best to plan to fill your water at campgrounds. Walk upstream for less contaminated water, and filter or boil it.
There were a few trail sections where hikers ran low on water:
Between Cribs Creek and Nitinat Narrows, about 6 miles and 4 hours of hiking
Between Nitinat Narrows and Tsusiat Falls, about 4.5 miles and 3.5 hours of hiking
Between Thrasher Campground and Owen Point Beach Access A (beach route), about 3 miles and 4.5 hours of hiking
Bears and Food Storage
There are no grizzly bears on Vancouver Island, only black bears. Still, proper food precautions are required by Parks Canada.
If you're used to hiking with a heavy bear can, you'll be relieved to know that bear boxes—also known as "bear caches" or "food caches"—are ubiquitous in British Columbia. Even at the busiest campsites like Thrasher Cove, I could always find space for my smelly items, as each camp had 1-3 boxes.
However, you can also hang your food in a bag. WildSafeBC.com recommends hanging food at least 13 feet (four meters) off the ground and 10 feet (3 meters) from the nearest tree trunk. Each WCT campsite had one or more food poles to hang bear bags. If you plan to hang your food, we strongly recommend investing in one of the many dedicated bear bag kits on the market, which simplify the process. Alternatively, we recommend an Ursack bear-proof bag.
Finally, bear canisters are considered an alternative to bear boxes and bags, but on my hike, I never saw anyone use one. Read more about in our review of the BearVault BV One bear canister here.
Variations (that Don't Require a Year of Planning)
Sometimes you don't have several months to plan a hike, so if you've missed the window for reserving the whole West Coast Trail, you have the following two options:
Hiking the Juan de Fuca Trail (no reservations required)
Section-hiking the West Coast Trail to or from Nitinaht Village
Juan de Fuca Trail
The Juan de Fuca Trail is a popular 29-mile (47-kilometer) backpacking trail with almost the same terrain. The Juan de Fuca is a fantastic alternative to the West Coast Trail for the following people:
Backpackers who want to hike for 3-5 days
Backpackers who want to go during the off-season (between October and April)
Last-minute backpackers
Backpackers who want to avoid the permit system
Surfers who want an alternative to Tofino to experience big-wave winter surfing in Canada's surfing capital
All sites are first-come-first-serve, and backcountry permits cost CDN $18 per person per night. You can reserve a permit online or show up and pay in cash at the trailhead.

On Camping.BCParks.ca, select "Backcountry" and "Backcountry Registration" to reserve a Juan de Fuca permit.
2. Section-Hiking the West Coast Trail from Nitanaht
Those who insist on seeing the West Coast Trail may be surprised to note that there are almost always permits from Nitinaht Village. Starting from Nitinaht is an excellent alternative for the following West Coast Trail hikers:
Backpackers who didn't get a permit for their preferred dates and still want to go
Backpackers who want to hike for 2-5 days
Backpackers who want to avoid the dangerous southern sections of the trail
Last-minute backpackers
For a sample 3- and 5-day itinerary, visit this Parks Canada site.
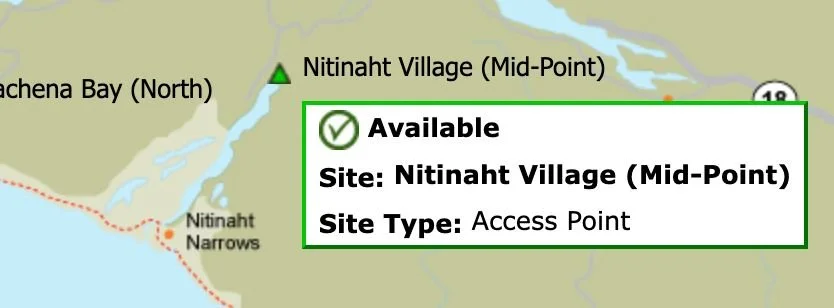
A frequent sight on Parks Canada (Reservation.pc.gc.ca): available entries at Nitinaht.
Gear Rentals
Renting gear is straightforward through West Coast Gear, a Victoria-based company that rents everything from bear spray to surfboards. If you'd lost your bag, you could rent a backpack, tent, sleeping bag, kitchen set, satellite communicator, and more. All you'd need to do is bring your clothing and food.

The best thing about this gear rental company is that you can pick up the gear in person for free—great for trekkers driving from Victoria—or pay CDN $5-$10 to pick up or drop off the equipment from the Trail Bus ($5 per trip). I rented trekking poles and bought a fuel canister, and the driver had them waiting for me on my first bus ride.

GEAR CHOICES

As an aspiring ultralight backpacker, I was happy when my backpack weighed 27 pounds (12 kilograms), including seven days of food. Below, I've listed my tent, backpack, quilt, cooking system, and water purifier.
Tent
I used a now discontinued tent, similar to the Six Moon Designs Lunar Duo, which weighs 45 ounces (1275 grams). I have used it in multiple weather conditions, including strong winds and rain, which is the most you can ask of a tent on the West Coast Trail. For something similar, see our Best Backpacking Tents guide.
Tarp
I used an inexpensive 7-by-10-foot waterproof tarp, a couple of stakes, and a 50-foot-long utility rope that I cut into five 10-foot-long pieces. The tarp can be placed over the tent for extra protection against the rain. Altogether, the tarp, rope, and stakes weigh 14.5 ounces (412 grams). As a first-time tarp user, I’m sure I could have done better (a larger tarp, for starters), but everything stayed dry! For something similar with more protection, see our Best Ultralight Tents guide.
Backpack
I used the Zpacks Arc Haul 60L Backpack. This backpack is ultralight, environmentally friendly, waterproof, and colorful. It weighs 21.6 ounces (638 grams) and is lined with waterproof material. Zpacks is a rare outdoor company that uses a bio-based Dyneema, which uses a sustainable fiber with a lower carbon footprint than nylon. It’s a winner in our guide to Best Lightweight Backpacking Backpacks. If you want something lighter, see our Best Running Packs and Fastpacks guide.
Backpacking Quilt
I used the Enlightened Equipment Enigma Quilt.
This customized quilt is warm and lightweight; it weighs 24 ounces (680 grams) and is rated for 10° F (-12° C). It is made with Responsible Down Standard (RDS) down feathers. The traditional advice is to select synthetic instead of down bags for backpacking in wet conditions. However, my quilt kept me warm and dried quickly in soggy conditions. See our Best Ultralight Backpacking Quilts guide for more information.
Cooking System
Stove: I used the Jetboil Zip stove. I've used the same budget-friendly workhorse stove since 2015, and it's been beneficial in windy, high-altitude settings. It weighs 12 ounces (340 grams). For more recommendations, see our guide to Best Backpacking Stoves.
Fuel: On a one-week trek like the WCT, only one (13-ounce, 368-gram) MSR fuel canister is necessary. The canister fuels a daily oatmeal breakfast, an afternoon cup of coffee, a hot dinner, and a makeshift hot water bottle at night.
Bowl/Cup: I cook and eat everything in my Jetboil. However, I pack an insulated cup to drink my coffee each evening.
Utensils: The Light My Fire titanium spork is a one-stop utensil (0.6 ounces; 19 grams).
Clean-Up: Campsuds and a small sponge.
Water FILTER OR Purifier
I used the Katadyn BeFree 1-liter filter bottle. For a few years, I've used this ultralight-friendly filter, which weighs only 2 ounces (56 grams). It’s a winner in our Best Water Filters and Purifiers for Backpacking guide.
Issues: I've always noticed and lived with the common problem of pinprick holes. However, on the WCT, even with a new replacement filter, my bottle started to drip so slowly that it was nearly unusable. I ended up boiling my water and borrowed my trail friends' filters. I can confirm you always need backup water purification (like iodine or chlorine tablets).
While I would have recommended BeFree in past years, I noticed that this issue had happened a couple of times on backpacking trips (both times with new filters), and I am hesitant to recommend taking a BeFree bottle without backup purification.
What to Wear
What you wear is critical on a backpacking trip, particularly to a damp, muddy location like the West Coast Trail, where getting wet is a certainty. I've listed my wearables—shoes, headlamp, and clothing—below.
Shoes
I wore Altra Lone Peak Trail Running Shoes with Altra Trail Gaiters. This pairing is an excellent setup for California Sierra hiking, which is dry and rocky. It's lightweight at 18 ounces (510 grams). For more information, see our Best Women’s Trail Running Shoes story and Best Men’s Trail Running Shoes guide.
However, my shoes and socks were soaked almost daily on the WCT. Meanwhile, my trail friends would walk through calf-high ocean water and emerge dry. So, I'd recommend hikers on the WCT invest in a pair of waterproof boots or hiking shoes and knee-high or mid-calf waterproof gaiters; I saw hikers wearing Merrell Moab waterproof boots and Rab Kangri GTX tall gaiters. See our in-depth review of the Merrell Moab for more info.
Headlamp
I took the Petzl Tikkina Headlamp, which is functional and affordable. It’s a winner in our guide to Best Headlamps.
Clothing
Here are the clothing items from the trip, which weighed 6 pounds (just under 100 ounces) altogether. I wore 1-2 pounds of this weight each day:
Rain Jacket Shell (1): Marmot Mitre Peak Jacket. This bright, multicolored jacket is made of 3-layer Gore-Tex, keeping me dry during rainfall. See our guide to Best Lightweight Rain Jackets for more recommendations.
Down Jacket (1): REI Co-op 650 Down Jacket. It kept me quite warm. See our guide to Best Down Jackets, where the 650 Down Jacket is a winner.
Sun Hat (1): Sunday Afternoons Ultra Adventure Hat, which I've worn regularly on hikes since writing a Treeline review of sun hats.
Hiking Pants (1): Athleta Trekkie North Jogger, which I featured in my guide to Best Women’s Hiking Pants. Though I wished I had brought a darker color of pants (so many dirt and algae stains!), the pants were lightweight, flexible, and excellent for hoisting up over a muddy mangle of exposed roots. For men’s hiking pants, see our guide to best men’s hiking pants.
Hiking Shirts (2): Two quick-drying shirts, one wool-blend long-sleeved shirt, and the other a synthetic t-shirt. Both were excellent choices as the synthetic material dried quickly, and the wool blend kept me warm on cold mornings. See our Best Men’s Hiking Shirts guide for recommendations.
Camp / Sleep Clothes: A pair of merino wool tights and this Helly Hansen LIFA Merino Midweight Base Layer Hoodie. See our guide to Best Women’s Baselayer Bottoms and Best Men’s Long Underwear for more info.
Cold-Weather Hat (1): Montbell Climaplus Knit Ear Warmer Cap. This lightweight fleece cap keeps the head and ears toasty.
Gloves (1): For long hikes, it's best to wear gloves (I like the REI sun gloves). On the WCT, quick-drying material is best.
Sports Bra (1): Ortovox Rock-n-Wool Sports Bra. This soft, lightweight merino wool dries quickly and stays stink-free.
Underwear (3). See our Best Men’s Hiking Underwear and Best Women’s Hiking Underwear guides for recommendations.
Socks (3). If you like something thinner, we have more ideas in our Best Running Socks guide.
Things I brought but didn’t wear:
Rain pants: The rain jacket effectively kept me dry. See our Best Rain Pants guide for more recommendations.
Things others brought but I didn't:
Swimsuit: I swam in my underwear and a sports bra while some trail friends changed into the bikinis they had packed. For some, this may be an excellent idea.
Other Backpacking Essentials
Satellite Communicator: Garmin inReach Mini with an additional Premium plan for unlimited messages with loved ones. You can read our in-depth review of the Garmin InReach Mini 2 here.
First Aid Kit: Antibacterial ointment, bandages, medical tape, ibuprofen, an antihistamine for allergic reactions, tweezers, safety pins, and a mini Swiss Army knife.
Toiletries: Toothbrush, toothpaste, deodorant, vitamins, tampons, chapstick, and lotion.
Bathroom Kit: A backpacker’s trowel, backcountry bidet, one roll of toilet paper, and antiseptic wipes. The trowel was unnecessary; there are well-maintained outhouses at each campground.
Sun Protection: Sunscreen tube and sunscreen face stick. See our guides to the Best Body Sunscreen and Best Face Sunscreen for more recommendations.
Electronics: Smartphone (doubled as a camera), fitness watch, headphones, and an Anker power bank.
Comfort Items: A small journal and pencil. A book, Finding the Mother Tree (Bookshop.org | Amazon).
Other Items: Matches, bug spray, passport, and cash. I needed them all except the spray (surprisingly few bugs).
Things others brought but I didn't:
Bear Spray / Bear Horn: I might have if this was grizzly territory (there are only black bears on this part of the island). Read more about bear safety on BCParks.ca. Note that if coming from the US, you cannot bring bear spray into Canada, but you can rent it from West Coast Gear.
Food and Storage
When backpacking on the West Coast Trail, you carry a week's worth of food and only stop once for a hot meal (at the unparalleled Crab Shack). I focused on eating at least 2,000 calories and 60-80 grams of protein daily. And I stored it all in a bear bag.
Food
See our guide to Best Freeze Dried Backpacking Meals for some of our favorites.
Here’s what I carried:
AlpineAire Foods Spicy African Peanut Stew. This stew was one of the most delicious backpacking meals I've had in years. It's even vegetarian/vegan-friendly.
Maxim Mocha Gold Coffee Mix (also available at Korean supermarkets). Hands down the best three-in-one instant coffee mix, and at 23 cents per packet, it's also one of the cheapest.
Nongskim Kimchi Noodle Soup Cup (also available at Korean supermarkets). I added a packet of StarKist Tuna Creations Thai Chili Style for a spicy, protein-dense dinner.
Verb's Energy Bars. These bars are delicious, caffeinated, and taste like cake!
Jabson's Chikki Peanut Crush (available at Indian supermarkets). This energy bar contains peanuts, almonds, pistachios, and cardamom. It’s high-protein and low-sugar.
Bakerly's French Pancakes To-Go! I opted for two mildly-sweet pancakes with chevre cheese for quick lunches.
Food Storage
Bear cans are not required anywhere on the WCT, but bear bags are, so I brought this Zpacks bear bagging kit and could easily fit seven days of food in the bag.
Other Resources
West Coast Trail Hiker Preparation Guide (Parks Canada)
West Coast Trail, beautiful British Columbia (a Facebook group). With over 20,000 members, this is an active public discussion group about all things WCT.
"West Coast Trail guardians keep the cultural history of the iconic trek alive" (Capital Daily, September 7, 2022). This excellent article features interviews with First Nations Canadians who take care of the trail.
"A Victorian’s guide to hiking the West Coast Trail" (Capital Daily, August 24, 2022). A fantastic, concise recap of a week on the WCT.
"How not to die on the West Coast Trail" (CBC News, June 7, 2016). The darkly funny article is about the dangers of the trail, with a concise recap of the author's hike.
"Walking the wild coast: territory, belonging and tourism on the West Coast Trail" (University of British Columbia, 2020). If you're open to reading a 200-word doctoral ethnographic dissertation, you'll learn about Canadian identity, the concept of "wilderness," and the history of indigenous people and this national park.
“Island of the Sea Wolves” (Netflix, 2022). This wildlife documentary focuses on Vancouver Island animals like eagles, bears, and wolves.


