Solo Backpacking: Guide for Adventuring Alone
Home > Learn Skills
Published February 3, 2024
Solo backpacking is fun, stimulating, empowering, exciting, and yes, it’s SAFE! You might be incredulous right now, thinking, “solo backpacking is dangerous!” I don’t blame you because that’s the message we hear on repeat on social media and in the news. You might even hear it from people in your life who are well-meaning, such as your parents, family, friends, or maybe even from other outdoors folks.
It’s unfortunate that there is a lot of misinformation in the world about the safety of solo backpacking, and it often gets repeated and recycled as facts. I’m here to help you break through the myths, empower you with knowledge, alleviate the fear, and help you open up your access to the world of solo backpacking!
Whether you’re an experienced backpacker who hits the trail with others or you’re brand new to the concept of backpacking, this guide offers information, strategies, and insights that anyone can use to expand your solo journeys. You, too, can be a competent, independent, empowered solo backpacker!
We create reader-supported, objective gear reviews independently selected by our editors. This story may contain affiliate links, which help fund our website. When you click on the links to purchase gear, we may get a commission — without costing you an extra cent. Thank you for supporting our work and mission of outdoor coverage for every body! Learn more.
FIRST STEPS
The first step to solo backpacking is acknowledging that you have the capacity and ability to learn everything you need in order to do it. It doesn’t matter your gender identity, age, ethnicity, or experience level; anyone can learn the necessary skills and acquire the necessary gear to start solo backpacking. Once you know what to bring, how to use it, and where to go, the rest is a breeze!
If personal safety is a concern, as it often is for women, femme, BIPOC, and LGBTQ+ communities, keep reading because I’m going to share some simple and practical self-defense strategies that can help you manage that fear as well. You have everything you need on your body to be able to protect yourself, problem solve, and manage uncomfortable situations. (Check out my series Outdoor Defense for more on that!)
The second step to solo backpacking is to gather the information you need to set out on your first trip. Even though the rule of thumb for backpacking (even if you’re with others) is to make sure you have everything you need so that you don’t have to borrow from someone else, that is even more crucial when you’re solo. Unless you run into someone on the trail who has the item you need, if you forget to pack something, or if the gear malfunctions, you’ll be on your own. With some advance planning, you can ensure you have what you need, including a backup plan if something goes awry. I highly recommend the Backpacking Badass Program by She Dreams of Alpine, who specializes in helping women+ become confident solo backpackers!
Alright, let’s tread deeper into what you need to get started.
PLANNING YOUR SOLO BACKPACKING TRIP

Nicole solo camping in Big Pines. View from a tent. Photo by Nicole Snell
RESEARCHING DESTINATIONS
If you are brand new to solo backpacking, I’d suggest doing a trail you know or have done before so there are fewer variables for you to be concerned with. If you are brand new to backpacking, I recommend finding a trail that has some amenities so that your first time out is a bit more comfortable and allows you the time and space to get used to being out on the trail solo. Some things to keep in mind when searching for a good beginner backpacking site are: an established campground, pit toilets, water source (human-made or natural), and a short/easy hike in.
Before I do a solo backpacking trip (or any solo trip!), I make sure to research the current conditions on the trail and call the ranger to verify. I want to know if there are any trail hazards (fallen trees, washed-out trails, late-season snow, etc.), fire restrictions, and if the water sources are still running (important in summer hikes when springs start to dry up). I also make sure I have a paper map and an electronic map and familiarize myself with both before I head out. I also leave my backpacking plans with at least 1 person, including information such as: how long I’ll be gone, the trail name, my campsite, what color my tent is, and my GPS/PLB contact info.
CHOOSING A DESTINATION THAT SUITS YOUR EXPERIENCE LEVEL
When choosing a place for solo backpacking, it’s important to research the area and conditions to make sure it is within your skillset to hike/backpack there. For instance, if the trail you want to do is going to be covered in snow and you have no snow hiking experience or gear, it is best to choose another trail or time of year that matches your ability level.
For example, I recently took a friend on her first backpacking trip, and although she has gone car camping numerous times, she was very nervous about the thought of being 100% self-sufficient with only her backpack. Instead of taking her deep into the backcountry for her first time, I opted for a beginner-friendly trail and campsite. The hike in was 1.5 miles with minimal elevation gain, and the established first come-first serve campsite had 2 flushing toilets, a sink with running water, and a spigot for potable water. This gave her the opportunity to get comfortable with the basics of hiking in with gear, setting up her tent, cooking food on her stove, and being far enough away from the car that she felt “in the wilderness.” And then she didn’t have to tackle the other less glamorous (but arguably more fun) aspects of backpacking, i.e.: digging catholes, finding and filtering water, scoping out a durable campsite, etc.
Your first solo backpacking trip can be one night on a trail near your home, and that would be a great intro to build up your confidence. If you can do a solo backpacking trip for 1 night, you can do one for any length of time! It all comes down to planning, gear (and resupplies), and conditioning. You can start small and work your way up if you enjoy it. My friend Sonja Lind reminded me recently that “no matter the conditions, it’s going to be good no matter what because it's the outdoors.”
CREATING A REALISTIC ITINERARY
When planning your trip, decide how many days you can realistically do and map out your route. You want to ensure that you are estimating a sustainable pace and that you have backup plans in case there are unexpected conditions or delays. For instance, keep in mind an alternate place you can camp if you can’t make it to your planned spot. That way, you’re not trying to figure it out at the moment. It’s also a good idea to carry at least 1 extra day’s worth of food in case you have to spend more time on the trail than anticipated. In solo backpacking, just like in life in general, we plan for the worst and hope for the best. Know that unexpected circumstances will more than likely arise and that it’s all part of the adventure. Having a plan to deal with them is the best way to be prepared.
PLANNING FOR EMERGENCIES
We always hope that we don’t run into any emergencies on the trail, but it’s important to know what to do if it happens. I highly recommend taking a wilderness survival and first aid class, which will offer you skills and training to handle some common emergencies. Have a reliable satellite messenger or personal locator beacon (PLB) (such as a Garmin inReach Mini 2) so that you can communicate with Search and Rescue (SAR) or loved ones in the case of an emergency or unplanned detour. Also, be sure to bring a first aid kit and know how to use everything in it!
BACKPACKING TRIP ESSENTIALS AND PACKING LIST
LIGHTWEIGHT GEAR
Backpacking does tend to be more expensive than hiking or car camping since lightweight gear is pricier and necessary to make a trip accessible. One of the most common mistakes with beginning backpackers is carrying too much weight. This is even more common with solo backpacking since you might feel inclined to have more extra items as “back-up” since you’ll be on your own. However, you can still carry lightweight gear and have some well thought out redundancies without having a pack that’s too heavy. Some lightweight gear you’ll need for your trip includes:
Backpack (the lighter the better, so you can allocate more weight for the gear you’ll pack)
Tent + footprint
Sleeping pad
Camp pillow
Sleeping bag
Sleeping bag liner (optional)
Cooking system: stove, pot, gas canister, matches or lighter, long spoon
Other lightweight gear considerations are:

Clothing (1 outfit for hiking and 1 for sleeping plus 2-3 pairs of socks and underwear, depending on the length of your trip). You may also want to pack gloves and a warm hat if it will be cold.
Food. Pack at least 1 extra day of food. Don’t forget your condiments like salt, pepper, sugar, etc.
Bear can/food storage. You may not need this depending on where you’re hiking, but research the trail in advance.
Water you’ll start the trail with. I like to start with 1-2L even when I know I can fill up fairly quickly on the trail.
Water filter. I bring 2 (Katadyn and Sawyer Squeeze), so I always have a backup.
Toiletries, e.g., deodorant, toothpaste, face wash, lotion, coconut oil, sunscreen, chapstick, personal medicine, body wash wipes or Dr. Bronners, microfiber towel, etc. Transfer toiletry items into smaller containers or packaging where possible because “travel size” items are often packaged in plastic that adds ounces and weight.
Microfiber eyeglass cleaner (I wear glasses, so this is essential!)
MULTI-FUNCTIONAL ITEMS

Mini Nalgene bottle
Bug net (mostly for summer trips)
Microspikes (only if there is snow/ice)
Antibacterial gel
Blister covers/moleskin
Duct tape
Battery backup (They have some that are solar powered, but for trips up to 4 days, I use a lightweight battery backup without the solar option)
Charging cables
BATHROOM KIT
Trowel
WAG Bags (may be necessary depending on the location). See our guide to best WAG bags and human waste bags for more recommendations.
P-Style (this is my go to for #1 on the trail)
Kula Cloth (optional for those who squat to pee)
Bidet (I use the “Culo Clean”) with plastic water bottle. See our guide to best backcountry bidets for more recommendations.
Toilet paper (just in case)
Quart Ziploc bag (to pack out any toilet paper or wipes)
SAFETY AND NAVIGATION TOOLS
Map & compass (and know how to use them!)
GPS or personal locator beacon (PLB) such as a Garmin inReach, etc.
Electrolytes
Headlamp
Emergency whistle (audible rescue device)
Signal mirror (visual rescue device)
Paracord bracelet (bright color)
Matches/lighter (depending on conditions)
Multitool (I carry a Victorinox that includes a saw, knife, screwdriver, tweezers, can opener, and toothpick)
First aid kit: bandaids, antibacterial wipes, tweezers, ace bandage, gauze pads.
Complete Sample Gear Checklist
| GEAR | OUR PICKS | MORE OPTIONS |
|---|---|---|
| Pack, Shelter, Sleeping | ||
| Backpack | Six Moon Designs Swift X | Best Lightweight Backpacks |
| Waterproof Pack Liner | Six Moon Designs Pack Liner | |
| Shelter | Six Moon Designs Skyscape Trekker | Best Backpacking Tents |
| Tent Stakes x 7 | MSR Groundhog Stakes |
SAFETY PRECAUTIONS
INFORMING OTHERS ABOUT YOUR ITINERARY
As I mentioned earlier, it’s best practice to let someone know about your itinerary and plans so that in the event of an emergency, it’s easier to get help to your location. At a minimum, tell them:
when you're leaving
where you're parked
what trail(s) you'll be on
when you expect to return
what your gear looks like (send them a photo)
For many backpacking trails, there is an option to register your itinerary and gear colors and types with the rangers as well.
EMERGENCY COMMUNICATION DEVICES

Since most backpacking happens on trails with little to no cell service, having an emergency communication device in addition to your cell phone is recommended. A device like the Garmin inReach Mini 2 is small and lightweight and uses satellites in orbit to communicate with the outside world. It can be connected via Bluetooth to your phone, which makes texting much easier since the screen on the Garmin is very small. You can keep in touch with friends or family along the way, and they can watch your progress or see your location (depending on your subscription level). It also comes with an SOS button that will connect you to Search and Rescue (SAR) in the event of a wilderness emergency (you must have a subscription plan).
FAMILIARIZING YOURSELF WITH LOCAL CUSTOMS AND REGULATIONS
I’ve been traveling, hiking, and backpacking around the world, and part of the research process is to make sure you’re familiar with local laws, customs, and regulations. A surefire way to ruin a trip is to carry a prohibited item and get caught or unintentionally offend the person trying to help you by making an inappropriate gesture. The rules and norms from your home country (or even state) may not apply, so learning the standards for your destination location can help you have a successful trip.
TRUSTING YOUR INSTINCTS AND PRACTICING SITUATIONAL AWARENESS
Trusting your intuition and harnessing your situational awareness are the two foundations of safety that I talk about at length in my solo hiking safety programs. If you feel like something is weird or not right in a given situation, trust that feeling! Your intuition is designed to protect you from danger, and the best way to honor your intuition is to listen to it. Even if the feeling doesn’t match what you’re seeing, it’s important to trust our bodies vs. trying to talk ourselves out of the feeling.
Noticing what’s going on around you is not only a great safety practice, but it can help you enjoy your backpacking trip! I use my awareness on every trip, and it has helped me spot rare animals, find springs that were not on the map, and take a moment to stare in awe at a view I wouldn’t have noticed if I hadn’t stopped and looked around. We don’t have to think of awareness as something that makes us hyper-vigilant or tense. Instead, think of awareness as “a conscious acknowledgment of your surroundings.” From a safety standpoint, awareness allows us to focus on potential issues and give ourselves the space to start the problem-solving process. From there, we move on to the response phase of handling the potential situation. Harness your awareness as one of the first tools for your safety while solo backpacking!
SELF-DEFENSE EDUCATION FOR THE TRAILS
Let’s call out the elephant in the room. Many folks have a fear of solo backpacking because they are afraid for their personal safety. They may feel that if they are backpacking alone, they are at increased risk from potential human predators or that if they do encounter a dangerous person/situation/animal, they won’t be able to protect themselves. Luckily, neither of those things is based on research or facts. In reality, hiking solo is not inherently more dangerous than any other activity, AND you are fully capable of defending yourself while solo on the trail if you need to!
I teach people around the world how to manage their safety and respond to uncomfortable or threatening encounters. I also have a YouTube series called Outdoor Defense, where I combine my love of solo hiking with my passion for self-defense education to help people harness the power inside of them.
You don’t have to follow an arbitrary list of do’s and don’ts (like “don’t hike solo,” or “make sure you carry a gun,” etc.) or carry a bunch of self-defense tools/weapons to be safe. I don’t advocate for, nor do I recommend, self-defense tools or weapons. Instead, I advocate for education and training. It’s irresponsible to oversimplify personal safety by recommending that people carry tool XYZ without highlighting the importance of training with that tool, and how that is directly related to its effectiveness.
If you are hiking in grizzly bear country, it is best practice to carry bear spray. But it’s also crucial to know how to use it and to prioritize prevention/avoidance strategies to minimize your chances of encountering a bear. Some backpackers prefer to carry bear spray in black bear country as well. The rule of thumb is always that you must know how to use the device you’re carrying, and you must have it readily available so it can be deployed quickly in an emergency. It's also important to check local regulations regarding bear spray – some places, such as Yosemite National Park, prohibit bear spray.
As a violence prevention expert with over 10 years of experience, I aim to provide people with the facts to make an informed decision about their safety, dismantle fear-based myths, and empower them with the knowledge that they can rely on themselves for their safety. You don’t have to wait for someone else to protect you or rely on something external. You are your own best protector! Your body is a weapon, and you have everything you need right now (including your voice and your mind) to de-escalate and respond to a wide variety of situations.
Imagine how much of the outdoors (and beyond) could open up for you if you could reduce your fear and replace it with knowledge and empowerment about the verbal and physical options available for self-protection. If fear is holding you back, I highly recommend taking an empowerment-based self-defense class that focuses on outdoor safety/scenarios. I believe that when we are empowered to live our lives freely and confidently, there is no limit to what we can do. And solo backpacking is the ultimate way to claim our freedom, autonomy, independence, and self-efficacy!
SOLO BACKPACKING SKILLS

Nicole backpacking near Kearsarge Pass. Photo by Sonja Lind
NAVIGATION AND MAP READING
I have taken over 8 hours of instruction on map and compass reading, and I still can’t take a bearing while out on the trail with any kind of accuracy! I say this because although it is advisable to know how to read a map and compass, the reality is that many of us who are backpacking aren’t pros at it. But when you are out on the trails solo, you have no one to rely on but yourself for navigation, so you want to make sure you can avoid getting lost. Using a map & compass is a perishable skill, meaning that if you don’t use it often, you forget it. I suggest that before you go on a backpacking trip that you refresh your skills and practice so that you’ll be better able to do it out on the trails if your electronic navigation device fails. Navigation aside, learning how to read a basic map is a crucial skill and can be easier to practice.
GPS devices and electronic maps such as Far Out, Gaia, and AllTrails have made navigation much easier and more accessible. If you’re backpacking on a well-known trail that is marked well, you likely won’t need to use a map and compass at all (I haven’t) and will be able to get by using your electronic device and/or your own senses. Familiarizing yourself with the trail in advance and reading recent reviews of trail conditions can be a big help when it comes to navigating on your own on a solo backpacking trip.

NAVIGATING WITHOUT TECHNOLOGY
We are often completely reliant on our technology, but we have to also be prepared to navigate without it. If your phone dies, breaks, gets lost, or some other mishap befalls you, your only option may be to navigate with a paper map & compass. You may also have to rely on your memory of your route and visual markers along the way if you are backtracking. This is where your awareness can really help!
BASIC FIRST AID
BUILDING A COMPREHENSIVE FIRST AID KIT
Your first aid kid can be comprehensive and light. I carry the basics such as bandaids, antibiotic cream/wipes, tweezers, gauze pads, tourniquet, and ace bandages. You want to be prepared for the most common injuries or emergencies. For more serious injuries, the ultimate goal is to stabilize yourself enough to get off trail for more advanced help, or to wait out SAR.
KNOWING BASIC WILDERNESS FIRST AID TECHNIQUES
I highly recommend taking a wilderness survival or first aid class, or at the very least, becoming familiar with some basic first aid techniques. When you are solo backpacking, you are your own first responder. You won’t be able to rely on anyone else. Knowing your options for handling various emergencies is part of being prepared. And these skills can not only help you when you need it, but you might be able to help a fellow backpacker if they are in trouble. Some basic techniques that would be helpful to learn are: how to stop bleeding, how to apply a tourniquet, how to splint a break/wound, how to irrigate a wound, and how to bandage a wound.
CAMPSITE SELECTION AND SETUP

Nicole solo backpacking in Mount San Jacinto State Park and Wilderness. Photo by Nicole Snell
LEAVE NO TRACE PRINCIPLES
Everyone deserves the opportunity to explore the outdoors and enjoy the beauty of nature, and that means making sure we are responsible stewards of the indigenous land we are recreating on. Leave No Trace has developed several principles to help make sure that we are leaving the land better than we found it and limiting our impact so future generations can enjoy the outdoors. The 7 Leave No Trace Principles are:
Plan Ahead and Prepare
Travel & Camp on Durable Surfaces
Dispose of Waste Properly
Leave What You Find (does not apply to indigenous communities who rely on the land to sustain them and who have a symbiotic relationship in which the land relies on them as well.)
Minimize Campfire Impacts
Respect Wildlife
Be Considerate of Others
SETTING UP A SAFE AND COMFORTABLE CAMPSITE
Now that you’ve found your perfect campsite, it’s time to set up your tent and get ready to enjoy the fruits of your hiking labor! Find a spot that is durable (flat, solid ground, often an established campsite that is gravel, dirt, or dry grasses and at least 200ft from lakes and streams). Clear away any large rocks or pieces of branches that could damage your tent or be uncomfortable to lay on. Look up and around to make sure you’re not setting up a tent under a tree with dead branches that could fall, or near any insect holes, etc. Also, be mindful if you’re camping in a well-known area that you want to give space to other campers and not crowd their sites.
Next, lay out your tent footprint, set up your tent, unpack your sleeping pad and sleeping bag, and put them in your tent. After that is done, I like to search for a bathroom spot so I know exactly where to go when nature calls. Then I find the nearest water source and make sure my supply is topped off before it gets dark. You’ll want to have enough to drink, to cook with, for coffee/tea (if that’s your thing), and for your bidet (if you’re using one). I prefer not to have to refilter water in the middle of the night.
MENTAL AND EMOTIONAL PREPAREDNESS

Nicole filtering water in Mount San Jacinto State Park and Wilderness. Photo by Nicole Snell
DEVELOPING A POSITIVE MINDSET
Say it with me, “I can be a solo backpacker.” Great, now say that to yourself several times a day! No one is born with all the know-how to take a solo backpacking trip, everyone has learned from somewhere and improved the more they’ve done it. Everyone who has ever solo backpacked had a “first solo backpacking trip.” That means you can too! Thinking positively is a key step to getting out on the trail solo. That can mean unlearning some of the unhelpful messaging we’ve heard out in the world or comments we’ve read under people’s posts.
The fact is that solo backpacking is not any more dangerous than backpacking with a group or walking in your own neighborhood. The difference is that you are 100% self-sufficient when you’re solo, which can be such an empowering experience. Heading off into the wilderness by yourself, knowing you have the knowledge, gear, and problem-solving skills to manage your experience and safety in the outdoors can be transformative. If you can do this, what else can you do? The answer is, anything you want! You are fully capable of backpacking solo and managing your safety along the way.
MANAGING SOLITUDE AND POTENTIAL LONELINESS
I have always loved being in solitude. In fact, as a child, I loved playing all by myself in my room with my toys, my music, and my imagination. When it comes to solo backpacking, solo camping, or solo hiking, I still feel completely content to relish the experience and don’t feel any loneliness along the way. I understand that is not everyone’s experience, and loneliness can be an uncomfortable emotion you experience while solo backpacking.
Some ways to manage those feelings is to have daily check-ins with someone back home so you can look forward to sharing what you’ve seen on the trail along the way. Journaling is another great way to check in with yourself and your feelings and allow yourself the space to process them. Loneliness and boredom can sometimes be synonymous, so having activities ready to go to keep yourself occupied can help. Here are some suggestions:
Download some of your favorite playlists and have a dance party! (use headphones so as not to disturb others around you!)
Download some of your favorite shows or movies and watch them when night falls.
Meditation and breathing exercises
Bird watching
Read a book (on your phone is ideal, so you don’t have to bring extra weight)
Sketchbook
Star gazing app
Exploring around your campsite
Rock hunting (find cool looking rocks, but leave them where they are)
BUILDING CONFIDENCE IN DECISION-MAKING
The first time we do anything, we often aren’t very good at it. There is a saying that I love, which guides just about all of the adventures and hobbies I’ve picked up in my life: “You have to be willing to be bad at something in order to be good at it.” This applies to solo backpacking too. Your first time out on your own, you might second guess yourself. You might judge yourself too harshly about a decision you’ve made. You might feel like you’re doing everything wrong. I want you to take a deep breath. You’ve got this.
EMBRACING THE CHALLENGES AS OPPORTUNITIES FOR PERSONAL GROWTH
We build confidence through each experience we have and through each failure. The beauty of solo backpacking is that you get to make your own decisions. That can also lead to some anxiety for those of us who like getting a second opinion, are indecisive, or want to “run this by” someone else. Challenges that are unexpected or frustrating may arise. But trust yourself that you have the knowledge to get through the experience. Any hiccup that happens along the way is an opportunity to learn for the next time and will only increase your confidence.
While backpacking and hiking, I’ve gotten lost, taken the wrong trail, had food poisoning, encountered animals, twisted my ankle, had too much weight in my pack, brought a faulty water filter, and sprung a leak in my sleeping pad. I’ve made it through all of those and came out on the other side with more skills and a calmer outlook I can use on the next challenge. You’re adding it to your experience toolkit. Confidence isn’t an end point or a summit. Confidence is a journey. Wherever you are on this journey is valid, and each experience you have will build onto that foundation and lead to personal growth. You’ve got this!
BUDGETING FOR SOLO BACKPACKING

ESTIMATING TRIP COSTS
Gear purchase is the most cost-prohibitive aspect of backpacking. But once you’ve acquired your gear (see below), you’ll have the freedom to go on a trip anytime you want, especially since now you know how to backpack solo, and you don’t have to wait on anyone’s schedule!
TRANSPORTATION
Here are some considerations:
How far away is the trail you want to do?
Do you have to rent a car?
If you use your own car, what will gas cost?
Rental cars average around $80/day plus gas and insurance (if you choose to purchase the extra plan). Gas varies around the US, so you can check out a website like Gas Buddy to estimate how much gas will cost you for your trip.
ACCOMODATIONS (IF APPLICABLE)
If you had to drive far to get to your trailhead, you may need to stay the night somewhere and then start your trail in the morning. You may need to stay in a hotel, or if there is trailhead campsite available or nearby, you can plan on that. Budget hotels range in price from $30-80/night (give or take, depending on your location).
CAMPSITES AND PERMITS
Backpacking often requires permits for the trail you plan to use, plus a daily fee for the campsite you plan to stay at. Prices vary, so check with the ranger for the location you are considering for accurate pricing. To give you an idea of a budget, I solo backpacked to San Jacinto Peak last year, and the costs were:
Wilderness Permit: $5
Campsite Fee: $0 (included with the permit)
Parking: $5 Adventure Pass (or free if you have a National Parks Pass)
Other wilderness areas or national forests charge substantially more for permits or campsites. For instance, if you want to backpack the Trans Catalina Trail, each campsite is around $96/night, and you’ll likely need at least 3 nights to complete the trail (4 or 5 is standard). Plus, you can purchase a locker at different sites that will provide firewood and water at around $25/each. Then the ferry ride round trip is around $90. As you can see, that is significantly more than my San Jacinto trip, so the price can and will fluctuate depending on your desired location.
FOOD AND SUPPLIES

This will vary depending on the length of your trip and how much food you need for each day. I typically purchase backpacking meals (most come as 2 servings) and divide them up into Freezer Quart plastic bags so they take up less space. (special thanks to Kaira Haynes for this hack!). I bring enough meals to have a dinner on each day, a breakfast on each day, and then an assortment of 3 snacks a day that end up being my lunch. Bring foods that make you happy and are packed with enough macronutrients (protein & carbohydrates) to sustain the calories you’ll burn while backpacking.
Here is what my typical food profile looks like:
Breakfast: Peak Refuel Mountain Berry Granola- $8.95/2 servings
Sometimes I’ll eat flour tortillas with an almond butter packet instead
Snacks/Lunch: Protein bars, chips, oreo cookies, pre-made almond butter/jelly sandwich, trail mix, dried mango, fig bars, etc.- ~$20-$30
Dinner: GOOD TO-GO Mushroom Risotto, and I add salt and freeze dried veggies.- $15.50/2 servings
TIPS FOR SAVING MONEY WHILE SOLO BACKPACKING
Borrowing gear is the #1 money-saving tip for solo backpacking. Next would be to rent gear from an outfitter like REI Co-op, Outdoors Geek, etc. If you can purchase used items online, through gear swap websites, or social media, that is also a great way to save money. I slowly built up my backpacking kit over the course of a few years and kept an eye out for sales. Once you have your gear, it should last you for several years with proper care and usage.
Reusable items are also a great way to save money, and can help make your trip more sustainable for the environment. Reusing plastic bags and transferring toiletries from your existing bottles at home into smaller containers vs. buying travel-sized versions can save you quite a bit, too.
CONNECTING WITH OTHER SOLO BACKPACKERS
UTILIZING ONLINE FORUMS AND COMMUNITIES

Learning from others and connecting with a community provides us the space to grow and expand as solo backpackers! Trading tips, sharing stories, and swapping gear reviews can help you feel more confident as a solo backpacker and help you acquire even more knowledge for future trips. There are many online groups and forums where you can connect with other solo backpackers from around the world.
ATTENDING GROUP EVENTS OR MEETUPS
If you want to get your feet wet backpacking with a group before you embark on a solo trip, attending a group event or meet-up is a great way to do that. You might also get recommendations on backpacking trails to try.
BENEFITS OF SOLO BACKPACKING WITH OCCASIONAL GROUP INTERACTIONS
When we are solo backpacking, it is rare that we never run into anyone else on the trail. Whether we are passing a day hiker, trail runner, or another backpacker, we are likely to see and interact with others along the way. Solo backpacking is a great way to experience the outdoors on your terms, on your schedule, at your own pace, and with your own goals in mind. However, you can also benefit from occasional group interactions along the way or on a separate trip. These can introduce you to new types of gear, lesser-known trails, interesting tips, and potential new friends to enjoy other trips with. We may be solo, but we’re not ever completely alone.
ENVIRONMENTAL RESPONSIBILITY
RESPONSIBLE WASTE DISPOSAL
You may find yourself on a trail that requires you to carry out your solid waste (poop) in a WAG bag. When you do your trail research, check about waste disposal so you’ll know if you need to use one. Although it’s not as glamorous as it sounds, it’s actually pretty easy to do your business in a WAG bag. Watch my video here on how to use one.
WAG bags are used to minimize your impact on the environment in places where solid waste can’t be buried properly, won’t degrade quickly, or is a high-traffic area. Places such as alpine, rocky, or desert environments often require WAG bags for backpackers. You can usually pick them up at the ranger station or trailhead for free.
Whether you use a WAG bag, dig a cathole, or have to go #1, always be sure to do your business at least 200 feet from a trail or water source.
MINIMIZING YOUR IMPACT ON THE ENVIRONMENT
CONCLUSION
I hope I have sparked your curiosity, excitement, and confidence to give solo backpacking a try. There’s no greater feeling of accomplishment than to set out on your own and successfully complete a backpacking trip while being 100% self-sufficient for all your survival needs. May you have many wonderful days on the trail – however you decide to experience them! I want to leave you with my favorite quote, “When we are empowered to live our lives freely and confidently, there is no limit to what we can do!”
ABOUT THE AUTHOR / WHY YOU SHOULD TRUST US

I’m Nicole Snell—a solo hiker, backpacker, international speaker, and the owner of Girls Fight Back, a world-renowned, empowerment-based self-defense company for people of all genders. I travel the world speaking and training groups from all demographics and industries, including college, corporate, military, outdoor groups, conferences, and more, on a variety of personal safety, boundary setting, and empowerment topics. I’m also the creator of Outdoor Defense, my YouTube series that offers practical strategies for building confidence and staying safe while enjoying the outdoors solo.
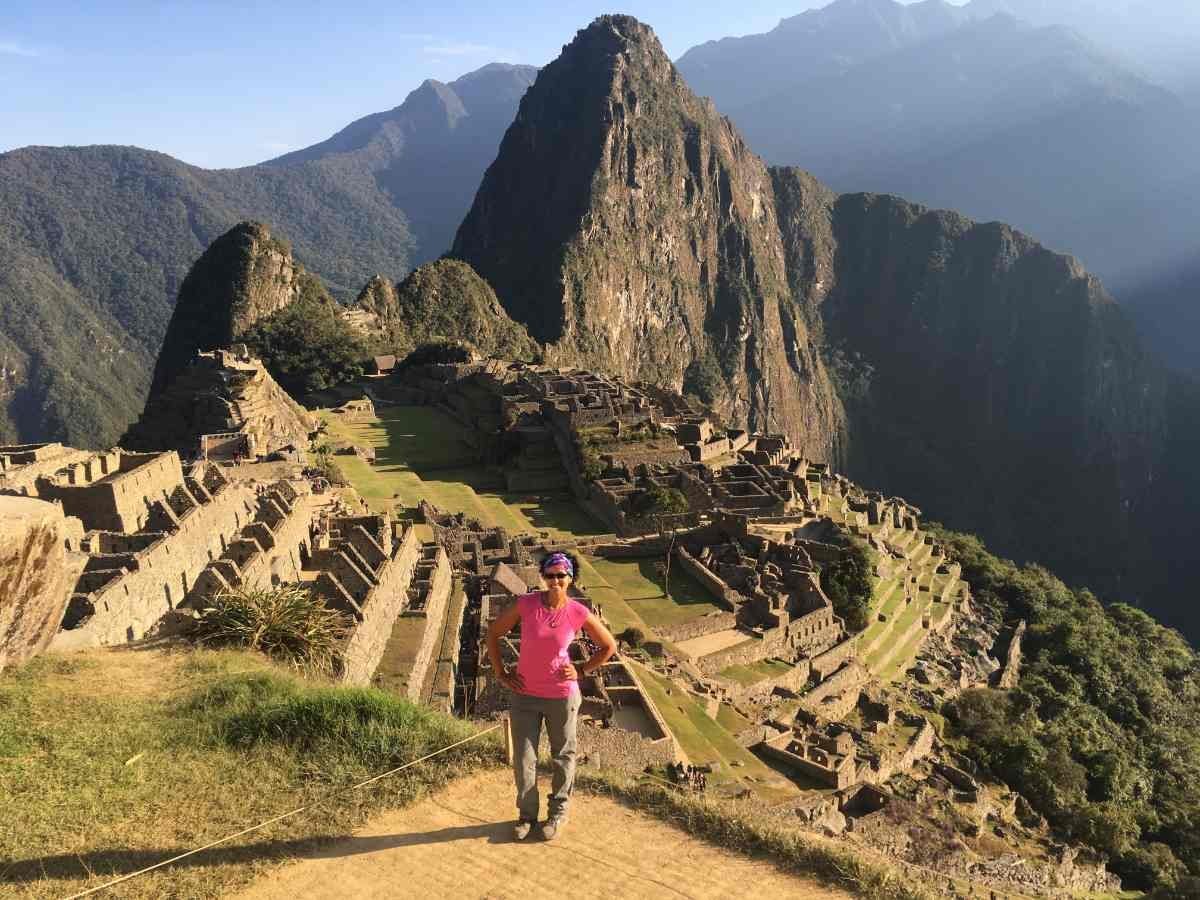
My first ever backpacking trip was the 4-day Inca Trail to Machu Picchu in 2017. I was in Peru for a solo trip, but in order to do the Inca Trail you must join a registered expedition company who have special permits from the government to lead trips there. I was the only Black woman, American, and solo traveler in the group I joined; everyone else knew each other or came as a couple. But that has never stopped me, so I made friends with the other travelers and ended up having the most incredible time with them! I learned so much about backpacking and knew I wanted to do more trips on my own that were self-sufficient (not guided and no porters). This trip opened the floodgates for me to start solo backpacking!
I’m an outspoken advocate for hiking, diversifying the outdoors, and protecting our natural lands. I spent 6 years as a hike leader for Black Girls Trekkin, an LA-based non-profit that focuses on Diversity, Inclusion, Conservation, and Education, and I lead hikes for other non-profits in LA. I’ve worked with a variety of outdoor-based brands, companies, and groups to educate their communities on personal safety and boundaries for the outdoors and beyond. I’ve had the pleasure of working with HOKA, Runner’s World, Strava, Kula Cloth, SheJumps, Explorer Chicks, Outwild, AdventurUS Women, She Dreams of Alpine, and dozens more! I have been a guest on over 40 podcasts, including REI’s podcast Wild Ideas Worth Living, the Nike Trained Podcast, and the Just Trek Podcast. I was a guest speaker at the Wilderness Risk Management Conference (WRMC) Conference in 2021 and the National Recreation and Parks Association (NRPA) Conference in September 2022. I have also been interviewed for my work in outdoor safety and empowerment by the Women’s Health Magazine, Backpacker Magazine, Outside Magazine, Melanin Basecamp, NRPA Magazine, and Spectrum 1 News. In 2020, I won a Webby Award for People’s Voice for Tastemade Travel’s Self Defense for Female Travelers.
From a young age, exploring and hiking have been my passion. I grew up outside Joshua Tree National Park and spent my childhood exploring the nearby desert and connecting with nature.
As an adult, I have continued that passion. I have hiked all over the world, including Japan, New Zealand, Rwanda, South Korea, Scotland, Wales, Andorra, and the infamous 4-Day Inca Trail to Machu Picchu in Peru. In 2022, I summited Mt. Whitney in a 6-day, 5-night section hike along the south end of the Nuumu Poyo.
Over the years of exploring trails and mountains as a solo camper, hiker, and backpacker, I have learned many ways to continue improving my techniques and upgrading my gear when needed. Because of my experiences solo camping and as a safety expert, I can share strategies and information that can help you feel confident solo backpacking and exploring the outdoors without limits!
You can learn more about Nicole Snell on her author page.