Guide to Backpacking the High Sierra Trail
Thru-hike a 60-mile iconic route in the Sierra high country

June 4th, 2026
Home → Trip Guides → Thru-hikes for Working People
The High Sierra Trail is a 60-mile backpacking trip from Crescent Meadow in the Giant Forest in Sequoia National Park to the top of Mt. Whitney (14,505'), the tallest mountain in the Lower 48.
The HST was designed to be the easiest route from west to east across the Great Western Divide, a shorter and less crowded trail than the John Muir Trail.
I've thru-hiked the HST twice, in both directions, and am here to share the tips and tricks that helped me have the best trip possible on this incredible trail.
Distance: 60 miles (72.1 to Whitney Portal)
Days: 5-7
Elevation gain/loss: +15,500/-13,900 feet (one-way including descent on Whitney Portal)
Best season: Mid to late summer
Permits: Required for overnight wilderness travel
Difficulty: Strenuous
Looking for another Sierra thru-hiking trail? Check out our Guide to Backpacking the John Muir Trail.

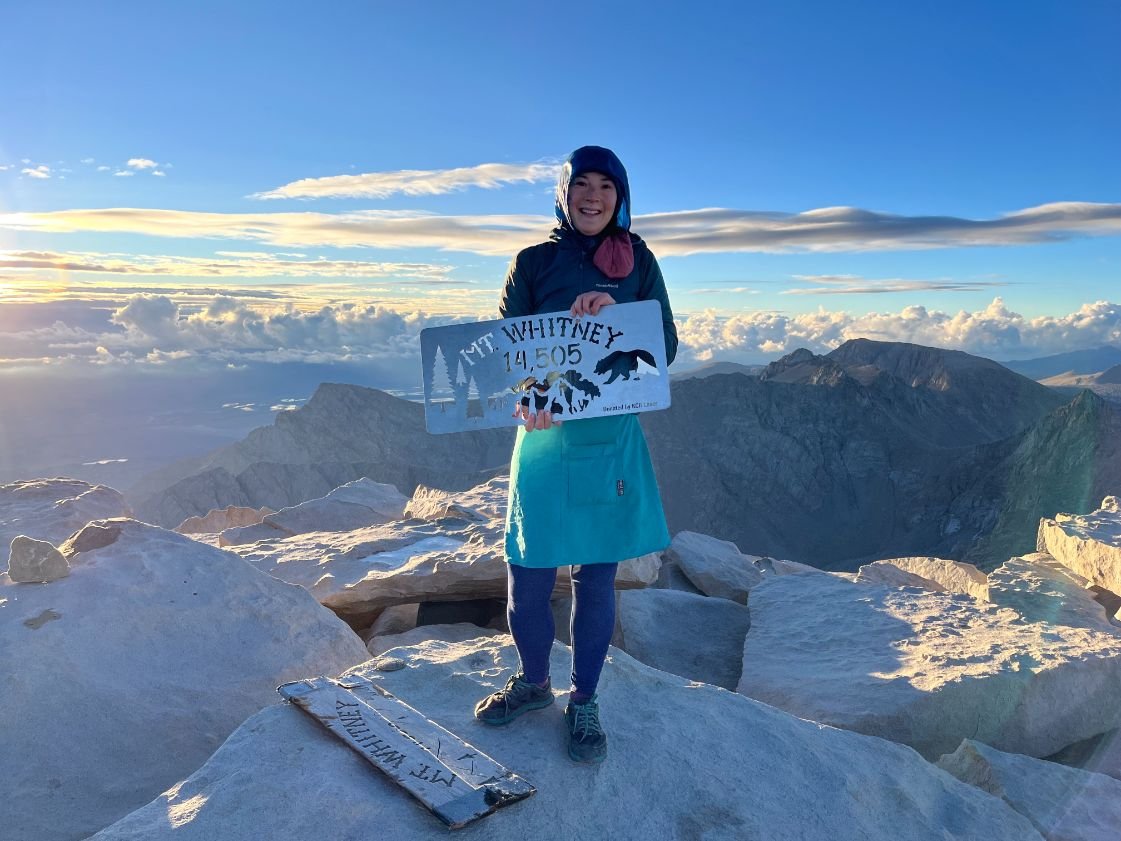
The High Sierra Trail is a west to east hiking trail that ends on Mt. Whitney. Author Liz Thomas stands here at sunrise.
Intro to the High Sierra Trail
The HST takes you from giant sequoia forest through oak and pine to alpine lakes, passes, and meadows. Waterfalls tumble hundreds of feet around you as you climb a white granite valley reminiscent of the smaller, hotel-and-car-free Yosemite Valley. You'll drop by a hot spring along the Kern River, nestled in an ancient cedar forest.
You'll climb through sage along Wallace Creek to reach the high sierra at the John Muir Trail/Pacific Crest Trail in a gnarled foxtail pine forest. The next 13 miles are the same as the JMT (called the Nüümü Poyo Trail), past Crabtree Meadow to Guitar Lake. From there, you ascend Mt Whitney (Tumanguya in the local Paiute language), finishing the trail atop the highest point in the lower 48 states.
Backpackers will appreciate the well-maintained and well-signed trail, plentiful campsites with their pit toilets, permanent bear boxes, and reliable water sources. It travels through more distinct ecosystems than the JMT-sequoia, oak, pine, alpine meadows, cedar, foxtail, and the high Sierra and rocky tundra of Mt Whitney.
In 60 miles, you pack a lot of views and experiences. To call the HST an alternative to the JMT would be to minimize its standing as a world-class trail in its own right.
Gallery of photos


We create reader-supported, objective, independently-selected gear reviews. This story may contain affiliate links, which help fund our website. When you click on the links to purchase gear, we may get a commission — without costing you an extra cent. Thank you for supporting our work and mission of outdoor coverage for every body! Learn more.

The author at the western terminus of the High Sierra Trail at Crescent Meadow. Within the first mile, the hiker will pass many giant sequoias and walk in the forest of the ancients.
Highlights
Views on the way to Kaweah Gap, including alpine lakes, waterfalls, and the surrounding granite monoliths of the Angel's Wings reminiscent of Yosemite Valley
Kern Hot Springs along the Kern River amongst giant cedar trees, with views of Chagoopa Falls and hugged in by granite cliffs on both sides
Finishing atop Mount Whitney and experiencing the beauty of the High Sierra
Well-maintained and well-signed trail, plentiful water sources, impeccable campsites with a pit toilet and bear boxes
Diversity of ecosystems you'll hike, from giant sequoia to alpine tundra
Wildflower and wildlife viewing opportunities, from black bear to pika, marmot, ptarmigan, and native rainbow trout
Art-like trail quality, including a rock tunnel built into the side of a cliff and many catwalk-like sections of trail with steep drop-offs (ok, this may be a challenge for some people who don't like heights)
Camaraderie of fellow HST hikers without the crowds of the John Muir Trail
Challenges
Getting a permit can be difficult
Logistics of transportation to and from the trail
Depending on the time of year, weather, and time of day, bugs may be an issue in some ecosystems. For me, gnats were a bother in the lower oak forest.
Creek crossings may be dangerous depending on the time of year and snow levels
Bear canisters are required to store food, and wag bags are required from Crabtree Meadow along the Mount Whitney Trail to the Whitney Portal trailhead
The 2020 wildfire along the Kern River impacted some of the cedar forest
Altitude can be a challenge, especially for many hikers from Trail Crest (13,645 feet) to Mt. Whitney (14,505 feet)
GEAR LIST
Here is a quick list of the gear and clothing I brought on this hike. For more insight into why I chose these items, read below.
| HIGH SIERRA TRAIL GEAR | OUR PICK | OTHER OPTIONS |
|---|---|---|
| Hardgoods | ||
| Tent | NEMO Hornet Elite OSMO Tent | Best Backpacking Tents Best Ultralight Tents |
| Backpack | Six Moon Designs Swift X 50L Backpack | Best Lightweight Backpacks |
| Sleeping bag | Katabatic Palisade 30F Quilt | Best Backpacking Sleeping Bags Best Backpacking Quilts |
| Sleeping pad | Therm-a-Rest NeoAir XLite NXT Sleeping Pad | Best Sleeping Pads For Backpacking |

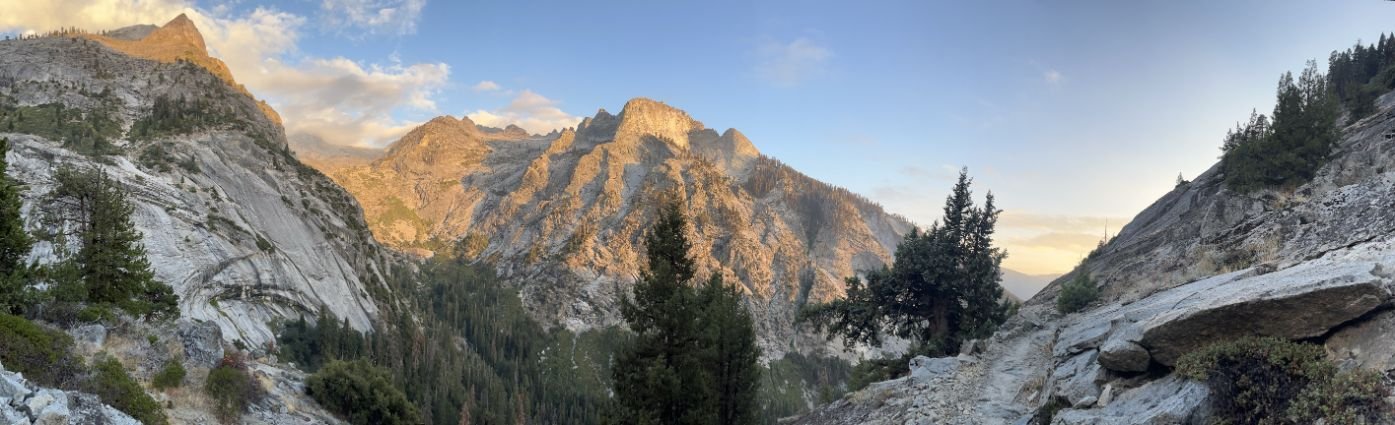
View of the Great Western Divide and Kaweah Range from the climb from Kern River up towards the JMT/PCT.
Best season
The best season is July, August, or early September. The Sierra Nevada range will hold snow into June and sometimes as late as August. Perhaps even more than the JMT, the HST has "catwalk" like sections of trail carved into the side of cliffs with steep drop-offs. Unless you have advanced mountaineering skills, you'll want to wait until those sections have melted out. High snowmelt levels in rushing creeks, notably in the Kern River Valley, can be challenging. In late September and October, snow can fall at any time.

A river crossing near Junction Meadow after a particularly torrential summer storm. Rivers and creeks on the High Sierra Trail can be dangerous after snowmelt. The author crossed on the log shown in the photo above.
Difficulty and skills
Navigation
The HST is a well-marked and well-signed trail with national park-level trail maintenance. Unless there has been a recent storm, you will mostly travel on the trail free of blowdowns.
Rough Terrain/Scrambling/Rock Climbing
The HST has some rocky and steep sections, though no hand-over-hand climbing is required.
Elevation Gain/Elevation Loss
+15,500/-13,900 feet (one-way, including a descent on the Mount Whitney Trail to Whitney Portal)
Snow and River Crossings
In the early or late season, snow and river crossings can be a challenge. Do not attempt the HST in these seasons without the proper skills and experience.

Liz Thomas at the Sentinel, a giant sequoia tree outside of the Giant Forest Museum in Sequoia National Park. In 2022, backpackers picked up their wilderness permits by this tree. The trail starts in the giant sequoias not far from this tree.
Permits
All HST travelers are required to obtain a wilderness permit reservation on recreation.gov.
When do I need a permit for this quota trail?
For 2026, The HST is a quota trail l between May 22nd and September 26th. After September 26th, you can self-register for a permit.
How do I get a permit ONLINE?
The HST is a quota trail, so you'll want to get permits as soon as you know your dates (up to 6 months in advance).
Recreation.gov can be used to make reservations up to 2 weeks before your trip (if you’re looking to pick up a permit from someone who canceled).
While many folks access the High Sierra Trail via the Alta Trail at Wolverton Trailhead, you still need a High Sierra permit to access the High Sierra Trail between Seven Mile Hill and Kaweah Gap. A permit for the Alta Trail is not valid for travel on this segment of the High Sierra Trail.
You can make reservations six months before the start day of your trip. Reservations open online at 7 am Pacific. Be prepared with your itinerary at 7 am sharp. Create your account on recreation.gov ahead of time.
Permits are $15 per party plus $5 per person.
For more info, here are the Sequoia National Park wilderness permit rules.
HOW DO I GET A WALK-UP PERMIT?
You can get a walk-up permit at 1:00 pm sharp the day before your planned trip. Your entire party must be with you. You must get it from the Lodgepole Ranger station during their open hours.
Walk-ups are only available to take-over permits from no-shows.
Walk-ups are available on a first-come, first served basis until none are left.
how do i pick up my HST permit?
You pick up the permit in person at the Lodgepole Ranger Station between 1 pm the day prior, and 10 am on the day of you trip. If you fail to pick it up by 10 am the day of your reservation, the station will cancel it.
However, you can make arrangements for late pick up by calling or email the rangers ahead of time to let them know you plan to get it after 10 am.
There is no “night drop” like on the Mt. Whitney Trail. You must get late permits in person.
CAN I GET A PERMIT IN THE OFF-SEASON?
My favorite HST permit hack is to get a permit outside the quota season. After September 24th, wilderness permits are free, self-issued, and not limited to daily entry quotas. Grab a permit at the nearest permit-issuing station.
Note: if you visit during the off-season, you MUST bring your own bear canister. You cannot rent it from the park. If you need to rent, pick one up from REI in Fresno before you enter the park (NOTE: many REI stores are discontinuing their rental program, so you will want to call ahead to make sure they still offer this service).
Temperatures will be colder this time of year, especially on Mt. Whitney. See our guide to What to wear hiking in the fall for ways to extend your summer backpacking kit into the cooler months.

The trail crosses over the top of this waterfall from Hamilton Lakes. You'll see it from across the valley on the descent to Roaring River bridge, so it's pretty neat to walk across it and look back towards where you came from.
Route summary
The HST starts in ancient giant sequoia trees through ferns, something of a temperate rainforest. You'll gently climb white granite to oak and pine forest. The trail ascends moderately (by Sierra standards) up and along the valley above the Middle Fork of the Kaweah River.
Big views are just a mile or so, looking way out above the Middle Fork canyon. Creeks cross the trail every few miles with campsites with pit toilets and bear boxes at each one. Buck Creek Canyon campsite has a bridge and a swimming hole to cool off.
Just past the ranger station and campground at Bearpaw Meadow, you'll descend through a lush forest reminiscent of the Pacific Northwest to epic vistas looking out at the River Valley. Bearpaw High Sierra Camp operates canvas tent facilities for guests and even sometimes has a chef, so you may be able to get a few supplies there.
Waterfalls tumble hundreds of feet off the sides of the Angel Wings monolith, reminiscent of the white granite of Yosemite Valley. You'll cross the Roaring Fork River over a high bridge with views towards Elizabeth Pass (note there is NO way you can reach the river to get water here!).

The High Sierra Trail has some of the most well-engineered trails in the Sierra, with numerous catwalks and even a tunnel to make the trip feel even more adventurous.
The trail built into the side of a cliff takes you to the top of a waterfall and blue Hamilton Lakes, surrounded by towering cliffs with more waterfalls. This is hands-down one of the best campsites I've seen. Backpackers swim in the lake or even bring packrafts for paddling the water.
You'll climb below the Valhalla cliffs on some of the best-built trail I've seen anywhere, including a rock tunnel built into the side of a cliff. You reach alpine Precipice Lake below Eagle Scout Peak and Mt. Stewart. The climbing becomes gentler as you go through green meadows to Kaweah Gap.
On the other side of the Great Western Divide, the descent is gentler through the alpine forest, and you'll quickly reach treeline in a forest of small pines. There are open views towards the Kaweah Peaks Ridge, where imposing 13,000+ foot peaks loom over the peaceful valley.
At Big Arroyo junction, you'll climb to traverse the slopes of Mt Kaweah with views across the valley towards Black Rock Pass. After reaching a gentle plateau (get water here!), you'll drop gently along Upper Funston meadow. Then, descend via switchbacks from Upper Funston meadow to reach the Kern River.
The Kern River Valley is a relatively low elevation but a remote section of the Sierra. Though several miles of the 9.2-mile Kern Canyon burned in the 2020 wildfire, the old cedars and pines that still exist are magical. Several backpackers I met carried fishing poles to fish for native rainbow trout.

The tub at Kern Hot Springs is right along the river with views of waterfalls and towering cliffs in both directions.
Kern Hot Spring was the highlight of the trip for me. It's a small tub that can fit one (maybe two people who know each other well). There's a warm pool below the main tub that can fit up to 10 people. Nearby is camping in a lush forest, along with bear boxes and a pit toilet.
The gradual ascent to Junction meadow has excellent views of Chagoopa Falls and other waterfalls tumbling off the side of the valley walls. You'll have to ford each of these creeks, but at least there's plenty of water. You'll cross Wallace Creek right above Junction Meadow campsite. Be sure to get water here as there is no on-trail water for several miles of well-graded by relentless climbing up Wallace Creek drainage.
While the map makes it look like the water is near, it is a hundred feet of rough rock above the water. You'll finally get water when the trail crosses Wallace Creek, which can be dicey here during high snowmelt or after rain (but it sure is beautiful to cross under a waterfall).

The view from when the High Sierra Trail joins the JMT among the Foxtail Pines.
You'll reach Wallace Creek at the John Muir Trail/Pacific Crest Trail. Here, the trail will be more crowded. You'll ford Wallace Creek again, and there's a campsite on the other side. The JMT bounces up and down through foxtail pine forest along the gentler lower slopes of Mt Young (at this point, these climbs of hundred feet up and hundred feet down felt annoying). Then, you drop at Crabtree Meadow ranger station for the final ascent to Mt. Whitney.
After Timberline Lake (no camping), the vegetation starts to disappear, and you reach Guitar Lake. Many backpackers use this as a staging area for a night ascent of Mount Whitney. I woke up at 3 am to climb the switchbacks in full moonlight. Most backpackers left their heaviest loads at Trail Crest for a lighter pack for the last two miles along the pinnacles of Whitney. I reached the summit at sunrise, watching the rays pop over the clouds from the highest point in the Lower 48.
The trail officially ends at Mt. Whitney, but you still need to get to a road. The fastest way is 11 miles west down the Mount Whitney Trail to Whitney Portal. You'll pick up anything you left at Trail Crest on your way down.

The view from the climb from Crabtree Meadow to Guitar Lake on the 13 miles where the High Sierra Trail joins the JMT.
Maps and guidebooks
FAROUT GUIDES
FarOut phone app has a guide to the High Sierra Trail. It shows your current location on the map, as well as water, campsites, trail junctions, and more. It has user comments that allow hikers in front of year to update on current conditions including river crossings, whether water is available, or bear activity.
Gaia
I used the Gaia GPS app on my phone. The trail is well-marked and signed, so I didn't need it. Still, I was thrilled to have it when I ascended Kaweah Gap in split pea soup fog that obscured my view more than 20 feet ahead. If you hike the trail when there is still snow at the Gap or other high-elevation areas, you'll also want to track.
Maps
The Tom Harrison Mt. Whitney map covers the entire High Sierra Trail. It even marks where there are campsites with bear boxes. This map is the one that the Park Service rangers use, and it has all the junctions and levels of detail you need for this trip.

The High Sierra Trail is a well-signed and well-maintained trail with impeccable campsites, each with built in bear boxes and toilets.
Getting There
By Plane
You have a few options. Most folks I talked to flew into Bay Area airports: Oakland, San Jose, San Francisco and rented a car to drive to the western terminus in Sequoia National Park.
Fresno Yosemite International Airport (FAT) is the closest airport and was also a popular fly-in option. From the Fresno airport, you can rent a car OR you can take a bus, Lyft, or taxi to Visalia.
Once in Visalia, you can take a $15 round-trip shuttle from Visalia to Sequoia National Park. Plus, unlimited shuttle service inside the Park. The shuttle picks up at hotels all over Visalia.
For hikers walking the HST westbound (which is pretty rare), take the Eastern Sierra Transit bus from Reno to Lone Pine. From there, it's an easy hitchhike to the trailhead at Whitney Portal.
See their Bus Connections for Thru-hikers Page!
By Car
Drive up to the Town of Three Rivers from Visalia to enter the Sequoia National Park Ash Mountain entrance. Continue up on the narrow mountain road past the Foothills Museum to the Giant Forest Museum, 16.4 very windy miles later. From there, take the paved road 2.6 miles to Crescent Meadow (along the way, you even have a chance to drive through a giant sequoia).
Bus and Shuttle Services
There's a $15 round trip shuttle from Visalia to Sequoia National park via the Sequoia Shuttle Bus. Once inside the park, take the free Route 2 bus (the Grey Route) to Crescent Meadow. In-park free shuttles run from 8:00 a.m. - 6:30 p.m. and are entirely ticketless, so simply hop on and off at any stop.
You can also park at the Giant Forest Museum and take the free Route 2 to Crescent Meadow trailhead.
On the return, East Side shuttle can take you from Whitney Portal back to your car at Crescent Meadow. It’s a 6-hour drive; the price was last quoted to me at $125/person for a car of 5 people. For folks who are shuttling, it's best to get together a group of 5 to minimize the price per person.
Alternatively, your return is simple if you took the shuttle from Visalia and don't have a car or rental car parked somewhere. Take the Eastern Sierra Transit bus from Lone Pine to the Reno Tahoe International Airport. From there, you can fly home.

The logistics for the High Sierra Trail are more challenging than some other trails, but worth it. This is the view from near Guitar Lake on the last few miles of the High Sierra Trail to Mt. Whitney.
Logistics
Here are your transportation options for hiking the High Sierra Trail one-way. It's about a 6-hour drive from one trailhead to the other.
Two cars
If multiple people are in your party, have two cars drive to the Mt. Whitney Portal trailhead. Leave a car there. Then have everyone get in the other car and drive to Crescent Meadow in Sequoia. When you're finished hiking, you must drive back to Crescent Meadow to retrieve the other car.
Pay for a shuttle
Drive to Crescent Meadow. When you finish at Whitney Portal, you can hitchhike or pay the East Side shuttle around $800 for up to five people, $80 for a 6th passenger. This shuttle will take you from Whitney Portal to to get back to Crescent Meadow. They also do custom reservations.
Get dropped off and picked up
I met backpackers who road-tripped from the East Coast. One in their party wasn't into backpacking, so they dropped off the hikers at Crescent Meadow and spent the week sightseeing in Yosemite and Tahoe. Then, they picked up the backpackers at Whitney Portal when they finished.
Key swap
I met one party who set up a key swap. If you have another friend who wants to do this hike, have them start at Mount Whitney. Plan to meet halfway through and swap keys (or better yet, make sure you have each other's keys before you start hiking). A strong and fast key swapper can also resupply a slower-moving party.
Public transit both ways
Fly to Fresno and take the V-line bus to Visalia. Take the Sequoia Transit shuttle and Park Service shuttle to Crescent Meadow trailhead. You can take the Eastern Sierra Transit bus to Reno airport when you finish. Note that the Eastern Sierra Transit only operates Monday through Friday.
Drive to Visalia and public transit back
Park in Visalia and take the Sequoia Transit shuttle and Park Service shuttle to Crescent Meadow. When you finish, take the Eastern Sierra Transit bus to Mojave and the Greyhound back to your car in Visalia.
Hybrid two-car/public transit
Do the two-car shuttle, but leave a car in Mojave and a car in Visalia. Take public transit from Visalia to Crescent Meadow. Take the Eastern Sierra Transit back to Mojave. Drive back and get your car in Visalia. This method allows you to start the trail sooner and cuts off about 6 hours of the two-car method, but you'll have to work with transit schedules, so I'm not sure it is worth it, but does avoid some mountain driving if that isn't your thing.
Hike Out-and-back to your car
Hike from Crescent Meadow to Mt. Whitney. Retrace your steps back to your car. I did this and would not advise it for anyone but the strongest hikers, as you'll be going 120 miles without resupply. Warning: If you poop on Mt Whitney, you must carry your used wag bag all the way back to Crescent Meadow. Ask me how I know!
Trailheads
Crescent Meadow trailhead is in Sequoia National Park. Take Crescent Meadow Road right at the Giant Forest Museum and drive 2.7 miles until it deadends at a parking lot. Crescent Meadow is also the trailhead for hikes to Moro Rock and the General Sherman tree, the world's largest tree at 275 feet tall.
Post Trip Favorite Restaurant
For those who end the trail at Whitney Portal, the restaurant at the trailhead is known for giant pancakes and decent burgers. There's nothing quite like finishing the trail and immediately being able to get some hot, real food.
Regulations
Carry a printed and signed version of your permit on your person at all times.
Backpackers must carry a bearproof food canister or use the permanent food storage boxes installed on the campsites.
Dogs are not allowed on trails in the National Park
Follow Leave No Trace Ethics, including packing out all trash (including toilet paper), not building rock cairns, not cutting switchbacks, and camping and pooping at least 100 feet from any water
Group size must be limited to 15 people or less
Firearms and weapons, including bear spray, are prohibited
No fires above 9000 feet in the Hamilton lakes basin (west of the Great Western Divide) or 10,000 feet east of the Great Western Divide. Use existing campfire rings, and don't burn trash. Attend fires and put them out with water at least 30 minutes before leaving.
When at Kern Hot Springs, do not use soap.

Hamilton Lakes is a campsite below Kaweah Gap that is among the most beautiful anywhere. Here it is on a stormy day.
Resupply
There is no resupply available on the High Sierra Trail. However, a fast and strong hiker can resupply you on trail or you can hire a pack train to bring you food if you plan to be on trail for a while.
Bearpaw High Sierra Camp operates canvas tent facilities for guests and even sometimes has a chef. Reservations are required. You may be able to get a glass of lemonade or small snack here, but don’t count on a meal without reservations. It was not operating in the 2022 season.

The high bridge over Roaring Fork River is not a place where you can get water on the High Sierra Trail. Be sure to top off at small springs on the way down between Bearpaw Meadow and the bridge. You've got a climb ahead!
Water Planning
As snow is melting, water can be plentiful early in the season. You’ll find streamlets flowing everywhere.
Later in the season, on-trail water is available about every 3 miles and often every half a mile. Because water is so frequent, it is easy to blow past your last water source for a few miles. If it's around camping time, this can be a bummer. I recommend checking the FarOut phone app and planning around your water and campsites, as it is easy to find yourself before dark caught on a series of switchbacks with no camping and water.
You'll want to be sure to get water at:
Bearpaw Meadow
Big Arroyo junction before the climb (there are a few unnamed creeks along the way as well)
Chagoopa Creek, a mile before the junction with the Moraine Lake trail
Junction Meadow
Wallace Creek at the JMT
Guitar Lake
Bears and Food Storage
Sequoia Kings Canyon National Parks requires that you store smellables, food, and garbage in a bear canister or permanent bear-proof food storage box. I saw a bear in Upper Funston Meadow on my second thru-hike of the HST.
I carried a Bearikade Weekender for 6 days for one person. See REI’s Food Storage story or REI’s Bear Canister story for other bear canister recommendations.
Side Trips
If the weather is good, peak baggers have many options, including Mt Kaweah and other peaks in the Kaweah Peaks ridge, Eagle Scout Peak, or even Mt Muir on the way to Whitney. See RJ Secor's Peaks, Passes, and Trails for more information.
Variations
Moraine Lake
Most backpackers opt to take the alternate to Moraine Lake campsite. It adds 0.2 miles and joins back up with the HST after about 3 miles apart.
Having done both variations, Moraine Lake is way more scenic. It even has a nice campsite next to a white sand swimmable beach and great views of the surrounding mountains.
I toyed with making a semi-loop hike out of this trip by combining the 12,000-foot Colby Pass and Elizabeth Pass. However, the weather didn't cooperate, so I hiked it as an out-and-back over the lower Kaweah Gap. Another alternate I considered was leaving the HST at Big Arroyo Junction and going up.
The FarOut phone app has camping, water, and trail information for this variation.

Ross going through the tunnel on the High Sierra Trail. The JMT doesn't have this kind of trail building.
John Muir Trail vs. High Sierra Trail vs. Sierra High Route
I've thru-hiked the JMT, High Sierra Trail, Sierra High Route, and Southern Sierra High Route. Here are the similarities and differences.
The JMT and HST feel similar in trail and campsite quality. The JMT has more options for camping in unestablished sites. In many spots along the HST, the terrain is so rugged that the established sites often end up being the best bet. The trail building on the HST is often more grand in nature, with rock tunnels and numerous catwalks dynamited into the cliff for a spectacular hiking experience, reminiscent of trails on the north rim of the Grand Canyon. You also get this somewhat in Yosemite Valley on the JMT, but the HST is next level.
The JMT is 211 miles long with 46,000 feet of ascent and 38,000 feet of descent. The HST is 60 miles long with +15,500/-13,900 feet. This means mile for mile, the HST has more elevation gain than the JMT.
The HST generally stays at a lower elevation until the very end. This can be good for slowly acclimating but can make ascending Mount Whitney even more difficult for some hikers.
The JMT has more bail-out options if you were to get injured or have a gear failure. Once you're in on the HST, you're pretty committed, especially with the logistics. On the JMT, often after you climb a pass there is an option to take a side trail to a road. On the HST, Big Arroyo Junction is one of the last spots where you can take a loop trail and turn around to get back to your car (and even then, it's over the 12,172 foot Black Rock Pass). You can read my full John Muir Trail guide here.
As for the Sierra High Route and southern Sierra High Route, it's hard to call either a backpacking trip in the same sense as the John Muir Trail or High Sierra Trail. They are both mostly off trail in extremely rugged terrain. They often require using minor rock climbing skills. About all the four trails/routes have in common with each other is that they are in the Sierra Nevada mountain range and are longer trips. You can learn more in Steve Roper's book (Amazon | Bookshop).
If you want to thru-hike in the Sierra, know that the HST, JMT, and SHR aren’t the only options. Consider the 174-mile long Tahoe Rim Trail, just a few hours north of the JMT. It has no permit quota and is way more beginner-friendly. In fact, it was my first thru-hike and I appreciated the ease of resupply, and milder weather. Plus the TRT logistics are simple: it’s a loop hike, so you can start anyone on the loop and walk back to your car!
Gear Rentals
Fresno has an REI store that offers gear rentals. You can see the full list of what you can rent here. However, if you are hiking one way, you will have to find a way to get the gear back after finishing. NOTE: Many REI stores are discontinuing their rental program. Call ahead to make sure they still offer this option.
The National Park Service and the Sequoia Conservancy offer bear canister rentals. You can pick it up at the Giant Forest museum and return it via mail (a slight additional charge for returning it by mail). Rentals are pretty affordable and subsidized because they want you to have a bear can.

The author on a raining ascent of Kaweah Gap.
Gear SELECTION
TENT
I used the NEMO Hornet Elite OSMO on this trip. As it rained extensively during my trip, I liked the benefits of a lightweight double wall tent to reduce condensation, especially when I had to hunker down for a few hours when the weather was too fierce to keep hiking. The fabric didn't absorb water, which I also appreciated. The semi-free standing system was sturdy and easy to set up in the rain. While technically a 2-person tent, I enjoyed having some extra room to sprawl out while sitting out storms. We liked this tent so much we wrote an entire in-depth review on the NEMO Hornet Elite OSMO. It’s also our Best Lightweight Tent winner in our Best Backpacking Tents guide.
BACKPACK
I used the Six Moon Designs Swift X pack for this trip. The water-resistant X-pack fabric was excellent in the rain. Its carrying capacity and wide top loading system were ideal for fitting my wide bear canister. I also appreciated the vest-harness system for carrying the extra load of the bear canister. We liked this backpack so much we wrote an in-depth review of this backpack. See our Best Backpacking Backpacks guide for more recommendations.
SLEEPING BAG
I used the Katabatic Designs Palisade 35-degree quilt on this trip. In the lower elevations, it was perfect for warm nights. It was warm enough to camp at nearly 12,000 feet at Guitar Lake just before Mt. Whitney. It was a good balance of warmth and weight.
SLEEPING PAD
I used the NeoAir Xlite NXT sleeping pad. It's lightweight, has a high R-value, and has 2.5 inches of cushioning. I carried the short length and wished I had carried the regular length. The Neo Air XLite is a winner in our Best Backpacking Sleeping Pads story.
HEADLAMP
I carried the BioLite Range 500 headlamp. I forgot to bring my power bank, yet the 500 held enough battery for the 6-day trip, even with a fair amount of night hiking in the early morning and evening, as well as a lot of camp set up and break down in the dark. See our recommendations in our Best Headlamps story.
TREKKING POLES
Since the NEMO Hornet Elite OSMO comes with its own poles, I carried a single Gossamer Gear LT 5 trekking pole. This was perfect because I wanted something light because I only use poles on downhills. The LT5 is our ultralight winner in our Best Trekking poles story.
COOKING SYSTEM
I used the PocketRocket Deluxe backpacking stove for this trip. It's lightweight and comes with a piezo lighter, which made it easier for me to roll over and make a cup of coffee in the morning. It's the fast-boil winner in our Best Backpacking Stoves story.
COOKPOT AND SPOON
I used our TOAKS 750 L titanium pot and TOAKS long-handled spoon. It is the Overall Winner in our Best Backpacking Cooking pots story and the spoon is in our Backpacking Essential Accessories story. We like both of them so much that they’re also in our gift guides. It’s amazing how such small things can make such a big difference on a backpacking trip!
WATER PURIFIER
I used the Sawyer Squeeze filter in line with my Platypus Hoser hydration hose system. The Squeeze filters water fast. Using it as an inline system allows me to fill a Platypus bag with dirty water and have it come out clean through the filter as I drink. You can read more in our Best Water Filters and Purifiers for Backpacking.
DITTY BAG
My ditty bag included my Map and Compass, First Aid Kit, lighter, and sunscreen.
POTTY BAG
I also carried a potty trowel and empty dog poop bags to make packing out my toilet paper easier. In addition, the ranger gave me a wag bag to carry out my own human waste from the Mt. Whitney area. You can read more in our Best Human Waste Bags and WAG Bags guide.
UMBRELLA
The High Sierra Trail can be a very sunny route, especially on the switchbacks up to Kaweah Gap. On the other hand, it can be an exposed rainy trail as well. I was very happy for my Montbell umbrella, but if I were to do the HST again, I'd bring a full size umbrella like the Six Moon Designs Carbon Shadow.
What to wear
SHOES OR BOOTS
I wore the Altra Lone Peak trail running shoes for this trip (read our in-depth review of the Lone Peak). They are lightweight yet sturdy enough to handle the rugged terrain. The trail was well-maintained and had no snow, so we felt comfortable wearing these lightweight trail runners on this kind of terrain. The Lone Peaks are our Long Distance Winners in our Best Women’s Trail Running Shoes and Best Men’s Trail Running Shoes.
We definitely saw a lot of backpackers in boots for this trip, especially around the rocky Old Army Pass. If you’d feel more comfortable in boots, check out our Best Hiking Boots story or our Best Lightweight Hiking Boots story.
A nice footwear compromise for this trip would’ve been hiking shoes, which are designed to feel like a trail runner but have stability more like a boot. For more, see our Best Hiking Shoes story (men’s and women’s) for footwear that has more durability and stability than trail runners. Still aren’t sure? See our article on Trail Running Shoes vs. Hiking Shoes.
RAIN SHELL
I carried the Montbell Torrent Flier rain jacket. What I love about this jacket is that it doesn't absorb water or wet- through like other rain jackets and dries incredibly fast. It's just the right balance of high-end waterproofness and being lightweight. As it rained every day of my trip, I wore this jacket a lot during the HST and was very happy this is the jacket I chose. While this isn’t one of the jackets in our Best Lightweight Rain Jackets article, it’s popular with thru-hikers because of its lightweight.
RAIN MITTS AND RAIN GAITERS
I brought the Mountain Laurel Designs eVent rain mitts and eVent Superlight gaiters. These provided extra warmth and waterproofing on my trip's colder and more wet weather days.
SYNTHETIC INSULATED JACKET
Since I knew the weather looked wet for my trip, I brought the Montbell Thermawrap synthetic jacket. It remains warm when wet, holds almost no water when wet, and dries very quickly. It got cold enough that I hiked in the rain with it and was so happy to have chosen this lightweight synthetic puffy layer over a down jacket. The Thermawrap is the ultralight winner in our Best Synthetic Jackets article. If you prefer down for its better warmth to weight ratio, check out our Best Down Jackets guide.
BOTTOMs
I wore a Purple Rain Adventure skirt, which I like for the plentiful pockets. At any time, I carried my lip balm, phone, snacks, or map in my pockets. It dries quickly. One thing I like the most about the skirt is how easy it is to put on or remove tights. As the weather changed, I could seamlessly add or subtract tights from my hiking costume with modesty and speed. I know hiking in skirts is not for everyone, so for more recommendations, see our Best Men's Trail Running Shorts guide, Best Women's Trail Running Shorts guide, Best Men's Hiking Shorts guide, or Best Thru-hiking Shorts guide.
SUN SHIRT
I wore the Ridge Merino Solstice Hoodie. While a merino sun hoodie is often too warm for backpacking in the summer, I wanted it for the cooler weather of my trip in September. The merino stayed warm when wet (and it got wet a lot). I was even surprised how quickly it dried for merino in the dry Sierra air. It wins Best Merino Hoodie in our Best Sunshirts guide.
UNDERWEAR
I wore and carried an extra pair of Uniqlo Airism underwear for use in the hot springs. They dry quickly and are very lightweight.
SOCKS
I wore and brought four pairs of Darn Tough Socks, ideal for the wet weather and creek crossings that made my socks wet every day. I brought two pairs of Darn Tough quarter cushion socks, and one pair of Darn Tough lightweight crew socks.
I saved the quarter cushion socks for big-mile days. I used the lightweight crew on my shorter first and last trip days. I saved the taller lightweight crew socks for sleeping and the colder day up Mt. Whitney. With this rotation, I was able to start each morning with dry socks, one of my greatest pleasures while backpacking. Check our Best Hiking Socks guide for more recommendations.
LONG JOHN BOTTOMS
I wore a pair of Montbell tights, which I still think are the best-fitting, quickest-drying, and lightest tights out there.
WARM HAT
I wore the Montbell Chameece Cap with earwarmers, which dries very quickly, provides a lot of warmth, and is designed to protect the ears. It’s a favorite in our Arizona Trail Gear List.
SUN HAT
I wore the Sunday Afternoons Ultra Adventure Hat. The brim kept the rain out of my eyes and the sun off my face. The cord kept it on my head during severe winds. It's our overall winner in our Best Sun Hats guide.
WARM GLOVES
I wore the Montbell fleece convertible mittens. These are lightweight and very quick drying. For more recommendations on lightweight but warm gloves, see our Best Winter Gloves guide.
About the Author
Liz Thomas is an award-winning Los Angeles-based writer and Editor-in-Chief of Treeline Review. A former Fastest Known Time (FKT) record holder on the Appalachian Trail, Liz came to Treeline Review from New York Times/Wirecutter, the New York Times’ product review site, where she was a staff writer on the outdoor team. She was a guest editor at Backpacker Magazine, a columnist of “Ask a Thru-hiker” and instructor of their online class, Thru-hiking 101. Her first book is Long Trails: Mastering the Art of the Thru-hike. The book was the recipient of the National Outdoor Book Award for Best Instructional Book, and deemed by judges as destined to become the “Bible of the Sport.”
Liz has talked gear on Good Morning America (TV), in The Wall Street Journal, The Guardian, Buzzfeed, Men’s Journal, Women’s Health, Gizmodo, and Outside Magazine. She represented the sport of hiking at President Obama’s Great American Outdoors Initiative. Liz’s keynote speaking engagements have included colleges and universities, including Yale and MIT and on Capitol Hill, the Trust for Public Land, the American Hiking Society, and BikeTexas. You can read more about Liz on her Wikipedia page here!