Cottonwood Lakes Loop Sierra Backpacking Trip Guide
Hike through the iconic High Sierra Backcountry

June 22nd, 2026
Home > Trip Reports > Thru Hikes for Working People
Distance: 19 to 26 miles
Elevation gain/loss: 3901 feet/ -3890 feet
Days: 2 to 5 days
Best season: July to September
Permits: Required
Difficulty: Moderate
Hike by alpine lakes, wildflower-lined streams, and twisted ancient foxtail pine forest straight out of Ansel Adams—under the shadow of 14,000-foot tall Mt. Langley. Although this loop takes you up and over two alpine passes, the elevation gain is relatively moderate because you start at one of the highest elevation trailheads in California. If you’re looking for a Mt. Whitney alternative hike with easier-to-get permits, this loop just south of that famous area gives you a taste of the Sierra high country without the hassle.


We create reader-supported, objective, independently-selected gear reviews. This story may contain affiliate links, which help fund our website. When you click on the links to purchase gear, we may get a commission, without costing you an extra cent. Thank you for supporting our work and mission of outdoor coverage for every body! Learn more.
Highlights
Alpine Lakes and creeks lined with wildflowers
Ansel Adams-esque Twisted Foxtail Pine forests
Starts at a high trailhead (~10,000). This means you can access the alpine country with less climbing and elevation gain than if you started at lower trailheads.
Accessibility—it’s one of the high Sierra’s closest trailheads to Southern California.
Easier-to-get permits than many other Eastern Sierra trailheads
Challenges
Can get crowded on summer weekends
Permits are limited. See below for how to get permits.
Best to time your trip to avoid snow on Old Army Pass and/or mosquitos

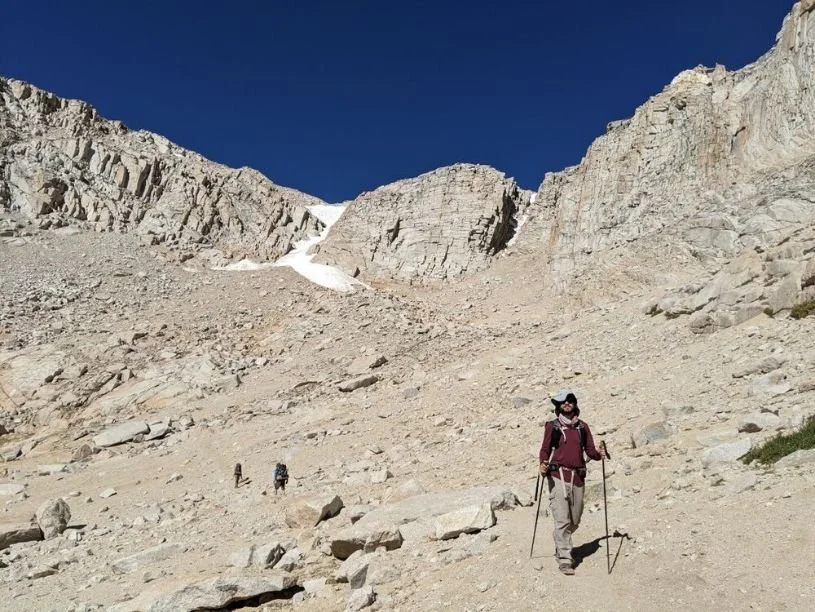
Cottonwood Lake #1 and Old Army Pass on the Cottonwood Lakes Loop. Photo by Liz Thomas
GEAR LIST
Here is a quick list of the gear we brought with us on the Cottonwood Lakes Loop. For more on how we chose the gear we did, skip below.
| COTTONWOOD LAKES LOOP GEAR | OUR PICK(S) | MORE OPTIONS |
|---|---|---|
| Gear | ||
| Shelter | Gossamer Gear The Two | Best Backpacking Tents |
| Backpack | Gossamer Gear Gorilla 50 Gossamer Gear Kumo 36 |
Best Lightweight Backpacks |
| Sleeping bag/ quilt | Feathered Friends Egret 20 (Women's) Feathered Friends Swallow 20 (Men's) |
Best Backpacking Sleeping Bags Best Backpacking Quilts |
| Sleeping pad | Therm-a- Rest NeoAir XLite | Best Sleeping Pads For Backpacking |
when to go to cottonwood lakes
Snow can be a significant obstacle to safely completing this loop, especially around Old Army Pass. Aim to hike after the snow has melted—usually late June or July. If Old Army Pass has snow, New Army Pass is a safer alternative.
August is usually a safe month for snow and may have fewer mosquitoes, though it will be warmer, and not all water sources may be flowing. Check with the ranger station before starting your trip.
Difficulty and Skills
Navigation
Everything is on-trail. However, if there is snow, the trail may be obscured. We recommend using maps (see more below on which maps we recommend) and a compass in addition to a GPS phone mapping app like Gaia GPS. Be sure to preload the base maps for offline version in Gaia before you leave home.
Rough terrain/scrambling
There are sections that are rough and rocky, though none require using your hands. Old Army Pass has some large boulders that have fallen on the trail. There are short detour-use trails around the boulder that will get you back to the switchbacks.
Permits
Permits are available at recreation.gov (select Inyo National Forest Wilderness permits). They can be reserved six months in advance.
To do the route Clockwise
Select Cottonwood Pass Trailhead as your entry point and Cottonwood Lakes Trailhead as your exit point. They are less than half a mile apart and connected by trails, allowing you to hike a complete loop.
To do the route Counter-Clockwise (see Variations)
Select Cottonwood Lakes Trailhead as your entry point and Cottonwood Pass as your exit point.
Cottonwood Pass’s quota is June 1 to September 15 with 40 people/day, 24 ahead of time, and 16 as walk-ups.
Cottonwood Lakes Basin limits overnight use to 60 people/day from May 1-November 1, with 60 reserved for advance permits and the rest as walk-ups.

The Cottonwood Lakes Loop has opportunities for swimming, soaking, and fishing in the Cottonwood Lakes Basin and other lakes along the hike. Photo by Liz Thomas
Trip Description
This trail description is for your reference, but always call the ranger station for the most updated information and checks maps.
From the Cottonwood Pass trailhead, follow signs to a 4-way signed junction ⅓ of a mile in. Your return route from Cottonwood Lakes is on the right. Stay straight through shaded, relatively flat trail across the expansive Horseshoe Meadow—a green and inviting flat area rare in the Sierra. After 3.7 miles and a few short switchbacks, you’ll reach the Pacific Crest Trail. Stay on the PCT as it contours through twisted foxtail pine forest, resembling an Ansel Adams photograph. At 4.4 miles, take a side trail to the right collect water at Chicken Spring Lake, which is tucked into one of the rocky cirques below Cirque Peak (12,894 feet). This is a great place to camp and get in some swimming. Later in the season, this may be your last water opportunity before Rock Creek, so if you’re heading on, be sure to top up here (see below for Water Planning).
Climb about 300 feet over a quarter-mile to an incredible vista. You’re at 11,500 feet looking out at Whitney Meadow to the west and the green valley below Siberian Pass to the northwest. The PCT continues to contour through more ancient foxtail pines around a meadow before topping out near the border with Sequoia-Kings Canyon National Park 7.5 miles into your hike. Just a mile later, you’ll leave the PCT, turning right on the Siberian Pass Trail (also signed Upper Rock Creek). The trail flattens. After 9.5 miles, reach wildflower-lined Rock Creek—a perfect place to take a lunch or camp.
Right after hopping across Rock Creek, turn right following signs for the Army Pass Trail. You’ll follow Rock Creek through a gentle open valley. Rock Creek does become intermittent after a mile, so fill up your water when you can (at mile 10, the trail crosses Rock Creek and *usually* water still flows there).
At 10.5 miles, the trees disappear and the trail looks out and up to the Army Pass/New Army Pass Plateau. As far as Sierra passes go, this one doesn’t have much climbing (at least when taken from this eastern side). In a mile and just two switchbacks, you’ll reach the plateau. Here, you can make the decision to take New Army Pass or a not-marked junction over to Old Army Pass. This is also the cut-off to climb the nearby 14,000-foot tall Mt. Langley (you can read about that side-trip below).
On our most recent trip, we opted for Old Army Pass. It’s exposed and can hold snow later into the season, but feels like an epic pass. It’s the route most folks take up to Mt. Langley. Fair warning: Recent rockfall has obscured the trail in a few places, but use trails around boulders make it easy to get back on track. On a busy weekend, if you can’t find your way around, just call out. Someone else may be standing on the other side of a boulder trying to figure out how to get around, too.
Once off the switchbacks of Old Army Pass, we picnicked by the shady Cottonwood Lake #4, notable for great fishing. We topped off our water bottles and rehydrated. There are trails and/or use-trails to all the lakes in the Cottonwood Lakes Basin (which can sometimes get confusing). But it gives you lots of options for campsites.
About 5 miles from the pass, we reached an Inyo National Forest sign. From there, you’ve got 3.5 shady miles following Cottonwood Creek down to an intersection. Depending on where you parked, take the trail to the Equestrian Camp Parking Lot and then down to your car at the Cottonwood Pass Trailhead.
Maps and Guidebooks
Gaia
We like the Gaia navigation phone app because it’s easy to use to check if we are on route.
Maps
We’re big fans of Tom Harrison Maps, which are easy to read and ground-truthed for accuracy. We carried Tom Harrison’s Golden Trout Wilderness Trails Topo Map. The upper portion of the loop continues on the Tom Harrison’s Mt. Whitney High Country Trail map. While we didn’t have the second map, we really wish we did. There were several lakes and peaks just north of us in the Mt. Whitney area that we would’ve loved to identify.

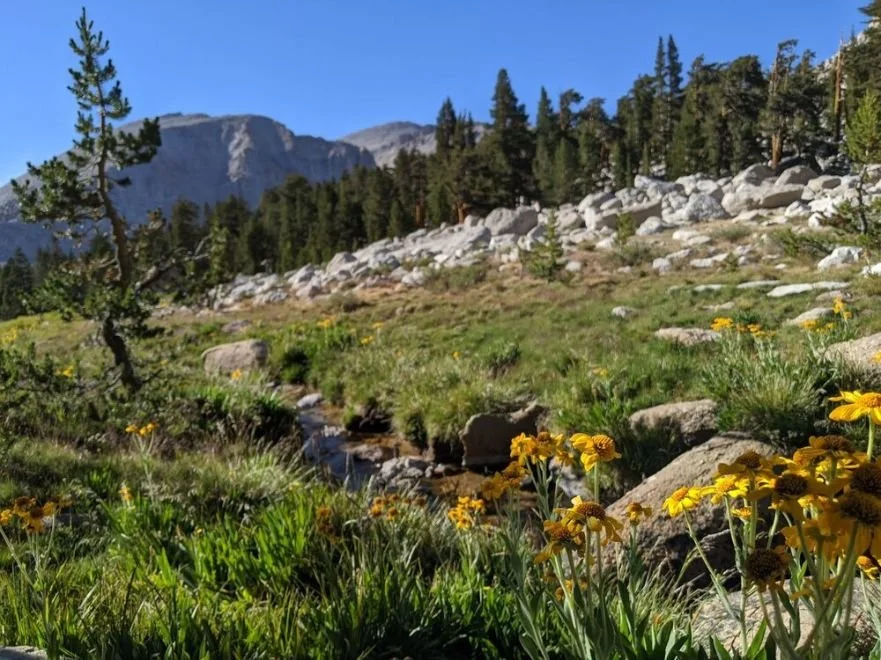
The green meadows in the Cottonwood Lakes Basin looking towards Cirque Peak. Photo by Liz Thomas.
How to get to cottonwood Lakes
By car
From the Los Angeles area, take I-5 to CA-14 to US 395 north near Ridgecrest. You can also take the 210 to the 15 to US 395 north (hey, sometimes traffic can make one of those routes easier). The two routes meet up around Ridgecrest. From there, continue on 395 north for 60.4 miles. Turn left at Lubken Canyon Rd, a narrow and unlikely shortcut through a private Pheasant Hunting Club. It spits you out 3.5 miles later at a 3-way intersection. Turn left and continue up on the windy, narrow, and big drop-off Horseshoe Meadow Road for 16 miles.
If you’re coming from 395 north (or aren’t stoked on the narrow Lubken Canyon Road shortcut), from the town of Lone Pine, take Whitney Portal Road east for 3.2 miles. Turn left onto Horseshoe Meadow Road and take it all the way up the mountain for 19.5 miles.
Bus and Shuttle Services
The Eastern Sierra Transit Authority runs a bus from Lone Pine to other areas in Inyo and Mono County. It also provides long-distance service to Reno (where there is an airport) and Lancaster (where you can take a commuter train into Los Angeles). See routes and schedules here.
From Lone Pine, you’ll have to hitchhike to get up to the pass (but it’s relatively easy as most traffic on that road is headed your direction).
Trailheads
The loop can be accessed from several trailhead parking lots—all within 0.5 miles of one another. Hiking trails connect the three, so depending on how crowded any given parking lot is, you can always choose a lot with more spots. Just remember to hike from the same trailhead as your permit.
Nearby trailheads:
Cottonwood Pass Trailhead
Horseshoe Meadows Equestrian Camp/Hiker Overflow Parking
Cottonwood Lakes Trailhead
On my most recent trip, we parked at the Horseshoe Meadows Equestrian Camp/Hiker Overflow area so we can start the hike heading downhill towards the Cottonwood Pass Trail. We figured that section of trail would feel anticlimactic at the end of our trip so best to get it out of the way in the beginning.
Rules and regulations
Here’s a list of some of the regulations in the Golden Trout Wilderness and Sequoia National Park. Be sure to check what is written on your permit and talk to the ranger about conditions before you go.
Follow Leave No Trace Ethics including camping and pooping far from water.
Group size must be limited to 8 people or less (some parts of the loop are up to 15, but it’s 8 if you want the full loop).
Bear canisters are required for Sequoia-Kings Canyon National Park and Chicken Spring Lake (so again, applicable if you’re doing the whole loop).
Carry a printed and signed version of your permit on your person at all times.
Sequoia-Kings Canyon does not allow dogs. Outside of the park, dogs must be leashed.
Campfires are prohibited at Chicken Spring Lake. Often campfires are banned everywhere in California during the summer. Check local regulations.
Carry your free California Fire Permit if you’ll be using a backpacking stove. It requires watching a short video and is printable at home.
Water Planning
Early in the season as snow is melting, water can be plentiful. You’ll find streamlets flowing everywhere.
Later in the season, these sources are reliable:
Chicken Spring Lake
Rock Creek (almost the entire length that you walk by it)
Any of the Cottonwood Lakes
Cottonwood Creek (the entire length that you walk by it)
Bears and Food Storage
Sequoia-Kings Canyon National Park requires that you store food, garage, and smellables like toiletries in a bear canister. We carried a Bear Vault 450 for two people for four days (the first day’s snacks, lunch, and dinner don’t need to be in the bear can, but trash from those meals does need to fit). See REI’s guide to How to Choose and How to Use Bear Canisters for more on weight, volume, and ease-of-use considerations.
Each parking lot has metal bear storage boxes. If you have extra food or garbage in your car, you can store them in those boxes (and don’t have to carry them into the backcountry). Just label them with your name and re-entry date.

The summit of Mt Langley (14,026 feet) is a worthy side-trip to the Cottonwood Lakes Loop Backpacking Trip. Plan an extra day for your trip if you plan to climb this peak. Photo by Liz Thomas
Side Trips
Mt Langley
At 14,026 feet, Mt. Langley squeaks by as one of California’s 12 peaks that are 14,000 feet or more. As the 9th highest peak in California, it’s also one of the easiest 14ers to climb. From Old Army Pass, take a well worn sandy trail heading to the north. It crosses a plateau. The trail then follows cairns to the top. The summit has incredible views of Mt. Whitney to the north, Owens Valley below to the west, and the Kern River Valley to the east. Because the hike is arguably easier than Mt. Whitney and doesn’t require permits, Mt. Langley is a good Mt. Whitney alternative. It’s one of the easiest 14ers to climb as nothing is technical, but can still be dangerous in snow or if you find yourself off route (easy to do as there are many use trails). Be sure to carry the right map and compass. We also found a GPS app pre-loaded with the Mt. Langley track to be useful to have on our phones.
trip Variations
Do the Loop Counter Clockwise
We describe the hike in the Trip Description as hiked clockwise (the direction we went), but counter-clockwise is an option, too. One perk of going clockwise as we did is that it makes the two climbs less steep (up to the PCT and to New Army Pass). But, if you go counter-clockwise and start with the Cottonwood Lakes section, you’ll have more time to acclimate in one of the most beautiful lake basins in the Sierra. By the time we reached the Cottonwood Lakes, we were ready for a pizza, so zoomed through it. In retrospect, I feel like we missed out on enjoying that area by hiking clockwise. The major downside of going clockwise is the big climb up Old Army Pass. If going counter-clockwise, it may be worth considering taking New Army Pass instead (see next variation).
New Army Pass vs. Old Army Pass
A variation of this trip uses New Army Pass to avoid the snow of Old Army Pass early in the seasons. They’re comparable in length, though New Army is slightly longer and more elevation gain (but not by much). New Army has better-maintained switchbacks. If you’re early in the season or even hiking in August during a big snow year, New Army is a better bet. But if you plan to camp in the basin, the Old Army route gives you more lakes to camp by. If you’re planning to climb Mt. Langley, Old Army gives you more direct access. See this Reddit thread for opinions on the two.
Longer version with more PCT
You can extend this route by 7 miles by continuing on the PCT all the way to Lower Rock Creek Camp and then following Rock Creek west all the way to Army Pass. This longer route gives you more time in lovely foxtail pine woods, contouring and staying relatively flat at 11,000 feet. There are views of the Siberian Outpost. The PCT tends to be easy walking on well-maintained trail, so you can look up at the view. Lower Rock Creek Camp has bear boxes (and a rumored toilet, though I have yet to find it). On the way back up to Army Pass, you’ll visit the Rock Creek Lake camping area (also great for wading).
favorite post-trip food stop
If coming from the North, Copper BBQ in Big Pine is divine (for the meat eaters out there).
There’s also a McDonalds in Lone Pine that seems to excite many backpackers.

Our campsite at sunset along the New Army Trail on the Cottonwood Lakes Loop. Photo by Liz Thomas.
Gear SELECTION
This is what we chose to carry with us on the Cottonwood Pass Loop. For more backpacking gear recommendations, see our Backpacking Gear section and our Essential Backpacking Accessories story. If you’re headed to the high country in the early spring or late fall, see our Shoulder Season Backpacking Gear article.
BACKPACK
We used the Gossamer Gear Gorilla 50 and Gossamer Gear Kumo 36 backpacks on this trek. They're both lightweight and comfortable with the Gorilla being able to fit a bear can and the tent without an issue. The Gorilla is a smaller version of the Mariposa, a winner in our Best Backpacking Backpack story. If you want something lighter, see our Best Running Packs and Fastpacks guide.
TENT OR TARP
We used the Gossamer Gear The Two on this trip. We love that it is spacious enough for 3 but weighs below 2 pounds. We discuss the single-person version in our Best Ultralight Tents guide.
SLEEPING BAG
We used the Feathered Friends Egret (women’s) and Feathered Friends Swallow (men’s) on this backpacking trip. They're both among the lightest full sleeping bags out there but very warm for their weight. Although we backpacked during a relatively warm time of year, we still appreciated having a bag with a 20F degree rating. Both the Egret and Swallow are our Overall Winners in our Best Sleeping Bags story. If you want something lighter, see our Best Ultralight Backpacking Quilts guide.
SLEEPING PAD
We both used the Neo Air XLite sleeping pads on this trip—one in short and one in 6-foot length. They’re lightweight, comfortable, and easy to inflate without taking much volume in our pack. The Neo Air XLite is our Overall Winner in our Best Backpacking Sleeping Pads story.
TREKKING POLES
We carried the Gossamer Gear LTs and the Cascade Mountain Techs. The Gossamer Gears are featherlight and a pleasure to carry. The Mountain Tech are heavier but rock-solid durable on rough terrain and off-trail. Both are winners in our Best Trekking poles story.
BACKPACKING STOVE
We used the new MSR PocketRocket Deluxe cooking system on this hike. It’s lightweight, has the easiest to use lighting system we’ve seen, and feels sturdy even in wind. It’s a winner in our Best Backpacking Stoves story.
POT AND SPOON
We also used our TOAKS 750 L titanium pot and TOAKS long-handled spoon. This lightweight and affordable pot is our Overall Winner in our Best Backpacking Cooking pots story and the spoon is in our Backpacking Essential Accessories story. We like both of them so much that they’re also in our gift guides. It’s amazing how such small things can make such a big difference on a backpacking trip!
WATER FILTER AND STORAGE
We used the Sawyer Squeeze and lightweight Sawyer Micro Squeeze as inline filters on this trip. They’re both lightweight and fast. As an inline filter working with our Platypus Hoser hydration bladders, they give us on-demand filtered water. We like that there’s no pumping required and no chemicals involved. The Squeeze is the overall winner in our Best Backpacking Filters story.
HEADLAMP
We carried the BioLite Range 500 and Black Diamond Spot on this trip. Both headlamps are bright, lightweight, and have long battery lives. Both are winners in our Best Headlamps story.
FOOD STORAGE
Because regulations require a bear canister, we brought a Bear Vault 450 for this trip. It’s approved by the Sierra Interagency Black Bear Group for use in National Parks as well as Forest Service areas that require bear canisters. It’s important regardless of the regulations to store food safely away from bears, marmots, and whatever other wildlife may be interested in your food. We found this article by REI to be useful in describing food storage techniques for camping in bear country.
SAFETY
Emergency Beacon: The Garmin inReach Mini allows two-way texting from the backcountry, spot forecasting, and more. It’s the Overall Winner in our Best Satellite Messengers and Personal Locator beacons story because of its light weight, ease of use, and reliability. The Mini’s newest version is the inReach Mini 3, and we did a review of the inReach Mini 3 Plus.
Maps and Compass: Suunto M-3 NH Compass and Waterproof Maps by Tom Harrison (see Maps and Guidebooks section).
First Aid Kit: Homemade. See our Make Your Own Emergency Kit story.
WHAT TO WEAR
Below is what we wore on the Cottonwood Pass Loop. Here are our favorite things to wear while backpacking and hiking from our Hiking Apparel page.
HIKING SHOES
We both wore the Altra Lone Peaks on this trip. The trail was well-maintained and had no snow, so we felt comfortable wearing these lightweight trail runners on this kind of terrain. The Lone Peaks are our Long Distance Winners in our Best Trail Running Shoes story.
We definitely saw a lot of backpackers in boots for this trip, especially around the rocky Old Army Pass. If you’d feel more comfortable in boots, check out our Best Hiking Boots story or our Best Lightweight Hiking Boots story.
A nice footwear compromise for this trip would’ve been hiking shoes, which are designed to feel like a trail runner but have stability more like a boot. For more, see our Best Hiking Shoes stories (men’s and women’s) for footwear that has more durability and stability than trail runners.
Hiking Shirts
We wore the Patagonia men’s Capilene Daily Cool long sleeve and Ushood Sunshirt. Because the route is at such a high altitude, having adequate sun protection was important. Both are featured in our Best Sunshirts story. See our Best Men’s Hiking Shirts and Best Women’s Hiking Shirts guides for more recommendations.
Hiking Socks
Each of us carried 2-3 Pair socks. The Darn Tough Micro Crew socks are soft, durable, comfortable, and fit like a glove. See our Best Hiking Socks article for more about why we love these socks. If you like something thinner, we have more ideas in our Best Running Socks guide.
Shorts and/or Skirts
Purple Rain Adventure Skirt / REI Sahara Hiking Pants were our respective bottoms. Both excel at feeling comfortable, not too hot, and nice and stretchy for lots of mobility. See our guides to Best Hiking Skirts, Best Shorts for Thru-Hiking, Best Hiking Pants for Men, or Best Women’s Hiking Pants for recommendations.
Sun hat
Sunday Afternoons Ultralight Adventure Hat and a trucker hat (augmented with the hood on our sunshirt). See our Best Sun Hats guide for more recommendations.
SUN PROTECTION
Bring sunscreen. Apply it. Period. Sunglasses will also be incredibly helpful on the sun-reflecting rocks above treeline. See our guides to the Best Body Sunscreen and Best Face Sunscreen for more recommendations.
What hiking clothes to bring
This is the hiking clothes you may not wear all day, but you’ll want for nighttime or if the weather turns bad. Even though California mountains are known for relatively good weather with less rain than other ranges, you should always carry rain gear and extra layers for cold evenings and chilly mornings.
Rain Jacket
We carried Montbell Versalite and a NW Alpine DCF rain jacket (now discontinued). While the latter isn’t one of the jackets in our Best Rain Jackets article, it’s popular with thru-hikers because it’s light weight. If you’re hiking later in the season, we recommend Rain Pants as well.
Down Jacket
Montbell U.L. Thermawrap, a winner for ultralight warmth in our Best Synthetic Jackets article, worked great on this trip. Check out our story on the Best Down Jackets for some great down options, which will be a little lighter for the weight.
Hiking Underwear
We had on Paradis Sport Natural Fiber Bikini and Fruit Of The Loom Micro Mesh Boxer Briefs, featured in our Urban Hiking Packing List. See our Best Men’s Hiking Underwear and Best Women’s Hiking Underwear guides for recommendations.
Warm hat
The Montbell Chameece Cap with Earwarmers is warm for its weight and packs down well. It also dries quickly and is warm even when wet. It’s a favorite in our Arizona Trail Gear List.
GLOVES/MITTENS
Montbell Climaplus 200 Mittens and Possum Down Gloves. The Montbell Climaplus are a mit that gives you finger freedom for tasks that require dexterity. They only weigh 1.7 oz for the pair, so are perfect for backpacking. See our Best Winter Gloves for Hiking, Running, and Cycling for more recommendations.


