Bikepacking the White Rim Trail
An Iconic 100-mile Loop in Canyonlands National Park
June 22nd, 2026
Home > Trip Guides > Bikepacking
The White Rim Trail is one of the most iconic long-distance mountain bike rides in the West. Traveling through spectacular canyon country on a rough four-wheel-drive track, the White Rim Road makes a 100-mile loop through the heart of the “Island in the Sky” district of Canyonlands National Park.
Much of the riding is on or along the distinctive white rim sandstone for which the road is named. Technical passages are few, but the road is still rough, steep, sandy, and rocky in places. While people are taking gravel bikes on the White Rim with more frequency, mountain bikes are still the preferred (and most popular) way to ride the trail. The White Rim has something for everyone — even beginners to bikepacking.
Distance: 100 miles
Days: 4 days 3 nights, ideally. The trip can be done in fewer days (or more) than that depending on skill, endurance, campsite reservations, and ability to carry water.
Elevation gain/loss: 7,096 feet of gain, 6,703 feet of loss
Best season: Spring or Fall. Summer temperatures can be over 100 degrees. Winter has its own challenges with snow, cold, ice, and mud.
Permits: All overnight backcountry trips in Canyonlands National Park require a backcountry permit.
Difficulty: Moderate. The main difficulty isn’t in technical riding or climbing, it’s the weather and the long distance combined with carrying all your camping gear and all the water you need on the bike. There is no reliable water available on the White Rim.


We create reader-supported, objective, independently-selected gear reviews. This story may contain affiliate links, which help fund our website. When you click on the links to purchase gear, we may get a commission — without costing you an extra cent. Thank you for supporting our work and mission of outdoor coverage for every body! Learn more.

For 100 miles the White Rim Road travels through the spectacular backcountry of Utah's Canyonlands National Park. Much of the road is on rock but there are also long stretches that are sandy, like this stretch between the Murphy Hogback and Gooseberry Canyon
Quick Facts
Bikepacking the White Rim is the best way to take in the Island in the Sky District of Canyonlands National Park — one of America’s most beautiful National Parks. On the White Rim, a new, breathtaking view unfolds around every turn. Every trail in Canyonlands is closed to mountain biking — and while the White Rim is a dirt road rather than a trail, I’ll take it.
Related: America the Beautiful National Park Pass
Plus, the physical challenge is rewarding. Manhandling a fully loaded bike across 100 miles of rugged desert terrain is an accomplishment to be proud of. For many people, riding the White Rim is a once-in-a-lifetime journey — and what a journey it is.
There is nothing technical about riding the White Rim. The trip is suitable for a novice mountain biker with a solid grasp of basic bike handling skills, and learning how to pack camping gear on a bike is a skill that’s easily acquired. (Check out our Bikepacking Basics story for more details.)
The most challenging aspect for a beginner is the distance, especially sitting in the saddle for most of the day. On a March trip, my oldest son — who isn’t a mountain biker and who had never bikepacked — did just fine, and is now talking about bikepacking the Arizona Trail. Experienced mountain bikers and bikepackers will have no trouble at all handling the trail.

Dean W. Krakel, the author's son, on his first bikepacking trip, hikes his bike up the steep gradient of the Murphy Hogback, one of 3 climbs on Utah's White Rim Trail in Canyonlands National Park. The Murphy Hogback campsites are on top of the hogback. Photo by Dean Krakel.
How to Bike the White Rim
White Rim in A Day, aka WRIAD
Because the White Rim can be ridden in a loop — and because of its harsh, waterless, windswept desert beauty — the trail attracts endurance cyclists. Attempting to ride the White Rim In A Day — a feat known as WRIAD in mountain biking circles — has become increasingly popular with amateur and professional riders.
WRIAD is certainly one way to experience the White Rim, as described to me by a friend who’s done it a dozen times. But for those of us born without the extreme gene, the most satisfying White Rim experience is to take a 3-night, 4-day trip. That’s time enough to soak in all that spectacular slot canyon country and not feel rushed.
For basics on how to train for 100-miles or more in a day, see our guide to How to Train for a Century Ride.
Vehicle Support
The most popular way bikers ride the White Rim is with vehicle support. Because the route is set along a dirt road, a four-wheel-drive vehicle can carry food, supplies, gear, and cold water from camp to camp. A vehicle can transport a tired or injured cyclist, and offer support along the way. Overheated riders can cool off in air-conditioned comfort. Steaks and cold beer every night. No worries about water. Okay, so having a support vehicle has its benefits.
See our recommended coolers to keep in your car in our Best Camping Coolers guide.
On the other hand, vehicles are cumbersome and slow-moving. The White Rim is likely difficult to drive — it’s no place for an amateur four-wheeler — and the drive takes almost as much time as riding it on a bike. Vehicles can break down — I met a couple with a broken axle on their Sprinter van on top of Murphy's Hogback, one of the White Rim’s steepest climbs. (I’ve no idea how they managed to get that far in that vehicle.) And the minimum tow bill, according to a warning on the National Park Service Island in the Sky/White Rim website, is $1000.00. And that’s if a tow truck will come and fetch you. So despite the allure of having a support vehicle, all of my White Rim trips have been self-supported bikepacking trips.
For recommendations on how to transport your bike, see our guide to Best Bike Racks for Your Vehicle.
Bikepacking
I think bikepacking is the perfect way to explore and experience the White Rim. Riding self-supported brings me great satisfaction. I’ve always felt that by leaving the vehicle behind I’m also leaving behind one of my ties to the civilized world, gaining more freedom. It makes me feel as if I’m flying free instead of being tethered
Bikepacking the White Rim isn’t easy. There’s no escaping the harsh environment. There’s little shade, and the landscape is so open and exposed that there’s no place to seek refuge from the wind. The road can be so rough, so relentless, so unforgiving that sitting on the bike for long hours can be painful. The nights can be cold, the days hot. If it does rain or snow, the composition of the soil makes the road so slick and muddy that it’s nearly impassable. Unless your quads are Godzilla-sized, you’re going to have some push, pull, and hike-a-bikes.
When you’re self-supported, water is also a major issue — especially when each liter weighs 2.2 pounds. Although I have carried as little as 2.5 liters of water per day on White Rim trips during cooler weather, I’ve carried 4 liters a day when temperatures warm up in April and May. Carrying a gallon (3.8 liters) a day is the National Park Service recommendation — so 8.4 pounds of water per day.
Yes, bikepacking the White Rim self-supported is challenging — but it’s worth it. And let's face it, steaks and cold beers every night are vastly overrated compared to a freeze-dried meal and a double pop of hydration tabs in a warm glass of water.
GEAR LIST
Here is a quick checklist of the gear and clothing I bring with me when I bikepack the White Rim Trail. I’ll speak to my gear selections more below.
| WHITE RIM BIKEPACKING GEAR | OUR PICK | OTHER OPTIONS |
|---|---|---|
| Cycling Gear | ||
| Bike | Jamis Roughneck | Best Bikepacking Bikes |
| Handlebar bag | Ortlieb Handlebar Pack | Best Bike Handlebar Bags |
| Frame bag | Blackburn Outpost Elite Frame Bag | Best Bike Frame Bags |
| Top tube bag | Revelate Designs Gas Tank Top Tube Bag | Best Bike Frame Bags |

The author on top of the Schafer switchbacks after a February bikepacking trip. A few minutes later the rain turned to snow. Photo by Dean Krakel
Why You Should Trust Us
Bikepacking gear has evolved considerably since I made my first White Rim trip in 1995. On those trips, I used a pannier setup and a B.O.B (Beast of Burden) trailer. These days I use a frame pack, front roll bag, and a seat pack to carry my food, gear, and water.
During a long surgery rehabilitation last summer, I gave myself the incentive to heal by saying I’d ride the White Rim again once I recovered.
“I gave myself another White Rim goal: to ride it during every month of the year. ”
Following that trip, I gave myself another White Rim Trail goal, to ride it during every month of the year. Not all of those trips were successful. A February trip was so hard, so cold, muddy, rainy, and snowy (the backcountry office advised bringing crampons) that I vowed to never come back... but I did.
What I learned from those defeats (and the victories, too) will help you make your White Rim bikepacking trip a success.

For much of its 100 mile length the White Rim Trail in Utah's Canyonlands National Park travels upon or close to the White Rim sandstone for which it is named. Many canyons branch off of the trail. Photo by Dean Krakel
Highlights
On a White Rim trip this past autumn I camped at Labyrinth campsite on the first night, one of my favorite places. The camp is perched above the slow-flowing and aptly named Green River. Downriver stretches the labyrinth of canyons for which the camp is named. Big, lonely, wild country.
All the hustle and bustle of planning, getting ready, driving from my home in Almont, Colorado to Moab, and then Canyonlands National Park was done. All that was ahead was my long-anticipated trip.
But there was a bit of fear inside of me that night. No matter how many times you’ve made the White Rim trip — and this was my fourth self-supported adventure doing it — there’s some worry involved. It’s intimidating to set off alone on a 100-mile bike journey through the Utah desert. What if I broke down? What if I had an accident? Had I trained enough? How would my 68-year-old body hold up to such extreme effort?
I’d had rotator cuff surgery on my right shoulder in June (a really bad bike wreck) and I’d been sidelined for the entire summer. How would my wounded shoulder do with the effort of riding on rough terrain and most of all, pushing a heavy bike up steep grades?
I found it easy to drift off into sleep but halfway through the night I awoke startled. Startled enough that I sat straight up in the tent. Something was noisily breathing nearby. Something big and loud. The hairs on the back of my neck prickled. My heart was pounding. Then I realized. I was hearing the sound of my own breath.
The canyon was so quiet. So still. There wasn’t a whisper of wind. No planes overhead. No flap of my tent. I don’t think I’ve ever heard such profound silence anywhere. My own breath. I laughed out loud.
I unzipped my sleeping bag, opened the tent door, and stepped outside, standing, staring up into a moonless, star-spangled sky reaching down to touch the dark silhouette of immense canyon walls, towers, and spires. I felt alone, vulnerable, insignificant. And very alive.

From Grandview Point visitors can look down on a portion of the 100 mile long White Rim Road. The travels on or close to the White Rim sandstone that gives the trail its name. Photo by Dean Krakel
A year later that moment still resonates as one of the high points of my many White Rim journeys. I would spend the next year visiting the canyon country once a month, providing I could obtain the permits to do so.
Although in the next half-dozen bikepacking trips I never again experienced that overwhelming silence, there is something about biking the rim, the clear sharp desert air, the heat, the cold, the wind, the immense scale of the canyon country, the incredible mind-blowing views and the full-body exertion of powering my self-contained bicycle through rough country that is magical.
The White Rim is a powerful place. Traveling it has changed my life.
The White Rim is truly a magical place that makes a person feel insignificant. It is hard for me to worry about my troubles when gazing into the vast abyss of the canyons. The clear, sharp desert air; the heat; the silence; the immense timescale of the canyons; the incredible mind-blowing views; the full-body exertion of mountain biking — it all contributes to the magic of the White Rim.
I have never known anyone to bikepack the Rim and come out of the experience unchanged. That alone is reason enough to go there.

Dawn reflections in the Green River along the White Rim Trail in Utah's Island in the Sky District of Canyonlands National Park. While the Green and Colorado Rivers (their confluence is downriver from this photo) are generally hundreds of feet below the White Rim. Photo by Dean Krakel.
Challenges
Water
There is no water on the White Rim. A bikepacker has to carry every drop of water they’ll need on a White Rim trip.
Potholes are short-lived and should only be considered for emergencies. Better to leave potholes for the Bighorn sheep and other critters that depend on them for survival.
See the section on water below for my strategy.
Permits
Backcountry permits are required to visit the White Rim for day or overnight use. Competition for designated campsite reservations is fierce. See the section below on strategies for permits.

Laine Walter pushes her bike up the steep grade of Hardscrabble Hill during a bikepacking trip on the White Rim Trail in Utah's Canyonlands National Park. Hardscrabble Hill is one of the 3 major climbs on the trail. Photo by Dean Krakel
Difficulty and Skills
The most difficult things about the White Rim Road are its 100-mile length and supporting yourself by carrying all the food, gear, and water you’ll need on your bike.
The terrain isn’t particularly challenging. For the most part, the surface of the White Rim Road is made of dirt, rock, and sand (and a few miles of pavement). There are no tricky ledges to ascend or descend, no technical rock gardens, and no sketchy moves with exposure. The challenge is in the distance and your own physical conditioning. The White Rim is a bikepacking adventure open to mountain bikers from beginner to expert.
Being self-contained gives you freedom, but the weight of all your food, water, and gear makes the trek more challenging. There are 3 noteworthy climbs: the Murphy Hogback, Hardscrabble Hill, and depending on your direction of travel, either Mineral or Shafer Roads. All in all, you’ll be getting in about 7,000 feet of elevation gain.

A bikepacker rides down a sandy passage through the empty space of the White Rim Trail in Utah's Canyonlands National Park. Photo by Dean Krakel
Navigation
No navigation is needed on the White Rim. All the features, intersections, and junctions with hiking trails are well-marked with official National Park Service signage. Just stay on the road!
That said, if you want to know exactly where you are, or how far you still have to go to get to camp, having a map or the Gaia GPS app on hand can be useful. The Island in the Sky District is featured on National Geographic Trails Illustrated map #310, and we love Gaia GPS for its ability to zoom into topo lines.

The Schafer Trail switchbacks are slick and treacherous following an October snowstorm on the White Rim Trail in Utah's Island in the Sky District of Canyonlands National Park. The switchbacks, which lead down to the White Rim road are one of the main entrances to the road. Photo by Dean Krakel.

The Schafer Trail switchbacks are slick and treacherous following a snowstorm in January on the White Rim Trail in Utah's Island in the Sky District of Canyonlands National Park. Photo by Dean Krakel.
Best Season
The absolute best times to ride the White Rim Road are in April and October. These months are best because the temperatures are generally cool and the daylight hours are long. There’s a special beauty as well to the canyon country waking up and greening up in the spring and in the fall the changing colors of the leaves and plant life. Biking in November, December, and January means cold temps and long nights in the tent. Ugh.

A clearing spring storm created dramatic lighting on a canyon rim along the White Rim trail in Utah's Canyonlands National Park. Photo by Dean Krakel
Permits
This is the hard part. Backcountry permits are required to visit the White Rim for day or overnight use. According to the Island in the Sky District’s annual report on visitation, last year 18,877 people got White Rim permits; 1,137 of those people were on bikes. There are no break-out statistics for how many bikepackers there were in comparison to bikers on vehicle-supported and commercially guided trips. My point being: competition for designated campsite reservations is fierce.
How many camps are there on the White Rim?
There are 20 campsites spaced out along the White Rim’s 100-mile length. Each campsite can have up to 15 individuals and 3 vehicles per group. All campsites must be reserved well in advance—meaning four months in advance—through Recreation.gov, and an overnight permit, if you get one, is $41. Sometimes a person can get cancellations if they keep checking on the website's reservation calendar.
On a recent May morning at 8 am, the campsite reservations were opened up for the 4-month block of September through December. By 9 am, nearly every campsite was reserved. The only months that had openings were November and December.

Mist and low clouds from a clearing winter storm obscure towers near Schafer Canyon on Utah's White Rim trail. Photo by Dean Krakel
Prime season is late March, April, and May, as well as late September, October, and early November. June, July, and August are scorching hot. Late November and the months of December, January, and February can be either miserable with cold, mud, snow, ice, wind, and snow or balmy, clear, dry, and joyful. These off-prime-season reservations are easier to score if you’re willing to roll the dice.
Plan for your permit beforehand
Before you make reservations, you’ll want to get to know the route a little better. We think the best strategy is to study the Trails Illustrated map of the Island in the Sky District (#310).
Figuring out the trailheads (more on that below), what campsites are where in relation to the trailhead you want to start at, the direction you want to travel, and the distance you plan to cover each day is crucial if you want to be quick when reservations open. See our section below on trailheads and whether you should do the loop clockwise or counterclockwise.
After deciding on the direction of travel and what entrance to use, figure out your mileage to and between each campsite — and be honest about your abilities. Slamming out miles on a light, unloaded double suspension bike is a bit different than slamming out miles over rough terrain on a weighed-down hardtail. I consider 25 miles on the White Rim a good day, and 30 extra good.
Make a list of your desired camps. Make a list of alternate camps. Make a list of camps going both clockwise and counterclockwise. Find out when the National Park Service is releasing the block of months in which you want to camp — and be there when the permits are released. Good luck!

A bikepacker pedals down the switchbacks on Mineral Canyon Road on the White Rim Trail in Utah's Canyonlands National Park. Mineral Road is one of the entrances or exits on the White Rim Trail. Most trips are done in a clockwise direction starting at the Schafer Trailhead. Photo by Dean Krakel.
Trailheads
There are 3 ways to access the White Rim Road. The two traditional trailheads are to the north at the top of Mineral Canyon and to the south at the top of Shafer Canyon. The third trailhead is on the Potash Road, a 30-mile, mostly flat, paved road and dirt road that starts near Moab and joins the White Rim at the bottom of the Shafer switchbacks. Potash is a useful access point when bad weather has closed the switchbacks, and it’s a good emergency bailout option, too.
Most trailheads don’t have reliable cell service. We recommend bringing a two-way satellite messenger or Personal Locator Beacons (PLBs) for those attemtping this trip.
Most mountain bikers enter at the top of Shafer Canyon, descending 2500 feet and 3 miles on the steep-but-wide-and-graded road, down to where it joins the White Rim. They then bike the rim in a clockwise direction and finish the loop when they finish climbing up the Mineral Canyon switchbacks. Bikers entering from the Mineral Canyon side just reverse the process.
Clockwise vs Counterclockwise
One advantage to traveling clockwise is that if you run low on water you can fill up again by going to the Green River. I also prefer to end my trips by climbing out of Mineral Canyon. Climbing out of Shafer is a long, arduous journey that I never look forward to.

Amid lush green growth along its banks the Green River makes an appearance along Utah's White Rim Trail during an April bikepacking trip. For most of its 100 mile journey through Canyonlands National Park the Colorado and Green Rivers are hundreds of feet. Photo by Dean Krakel.
Water
Here’s how I manage my water carries: on my bike’s front forks, I’ve mounted two water bottle cages for two 48oz Nalgene bottles. The two fork-mounted bottles, the 3L I carry in my frame pack, and the 2.5L I carry in my hydration pack on my back give me the ability to carry 8.5 liters of water. Carrying 8.5 liters gave me a little over 3L of water a day, which is plenty for the cooler temps of fall and spring on a typical 3 night 4-day ride.
The Nalgene bottle is the overall winner in our Best Hiking Water Bottles guide for a reason—it’s rugged enough to fall off a bike and still survive and affordable enough that you won’t be too sad if it’s gone forever.
In warmer temperatures, I found myself using closer to 4L a day. On extended trips with 5 nights of camping and 6 days of riding, I’ve carried as much as 11L. Usually, I just strap the extra water in 1L or 2L bags to my seat pack or front handlebar pack.
Can self-supported bikepackers rely on vehicles for water?
When in need, I have relied upon the kindness of strangers for water. Vehicles usually slow down or stop and the driver will ask if there’s anything I need.
Most visitors to the Canyonlands have never seen a bikepacker. We’re a novelty. When the offer of water is made it’s always nice to top off the hydration bladder and water bottles.
I don’t ever count on getting water from strangers. Help can be a long time in coming. I have gone a day and a half without seeing another person on the rim.

Potholes are filled with water after a February snowstorm on Utah's White Rim Trail. Several forms of life are dormant in the dried potholes but become active when the potholes contain water. Potholes are also relied upon the wildlife that inhabit the White Rim. Photo by Dean Krakel.
Potholes: To Use or Not Use?
Sometimes after a rare rain or snowstorm, the potholes you’ll see along the way are filled with water. But there is life in the potholes: tiny creatures lay buried in the silt and mud at the bottom, stirred to life by moisture. If you take water from a pothole, you’re trashing their living room at the very least. If that weren’t enough, the potholes give life to the animals that inhabit the Rim, who may be relying on these sources to avoid dehydration and worse.
This is why you also shouldn’t wash anything — your face, your hands, your body, your dishes — in potholes. Thou shalt not dip thy sunscreened or sweaty hands into potholes either. Unless you’re dying I say leave the potholes to the microfauna, bighorn sheep, mule deer, and jackrabbits.

The Green River makes an appearance among Cottonwood trees along Utah's White Rim Trail during a March bikepacking trip. For most of its 100 mile journey through Canyonlands National Park the Colorado and Green Rivers are hundreds of feet below the trail. Photo by Dean Krakel.
Emergency Water Options
In an emergency, a biker can get to the Colorado River by way of a sandy descent down Lathrop Canyon. On the Green River side, a thirsty biker could get water at the Potato Bottom and Hardscrabble Bottom campsites, all of which have easy passages through the undergrowth to the water. (Yes, undergrowth. The river banks are a jungle of Tamarisk trees.)
(Note: The river water from both the Colorado and the Green is silt-laden, so trying to filter water directly from either will result in clogs and frustration. I avoid getting water from the rivers if I can. But if I can’t, I let the river water settle overnight so that the sand settles to the bottom of the container. Some bikepackers use water filters and purifiers, often pre-filtering first. From that point on it can be treated with chemicals — I prefer chlorine tablets or Aquamira — or filtered.)

A bikepacker travels along a canyon rim on the White Rim Trail in Utah's Canyonlands National Park. While the trail travels close to many canyon rims there is never any danger (for a careful person) of exposure. Photo by Dean Krakel.
Route Summary
This summary moves clockwise from the Island in the Sky Visitor Center. For a counterclockwise trip, take the route in reverse.
Start at the Visitor Center
The visitor center for the Island in the Sky District of Canyonlands National Park is located 30 miles west of Moab, Utah on the Deadhorse Mesa Scenic Byway (Highway 313). There are no amenities at the Visitor Center — no water, no gas, no groceries — and the only vehicle-accessible camping in Island in the Sky is at the Willow Flat Campground, located 7.3 miles south of the Visitor Center. Ideally, you’d score a spot at this campground the night before the trip.
Related: The Best Bike Racks for Your Car
Camp the Night Before
Willow Flat is one of the prettiest campgrounds in canyon country, but it’s small and first-come-first-served, and usually fills quickly in prime season. There are restrooms, shade arbors, picnic tables, and tent sites — but no water.
If you don’t manage a spot at Willow Flat, there are other primitive campgrounds on BLM land outside of the National Park boundary. Horsethief Campground is my favorite — it’s a short way off of Highway 313 and half a mile from Mineral Bottom Road, where the White Rim Road meets the highway.

Utah's White Rim Trail in Canyonlands National Park has spectacular views all along its 100 mile length. This was taken from the White Crack campsite. Photo by Dean Krakel.
Trailhead Parking at Shafer Canyon Overlook
Park your vehicle at the Shafer Canyon Overlook, just half a mile south of the Island in the Sky Visitor Center on Highway 313. Your camping permits for the White Rim Road will have a vehicle parking pass attached that you’ll leave on your dashboard. Pedal back up the highway about a mile, going past the Visitor Center to a well-marked junction with the dirt Shafer Canyon road. Follow Shafer Canyon Road as it drops through wide, graded switchbacks for 3 miles to the junction with Potash Road (on your left).
A note on closures: Shafer Canyon Road is sometimes closed when conditions become too slick for safe travel. The road consists of special clay that, when wet, becomes almost too slick to stand up on — much less ride a bike. It’s one of those things you have to experience to believe. Only a little bit of rain or snow turns Shafer Canyon Road into a slippery, muddy, chain-clogging, derailleur-snapping mess. On the plus side, it usually only takes a few hours for the road to dry out. This is also true of the White Rim Road and Mineral Canyon Road on the north end.
When Shafer is closed, you can use Potash Road to gain entrance to the White Rim. Potash road starts just outside of Moab off of Highway 191 at a well-marked junction. Potash is paved part of the way and dirt the rest. There is no camping allowed on Potash Road, except in designated campsites. Potash is 30 miles long from the turnoff on 191 to the junction with the White Rim Road at the base of the Shafer switchbacks.

Airport campsites, named for the distinctive Airport Tower that overlooks them, on the White Rim Trail in Utah's Canyonlands National Park. Campsites must be reserved well in advance. Photo by Dean Krakel.
Campsite Night 1
Shafer Canyon Campsite is located a short distance down Potash Road and can be used as a White Rim campsite. Most riders prefer to travel further to the Airport sites (A, B, C & D) located about 19 miles from the Visitor Center. Be warned, Airport’s sites are wide open, and the exposure can make it a windy place. That said, Airport is an easy camp to reach for the first night on the White Rim.
Eleven miles further are the Gooseberry Camps (A & B). Gooseberry A is right on the slickrock at the edge of Gooseberry Canyon.
Eight miles from Gooseberry camp at a well-marked junction, the turnoff for White Crack is on your left. White Crack is one of the best campsites on the White Rim — and perhaps in all of Canyonlands National Park. There is only one site, but the views in every direction are spectacular. The 1.4-mile road going to White Crack is moderately steep and very sandy. You can reach the White Crack itself by taking a short trail leaving from the east side of the camp. There are numerous large potholes in the sandstone, as well as archeological sites that are not to be disturbed.
Murphy Hogback
From the White Crack junction, it’s 8 more miles to Murphy Hogback — one of the trail’s steepest climbs — at mile 45. There are two false summits you’ll pedal up before arriving at the base of the real thing. The real Murphy goes up about 400 vertical feet in .75 miles — without switchbacks. Unless you’re a beast, you’ll have to hike your bike to the top.
But the views from the top of Murphy are well worth the hike-a-bike. A maze of canyons and mesas spread out in every direction, for as far as you can see. Murphy Camps (A, B, & C) are up top too, among rock formations and cedar and juniper trees.

Utah's White Rim Trail passes through some of the most beautiful scenery in Canyonlands National Park. This panorama was taken between Candlestick campsite and Potato Bottom campsite. Photo by Dean Krakel.
It’s 9.6 miles from the top of Murphy to Candlestick Camp at mile 54.3. Candlestick has one site.
From Candlestick Camp, the White Rim provides a gentle (albeit bumpy) ride downhill for 19 miles to the Potato Bottom Camps (A, B, & C) at mile 64 along the Green River. Both Queen Anne Bottom (this is just a wide, gentle spot along the river, not a campsite) and Potato Bottom Camp C have access to the Green River, though the river is silty and it’s better to carry your own than to filter.

Sunset creates dramatic light near Potato Bottom along the White Rim Trail in Utah's Canyonlands National Park. Photo by Dean Krakel.
Hardscrabble Hill
Leaving Potato Bottom, the White Rim begins an almost immediate climb up Hardscrabble Hill. Hardscrabble’s climb ascends about 500 feet in a mile — only slightly more lenient than the Murphy Hogback — and for me has always been another hike-a-bike, although in places it requires some push-a-bike as well.
After a fast descent from Hardscrabble, arrive at Hardscrabble Camps (A & B) at mile 64. Camp A has easy access to the Green River.
Labyrinth Campsites
At mile 70 are the Labyrinth Campsites (A & B). These are special: they overlook the Green River and show off views of Labyrinth Canyon downriver. Across the White Rim Road from the Labyrinth Camps, a six-mile-long side road leads to the Taylor Canyon Camp and views of the nearby Moses and Zeus towers. The Taylor Canyon Road is little used, so whether you camp there or not, its remoteness makes for a very pleasant side excursion.
Leave Canyonlands National Park
The Canyonlands National Park boundary is at mile 72. Five miles past the boundary, the Mineral Canyon switchbacks begin — a 1.5-mile climb that gains the top of the canyon after ascending over 800 feet. Looking down from the halfway point, you can see several crushed car bodies at the bottom of the canyon — the ruined metal now acting as monuments to folks that didn’t make the tight turns on the switchbacks.
Ride Mineral Road for 10 miles to Highway 313, turn right on the pavement, and pedal another 6.5 miles back to the Shafer Viewpoint parking lot and your vehicle, which brings you to mile 100.
Other Vehicle Parking Options
Many riders leave a vehicle at the top of Mineral Canyon to avoid the 10-mile trip up Mineral Road. While it’s a well-maintained county road (until it crosses the National Park boundary), Mineral Road can be dusty, washboarded, and busy with vehicles, especially in prime seasons. This is because Mineral Road also provides access to the Mineral Canyon Boat Ramp, from which numerous raft, kayak, and canoe trips depart for trips down the Green River.
Mineral Canyon Road also suffers the same slick conditions as Shafer Canyon Road when it’s wet or snowy. The big difference is that the National Park Service will shut down Shafer Canyon Road when conditions are hazardous. With Mineral Canyon Road, a rider has to make their own judgment about safety in dicey conditions. I have looked down Mineral in the winter when it was so snowy, frozen, and slick it resembles more of a ski trail than anything bikeable. Despite having studded tires on my bike and winter traction and microspikes among my gear (as recommended by the Island in the Sky backcountry office when I called them) I turned back to await more favorable conditions.
Be Flexible
I once read a passage in the book Deep Survival, Who Lives, Who Dies and Why by Laurence Gonzales that has stayed with me throughout my wild country adventures, a book I highly recommend that anyone reads who goes into the wild: “It’s never too late to turn back from a bad decision.” Right on. Better to be flexible in planning and live to roam another day.

The White Rim Road can be cold with long nights during the winter. Photo by Dean Krakel.
Maps and Guidebooks
Maps
Maps really aren’t necessary on the White Rim Road. There are no confusing intersections, and you’d have to work hard to get yourself misplaced. But a map is nice to have to know what you’re looking at and to know how much further you have to go to camp. I use the National Geographic Trails Illustrated Island in the Sky map (#310). The Trails Illustrated map Moab South (#501) also has the White Rim, if that map is already a part of your library.
If you want a more accurate accounting of your relative location, mapping apps that use GPS to pinpoint your location can be helpful, though there are no apps specific to the White Rim. Ride with GPS has numerous detailed maps of White Rim bike trips contributed by riders with mileage, elevation gains and losses, and turn-by-turn directions. REI’s MTB Project also has a GPS feature and has route, mileage, and campsite location, and information about the White Rim. If you like the Gaia GPS App, download the maps for the GPX track to your phone before leaving home, so they can be used offline.
Guidebooks
Mountain Biking Moab by David Crowell — published by Falcon Guides — is the best guidebook I’ve found for the White Rim Road, and well worth reading.
A Naturalist's Guide to the White Rim Trail by David B. Williams and Damian Fagan — published by Wingate Ink — is an informative guide to the geology, flora, and fauna of the country you’re riding through. The authors say it best in their introduction: “Don’t just do the White Rim Trail. Be a traveler, not a tourist.”
Websites
The National Park Service’s Island in the Sky District website has good information on the White Rim, natural history, precautions, advice, and planning. It also features updated weather and road information, as the Shafer Canyon Road switchbacks are sometimes closed due to weather.
Bikepacking.com is the premier source for all things bikepacking. Unsurprisingly, it has a lot of information about the White Rim, including how-to articles both about riding it and about bikepacking more generally.

Ice in a mudhole following a storm on Utah's White Rim Trail in Canyonlands National Park during an October bikepacking trip. Ice and snow are not uncommon along the White Rim during the winter and spring seasons. Photo by Dean Krakel.
Getting There
No matter where you’re coming from, your destination is Moab, Utah. Moab sits off I-70 — the main east-west highway passing through Utah and Colorado — on Highway 191, and is accessible via the Thompson Springs exit. Moab does not have bus service, so the easiest ways to get into town are to drive, fly, or some combination of the two.
While Moab is a small town, it does have an airport. The Canyonlands Field Airport is serviced by SkyWest Airlines (United Airlines), with daily flights between Moab and Denver, Colorado on 50-seat commuter jets. If you’re coming from the west, SkyWest Airlines (Delta Airlines) has daily flights between Moab and Salt Lake City, Utah on 50-seat commuter jets. The phone number for the airport is 435-259-0408.
Grand Junction Regional Airport in Grand Junction, Colorado — 113 miles and 2 hours to the east — is the closest large airport and the biggest on Colorado’s Western Slope. It offers more flights for easier scheduling, as Delta, American, Frontier, and United Airlines all fly in and out of Grand Junction. Rental cars are also available.
From Grand Junction, you can rent a car or take a shuttle to get to Moab. It’s a relatively small airport, so you’ve got three rental car options: Avis or Enterprise.
Alternately, American Spirit offers scheduled, daily shuttle services between Grand Junction and Moab.
Post Trip Favorite Restaurant
If you finish in the morning (or arrive in Moab ahead of time to stage your trip), I like Gilberto’s drive thru for breakfast burritos, and Wicked Brew drive thru has the best morning coffee.
I like El Charro Loco for post-ride refueling, as they serve some of the best Mexican food I’ve had anywhere. (I recommend their fajita bowl.) If you’re hankering for a burger, check out Milt’s Stop and Eat Drive-In and have the best malts and onion rings in Canyonlands country while you’re at it. For pizza, if you’re headed east towards Grand Junction, I usually hold off until I reach Fruita, Colorado and visit the Hot Tomato just off Main Street.

The author having a tough moment in rain and sleet during a February bikepacking trip on the White Rim road in Utah's Canyonlands National Park. Photo by Dean Krakel.
Rules and Regulations
Don’t bust the crust
Cryptobiotic soil is everywhere in Canyonlands National Park. While it looks like blackened coral covering the ground, it’s actually alive and helps the ground retain what little water there is. Plants are even able to root in crypto — it’s an important part of the delicate web of life in the desert. A footprint or tire track can crush the life out of these ancient beings — some cryptobiotic soil is thousands of years old — and the imprint may last for years.
Respect archaeological sites
Ruins and rock art left by Native Americans thousands of years ago that have survived this long can be damaged by visitors in just a few careless moments. Do not touch pictographs or petroglyphs. Do not touch or enter structures. Do not pick up potsherds or arrow points. Leave everything as you find it.
Campfires are not allowed on the White Rim
The landscape doesn’t have enough wild resources to support campfires. The denuded and hacked-up landscape that people leave in the wake of all their fire building isn’t visually appealing, either. There’s also the danger of starting a wildfire.
Pack out your garbage
All of it. Every bit. There are no trash facilities on the White Rim. Be aware of micro trash (like wrapper corners) in your campsites and wherever you stop to eat or snack. Crumbs also lure rodents and insects and make camping conditions unpleasant for those that follow in your footsteps (er, tire tracks).
Keep the noise down
For me, there are few things worse than having a noisy bunch of partying campers next door destroying the silence and solitude. Want to listen to music? Wear headphones. It’s great to visit and have fun, and friends and family are awesome to have on a White Rim trip, but out of respect for other people keep your noise level down. Otherwise you’ll likely have a cranky and tired visitor like me who’ll bust your joy with a STFU.
Related: The Best Wireless Earbuds and Headphones for Outdoors People
Group size
Groups must be limited to 15 people and 5 vehicles or less. (Mountain bikes don’t count as vehicles. If you have 15 bike packers in your group you can have 15 bicycles in your camp.)
PermitS
Carry a printed and signed version of your permit on your person at all times.
No drones
Drones are illegal in Canyonlands National Park.
No dogS
Dogs are not allowed on the White Rim, not even as passengers in vehicles.
Toilets
Use toilets, when you can. The desert climate is so dry that archeologists are studying the dried out feces left from native people who inhabited the area thousands of years ago. We don’t want any more sticking around than is absolutely necessary.
All White Rim camps have toilets. These bathrooms are cleaned regularly and are usually well-stocked with toilet paper. Use them. I always carry my own toilet paper along with a small bottle of hand sanitizer, just in case.
Follow Leave No Trace Ethics
While nearly everything in this section has to do with Leave No Trace, it’s worth talking explicitly about what to do if you have to poop and there’s no toilet for miles. Please walk a good distance, at least 50’ from the road and 300’ away from any water source or drainage, and dig a cathole where there is no cryptobiotic soil. Dig a cathole 6” deep or deeper. Do your business and bury it. We recommend bringing a Deuce #2 potty trowel. Pack out your toilet paper. DO NOT leave your toilet paper on the ground to blow away or place it under a rock. Used toilet paper can be placed in a ziplock or other plastic bag; there is no odor.

Dean W. Krakel, the author's son, enjoys a cold, windy, rainy dinner in camp on Utah's White Rim Trail in Canyonlands National Park. A few minutes later a windstorm destroyed his tent and flattened and ripped mine. Photo by Dean Krakel.
Resupply
There is no need for resupply on the White Rim. A bikepacker should be able to carry everything they need for the duration of their trip.
The biggest limiting factor in trip length is water. There is no water available on the White Rim. You have to bring all the water you need.
Food Storage
You don’t have to guard your food against bears on the White Rim — but you do have to be mindful of the rodents, as mice frequent the campsites. I’ve felt safe storing my food in my bike’s frame and seat bags.
If I hadn’t done that, I would have used an Ursack made especially for smaller chewing animals. If the cost of an Ursak will break the bank, you can store your food in a scent-proof bag or even a garbage bag (or two). With these setups, I’d be willing to sleep with my food in the tent. That said, I wouldn’t go off on a hike and leave food in a tent.
Be careful of leaving food and other items out in plain sight in a camp. The ravens on the White Rim, as intelligent as they are, are thieves and destroyers. They wait and they watch, and the moment you leave, they invade camp and alert all their friends.
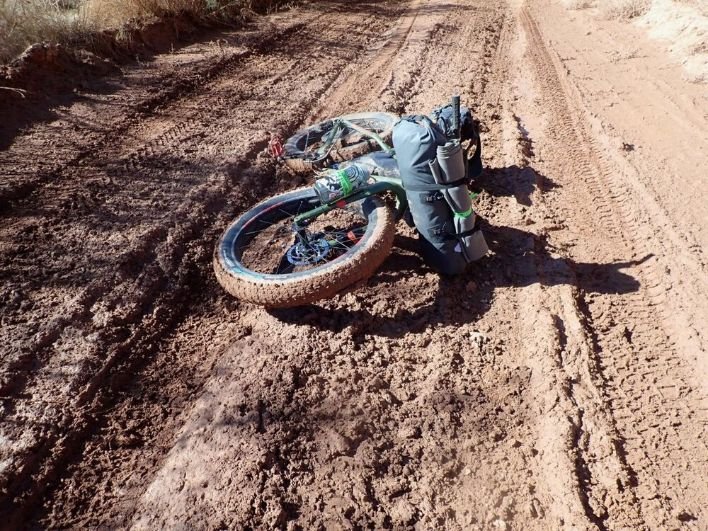
The White Rim Trail in Utah's Canyonlands National Park is notorious for mud. Just the slightest bit of rain or snow can make the 100 mile long road impassable. Photo by Dean Krakel.
Gear Rentals
Mountain bikes can be rented in Moab or in Fruita, CO, two hours to the east. Don't do this on a road bike. The best mountain bike for a bikepacking expedition is a hardtail, preferably one with front suspension. Double suspension bikes lose a lot of carrying capacity because the rear shock takes up so much space in the frame, and there are few frame bags designed to work in that small of a space. Generally, you’ll bring your own bike bags; no one that I know of rents the frame, seat and front bags needed for bikepacking.
GEAR SELECTION

The author's bikepacking setup on a Jamis Roughneck Fat Tire bike during a trip on the White Rim in Utah's Canyonlands National Park. Photo by Dean Krakel.
Bicycle
I have used a Jamis Roughneck fat tire bike for all 6 of my recent White Rim Trips. I love the simplicity of a fat bike with a hardtail frame. Front suspension might make the ride even nicer, but I worry about mechanical failure with both front and rear shocks — and not having either is just one less thing to worry about. When you’re a long way from anywhere, the thought of having to walk a bike out (or worse, carry it out) is sobering. See our guide to Best Bikepacking Bikes for bicycles we recommend.
BIke REPAIR KIT
Mostly so you don’t have to walk or carry out your bike. I carry a Topeak mini PT 30 tool, a Gerber Dime multi tool, chain oil (in a plastic bag), spare brake pads, spare chain link parts, a small roll of cable, 3 long zip ties, 3 spare spokes, and a Lezyne Gauge Drive HV pump. (I like this pump because of its flexible hose, locking valve, and built-in tire pressure gauge.) I also throw in the Hero Kit Mountain Bike Field Repair Guide Manual to make sure I know what I’m doing.
TIRES
I like fat tires for sand and mud. The tires’ width and thickness provides shock absorption in rough country. For prime season trips, I’ve run 26 x 4.5 tubeless Vee Tire Snowshoes on both front and back, and found the traction to be excellent across all conditions.
During my winter and early spring trips, I’ve run a studded 45 Nrth Dillenger 5, 26 x 4.6 tire on the front. I chose a studded tire for the same reason I packed Kahtoola K 10 microspikes: ice, snow, rain and freezing temperatures can make the canyon country slickrock live up to its name, and the dropoffs can be fatal.
I have experienced both the Shafer Canyon and Mineral Canyon Roads when they have been icy, and a biker needs all the traction they can get to get down or up them. It would be hellish to get down on a White Rim tour, get caught in a storm, and not be able to climb back out.
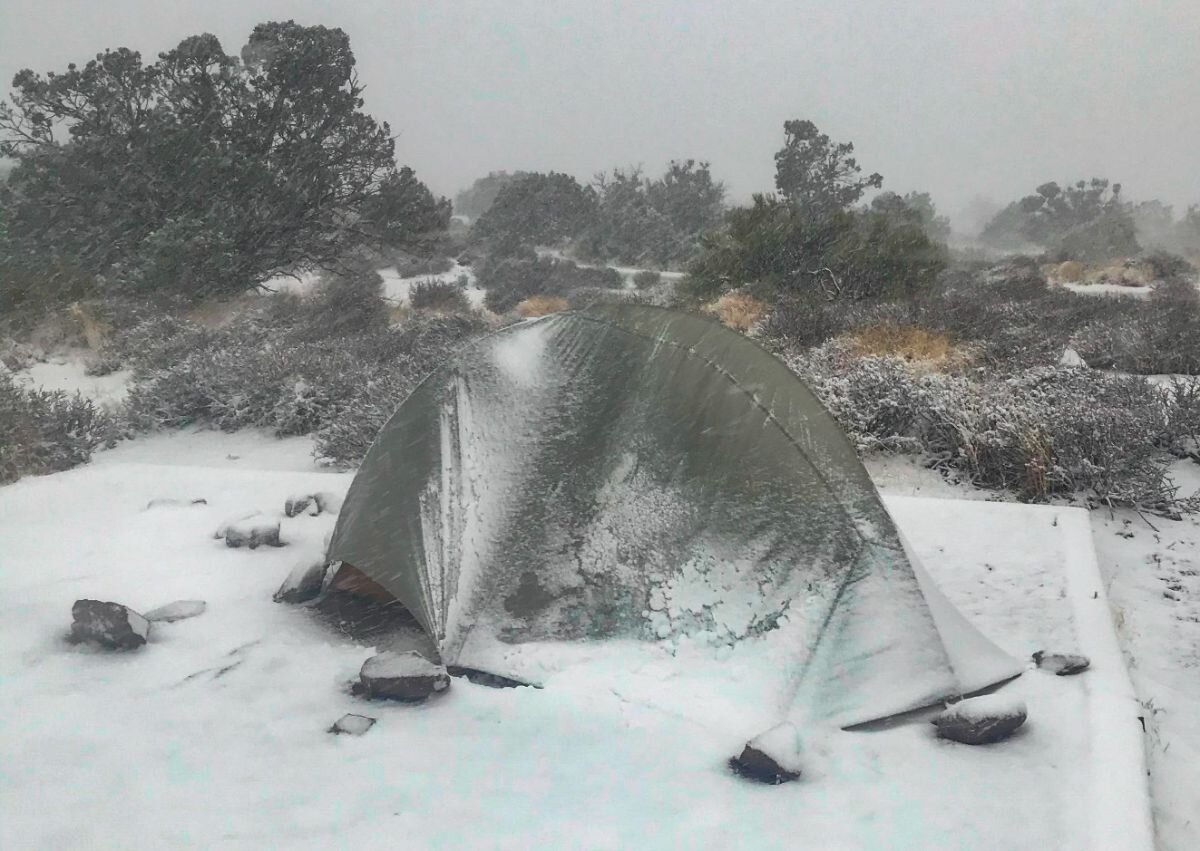
A late October snow storm hammers my tent at a campsite near Mineral Road before a bikepacking trip on the White Rim in Utah's Canyonlands National Park's Island in the Sky District. While we tend to think of the canyon country as fairly temperate, be prepared for changing weather. Photo by Dean Krakel.
TENT
I used 3 types of shelters on my trips, depending on the season.
My favorite all-around tent is the Big Agnes Copper Spur HV UL1. They make it in a bikepacking version. It weighs a little over 2lbs, packs down well (without a stuff sack) in my front handlebar bag, and the side opening door is an easy in-and-out. I had this tent crushed flat in the wind at Airport camp and it bounced back upright no worse for the wear. The Copper Spur is a winner in our Best Backpacking Tents guide and our Best Bikepacking Tents guide.
During the cold seasons, I used the now discontinued Marmot 3-season, 2-person Fortress tent. (It was previously a winner in Treeline Review’s guide to Best 4-season Tents) Although it’s marketed as a 3-season tent, the Fortress served me well in the subalpine canyon environment. It was easy to set up, warm, weatherproof, and so well-vented I never had a condensation issue. The Fortress also has a side opening door, which I love. The only downside is the weight: 4 lbs 3oz.
For a spring trip with warmer temperatures, I used an Outdoor Research Helium Bivy. This is by far the best bivy I’ve ever used. The OR Helium weighs less than a pound. It has a bug proof hood that’s held upright and off your face by a pole insert that forms an arch and a cord that can be attached to a tent stake, bike frame or tree branch. Plus, I’ve never had condensation problems, and condensation has been a buzzkill in every other bivy sack I’ve tried. The OR Helium is very comfortable, very solid and easy to set up. Lay it out on the ground, and climb in.
Recently, more brands are coming out with new bikepacking-specific tents. We review them in our Best Bikepacking Tents guide.
SLEEPING BAG
My go-to 3-season sleeping bag is the Enlightened Equipment Revelation 20 degree quilt. At 18 oz, it’s lightweight and comfortable, easily vented in warm conditions and easy to tuck and button up in cool conditions.
For colder temperatures, I used a Western Mountaineering 10-degree Versalite mummy bag that weighs 34oz. Western Mountaineering has the zipper thing down. Never a jam. Ever. This bag lofts like crazy and I’ve never been cold in it despite using it in conditions colder than 10 degrees.
SLEEPING PAD
For warmer temperatures, I used the Therm-a-Rest NeoAir XLite NXT Sleeping Pad. The newest version with the Winglock air valve doesn’t seem to have the snap crackle and pop of earlier NeoAirs. This pad isn’t as light as I’d like — it weighs 13 oz in size Regular — but it’s luxuriously thick (3 inches!) and the pad has an R-value of 4.5, which is insulation enough for all conditions save winter. This pad packs up small enough that I can fit both it and a tent in my handlebar bag. It’s our Overall Winner in our Best Sleeping Pads guide.
Desert cold calls for a super-warm insulating layer underneath a sleeping bag. In colder conditions, I used a Therm-a-Rest NeoAir XTherm pad. It’s still only 3 inches thick but the R-value is a remarkable 7.3 — one of the highest R-values commercially available. The downsides? The pad weighs 16 oz, and I couldn’t really compact this pad down small enough to fit in my handlebar bag. I rolled it up around my tent poles and strapped it to the top of my front bag. It’s our Winner for Best Winter Pad in our Best Sleeping Pads guide.
In all conditions, I’ve also carried a Gossamer Gear Thinlight pad. It goes under my Therm-a-Rest pads and is meant to protect them from desert prickly stuff and sharp rocks. Since it’s a minimal addition to my gear kit (⅛ inch thick and 2 oz), I carry the Thinlight rolled up around my tent poles (alongside the Therm-a-Rest XTherm when necessary), and strap it to the top of my handlebar bag.
For comfort at night, I carried an Outdoor Vitals inflatable pillow. What can I say? I didn’t carry a pillow for years and years, and now I can’t live without one.
Gear REPAIR KIT
I also throw in a Therm-a-Rest patch kit, Tenacious Tape, and a small roll of Lucky Duck duct tape for quick-fix camping gear repairs.
HEADLAMP
I carried a Black Diamond battery-powered headlamp that’s no longer manufactured. I like it because I can lock it so that it won’t accidentally turn on. I also carried 3 extra AAA batteries rolled up in a few strands of duct tape in my bag of electronics. As a spare headlamp, I carried a Petzl e+LITE. The e+LITE is silver dollar sized (remember those?) and weighs just about as much. See our Best Headlamps guide for recommendations.
For more information, see our Mountain Bike Gear Checklist.

Dean W. Krakel, the author's son, tries to put on warmer clothing during a snow squall on Mineral Road on a bikepacking trip on Utah's White Rim Road. Photo by Dean Krakel.
BIKE SHORTS
I used Club Ride Mountain Surf biking shorts and Club Ride Gunslinger chamois padded shorts. If you wear men’s bike shorts, see our Best Mountain Biking Shorts guide for recommendations. If you wear women’s bike shorts, see our Best Women’s Mountain Biking Shorts guide for more recommendations.
Chamois butter
I used Paceline Chamois Butt’r (on of our staff pics in our anti-chafe guide) and rubbed it into the chamois pads every morning to prevent saddle sores and chafing, and it’s a lifesaver. On my first White Rim trip, I didn’t use the butter — and could barely walk afterwards. Plus, every bump in the road started hurting... and there are millions of bumps.
Tights
For cold-season riding I wore a pair of Terramar baselayer tights over the pads but under the shorts (so pads on the bottom, tights over pads, shorts over tights). Tights are a versatile way to extend your cycling apparel into cooler months, but folks willing to spend a little more may want dedicated cycling leg sleeves. See our Best Baselayers guide for more recommendations.
SHIRT
Voormi River Run Hoodie. I wore this instead of a short-sleeved shirt, to stay protected from the sun. The Merino wool kept me cool in warm temperatures and warm in cool temperatures. The oversized hood is great in the open desert and canyon country, keeping your head and face protected. The hood also fits over a bike helmet. I wore one of these nearly every day for five months on an attempted Continental Divide thru-hike, and I love it for bikepacking. It’s a winner in our Best Sun Shirts guide. See our in-depth review of the Voormi River Run hoodie for more info.
SOCKS
Melanzana long Merino wool socks are the best socks I’ve ever worn. In wet or cold weather, I wore GORE-TEX booties over my socks. In general, any Hiking Socks will work.
RAIN GEAR
Outdoor Research Helium rain pants and a Marmot rain shell jacket that has long been discontinued. See our story on Lightweight Rain Jackets for ideas.
WIND GEAR
I also carried a Patagonia Houdini windbreaker, as things can get a bit drafty in the open landscape. The Houdini is recommended in multiple guides, including our Best Men’s Windbreakers guide and Best Women’s Windbreakers guide.
INSULATION
I carried a Patagonia Down Sweater and wore it nearly every morning and every night. The canyons grow cold the minute the sun disappears. I also always had a light wool beanie that fit under my bike helmet. The Patagonia Down Sweater is the winner in our Best Down Jackets guide.
Fleece and vest
On my cold trips, I brought along a Patagonia R1 fleece, a Club Ride vest (now discontinued) and a Club Ride flannel shirt. The Patagonia R1 fleece is the overall winner in our Best Fleece Jackets guide. For more recommendations on vests, see our Best Men’s Insulated Vests guide.
BIKE GLOVES
My regular go to riding gloves are Giro DND. They’re a winner in our Best Mountain Biking Gloves guide.
I wore Outdoor Research fleece gloves on my hands and in camp. For damp and cool weather, I wore waterproof shell gloves.
EYE PROTECTION
Although I primarily wore sunglasses, I also carried and wore Bobster Diesel goggles. Goggles were especially great for wind blown sand because, yes, the canyon country is windy and getting sand in your eyes is definitely unpleasant. Several companies are making cycling goggles and sunglasses that would work.
SHOES OR BOOTS
I use flat pedals (Xpedo Zeds) and I like the feel of trail shoes versus bike-dedicated shoes. In particular, they work better for me when hike-a-biking (and I do that a considerable amount). You can read more about mountain bike pedals and how they work with your shoes to propel the bike forward in our Best Mountain Bike Pedals guide.
I wore Salomon trail running shoes for my warmer weather rides. There are a lot of options to choose from in our Best Men’s Trail Running Shoes guide and Best Women’s Trail Running Shoes guide. You could also use Hiking Shoes or even Hiking Sandals.
In wet weather, I use GORE-TEX socks inside the Salomons, but in dry weather I prefer just plain socks.
While you might not think much about your feet in colder weather, they’ll be on a metal pedal much lower to the ground, where the air temperature is already colder. Pedaling also creates your own personal wind chill on your feet. And if you do have to push your bike through snow, mud, freezing water, or ice, you need warmth on those tootsies.
So for my cold weather White Rim trips, I wore Merrell Thermo Chill 6” insulated hiking boots. They’re light, warm, and have a stiff-enough sole for pedaling. In moderate winter temperatures, I wear them for winter biking around Crested Butte. See more recommendations in our Best Waterproof Hiking Boots guide.
For brutally cold conditions on the White Rim (or anywhere for that matter), I bikepack in Salomon Toundra boots, which are good to -40. For more recommendations, see our Best Men’s Winter Boots guide or Best Women’s Winter Boots guide.
WATER PURIFIER
I brought along MSR chlorine Aquatabs for water purification. The only time a person would need water purification is if they ran out of water (carry extra!) and had to use a pothole (avoid this!) or had to get water from the Green River.
A regular pump filter or a Sawyer Squeeze would choke on the silt-laden river water unless the water was prefiltered or allowed to settle overnight before it was filtered. See our Best Water Filters and Purifiers guide for other recommendations for this kind of water.
WATER STORAGE
For water storage, I used 2.5L Evernew collapsible bags. I love these because the bottom flattens out so they can stand up, and once they’re emptied, they roll up nice and tight. I also used Platypus 1L bags. I always have something to scoop water out of the river with — generally an old Sawyer Squeeze pouch that I’ve cut in half.
COOKING system
My cooking system is simple. An MSR PocketRocket, TOAKS 550mL titanium cook pot, and a butane gas cartridge. While packed, the stove and gas cartridge nestle down inside the pot, along with a BiC lighter. I’ve used this system for many trips, and it’s never failed me. See our Best Backpacking Stoves and Best Cooking Pots guide for more recommendations.
FOOD STORAGE
I stored my food in my bags on my bike at night and didn’t have trouble with wildlife. See our recommendations above for other methods of food storage.
FOOD
My diet was different on my latest White Rim trips. I was doing some intermittent fasting in the form of One Meal a Day (OMAD), and aimed for Keto meals. The idea behind the Keto diet — which is focused on zero-to-low carbohydrate intake — is to turn your body into a fat-burning machine instead of a carb-burning machine, since you have far more energy stored in your fat. (Okay, I wasn’t totally Keto. I brought energy bars and energy packets.)
There are a plethora of Keto/Paleo-friendly bars. In particular, I liked Blue Dinosaur’s Paleo Bars, which we’ve written about in our Gift Guide.
Hammer Gel makes low carb (zero added sugar) Rapid Energy Fuel packets (1.2 oz). When I needed a real energy boost (climbing up Murphy for instance), I’d pop a Hammer Espresso energy gel, which has 50mg of caffeine.
I had coffee and apple cider vinegar for breakfast. I like Mount Hagen instant coffee, and I’d often add MCT oil and ghee (clarified butter that won’t spoil in the desert climate) to my coffee for extra fat as an energy boost. Mount Hagan is a Budget Winner in our Best Instant Coffee guide.
There wasn’t really any stopping for lunch — I just ate as I pedaled. I usually had energy bars and Trail Butter (700 calories in one 4.5-oz squeeze pack), along with cheese and Epic or Tanka meat bars. And maybe some dark chocolate. Maybe.
Dinner was a Next Mile meals. These dehydrated meals are delicious and nutritious, Keto-friendly, and filling. I’m partial to any meal of theirs that has eggs in it, and am especially fond of the Italian Marinara meal.
I’m used to cramming carbs and having three official meals a day, so I was concerned that I wouldn’t have the energy I needed to pedal 25-30 miles a day on a semi-dirty (very dirty) Keto diet. But it wasn’t a problem — I actually never felt hungry or had a lack of energy.
TOILET KIT
So what goes in must come out. Right? I carry a roll of TP, a small container of hand sanitizer and some Handi Wipes. Although every White Rim campsite has a vault toilet that’s usually stocked with toilet paper, I like to bring my own just in case. (The toilets get a lot of use.) See our guide to Best Human Waste Bags (WAG Bags) and Toilet Kits.
WATCH
I used a Garmin Instinct watch to keep track of all my stats. (I’m a stat freak.) It’s our Overall winner in our Best Hiking Watch guide (trust me, they work for bikes, too!). You can also read our Long Term Review of the Garmin Instinct. My iPhone likewise came with me.
CAMERA
To capture the views, I carried an Olympus (OM System) TG digital camera. This is simply the most durable camera on the market; I’ve used this one on my backcountry excursions for the past 6 years. The camera is waterproof, dust-proof, shock-proof, and evidently Dean-proof. It’s the Overall Winner in my Best Rugged Cameras guide.
EMERGENCY BEACON
I also carried a Garmin inReach Mini for emergencies and for communicating with family every day to let them know all was well. The Mini also lets you check the localized weather forecast. I didn’t leave the Mini on all the time, even though it can go a long time without being recharged; instead, I turned it on for 15 minutes every morning and evening so that I could receive and send messages. The Mini is the Overall Winner in my Best Two-Way Satellite Messengers and Personal Locator Beacons guide.
RECHARGE
To charge my watch and phone, I carried a RAVPpower Power Bank and all the necessary charging cords. In my electronic bag I also carried 3 spare camera batteries, my spare AAA batteries, and a spare 16g SD card for the camera.
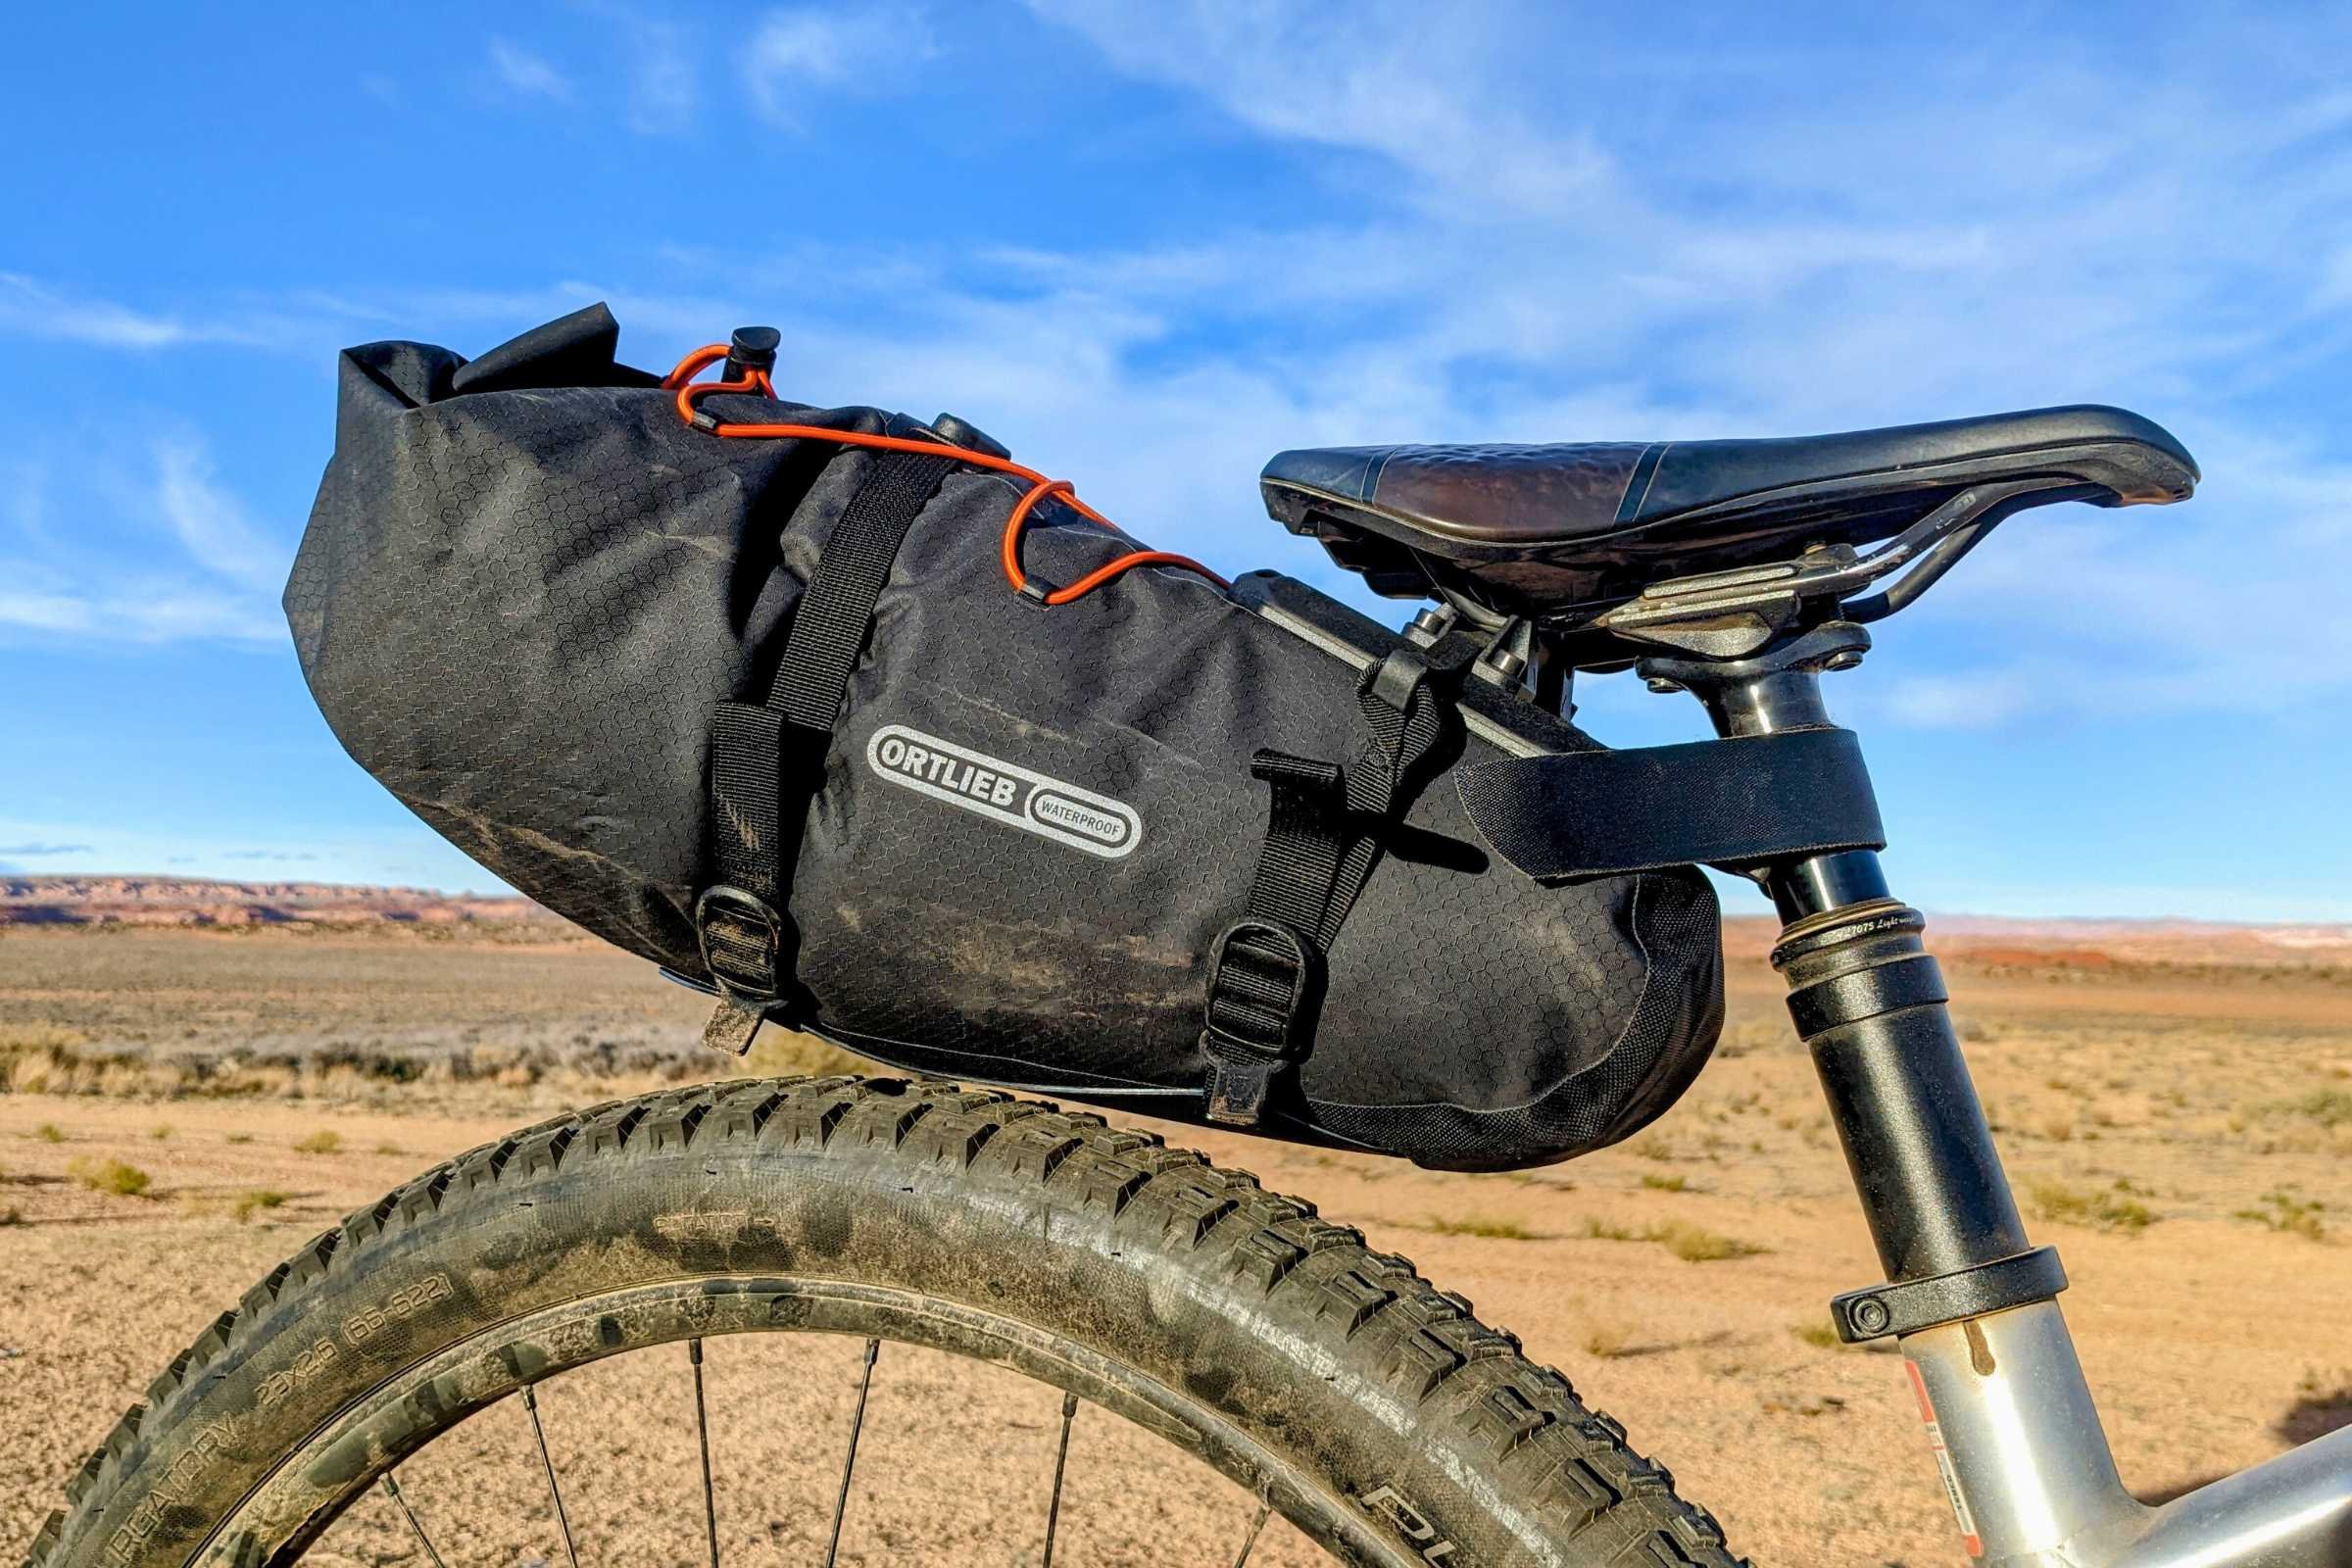
HANDLEBAR BAG
I used an Ortlieb 15L Handlebar Pack. I like the Ortlieb because it’s water- and dust-proof, and I can easily pack and unpack it while it’s still mounted on the bike. Just unsnap and unroll either end. I also like the cargo net on top and the extra straps for lashing other items on. It’s a winner in our Best Bike Handlebar Bags guide.
In this front roll, I loosely carried my tent and fly, sleeping bag and sleeping pad, Thinlite pad and pillow. I always lashed my tent poles and stakes to the handlebar bag. Everything in the handlebar bag was loose; nothing was stuffed in extra bags or put in compression sacks.
During the colder trips my 10 degree sleeping bag had to be compressed; it and the Fortress tent took up every bit of room in the handlebar pack. I rolled the Therm-a-Rest Neoair Xtherm winter pad up in the Thinlite and lashed it onto the handlebar pack.
FRAME BAG
My frame bag is a Blackburn Outpost Elite, Large. This bag is waterproof and dustproof as well. It has tabs at the end of each zipper so you can easily hold the tab and pull the zippers open or closed. Seems like a small thing, but it’s much appreciated, especially on cool mornings when I was wearing gloves.
I also liked the way the Blackburn attached to the bike frame. It uses both buckles and velcro straps rather than the velcro of other frame bags. I found the velcro-only bags irritating on other frame bags when it came to taking the frame bag off the bike or putting it back on.
Into the frame bag went a 2.5L Evernew water bag and a 1L Platypus water bag. This kept the weight of the water down low on the bike, providing more stability. The spaces around the water bags I stuffed with energy gel, Trail Butter, energy bars and whatever else I could cram into the nooks and crannies.
For more recommendations, see our Best Frame Bags guide.
TOP TUBE
On the bike’s top tube, I mounted a Revelate Designs Gas Tank bag. This held my camera and other small items, like a tube of sunscreen, reading glasses, and snacks.
BACKPACK
On my back I carried a 14L Osprey Raptor hydration pack. Into this went my iPhone, bike repair kit (in the handy tool kit bag), spare tube, pump, Houdini windbreaker, snack foods, spork, and toilet kit — and, of course, a 2.5L Hydrapak water bladder. In wet or cool weather (or if I expected weather), I carried my rain shells in the pack as well. For more recommendations, see our Best Mountain Bike Backpacks guide.
SEAT PACK
I used a 16L Ortlieb seat pack. Again, this is water and dust proof, which is so important in a sandy, dusty environment. This seat pack was easy to mount, adjust, and fill so that it didn’t bounce and rub on the rear wheel.
I carried my kitchen kit in the seat pack, placed well up into the nose of the pack along with a pair of spare socks. The majority of my food also went into the seat pack, placed forward so that the food weight was forward. Next came the down sweater, tights, fleece gloves and every other piece of clothing I could cram into it. If I needed an extra water bag, I lashed a 2L Evernew to the top of the seat pack. My medical kit went in the very end of the seat bag. For more recommendations, see our Best Seat Packs and Saddle Bags guide.
First aid kit
Speaking of my medical kit, I just dumped it out from my last trip in April and here’s what I was carrying:
4x Ben’s Tick & Insect repellent wipes (never needed them on any of my trips this year but I have seen clouds of ravenous mosquitos along the Green River in early June)
Dynarex CPR Shield
surgical face mask
surgical gloves
0.5 Oz tube of Neosporin pain relief cream
Moleskin for blisters and a wad of sheep’s wool for blisters
4 sheets of 4” x 4” Sterile Gauze Pads
7 packages of various sized bandaids
small roll of medical tape
a pair of long tweezers with the handle wrapped in lots of Leukotape
surgical scissors
30 500mg Tylenol tabs
1 tab of Benedryl
2 aspirin tabs
4 non aspirin tabs
3 rubber bands, a needle and fishing line (for sewing things up) and 3 safety pins
6 Band-Aid Gauze Pads 2” x 2”
1 40” x 40” Triangular Bandage
2 5” x 9” Dynarex Combine Pads
1 CAT tourniquet
spare lighter
toothpaste/toothbrush