Pemigewasset Loop (Pemi Loop) Hiking and Backpacking Guide
classic white mountains, new hampshire hike, including parts of the Appalachian Trail

February 19th, 2026
Home → Trip Guides → Backpacking
The Pemi Loop (short for Pemigewasset Loop) is a challenging 30-mile route in New Hampshire’s White Mountains. It overlaps with the Appalachian Trail (AT) for 10 miles, traverses the famous and popular Franconia Ridge, directly summits eight of New Hampshire’s 48 4,000-Footers (NH48), and passes one of the famous Appalachian Mountain Club’s (AMC) huts. Backpacker Magazine considers this to be the 2nd hardest day hike in the US, and the Pemi Loop also contains the 3rd and 4th steepest sections on the entire Appalachian Trail.
I’ve completed this route or variation more than half a dozen times and in all four seasons, set an FKT for a Super Pemi loop, and have climbed more than 6 rounds of the NH48. In this guide, I’m happy to share my tips and tricks for making this a safe and successful adventure.
Distance: 30 miles
Days: 1-3
Elevation gain/loss: 9,300’
Best season: July-September, with June and October both possible depending on snow melt, black fly season, and weather
Permits: None. A Hike Safe card is recommended for NH hiking to fund Search and Rescue (SAR) efforts and mitigate any risk of being charged for SAR services.
Difficulty: Strenuous
We create reader-supported, objective gear reviews independently selected by our editors. This story may contain affiliate links, which help fund our website. When you click on the links to purchase gear, we may get a commission — without costing you an extra cent. Thank you for supporting our work and mission of outdoor coverage for every body! Learn more.

The Pemi Loop as viewed in September in peak fall color. Photo by Aubri Drake.
QUICK FACTS
The Pemigewasset (Pemi) Loop is located in New Hampshire’s White Mountains (also known as the Wobanadenok), utilizing various trails to make a 30-mile loop hike, traditionally hiked in a clockwise direction. It can even be expanded up to 43 miles to visit another AMC hut and summit an additional five of New Hampshire’s 48 4,000-Footers.
The Pemi Loop starts and ends in Lincoln Woods, off of the Kancamagus Highway, and parallels the Pemigewasset River for 5 miles before steeply climbing up to the mountains that collect precipitation and drain into the river.
The Pemi Loop is located on Wabanaki/Abenaki land, and offers a little bit of everything precious about the Wobanadenok/White Mountains–shaded walks alongside a river, windy and exposed above treeline travel, wet and technical trail descents and climbs, epic 360-degree views, and hot soup, cold lemonade, and baked goods at backcountry huts!
It can be done as a long, single-day push in 10-20 hours (the current Fastest Known Time is 5:27:20), or as a 2-3 day backpacking trip. It can fit nicely into a weekend, heading out on Friday afternoon and finishing on Sunday.
Backpacking the Pemi Loop in September. Photo by Aubri Drake.
Highlights
360-degree views from Franconia Ridge, Mt Garfield, South Twin Mountain, and Mt Bond and Bondcliff
Above treeline travel, but shorter and less exposed than a Presidential Traverse
AMC Galehead Hut offers shelter from the elements, composting privies, potable water, and snacks for purchase to all hikers
Well-maintained trails
Caretakers at backcountry campsites
No permits required

View of Owl's Head and Franconia Ridge as seen from Mt Garfield. Photo by Aubri Drake.
CHALLENGES
Water access
Weather: high winds, thunderstorms, rain, cold
Technical, often wet trails
Camping is only allowed at established sites to protect the fragile alpine environment
The route and surrounding trails are busy in summer
If done earlier in the season, mosquitoes and black flies will be a substantial annoyance
GEAR LIST
Here is a quick list of the gear I’ve used on the Pemi Loop. For more detail on my choices, skip below.
| PEMI LOOP GEAR | AUTHOR'S CHOICE | COMPARE OTHER OPTIONS |
|---|---|---|
| Trail Running Gear | ||
| Running pack | Salomon Adv Skin 12 Hydration Vest Women's Men's |
Best Running Hydration Vests |
| Water filter | Katadyn BeFree 1L FIlter Bottle | Best Backpacking Water Filters |
| Headlamp | Black Diamond Strom 450 Headlamp | Best & Brightest Headlamps |
| Satellite communicator | Garmin inReach Mini 2 | Best Satellite Messengers |

BEST SEASON
The Pemi Loop is best hiked between July and September. Late May and June are possible; however, there is often still snow at higher elevations in May that can require traction and snowshoes, and June (and sometimes early July) is black fly and mosquito season. October can be an option with crisp nights and cooler days, though it is often a very wet month—the average October sees 10” precipitation on Mt. Washington with a record of 11” in 24 hours.

My hiking partner descending South Twin. Photo by Aubri Drake.
DIFFICULTY AND SKILLS
NAVIGATION
The navigation for the Pemi Loop is straightforward. You won’t see “Pemi Loop” on any signage, but every intersection is signed, with arrows indicating upcoming peaks, campsites, or trail intersections. These will be most helpful if you have studied the route’s landmarks.
While I only carried GPS maps saved to my cell phone using Gaia GPS, my phone is waterproof (IP68 rating) and I protect it from impact with an Otterbox Defender case. If you’re looking for a waterproof map covering the White Mountains, this Map Adventures White Mountains waterproof hiking trail map is my recommendation.
ROUGH TERRAIN / SCRAMBLING / ROCK CLIMBING
This route is mostly class II terrain (hands helpful for balance, uneven terrain, simple scrambling, low-moderate risk of injury with a fall) with a lot of rocks and roots (sometimes called “northeast technical”), with a few sections of class III (hands required, holds may be needed but are large and plentiful, complex scrambling or simple climbing, moderate-high risk of injury with a fall).
The only smooth section of trail is the infamously long Lincoln Woods trail that stretches for 5 miles alongside the Pemigewasset River; it used to be a logging railroad and many of the original ties are still there.
One of the more memorable sections of class III is right after the Garfield Ridge shelter going clockwise. There is also an 8’ ledge on the descent of Bondcliff that requires intention, but is textured and offers some clear steps.
ELEVATION GAIN / ELEVATION LOSS
Over this route’s 30 miles, the trail gains (and subsequently loses) 9,300’. All of this is hard earned, on very rocky trails. This route has two of the five steepest sections of the entire Appalachian Trail, so be prepared for hands and feet scrambling and possibly some butt scooting. Trekking poles can help with the climbing and dispersing the downhill force on the knees with the descents.
Going clockwise, the two most substantial climbs are the first long climb up to Mt. Flume and then climb up to South Twin Mountain from Galehead hut, which gains 1,130′ in 0.8 miles, with 900′ of that in only 0.5 mile.

My hiking partner standing on the ledges at the summit of Flume. Photo by Aubri Drake.
WEATHER
A unique consideration for the White Mountains is the volatility of the weather. Mount Washington and the surrounding mountains have some of the worst weather in the world, with the 2nd highest wind speed ever recorded on earth taking place on the summit of Mt. Washington. Eight months out of the year, the record low temperature on Mt. Washington is in the negatives (-47°F is the lowest recorded temperature, and 72°F is the highest). Snow has accumulated on White Mountain summits every month of the year, and each month has seen wind gusts as high as 147 MPH.
Franconia Ridge is notorious for having high winds and closely mimicking the weather on Mt. Washington. Multiple fatalities occur each year on just Franconia Ridge due to dangerous weather conditions; it’s most often people who were unfamiliar with the mountains’ turbulent weather and unprepared for the impacts of snow, rain, poor visibility, and windchill far lower than actual temperatures.
Please familiarize yourself with the mountains’ weather conditions in advance of your trip, looking at not just weather in the valley but also weather reports specifically for the mountain summits.
These can be accessed through NOAA Mountain Point and the Mt. Washington Observatory’s Higher Summits forecasts. A well-known White Mountains blogger pulled together a NH48 summits weather forecast page, with multiple forecast sources for each peak, which I use frequently.
However, I would recommend against only utilizing Mountain Forecast, as in my experience and the experience relayed to me by other experienced hikers, it shows more fair weather than reality. Triangulating weather forecasts across multiple platforms is recommended.

An April sunset on the Pemi Loop. Photo by Aubri Drake.
ROUTE SUMMARY
Lincoln Woods Trailhead to Mt. Flume
From the Lincoln Woods trailhead, follow the Lincoln Woods trail over the Pemi River’s bridge, and walk for about a mile until you get to the Osseo trail intersection, where the route goes left to follow Osseo. The trail begins to gently slope as the initial climb begins–this is the first of the route’s two steepest climbs, covering 1,500’ gain in a little more than a mile.
Partway up the climb, on a steeper section with dozens of large log and rock steps, there is a lookout spot (signed as “down-look”) of the surrounding Pemi Wilderness area, with views of many of the day’s summits–Flume, Garfield, South Twin, Guyot, and the Bonds as well as some other mountains. This is a great place for a quick snack and drink before the final push up a long wooden staircase, some muddy trails, and a small rock scramble to emerge on the first summit of the day atop Mt. Flume (4,328’).
Flume’s ledges have views of Liberty, Lincoln, Lafayette, Garfield, and many other mountains, for a total of 33 of New Hampshire’s 48 4,000-Footers (NH48) visible. Be careful navigating the ledges; there’s a portion of trail that has sharp drop-offs to the left.

One of the wooden staircases on the ascent of Flume. Photo by Aubri Drake.
Mt. Flume to Mt. Lafayette
The Osseo trail ends atop Mt. Flume, and so the route continues straight ahead to follow the Franconia Ridge trail. The trail then descends into a saddle and then climbs back up to summit Mt. Liberty, a little more than a mile from Mt. Flume. There are spectacular views of North and South Kinsman, Cannon, Moosilauke, and many other NH48 peaks.
The route continues to follow the Franconia Ridge trail, which soon intersects with and is joined by the AT. Liberty Springs Tentsite is 0.25 miles down this side trail. There is 1.8 miles of moderate climbing through forests before the trail emerges from the trees near the summit of Little Haystack. Continue along the ridge, going straight through the Falling Waters trail intersection.

View of Mt Liberty, Little Haystack, Lincoln, and Lafayette from the ledges of Mt Flume. Photo by Aubri Drake.
This next section can be the busiest of the entire Loop, with day hikers completing the Franconia Ridge traverse. The trail is above treeline between Little Haystack and North Lafayette, so if there is inclement weather, be sure to bundle up while still in the trees. The trail winds along the open ridgeline, soon arriving at Mt. Lincoln. There are views of 38 of the NH48 from the summit, and on clear days, it is possible to spot Vermont and Maine mountains in the distance.
The trail descends off of Lincoln into a saddle and then climbs along the ridge up to the high point of the Pemi Loop, 5,260’ Mt. Lafayette. The summit allows a clear view of the entire Pemi Loop route and the Pemi Wilderness, as well as Mt. Washington and the Presidential Range.

The summit of Lafayette as seen from the trail below it. Photo by Aubri Drake.
Mt. Lafayette to Galehead Hut
Franconia Ridge trail ends atop Mt. Lafayette, so the route continues forward onto the Garfield Ridge trail. The trail descends off of Lafayette and then has a small climb to North Lafayette, where the trail descends in earnest, traversing many rock slabs before ducking back below treeline.
The trail then winds through rocky forested sections of trail. The 2.5 miles between North Lafayette and Garfield summit tends to take longer than expected and it can be a bit boring after the majestic views of Franconia Ridge. This portion, plus the next, is often people’s least favorite section of the Pemi Loop, aside from the grand Garfield summit views.
The trail then emerges from the woods with Garfield summit a few feet off of the trail, up a small rock scramble to sit on or around the cement foundation of the 1940s forest fire lookout cabin. Enjoy the breathtaking views of the entire Pemi Loop and Pemi Wilderness spread out in front of you, and feel proud that you’ve climbed 65% of the loop’s total elevation gain already. There are many rock ledges for taking a break, if you’re looking to sit down for a few minutes.
You’ll then descend the Garfield summit cone, pass by the Mt. Garfield trail, and head down to the intersection with the Garfield Ridge shelter where your first on-trail water source is located. This is a nice, cool spot to sit and eat a snack while you filter water.
The route then continues to descend, covering 1,000’ of steep, wet, rocky, and slabby elevation loss in the first 0.75 miles from Garfield summit. This is the 4th steepest section of the entire Appalachian Trail. It’s 2.75 miles from the summit until you arrive at the sign for the 100’ spur trail to Galehead hut –it is always a welcome sight! When open, the hut has potable water at an outdoor spigot, outdoor benches, composting privies inside, as well as lemonade and baked goods for purchase. Be sure to fuel up at the hut, because one of the steepest climbs is next.

View of an AMC hut from the ridgeline. Photo by Aubri Drake.
Galehead Hut to Mt. Bond
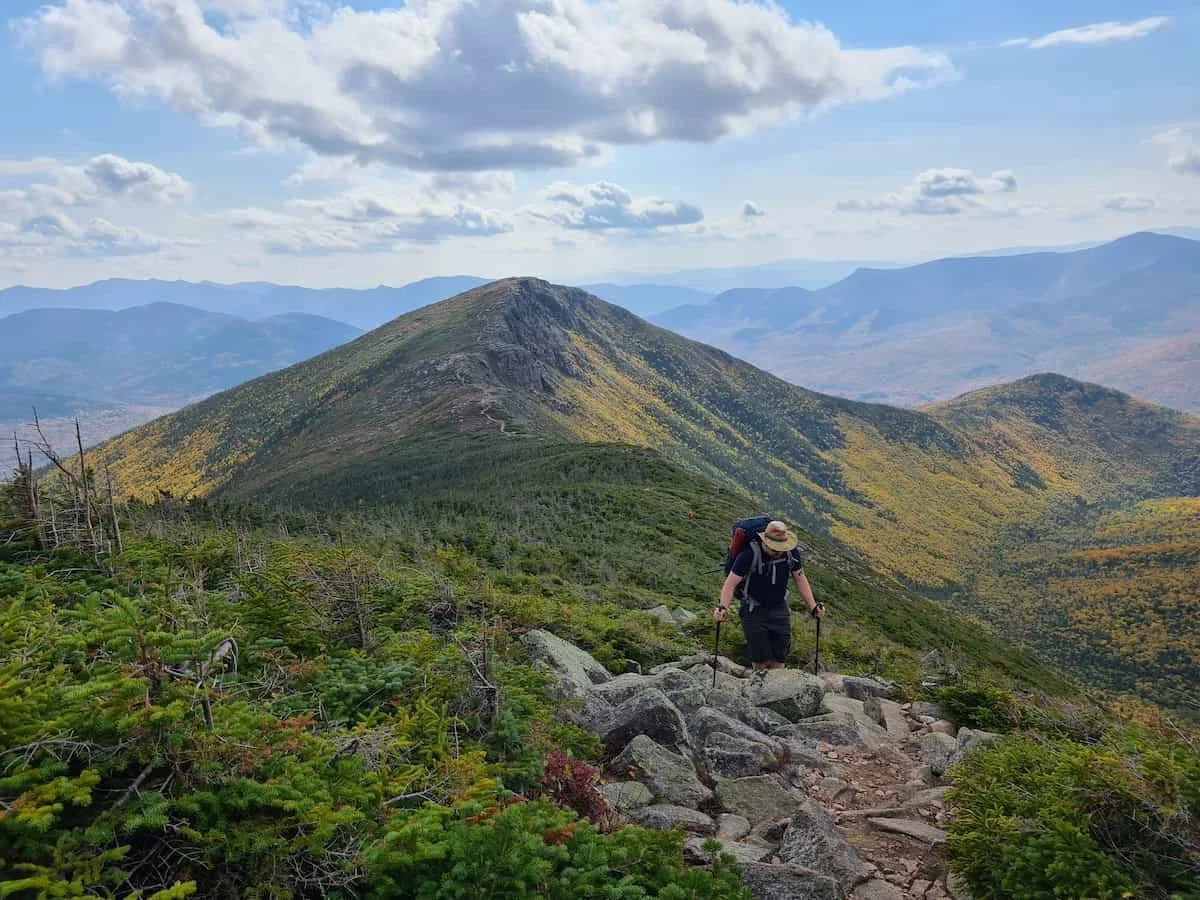
The Garfield Ridge trail ends at the hut, and so you’ll continue forward onto Twinway, following those white blazes. The trail quickly begins its climb up South Twin, covering 900’ gain in 0.5 miles for the 3rd steepest section of the AT. While steep, it is mostly rock and boulder steps with a few rock slabs here and there. The climb is sharp but swift, reaching the South Twin summit less than a mile from the hut. Enjoy the epic view of the Pemi–this is also the closest the Pemi Loop brings you to Mt Washington and the Presidential Range, so take a moment to soak it in.
At the South Twin summit, pay close attention and be sure to take the hard right. If you continue over the summit and keep going straight instead, you’ll find yourself on North Twin in 1.2 miles, rather than continuing around the Pemi Loop.
The next few miles take you through a fairly flat (and sometimes muddy) section that wanders through the alpine forest. The trail emerges among the rocks close by the Guyot intersection, with expansive views of the Pemi. At this intersection, the Twinway/AT turns left and the Pemi Loop route continues straight onto the Bondcliff trail. You’ll continue to follow the Bondcliff trail all the way until it becomes the Lincoln Woods trail, which will bring you back to the start. The trail forward takes you up and over a small rise, which is Mt. Guyot. Enjoy the unique view of the slides on the sides of South Twin and Franconia Ridge.

View of South and North Twin from the Guyot intersection. Photo by Aubri Drake.
After going over the Guyot summit, the trail heads back below treeline and you’ll soon pass by the spur for Guyot Campsite. From here, it’s a methodical, steady ascent up to the summit of Bond. It’s almost all downhill from here! From the summit of Bond, there is a striking view of Bondcliff below. The trail takes a right turn on the Bond summit to head towards Bondcliff, but it’s obvious given that there are no other ways off of the summit.
Mt. Bond to Lincoln Woods Trailhead
The descent toward Bondcliff is rocky and strewn with small and medium rocks, with lots of holes to catch feet and ankles. It is also mostly above treeline, with only 1-2 spots with trees large enough to provide shelter from the wind until descending Bondcliff, so layer up as needed before leaving treeline below Bond. The saddle between Bond and Bondcliff has many soft grasses and delicate alpine plants, so stay on the rocks and keep to the trail. This section can be hard to stay on trail, so keep a sharp eye for the large rock cairns, rock borders, and string fences to guide you.
All of your attention to detail will pay off as you climb the last hill to the summit of Bondcliff. It has a unique shape, with sharp ledges and big drops, and a great photo opportunity. It’s easy to stay away from the edge, but if visibility is poor, be attentive to the drop-offs.

My hiking partner standing on the summit of Bondcliff. Photo by Aubri Drake.
As you descend Bondcliff, right before you drop below treeline, there is a 8’ ledge to descend. There isn’t a way around, it has to be down climbed. The rock is textured and there are many hand holds–just take your time. Dogs may need assistance for this section.
As you continue descending in the trees, the trail will begin to smooth out. In the first mile or two, you’ll pass by your first on-trail water since Garfield Ridge shelter. If you need to filter water, there are many opportunities over the next 6 miles.
Once you hit the first stream, the trail will flatten out and the long walk back to the start begins. This can be a hard exit for many people–it will be many miles of flat forest walking, with the rushing of the Pemi River in the background. While it is different from the soaring summit views you’ve had, its quiet beauty can be a great time to meditate on or chat with friends about your day’s highs and lows, and all of the delicious food you’re going to eat just as soon as you get back to town!

The Lincoln Woods trail starts and ends with crossing the Pemi River. Photo by Aubri Drake.
MAPS AND GUIDEBOOKS
FAROUT
FarOut offers the White Mountain National Forest bundle, as well as an option to individually purchase just the Pemigewasset Region.
GAIA GPS
Gaia GPS is my preferred navigation app, and it functions very well in the White Mountains. While you may have service on the peaks, there will be little service elsewhere on the Pemi Loop, so be sure to download the route and maps before heading out of town.
MAPS
Map Adventures offers a White Mountains waterproof hiking trail map of the White Mountains. There is also a more detailed 6-map set available from the Appalachian Mountain Club.
GETTING THERE
BY PLANE
Fly into Boston Logan International Airport (BOS) and then either rent a car and drive 130 miles/2.5 hours or take a 4-hour Concord Coachline bus to Lincoln.
BY CAR
This is by far the easiest method. The Lincoln Woods trailhead is off of the Kancamagus Highway, a 10-minute drive from Lincoln and the I-93 highway exit. It is a 2-hour drive from Portland, Maine, a 2.5-hour drive from Boston, 3.5-hour drive from Montreal, and a 5-hour drive from New York City.
BUS AND SHUTTLE SERVICES
Concord Coachline offers bus service from Boston to Lincoln, NH. In order to get to the Lincoln Woods trailhead from Lincoln, a taxi or shuttle service will be required.
TRAILHEADS
The Pemi Loop starts and ends at the Lincoln Woods trailhead. It costs $5 to park (there is now a solar-powered machine for credit card payment), and there are flush toilets open 24/7/365. On summer weekends, the large parking lot often fills up by ~7am on Saturday; people are allowed to park on the side of the road west of the trailhead. Be sure to respect any “no parking” signage–they will ticket or tow improperly parked vehicles. The Pemi River is easily accessible from the trailhead, and it’s a perfect spot for a post-Pemi Loop swim or soak.
POST-TRIP FAVORITE RESTAURANT
The town of Lincoln has many delicious restaurants and breweries! Among my favorites are The Purple Tomato for lunch sandwiches, White Mountain Bagel Co for breakfast sandwiches, El Charro for enchiladas, Thai 9 for noodles, and Ice Cream Delights for ice cream sundaes! You can also get maps, stickers, and other swag at the Mountain Wanderer book store, and any last minute groceries at Price Chopper.
Front country camping is available nearby the Lincoln Woods trailhead if you’re looking for somewhere close by to sleep before and after your adventure. Both Hancock Campground (first come, first served) or Big Rock Campground (reservations available) are within 5 minutes of the trailhead, though there is some road noise at all sites. They both have a more minimal set-up, offering only water spigots and composting toilets.
Ten minutes out of town, Russell Pond Campground offers tranquility, flush toilets, hot showers, and lake swimming. If you’re looking for generous amenities, check out the bunks and rooms of the nearby Notch Hostel, popular with AT thru-hikers and day hikers alike.
REGULATIONS
Follow Leave No Trace Ethics.
Per US Forest Service regulations in the White Mountains, dogs must be leashed when in developed recreation areas, such as campgrounds, picnic areas, trailhead parking lots, and on developed trails. Once outside of developed recreation areas, dogs may be off leash if they are under strict voice command.
Beyond this, please note there is at least one place where dogs may need to be lowered down an 8’ ledge, as well as numerous steep rock slab ascents and descents. This route requires a very athletic and experienced hiking dog. There are also very few natural water sources, so you’ll need to carry additional water.
It’s also good to know that dogs are not allowed inside of Galehead hut, so they’ll need to wait outside. They’re also not allowed inside the shelters at Garfield or Guyot campsites, and dog waste around all campsites must be composted in the privy; ask the caretaker for a shovel if needed.
Camping on this loop is only allowed at established campsites to prevent overuse and damage to the fragile alpine environment; this route is within a Wilderness area, which adds restrictions not present in all areas of the White Mountain National Forest.
Group size is limited to 10 people or less.
Stay on the trail, particularly above treeline where there are fragile alpine plants that are easily damaged by careless footsteps. Please respect all “Revegetation area - stay out” signs.
If staying on trail overnight, please utilize the bear boxes located at each campsite.
CAMPING
Going clockwise, the campsites are:
1) Liberty Springs tentsite (0.25 miles off-trail; on the Appalachian Trail)
2) Garfield Ridge shelter and tentsite (on the Appalachian Trail)
3) Guyot shelter and tentsite (0.2 miles off-trail).
Each of these locations is first come, first served at $15/person/night, and has a water source, bear box, tent platforms, dishwashing area, and composting privy. Garfield Ridge and Guyot each offer a communal shelter.
Another lodging option on the loop is the AMC Galehead hut. Reservations are required and no camping is allowed. The hut is $170/night/person and includes a bunk, blankets, pillow, dinner, and breakfast. The campsites will not turn anyone away, but can be very crowded on fair weather summer weekends.
WATER PLANNING
Going clockwise, I recommend that people carry enough water to hike the first 13 miles. While there is easy water access at a few points in the first 1.25 miles, there is no on-route water access after that until the spring by the Garfield Ridge Shelter at mile 13. Many of these miles are steep climbs and descents on rocky, technical trails, including a full traverse of Franconia Ridge. I’m a heavy sweater and typically bring 3L in summer for this section. I’ve brought only 2L twice and regretted it.
At mile 15.5, the AMC Galehead hut offers potable water from a spigot outside. They also have composting privies and snacks for purchase. Please note this hut is only open ~June to mid-October; outside of these dates, no water is available at the hut.
At mile 18.5, there is a 0.2-mile spur trail leading to Guyot campsite. It’s a steep descent and climb back up, but there is a spring.
Around mile 22, there is a spring as the trail descends. In the next mile or two, the trail begins to parallel and cross many small streams; water access is easy from this point forward.
BEARS AND FOOD STORAGE
If staying on trail overnight, every backcountry campsite provides bear boxes. No other precautions are required.
Please note that birds (particularly Canada jays) are well known in these mountains for begging or stealing food; please follow Leave No Trace and do not feed them. Canada jays (sometimes called “camp robbers”) have been known to become aggressive and scratch and peck hikers who do not feed them, myself included. They’re all well accustomed to life above treeline year round, and they don’t need handouts, no matter how cute they look.

A Canada jay on Mt Garfield, with Franconia Ridge in the background. Photo by Aubri Drake.
SIDE TRIPS AND VARIATIONS
Counter clockwise
The Pemi Loop is traditionally done clockwise. It can be done counter-clockwise, though that puts the Franconia Ridge traverse at the end of the route, making you more likely to be on the ridge above treeline in an afternoon thunderstorm or navigating it after dark.
Super Pemi Loop
There is a 43-mile variation of the 30-mile Pemi Loop sometimes called a Super Pemi, which adds on five additional New Hampshire 48 4000-Footers and a visit to another AMC hut.
Side Trips
Single spurs can be added as desired for Galehead (300’, 0.8mi round trip), North Twin (800’, 2.3mi RT), and West Bond (400’, 1mi RT). Additionally, a 1-mile RT side trip from Lincoln Woods will take you to Franconia Falls and a great swimming hole.
GEAR RENTALS
There are a few gear shops in Lincoln, but they cater to the winter skiers brought to town by the Loon and Cannon mountain resorts. There are no backpacking gear rentals available in town. If you need gear, REI can be found in both Boston and North Conway, and may offer gear rentals.

Because the Pemi Loop is so rugged, a lightweight gear set up is beneficial. Photo by Tobias Davis.
WHAT TO PACK
I have day hiked and trail run the full Pemi Loop and its variations, as well as partial Pemi Loops, more than half a dozen times. I have also done it as a 2-day backpacking trip. This gear list shows what I've carried on various versions of this trip, from trail running in a day to backpacking.
TRAIL RUNNING ESSENTIAL GEAR
For my trail runs of the Pemi Loop, I’ve worn the Salomon ADV Skin 12 vest, and carried a Katadyn BeFree 1L water filter, a Black Diamond Storm headlamp, a Garmin InReach Mini satellite communicator, an Outdoor Research Helium rain jacket, and an emergency bivy sack.
The Salomon ADV Skin 12 is the winner in our Best Running Hydration Vests guide and also has an in-depth, long-term review. For more of our favorite trail running gear, read our Trail Running Gear List.
When I did backpack the Pemi Loop, I completed it with a partner and here is the gear I brought with me:
TENT
I used the REI Half Dome 2 on this trip because the Pemi Loop’s tent sites’ raised wooden platforms make it difficult (verging on impossible for many sites) to pitch a freestanding trekking pole tent, and the weather and humidity in the Northeast typically require a double-walled tent. I already owned this ~5 lb model for quick and light car camping, so I split the weight with my hiking partner to ensure a dry, freestanding tent.
If I could pick the best 2-person tent for this trip, I would have brought the Big Agnes Copper Spur UL2, since it is lighter than the Half Dome, but still fully freestanding, spacious, and double-walled. It's the overall winner in our Best Backpacking Tents guide.
BACKPACK
I used an Osprey Aether pack on this trip for its excellent ability to carry weight well, since I was carrying more than half of the gear to help balance the difference between me and my hiking partner in terms of experience and fitness. If I did it again now, I’d use my Gossamer Gear Mariposa (a winner in Treeline’s Best Lightweight Backpacks), since it also carries a heavy load well but with a lighter frame than the Aether.
SLEEPING BAG
I used the Enlightened Equipment Revelation on this trip since it’s my favorite 3-season quit, customized to allow lots of room for my broad shoulders. See our Best Sleeping Bags story for more recommendations.
SLEEPING PAD
I used the Therm-A-Rest NeoAir XLite NXT pad in wide (the overall winner in Treeline’s Best Sleeping Pads story) for the excellent cushion on top of the wooded tent platforms and warmth against the mountains’ cooler nighttime temperatures.
TREKKING POLES
I used the (now discontinued) Black Diamond Trail Ergo Cork trekking poles for this trip because they’re light, mold to my hands, and don’t grow slick when I sweat. I’m very hard on my poles, and these aluminum poles are light but also hold up well despite everything I ask of them. Black Diamond has also gracefully replaced my poles many times when they’ve broken within the warranty period. The closest thing to those poles is the new winner of the Best Trekking Poles guide, the Black Diamond Pursuit poles.
COOKING SYSTEM
I used the MSR PocketRocket 2 stove on this trip because it’s simple, inexpensive, and hard to break, and my beloved TOAKS titanium long handle spoon. See our Best Backpacking Stoves story for more recommendations.
COOKING POT
I used the GSI Halulite Soloist cook set. I typically cold soak when I’m backpacking solo, so this is the larger of the two cooksets I own. Take a look at our Best Backpacking Cooking Pots guide for more of our recommendations.
HEADLAMP
I carried the Black Diamond Storm 450 headlamp, which is affordable, bright, and lightweight. Since headlamps continue to get lighter and brighter every year, I recommend checking out our Best Headlamps guide for our other favorite headlamps.
SATELLITE MESSENGER
Cell reception is not always guaranteed on this trail. There is typically cell service on the summits and ridgeline but no service below those high points. I carried a Garmin InReach Mini (find the updated version here) to be sure I could contact Search and Rescue if needed for myself or other hikers around me. Learn more in our Best Personal Locator Beacon and Satellite Messenger guide.
WATER FILTER
I used the Sawyer Squeeze, the thru hiking winner in our Best Water Filters and Purifiers guide. I was filtering for two people and wanted something I could easily backflush in the field.
WHAT TO WEAR
SHOES OR BOOTS
I wear either Brooks Cascadias or Saucony Peregrines on this route because they are available in 2E/men’s wide sizes and provide excellent traction.
On smoother trails, I’ll use HOKA Speedgoats (men's and women's). They are Treeline’s winner for Best Cushioned Trail Running Shoes. However, these trails require more stickiness for all the wet rock slabs. Here is an in-depth review of the Speedgoats.
On this route, I’d strongly recommend that whatever shoe you select has aggressive lugs and softer rubber to allow for better grip. For recommendations, see our Best Men's Trail Running Shoes and Best Women's Trail Running Shoes guides.
If you’d feel more comfortable in boots, check out our Best Hiking Boots and Best Lightweight Hiking Boots guides.
A good compromise for this trip could be hiking shoes, which are designed to feel like a trail runner but have stability more like a boot. See our Best Hiking Shoes guide for footwear that has more durability and stability than trail runners. And if you’re having a difficult time deciding what kind of trail shoe is best, we also have a Trail Shoes vs. Hiking Shoes guide to help you determine which option is best for you.
RAIN JACKET
I wore the Outdoor Research Foray on this trip because it offers a robust 3-layer shell that can withstand tree branches dragging and catching, since some parts of this trail can be narrow and in need of brushing. While I prefer to bring my lighter-weight Outdoor Research Helium jacket on fair weather trail running trips, I worry the tough trail conditions of the White Mountains would tear it if used for any length of time.
For more recommendations, see our Best Rain Jackets guide.
FLEECE OR MIDLAYER
I run warm so I used the Smartwool Merino Classic Crew—winner of Best for Extreme Cold in our Best Base Layer guide—as my midlayer for hanging out around camp. Most people would like a fleece jacket or a down jacket for this purpose.
HIKING PANTS
I did not use pants on this trip, but in 3-season conditions, I typically use Janji Transit Tech pants. See our guides to the Best Women's Hiking Pants and Best Men's Hiking Pants for more recommendations.
SHORTS
I wear MIER 5” running shorts because they’re inexpensive, quick-dry, and do not have a liner. For more recommendations, see our Best Men's Trail Running Shorts guide, Best Women's Trail Running Shorts guide, Best Men's Hiking Shorts guide, or Best Thru-hiking Shorts guide.
BASE LAYER
I wear the Smartwool Classic All-Season T-shirt because it fully covers my upper arms, dries quickly, doesn’t smell, and provides great temperature control. It's the short sleeve version of the overall winner in our Best Base Layers guide.
HIKING SOCKS
I wore the Darn Tough Hiker Cushion socks on this trip because they dry quickly, provide good temperature control, and hold their shape. Check our Best Hiking Socks guide for more recommendations.
WARM HAT
The Turtle Fur fleece hat was my choice for this trip because it’s light, comfortable, and covers my ears.
GLOVES OR MITTENS
I used the Minus33 Merino Wool Glove Liner on this trip, since I only needed a light pair of gloves for the morning chill until the day warmed up. They kept my fingers warm without losing dexterity. For more recommendations on lightweight but warm gloves, see our Best Winter Gloves guide.
MISCELLANEOUS GEAR ITEMS
FIRST AID KIT
Ibuprofen
Emergency bivy sack
Adhesive bandages
Safety pins
Gold Bond Friction Defense Stick
For more ideas on how to build a first aid kit for the outdoors, we have a guide on Outdoor Items for an Emergency Preparedness Kit.
SUN PROTECTION
I brought sunscreen for my face, ears, and neck, but so much of this route is under tree cover that even when it’s a very sunny day, you likely won’t need more sun protection than that. If you’re especially sensitive to the sun, I’d consider bringing a Buff wrap to cover the back of your neck.
See our guide for Best Face Sunscreen and Best Body Sunscreen for more recommendations.
GAITERS
I wore Dirty Girl Gaiters to keep rocks and dirt out of my shoes.
OTHER RESOURCES
Forest Service information about the Pemigewasset Wilderness regulations
Forest Service Pemigewasset Ranger District page with an interactive map of the district
Pemigewasset Valley Search & Rescue Team’s hiker information page, with numerous resources
Sectionhiker.com’s excellent round-up of NOAA weather reports, Mountain Forecast, and trail conditions webpages for each of the NH48, including the peaks on the Pemi Loop

Data in Yosemite/Tuolumne Meadows in July 2022 at the end of a 750-mile PCT section hike.
ABOUT THE AUTHOR / WHY YOU SHOULD TRUST US
Aubri ('Data') Drake is a queer and transgender hiker, ultrarunner, writer, researcher, and LGBTQ+ activist. Aubri discovered long-distance backpacking in 2013 and has been running away to the woods ever since. They’ve hiked the Appalachian Trail, Europe’s Tour du Mont Blanc, Vermont's Long Trail, John Muir Trail x2, Tahoe Rim Trail, New England Trail, New Hampshire's Cohos Trail, Pacific Crest Trail, and Arizona Trail.
Aubri has also completed numerous Northeast routes and peakbagging lists in both winter and summer seasons including the Northeast 111 4000 Footers and the New England Hundred Highest. They’ve run ultramarathon distances up to 100 miles, and set 20 Fastest Known Times. Aubri has logged more than 9,000 miles on their feet in the last three years, and their writing has been featured in Trail Runner Magazine and Long Trail News magazine.
Website: https://transcendingmountains.blog/
Instagram: @genderqueer_hiker
To see all of Aubri's stories, check their author page.


